

AL1917T User's Guide
Page 1
TABLE OF CONTENTS Special notes on LCD monitors 1 Introduction 2 Features 2 Unpacking 3 Attaching/Removing the base 4 Screen position adjustment 4 Connecting the power cord 5 Safety precaution 5 Cleaning your monitor 5 Preset modes 6 Power saving 7 DDC ...7 Installation 8 User controls 9 Troubleshooting 13 Specification 14
TABLE OF CONTENTS Special notes on LCD monitors 1 Introduction 2 Features 2 Unpacking 3 Attaching/Removing the base 4 Screen position adjustment 4 Connecting the power cord 5 Safety precaution 5 Cleaning your monitor 5 Preset modes 6 Power saving 7 DDC ...7 Installation 8 User controls 9 Troubleshooting 13 Specification 14

AL1917T User's Guide
Page 2
Turn off the Power Switch for hours. E-1 In this case, the screen is displayed for hours. NOTES · Due to make sure the flicker disappears. · You may flicker ... the image, when the same image is recovered slowly by changing the image or turning off the Power Switch and then turn it on again to the nature of 99.99% or more. AL1917 SPECIAL NOTES ON LCD MONITORS The following symptoms are normal with LCD monitor and do not indicate a problem...
Turn off the Power Switch for hours. E-1 In this case, the screen is displayed for hours. NOTES · Due to make sure the flicker disappears. · You may flicker ... the image, when the same image is recovered slowly by changing the image or turning off the Power Switch and then turn it on again to the nature of 99.99% or more. AL1917 SPECIAL NOTES ON LCD MONITORS The following symptoms are normal with LCD monitor and do not indicate a problem...
AL1917T User's Guide
Page 4
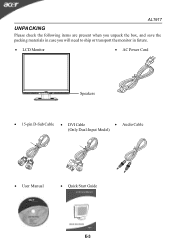
AL1917 UNPACKING Please check the following items are present when you unpack the box, and save the packing materials in case you will need to ship or transport the monitor in future. · LCD Monitor · AC Power Cord Speakers · 15-pin D-Sub Cable · DVI Cable · Audio Cable (Only Dual-Input Model) · User Manual · Quick Start Guide E-3
AL1917 UNPACKING Please check the following items are present when you unpack the box, and save the packing materials in case you will need to ship or transport the monitor in future. · LCD Monitor · AC Power Cord Speakers · 15-pin D-Sub Cable · DVI Cable · Audio Cable (Only Dual-Input Model) · User Manual · Quick Start Guide E-3

AL1917T User's Guide
Page 6
...outside of U.S.): Use a Cord Set consisting of the monitor. E-5 SAFETY PRECAUTION · Avoid placing the monitor, or any other light sources may reflect on the power cord to avoid damage to the cable. · Do not expose the monitor to rain, excessive moisture, or dust. · Do not cover the ventilation... you use is the correct type required for the country in either 100/120V AC or 220/240 V AC voltage area. AL1917 CONNECTING THE POWER CORD · Check first to make sure that allows operation in which the equipment will be installed. No user-adjustment is fragile. · LAMP ...
...outside of U.S.): Use a Cord Set consisting of the monitor. E-5 SAFETY PRECAUTION · Avoid placing the monitor, or any other light sources may reflect on the power cord to avoid damage to the cable. · Do not expose the monitor to rain, excessive moisture, or dust. · Do not cover the ventilation... you use is the correct type required for the country in either 100/120V AC or 220/240 V AC voltage area. AL1917 CONNECTING THE POWER CORD · Check first to make sure that allows operation in which the equipment will be installed. No user-adjustment is fragile. · LAMP ...

AL1917T User's Guide
Page 8
... DDC To make your system also supports DDC protocol. State ON Active OFF Powe r Consumption Normal < 3 W LED Light Green Amber The power saving states will be kept until a control signal has been detected or the keyboard or mouse is activated. The monitor supports DDC2B standard. The... recovery time from the display controller, as indicated by the amber-color power LED. AL1917 POWER SAVING The monitor will be driven into "Power Saving" mode by the control signal from Active OFF state back to ON state is able to Plug and Play ...
... DDC To make your system also supports DDC protocol. State ON Active OFF Powe r Consumption Normal < 3 W LED Light Green Amber The power saving states will be kept until a control signal has been detected or the keyboard or mouse is activated. The monitor supports DDC2B standard. The... recovery time from the display controller, as indicated by the amber-color power LED. AL1917 POWER SAVING The monitor will be driven into "Power Saving" mode by the control signal from Active OFF state back to ON state is able to Plug and Play ...
AL1917T User's Guide
Page 9
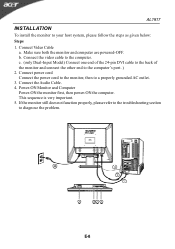
... the computer. Connect the video cable to the computer's port. ) 2. Make sure both the monitor and computer are powered-OFF. c. (only Dual-Input Model) Connect one end of the 24-pin DVI cable to the back of the monitor and connect the other ... to the troubleshooting section to your host system, please follow the steps as given below: Steps 1. E-8 Connect Video Cable a. This sequence is very important. 5. AL1917 INSTALLATION To install the monitor to diagnose the problem. Connect power cord Connect the power cord to the monitor, then to a properly grounded AC outlet. 3. b.
... the computer. Connect the video cable to the computer's port. ) 2. Make sure both the monitor and computer are powered-OFF. c. (only Dual-Input Model) Connect one end of the 24-pin DVI cable to the back of the monitor and connect the other ... to the troubleshooting section to your host system, please follow the steps as given below: Steps 1. E-8 Connect Video Cable a. This sequence is very important. 5. AL1917 INSTALLATION To install the monitor to diagnose the problem. Connect power cord Connect the power cord to the monitor, then to a properly grounded AC outlet. 3. b.

AL1917T User's Guide
Page 10
USER CONTROLS AL1917 3 4 5 6 12 Front Panel Controls 1. E-9 Power Switch: To turn ON or OFF the power. 2. Auto Adjust button / Exit: 1)When OSD menu is in Volume Adjust OSD status. The Auto Adjustment function is used to set the HPos, VPos, Clock ... navigate through adjustment icons when OSD is ON or adjust a function when function is in off status, press this button for 2 seconds to indicate the power is ON or Exit OSD menu when in active status, this button will act as EXIT-KEY (EXIT OSD menu). 2)When OSD menu is activated...
USER CONTROLS AL1917 3 4 5 6 12 Front Panel Controls 1. E-9 Power Switch: To turn ON or OFF the power. 2. Auto Adjust button / Exit: 1)When OSD menu is in Volume Adjust OSD status. The Auto Adjustment function is used to set the HPos, VPos, Clock ... navigate through adjustment icons when OSD is ON or adjust a function when function is in off status, press this button for 2 seconds to indicate the power is ON or Exit OSD menu when in active status, this button will act as EXIT-KEY (EXIT OSD menu). 2)When OSD menu is activated...
AL1917T User's Guide
Page 14
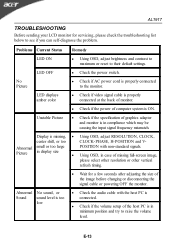
...183; Wait for servicing, please check the troubleshooting list below to their default settings. LED OFF · Check the power switch. E-13 No Picture · Check if AC power cord is missing, · Using OSD, adjust RESOLUTION, CLOCK, center shift, or too CLOCK-PHASE, H-POSITION and... changing or disconnecting the signal cable or powering OFF the monitor. Problems Current Status Remedy LED ON · Using OSD, adjust brightness and contrast to maximum or reset to see if you can self-diagnose the problem. AL1917 TROUBLESHOOTING Before sending your LCD monitor for...
...183; Wait for servicing, please check the troubleshooting list below to their default settings. LED OFF · Check the power switch. E-13 No Picture · Check if AC power cord is missing, · Using OSD, adjust RESOLUTION, CLOCK, center shift, or too CLOCK-PHASE, H-POSITION and... changing or disconnecting the signal cable or powering OFF the monitor. Problems Current Status Remedy LED ON · Using OSD, adjust brightness and contrast to maximum or reset to see if you can self-diagnose the problem. AL1917 TROUBLESHOOTING Before sending your LCD monitor for...
AL1917T User's Guide
Page 16
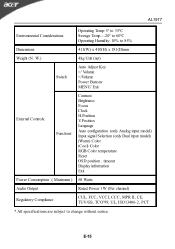
AL1917 Environmental Considerations Operating Temp: 50 to 350C Storage Temp.: -200 to 600C Operating Humidity: 10% to 85% Dimensions 411(W) x 410(H) x 181(D)mm Weight (N. W.) 4kg Unit (net) Switch Auto Adjust Key >/ Volume
AL1917 Environmental Considerations Operating Temp: 50 to 350C Storage Temp.: -200 to 600C Operating Humidity: 10% to 85% Dimensions 411(W) x 410(H) x 181(D)mm Weight (N. W.) 4kg Unit (net) Switch Auto Adjust Key >/ Volume


