

AL1715 Service Guide
Page 4
...is connected. 4. Increase the separation between the equipment and receiver. 3. WARNING: To prevent fire or chock hazard, do not expose the monitor to radio communications. Dangerously high voltages are designed to operate the equipment. Reorient or relocate the receiving antenna. 2. You are cautioned that ... Rules. If this product meets the ENERGY STAR® guidelines for help. These limits are present inside the monitor. Warning Use only shielded signal cables to connect I/O devices to Part 15 of the following measures: 1. Refer servicing to radio or television ...
...is connected. 4. Increase the separation between the equipment and receiver. 3. WARNING: To prevent fire or chock hazard, do not expose the monitor to radio communications. Dangerously high voltages are designed to operate the equipment. Reorient or relocate the receiving antenna. 2. You are cautioned that ... Rules. If this product meets the ENERGY STAR® guidelines for help. These limits are present inside the monitor. Warning Use only shielded signal cables to connect I/O devices to Part 15 of the following measures: 1. Refer servicing to radio or television ...

AL1715 Service Guide
Page 8
...and eliminates the requirement of AR577/578 AR577 Panel Normal 17" panel HYDIS HT17E12-200 Signal Interface Sync Type for the 17" MICRO-PROCESSOR based Multi-mode supported high resolution color LCD monitor. There is a build-in addition MTBF target is also a space saving design, allowing...DDC2B NO NO No Not support Yes / No Option This monitor can be directly connected to the traditional CRT monitor, it consumes less power and gets less weight in stereo audio amplifier with no radiation. Monitor Feature INTRODUCTION Chapter 1 Scope This specification defines the requirements for...
...and eliminates the requirement of AR577/578 AR577 Panel Normal 17" panel HYDIS HT17E12-200 Signal Interface Sync Type for the 17" MICRO-PROCESSOR based Multi-mode supported high resolution color LCD monitor. There is a build-in addition MTBF target is also a space saving design, allowing...DDC2B NO NO No Not support Yes / No Option This monitor can be directly connected to the traditional CRT monitor, it consumes less power and gets less weight in stereo audio amplifier with no radiation. Monitor Feature INTRODUCTION Chapter 1 Scope This specification defines the requirements for...

AL1715 Service Guide
Page 9
...: 1280 x1024 /60 Hz MEASUREMENT SYSTEMS The units of LCD panel Warrn up time All specifications : 30 minutes Fully functional : 5 seconds Measuring Equipment : Chroma 2250 signal generator or equivalent, directly Connected to the monitor under the following conditions, unless otherwise specified.
...: 1280 x1024 /60 Hz MEASUREMENT SYSTEMS The units of LCD panel Warrn up time All specifications : 30 minutes Fully functional : 5 seconds Measuring Equipment : Chroma 2250 signal generator or equivalent, directly Connected to the monitor under the following conditions, unless otherwise specified.

AL1715 Service Guide
Page 10
... / 80 ( 160 degrees horizontal typical) U / D 65 / 65 ( 130 degrees vertical typical) > 75 % (typical) 1).Video: RGB analog 0.7V peak to peak Sync: TTL positive or negative Signal connector: 15 pin Mini D type, (standard VGA video) 3.5 mm stereo audio jack (Audio) (For AR577 only) Audio power: 0.5Wrms + 0.5Wrms (300Hz - 10kHz (S.P.L. - 10 dB))(AR577...: Support VESA DDC2B functions Power Input voltage: Single phase, 50/60HZ, 100 VAC to 240VAC ±10% Total output power: 60 Watt max. - 10 - LCD monitor General specification Panel Type: 17 " active matrix color TFT LCD 1).
... / 80 ( 160 degrees horizontal typical) U / D 65 / 65 ( 130 degrees vertical typical) > 75 % (typical) 1).Video: RGB analog 0.7V peak to peak Sync: TTL positive or negative Signal connector: 15 pin Mini D type, (standard VGA video) 3.5 mm stereo audio jack (Audio) (For AR577 only) Audio power: 0.5Wrms + 0.5Wrms (300Hz - 10kHz (S.P.L. - 10 dB))(AR577...: Support VESA DDC2B functions Power Input voltage: Single phase, 50/60HZ, 100 VAC to 240VAC ±10% Total output power: 60 Watt max. - 10 - LCD monitor General specification Panel Type: 17 " active matrix color TFT LCD 1).

AL1715 Service Guide
Page 21
... Power off your CD ROM drive. Connect the other end of the signal cable to the LCD Monitor's " AUDIO IN " jack. - 21 - Connecting the AC Power Connect the power cord to an AC power source. Connecting the Audio Cable (For AL1715 m and AL1715 bm) Connect the audio cable to the " LINE OUT " jack on... your PC's audio card or to the front panel's "AUDIO OUT" jack of the signal cable to the VGA port on your PC. Connect the power cord to the LCD Monitor. Connect the other end of...
... Power off your CD ROM drive. Connect the other end of the signal cable to the LCD Monitor's " AUDIO IN " jack. - 21 - Connecting the AC Power Connect the power cord to an AC power source. Connecting the Audio Cable (For AL1715 m and AL1715 bm) Connect the audio cable to the " LINE OUT " jack on... your PC's audio card or to the front panel's "AUDIO OUT" jack of the signal cable to the VGA port on your PC. Connect the power cord to the LCD Monitor. Connect the other end of...
AL1715 Service Guide
Page 25
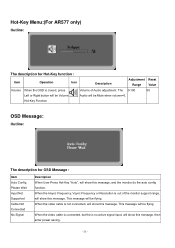
...Reset Range Value Volume When the OSD is not connected, will show this message. When the Hsync Frequency, Vsync Frequency or Resolution is no active signal input, will show this message, then enter power saving. - 25 - This message will be flying. This message will be flying. Hot-... for OSD Message : Item Auto Config Please Wait Input Not Supported Cable Not Connected No Signal Description When User Press Hot-Key "Auto", will be Volume Audio will show this message, and the monitor do the auto config function. When the video cable is closed, press Volume of the...
...Reset Range Value Volume When the OSD is not connected, will show this message. When the Hsync Frequency, Vsync Frequency or Resolution is no active signal input, will show this message, then enter power saving. - 25 - This message will be flying. This message will be flying. Hot-... for OSD Message : Item Auto Config Please Wait Input Not Supported Cable Not Connected No Signal Description When User Press Hot-Key "Auto", will be Volume Audio will show this message, and the monitor do the auto config function. When the video cable is closed, press Volume of the...

AL1715 Service Guide
Page 27
...restored and the display is defined in European counties. - 27 - IN ORDER FOR THIS MONITOR TO OPERATE PROPERLY, THERE MUST BE A VIDEO INPUT SIGNAL. When there is no video-input signal present. The appearance is similar to power outlet of DDC used, communicate additional information about its...host can request EDID information over the DDC2B channel. The display is restored by reducing power consumption when there is no video input signal this monitor, following a time-out period, will automatically switch to inform the host system of its identity and, depending on the I2C ...
...restored and the display is defined in European counties. - 27 - IN ORDER FOR THIS MONITOR TO OPERATE PROPERLY, THERE MUST BE A VIDEO INPUT SIGNAL. When there is no video-input signal present. The appearance is similar to power outlet of DDC used, communicate additional information about its...host can request EDID information over the DDC2B channel. The display is restored by reducing power consumption when there is no video input signal this monitor, following a time-out period, will automatically switch to inform the host system of its identity and, depending on the I2C ...

AL1715 User Guide
Page 2
... the correctness of the FCC Rules. All rights are cautioned that interference will not occur in setting up and using the LCD Monitor. Information in this equipment does cause harmful interference to radio or television reception, which can radiate radio frequency energy, and if not... installed and used in this equipment. Warning Use only shielded signal cables to connect I/O devices to this document is connected. • Consult the dealer or an experienced monitor technician for comliance could void your authority to change without prior written permission of ...
... the correctness of the FCC Rules. All rights are cautioned that interference will not occur in setting up and using the LCD Monitor. Information in this equipment does cause harmful interference to radio or television reception, which can radiate radio frequency energy, and if not... installed and used in this equipment. Warning Use only shielded signal cables to connect I/O devices to this document is connected. • Consult the dealer or an experienced monitor technician for comliance could void your authority to change without prior written permission of ...

AL1715 User Guide
Page 3
...6. This manual should be used. 3 Do not apply pressure to the display. 4. Storing the LCD Monitor outside this unit by an authorized technician. 5. Only use . 1. To clean LCD Monitor screen; -- Excess pressure may cause permanent damage to the LCD screen. For a nominal current up to ... Instructions Please read the following occurs, immediately unplug your monitor and call an authorized technician. * Monitor to PC signal cable is frayed or damaged. * Liquid spilled into LCD Monitor or the monitor has been exposed to rain. * LCD Monitor or the case is damaged. 7. Do not remove the...
...6. This manual should be used. 3 Do not apply pressure to the display. 4. Storing the LCD Monitor outside this unit by an authorized technician. 5. Only use . 1. To clean LCD Monitor screen; -- Excess pressure may cause permanent damage to the LCD screen. For a nominal current up to ... Instructions Please read the following occurs, immediately unplug your monitor and call an authorized technician. * Monitor to PC signal cable is frayed or damaged. * Liquid spilled into LCD Monitor or the monitor has been exposed to rain. * LCD Monitor or the case is damaged. 7. Do not remove the...

AL1715 User Guide
Page 5
... 1-3 Figure 1-4 Figure 1-5 Figure 1-6 These specifications meet the VESA Flat Panel Monitor Physical Mounting Interface Standard (paragraphs 2.1 and 2.1.3, version 1, dated 13 November 1997). Make sure connections are secure. The rear of the signal cable to release. Power off your PC. 4. Connect the power cord to the... VGA port on your computer. 2. Connect the other end of the signal cable to the LCD Monitor.(See Fig. 1-6) 2. Connecting the AC Power 1. Connect one end of this LCD display has four integrated 4 mm, 0.7 pitches...
... 1-3 Figure 1-4 Figure 1-5 Figure 1-6 These specifications meet the VESA Flat Panel Monitor Physical Mounting Interface Standard (paragraphs 2.1 and 2.1.3, version 1, dated 13 November 1997). Make sure connections are secure. The rear of the signal cable to release. Power off your PC. 4. Connect the power cord to the... VGA port on your computer. 2. Connect the other end of the signal cable to the LCD Monitor.(See Fig. 1-6) 2. Connecting the AC Power 1. Connect one end of this LCD display has four integrated 4 mm, 0.7 pitches...

AL1715 User Guide
Page 6
Figure 1-7 Power Management System This LCD Monitor complies with the VESA DPMS (version 1.0) Power Management guidelines. signal. Connect the audio cable to the " LINE OUT " jack on your CD ROM drive. (See Fig. 1-7) 2. Connecting the Audio Cable (For AL1715 m and AL1715 bm) 1. The VESA DPMS provides four power saving modes through detecting a horizontal or vertical...
Figure 1-7 Power Management System This LCD Monitor complies with the VESA DPMS (version 1.0) Power Management guidelines. signal. Connect the audio cable to the " LINE OUT " jack on your CD ROM drive. (See Fig. 1-7) 2. Connecting the Audio Cable (For AL1715 m and AL1715 bm) 1. The VESA DPMS provides four power saving modes through detecting a horizontal or vertical...

AL1715 User Guide
Page 15
...display mode or new VGA card is ON, all or properly, the monitor screen will display a "Out of the LCD Monitor's synchronous range (Horizontal: 24 ~ 80 KHz and Vertical: 49 ~ 75 Hz), the OSD will display a message "No Input Signal". 15 Due to an alternative mode listed in OSD menu and adjust... (by this LCD Monitor. Check the screen to Chapter 3 for a listing of the "Clock" function in the Standard Timing Table or replace...
...display mode or new VGA card is ON, all or properly, the monitor screen will display a "Out of the LCD Monitor's synchronous range (Horizontal: 24 ~ 80 KHz and Vertical: 49 ~ 75 Hz), the OSD will display a message "No Input Signal". 15 Due to an alternative mode listed in OSD menu and adjust... (by this LCD Monitor. Check the screen to Chapter 3 for a listing of the "Clock" function in the Standard Timing Table or replace...


