AL1516 LCD Monitor User's Guide
Page 1
Table of Contents TCO03 Notice...1 FCC Statement Warning...2 Canadian DOC Notice...3 Precautions...3 Package Contents...4 Installation Instructions...4 Assembling the Monitor...4 Detaching the Monitor ...4 Adjusting the Viewing Angle ...4 Connecting the Devices ...4 Switching the Power ...5 Adjusting Display Settings ...5 External Controls ...5 OSD Options ...5 OSD Menu ...6 Brightness & Contrast ...6 Tracking ...6 Position ...6 Color ...6 Language ...
Table of Contents TCO03 Notice...1 FCC Statement Warning...2 Canadian DOC Notice...3 Precautions...3 Package Contents...4 Installation Instructions...4 Assembling the Monitor...4 Detaching the Monitor ...4 Adjusting the Viewing Angle ...4 Connecting the Devices ...4 Switching the Power ...5 Adjusting Display Settings ...5 External Controls ...5 OSD Options ...5 OSD Menu ...6 Brightness & Contrast ...6 Tracking ...6 Position ...6 Color ...6 Language ...
AL1516 LCD Monitor User's Guide
Page 2
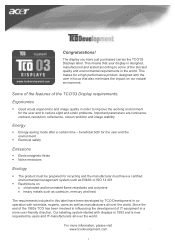
Our labelling system started with scientists, experts, users as well as cadmium, mercury and lead. This makes for a high performance product, designed with the user in focus that your display is now requested by TCO Development in the world. beneficial both for the user and the environment Electrical safety Emissions Electromagnetic fields Noise emissions Ecology The product must be prepared for the user and to some of the strictest quality and environmental requirements in cooperation with displays in 1992 and is designed, manufactured and tested according to ...
Our labelling system started with scientists, experts, users as well as cadmium, mercury and lead. This makes for a high performance product, designed with the user in focus that your display is now requested by TCO Development in the world. beneficial both for the user and the environment Electrical safety Emissions Electromagnetic fields Noise emissions Ecology The product must be prepared for the user and to some of the strictest quality and environmental requirements in cooperation with displays in 1992 and is designed, manufactured and tested according to ...

AL1516 LCD Monitor User's Guide
Page 3
...of the company's top priorities in recycling, please visit the following websites: Worldwide: http://global.acer.com/about the collection of WEEE welcome to visit our homepage at Acer are very conscious of the environmental forces that impose on our other products and its features and...more information and help in minimizing the burden placed on the environment. ORG. FOR LAMP SPECIFIC DISPOSAL INFORMATION CHECK WWW. We at www.acer.com under environment. 2 To minimize pollution and ensure utmost protection of the global environment, please recycle it. FOR MORE INFORMATION, CONTACT ...
...of the company's top priorities in recycling, please visit the following websites: Worldwide: http://global.acer.com/about the collection of WEEE welcome to visit our homepage at Acer are very conscious of the environmental forces that impose on our other products and its features and...more information and help in minimizing the burden placed on the environment. ORG. FOR LAMP SPECIFIC DISPOSAL INFORMATION CHECK WWW. We at www.acer.com under environment. 2 To minimize pollution and ensure utmost protection of the global environment, please recycle it. FOR MORE INFORMATION, CONTACT ...
AL1516 LCD Monitor User's Guide
Page 4
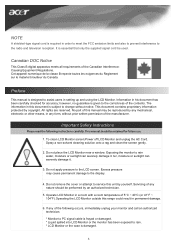
... All rights are reserved. Spray a non-solvent cleaning solution onto a rag and clean the screen gently. 2. To clean LCD Monitor screen;Power off LCD Monitor and unplug the AC Cord. Do not apply pressure to service this range could result in his document has been carefully checked... the FCC emission limits and also to prevent interference to rain water, moisture or sunlight can severely damage it . Do not place the LCD Monitor near a window. Information in permanent damage. 6. NOTE A shielded-type signal cord is damaged. 3 No part of the Canadian InterferenceCausing ...
... All rights are reserved. Spray a non-solvent cleaning solution onto a rag and clean the screen gently. 2. To clean LCD Monitor screen;Power off LCD Monitor and unplug the AC Cord. Do not apply pressure to service this range could result in his document has been carefully checked... the FCC emission limits and also to prevent interference to rain water, moisture or sunlight can severely damage it . Do not place the LCD Monitor near a window. Information in permanent damage. 6. NOTE A shielded-type signal cord is damaged. 3 No part of the Canadian InterferenceCausing ...

AL1516 LCD Monitor User's Guide
Page 5
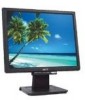
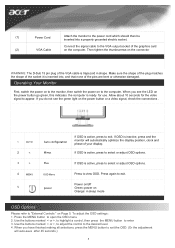
...the monitor to backward 15°. Attempting this will result in damaging the Monitor and Monitor stand. Connecting the Devices Please shut down the power of monitor along the track. Package Contents LCD Monitor Power Cord VGA cable User manual (CD) Quick start Guide Assembling the Monitor 1. Position the monitor on .... 2.Connect the stand into the neck of computer and monitor before you do the connection. Caution: Do not force the LCD Monitor over its maximum viewing angle settings as stated above. Pull the monitor slightly up and away from the stand. Adjusting the Viewing...
...the monitor to backward 15°. Attempting this will result in damaging the Monitor and Monitor stand. Connecting the Devices Please shut down the power of monitor along the track. Package Contents LCD Monitor Power Cord VGA cable User manual (CD) Quick start Guide Assembling the Monitor 1. Position the monitor on .... 2.Connect the stand into the neck of computer and monitor before you do the connection. Caution: Do not force the LCD Monitor over its maximum viewing angle settings as stated above. Pull the monitor slightly up and away from the stand. Adjusting the Viewing...
AL1516 LCD Monitor User's Guide
Page 6
.... To adjust the OSD settings : 1. Press the MENU button to view OSD. When you do not see the LED on the connector WARNING: The D-Sub 15 pin plug of the VGA cable is active, press to select or adjust OSD options. Then tighten the thumbscrews on the power button go green... use. If OSD is active, press to exit. Use the buttons marked < or >, to adjust the control to exit. Operating Your Monitor First, switch the power on to the monitor, then switch the power on Page 5. If you have finished making all selections, press the MENU button to exit the OSD. (Or...
.... To adjust the OSD settings : 1. Press the MENU button to view OSD. When you do not see the LED on the connector WARNING: The D-Sub 15 pin plug of the VGA cable is active, press to select or adjust OSD options. Then tighten the thumbscrews on the power button go green... use. If OSD is active, press to exit. Use the buttons marked < or >, to adjust the control to exit. Operating Your Monitor First, switch the power on to the monitor, then switch the power on Page 5. If you have finished making all selections, press the MENU button to exit the OSD. (Or...
AL1516 LCD Monitor User's Guide
Page 7
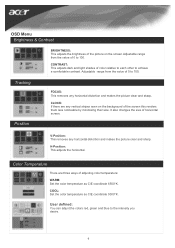
CLOCK: If there are three ways of adjusting color temperature: WARM: Set the color temperature as CIE coordinate 9300°K. H-Position: This adjusts the horizontal. Color Temperature There are any vertical stripes seen on the screen.Adjustable range from the value of 0 to the intensity you desire. CONTRAST: This adjusts dark and light shades of color relative to each other to 100. Tracking Position FOCUS: This removes any horizontal distortion and makes the picture clear and sharp. V-Position: This removes any horizontal distortion and makes the picture clear and sharp. OSD ...
CLOCK: If there are three ways of adjusting color temperature: WARM: Set the color temperature as CIE coordinate 9300°K. H-Position: This adjusts the horizontal. Color Temperature There are any vertical stripes seen on the screen.Adjustable range from the value of 0 to the intensity you desire. CONTRAST: This adjusts dark and light shades of color relative to each other to 100. Tracking Position FOCUS: This removes any horizontal distortion and makes the picture clear and sharp. V-Position: This removes any horizontal distortion and makes the picture clear and sharp. OSD ...

AL1516 LCD Monitor User's Guide
Page 8
Language Select the OSD menu language. OSD Position This changes the position of the OSD window on the screen. AUTO Configuration Adjust the monitor parameter automatically. Source Change Analog and Digital source change .(option) Information This shows brief information on the screen. TIMEOUT function allow user define the OSD appearing period from 10 seconds to 120 seconds.
Language Select the OSD menu language. OSD Position This changes the position of the OSD window on the screen. AUTO Configuration Adjust the monitor parameter automatically. Source Change Analog and Digital source change .(option) Information This shows brief information on the screen. TIMEOUT function allow user define the OSD appearing period from 10 seconds to 120 seconds.
AL1516 LCD Monitor User's Guide
Page 9
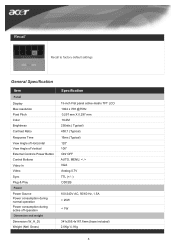
... Response Time View Angle of Horizontal View Angle of Vertical External Controls Power Button Control Buttons Video In Video Sync Plug & Play 15-inch Flat panel active-matrix TFT LCD 1024 x 768 @75Hz 0.297 mm X 0.297 mm 16.2M 250nits ( Typical) 450:1 (Typical) 16ms (Typical) 120° 100° ON/ OFF AUTO...
... Response Time View Angle of Horizontal View Angle of Vertical External Controls Power Button Control Buttons Video In Video Sync Plug & Play 15-inch Flat panel active-matrix TFT LCD 1024 x 768 @75Hz 0.297 mm X 0.297 mm 16.2M 250nits ( Typical) 450:1 (Typical) 16ms (Typical) 120° 100° ON/ OFF AUTO...

AL1516 LCD Monitor User's Guide
Page 10
Technical Information Pin Assignment Signal PIN Description 1 Red 2 Green 3 Blue 4 N.C. 5 GND 6 Red_GND 7 Green_GND 8 Blue_GND Signal PIN Description 9 +5V 10 N.C. 11 N.C. 12 DDC_SDA 13 HSYNC 14 VSYNC. 15 DDC_SCL 9
Technical Information Pin Assignment Signal PIN Description 1 Red 2 Green 3 Blue 4 N.C. 5 GND 6 Red_GND 7 Green_GND 8 Blue_GND Signal PIN Description 9 +5V 10 N.C. 11 N.C. 12 DDC_SDA 13 HSYNC 14 VSYNC. 15 DDC_SCL 9

AL1516 LCD Monitor User's Guide
Page 11
Refer to the output timing differences among various VGA cards in table below, this LCD Monitor. Due to the Standard Timing Table for a listing of modes supported by this LCD monitor will go into the sleep mode. Mode Resolution VGA SVGA XGA 640*480@60Hz 640*480@72Hz 640*480@75Hz 800*600@56Hz 800....000 50.000 49.500 65.000 75.000 78.750 25.175 28.322 57.284 57.284 64.000 80.000 Troubleshooting This LCD Monitor has pre-adjusted using factory standard VGA timings. Standard Timing Table If the selected timing is NO T included in the market, users may initially experience...
Refer to the output timing differences among various VGA cards in table below, this LCD Monitor. Due to the Standard Timing Table for a listing of modes supported by this LCD monitor will go into the sleep mode. Mode Resolution VGA SVGA XGA 640*480@60Hz 640*480@72Hz 640*480@75Hz 800*600@56Hz 800....000 50.000 49.500 65.000 75.000 78.750 25.175 28.322 57.284 57.284 64.000 80.000 Troubleshooting This LCD Monitor has pre-adjusted using factory standard VGA timings. Standard Timing Table If the selected timing is NO T included in the market, users may initially experience...
AL1516 LCD Monitor User's Guide
Page 12
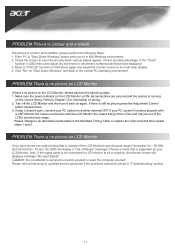
... stripes appear. Choose a mode that is unclear and unstable, please perform the following steps: 1. Check the screen to Chapter 3 for information on LCD Monitor If you 're in the Standard Timing Table or replace the VGA card,and then repeat steps 1 and 2. Click "No" on again. If...message. PROBLEM There is no picture,press the Adjustment Control button several times. 3. PROBLEM Picture is unclear and unstable The picture is outside of the LCD Monitor's synchronous range (Horizontal: 24 ~ 80 KHz and Vertical:56 ~ 75 Hz), the OSD will display a message "No Input Signal". Enter PC...
... stripes appear. Choose a mode that is unclear and unstable, please perform the following steps: 1. Check the screen to Chapter 3 for information on LCD Monitor If you 're in the Standard Timing Table or replace the VGA card,and then repeat steps 1 and 2. Click "No" on again. If...message. PROBLEM There is no picture,press the Adjustment Control button several times. 3. PROBLEM Picture is unclear and unstable The picture is outside of the LCD Monitor's synchronous range (Horizontal: 24 ~ 80 KHz and Vertical:56 ~ 75 Hz), the OSD will display a message "No Input Signal". Enter PC...
AL1516W LCD Monitor User's Guide
Page 1
TABLE OF CONTENTS Special notes on LCD monitors 1 Introduction 2 Features ...2 Unpacking 3 Attaching/Removing the base 4 Screen position adjustment 4 Connecting the power cord 5 Safety precaution 5 Cleaning your monitor 5 Preset modes 6 Power saving 7 DDC ...7 Installation 8 User controls 9 Troubleshooting 13 Specification 15 For more information and help in recycling, please visit the following websites: Worldwide: http://global.acer.com/about/sustainability.htm
TABLE OF CONTENTS Special notes on LCD monitors 1 Introduction 2 Features ...2 Unpacking 3 Attaching/Removing the base 4 Screen position adjustment 4 Connecting the power cord 5 Safety precaution 5 Cleaning your monitor 5 Preset modes 6 Power saving 7 DDC ...7 Installation 8 User controls 9 Troubleshooting 13 Specification 15 For more information and help in recycling, please visit the following websites: Worldwide: http://global.acer.com/about/sustainability.htm

AL1516W LCD Monitor User's Guide
Page 2
...0950 material declaration for this case, the screen is displayed for hours. Visit http://global.acer.com/about/sustainability.htm EN-1 AL1516W SPECIAL NOTES ON LCD MONITORS The following symptoms are normal with LCD monitor and do not indicate a problem. Turn off the Power Switch for hours. NOTES &#...183; Due to make sure the flicker disappears. · You may flicker during initial use . · The LCD screen has effective ...
...0950 material declaration for this case, the screen is displayed for hours. Visit http://global.acer.com/about/sustainability.htm EN-1 AL1516W SPECIAL NOTES ON LCD MONITORS The following symptoms are normal with LCD monitor and do not indicate a problem. Turn off the Power Switch for hours. NOTES &#...183; Due to make sure the flicker disappears. · You may flicker during initial use . · The LCD screen has effective ...
AL1516W LCD Monitor User's Guide
Page 3
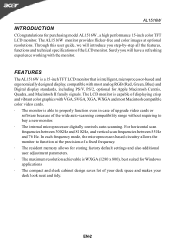
... 76 Hz. Surely you step-by-step all the features, functions and technical specifications of the LCD monitor. EN-2 FEATURES The AL1516W is a 15-inch TFT LCD monitor that is able to properly function even in case of upgrade video cards or software because of... suited for purchasing model AL1516W , a high performance 15-inch color TFT LCD monitor. In each frequency mode, the microprocessor-based circuitry allows the monitor to buy a new monitor. · The internal microprocessor digitally controls auto-scanning. The AL1516W monitor provides flicker-free and color images at the precision...
... 76 Hz. Surely you step-by-step all the features, functions and technical specifications of the LCD monitor. EN-2 FEATURES The AL1516W is a 15-inch TFT LCD monitor that is able to properly function even in case of upgrade video cards or software because of... suited for purchasing model AL1516W , a high performance 15-inch color TFT LCD monitor. In each frequency mode, the microprocessor-based circuitry allows the monitor to buy a new monitor. · The internal microprocessor digitally controls auto-scanning. The AL1516W monitor provides flicker-free and color images at the precision...

AL1516W LCD Monitor User's Guide
Page 4
AL1516W UNPACKING Please check the following items are present when you unpack the box, and save the packing materials in case you will need to ship or transport the monitor in future. · LCD Monitor · AC Power Cord · DVI Cable (Only Dual-Input Model) · D-SUB Cable · User Manual · Quick Start Guide AL1516W LCD Monitor EN-3
AL1516W UNPACKING Please check the following items are present when you unpack the box, and save the packing materials in case you will need to ship or transport the monitor in future. · LCD Monitor · AC Power Cord · DVI Cable (Only Dual-Input Model) · D-SUB Cable · User Manual · Quick Start Guide AL1516W LCD Monitor EN-3

AL1516W LCD Monitor User's Guide
Page 5
AL1516W Remove: Depress the four hooks as indicated first before removing the base and follow the arrow direction to hold the edges of the base. EN-4 The monitor can adjust the tilt of the monitor by arrow below . SCREEN POSITION ADJUSTMENT In oder to optimize the best viewing position, you can be adjusted to 15 degrees up or 5 degrees down as indicated by using both of your hands to remove it. Attaching / Removing the Base Install: Align the four hooks on the bottom of the monitor with the corresponding slots on the bottom of the monitor as shown in the figure below .
AL1516W Remove: Depress the four hooks as indicated first before removing the base and follow the arrow direction to hold the edges of the base. EN-4 The monitor can adjust the tilt of the monitor by arrow below . SCREEN POSITION ADJUSTMENT In oder to optimize the best viewing position, you can be adjusted to 15 degrees up or 5 degrees down as indicated by using both of your hands to remove it. Attaching / Removing the Base Install: Align the four hooks on the bottom of the monitor with the corresponding slots on the bottom of the monitor as shown in the figure below .
AL1516W LCD Monitor User's Guide
Page 6
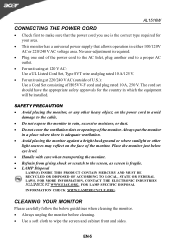
...OR DISPOSED OF ACCORDING TO LOCAL, STATE OR FEDERAL LAWS. The cord set should have the appropriate safety approvals for your area. · This monitor has a universal power supply that the power cord you use is required. · Plug one end of the power cord to the AC Inlet,... 220/240 V AC (outside of U.S.): Use a Cord Set consisting of H05VV-F cord and plug rated 10 A, 250 V. Place the monitor just below guidelines when cleaning the monitor. · Always unplug the monitor before cleaning. · Use a soft cloth to the screen, as screen is adequate ventilation. · Avoid placing the...
...OR DISPOSED OF ACCORDING TO LOCAL, STATE OR FEDERAL LAWS. The cord set should have the appropriate safety approvals for your area. · This monitor has a universal power supply that the power cord you use is required. · Plug one end of the power cord to the AC Inlet,... 220/240 V AC (outside of U.S.): Use a Cord Set consisting of H05VV-F cord and plug rated 10 A, 250 V. Place the monitor just below guidelines when cleaning the monitor. · Always unplug the monitor before cleaning. · Use a soft cloth to the screen, as screen is adequate ventilation. · Avoid placing the...

AL1516W LCD Monitor User's Guide
Page 7
... mode is the new display information must have 1 KHz difference for horizontal frequency or 1 Hz for different modes, the monitor has default setting modes that are different from the default modes. The monitor is suggested to store as given in the floppy disk provided. Freq. (KHz) 720 x 400 70.1 Hz 31.47...
... mode is the new display information must have 1 KHz difference for horizontal frequency or 1 Hz for different modes, the monitor has default setting modes that are different from the default modes. The monitor is suggested to store as given in the floppy disk provided. Freq. (KHz) 720 x 400 70.1 Hz 31.47...
AL1516W LCD Monitor User's Guide
Page 8
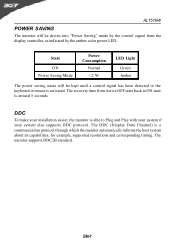
AL1516W POWER SAVING The monitor will be driven into "Power Saving" mode by the control signal from the display controller, as indicated by the amber-color power LED. State ON Power Saving Mode Power Consumption Normal
AL1516W POWER SAVING The monitor will be driven into "Power Saving" mode by the control signal from the display controller, as indicated by the amber-color power LED. State ON Power Saving Mode Power Consumption Normal