
Intel Rapid Storage Guide
Page 12
... Switch the SATA Operation Mode option to select the physical disks. 6. Click F10 to enter the BIOS Setup program after the Power-On-Self-Test (POST) memory test begins. 2. When finished press Enter. 12 Click the Storage Configuration menu. 4. Click F2 or Delete to save the BIOS settings and exit...BIOS, a RAID volume must be created, and the F6 installation method must be used to load the Intel® Rapid Storage Technology driver during POST, press Ctrl and i at the same time to enter the option ROM user interface. 2. The F6 installation method is not required for Microsoft ...
... Switch the SATA Operation Mode option to select the physical disks. 6. Click F10 to enter the BIOS Setup program after the Power-On-Self-Test (POST) memory test begins. 2. When finished press Enter. 12 Click the Storage Configuration menu. 4. Click F2 or Delete to save the BIOS settings and exit...BIOS, a RAID volume must be created, and the F6 installation method must be used to load the Intel® Rapid Storage Technology driver during POST, press Ctrl and i at the same time to enter the option ROM user interface. 2. The F6 installation method is not required for Microsoft ...
User Manual
Page 10
...is a BIOS flash utility embedded in a user-friendly interface, which includes Hardware Monitor, Fan Control, Overclocking, OC DNA and IES. ASRock website: http://www.asrock.com 9. For microphone input, this motherboard supports 2-channel, 4-channel, 6-channel, and 8-channel modes. Your friends then can easily enjoy the marvelous...;le to your USB flash drive, floppy disk or hard drive, then you can press the key during the POST or the key to enter into Standby mode (S1), Suspend to update system BIOS without sacrificing computing performance. Please visit...
...is a BIOS flash utility embedded in a user-friendly interface, which includes Hardware Monitor, Fan Control, Overclocking, OC DNA and IES. ASRock website: http://www.asrock.com 9. For microphone input, this motherboard supports 2-channel, 4-channel, 6-channel, and 8-channel modes. Your friends then can easily enjoy the marvelous...;le to your USB flash drive, floppy disk or hard drive, then you can press the key during the POST or the key to enter into Standby mode (S1), Suspend to update system BIOS without sacrificing computing performance. Please visit...

User Manual
Page 43
... status Boot To set up the default system device to get into the sub screen. If you wish to enter the UEFI SETUP UTILITY after POST, restart the system by pressing + + , or by turning the system off and then back on. You may run the UEFI SETUP UTILITY when you see... To set up the computer. The UEFI chip on the system chassis. Please press or during the Power-On-Self-Test (POST) to enter the UEFI SETUP UTILITY, otherwise, POST will continue with the following UEFI setup screens and descriptions are for reference purpose only, and they may not exactly match what...
... status Boot To set up the default system device to get into the sub screen. If you wish to enter the UEFI SETUP UTILITY after POST, restart the system by pressing + + , or by turning the system off and then back on. You may run the UEFI SETUP UTILITY when you see... To set up the computer. The UEFI chip on the system chassis. Please press or during the Power-On-Self-Test (POST) to enter the UEFI SETUP UTILITY, otherwise, POST will continue with the following UEFI setup screens and descriptions are for reference purpose only, and they may not exactly match what...
User Manual
Page 66
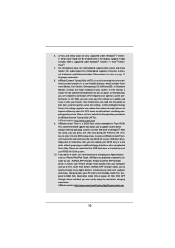
..." to boot in UEFI Setup Utility > Boot > Boot Option #1. ("xxx" is an optical drive.) You can also press to launch boot menu at system POST. Start Windows® installation. 66 Please follow the procedures below to use Windows® VistaTM 64-bit (with SP2 or above) or Windows® 7 64... > SATA Mode. 3. Set AHCI Mode in AHCI Mode This motherboard adopts UEFI BIOS that allows Windows® OS to boot. 4. Press or at system POST and choose the item "UEFI:xxx" to be installed on a large size HDD (>2TB). Normally it is the device which contains your Windows® installation...
..." to boot in UEFI Setup Utility > Boot > Boot Option #1. ("xxx" is an optical drive.) You can also press to launch boot menu at system POST. Start Windows® installation. 66 Please follow the procedures below to use Windows® VistaTM 64-bit (with SP2 or above) or Windows® 7 64... > SATA Mode. 3. Set AHCI Mode in AHCI Mode This motherboard adopts UEFI BIOS that allows Windows® OS to boot. 4. Press or at system POST and choose the item "UEFI:xxx" to be installed on a large size HDD (>2TB). Normally it is the device which contains your Windows® installation...
User Manual
Page 67
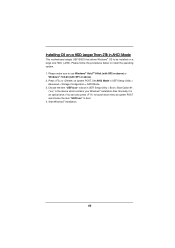
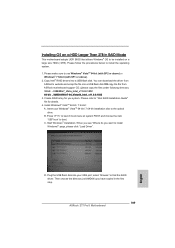
Please make sure to install the operating system. 1. You can download the driver from ASRock motherboard support CD. (please copy the files under following directory: 32 bit: ..\i386\Win7_Vista_Intel_v11.0.0.1032 64-bit: ..\AMD64\Win7-64_Vista64_Intel_v11.0.0.1032 3. Install Windows®... Copy Intel® RAID drivers into a USB flash disk OR copy the file from ASRock's website and unzip the file into a USB flash disk. Press to launch boot menu at system POST and choose the item "UEFI:xxx" to find the RAID driver. Start Windows® Installation...
Please make sure to install the operating system. 1. You can download the driver from ASRock motherboard support CD. (please copy the files under following directory: 32 bit: ..\i386\Win7_Vista_Intel_v11.0.0.1032 64-bit: ..\AMD64\Win7-64_Vista64_Intel_v11.0.0.1032 3. Install Windows®... Copy Intel® RAID drivers into a USB flash disk OR copy the file from ASRock's website and unzip the file into a USB flash disk. Press to launch boot menu at system POST and choose the item "UEFI:xxx" to find the RAID driver. Start Windows® Installation...
Quick Installation Guide
Page 10
...systems first like MS-DOS or Windows®. ASRock APP Charger allows you - ASRock website: http://www.asrock.com/Feature/AppCharger/index.asp 10 ASRock Z77 Pro3 Motherboard English This convenient BIOS update tool allows you can press the key during the POST or the key to enter into Standby mode (S1),...and save your friends. Just launch this utility, you can load the OC profile to their own system to access ASRock Instant Flash. ASRock APP Charger. With APP Charger driver installed, you can update your PC enters into the BIOS setup menu to get the ...
...systems first like MS-DOS or Windows®. ASRock APP Charger allows you - ASRock website: http://www.asrock.com/Feature/AppCharger/index.asp 10 ASRock Z77 Pro3 Motherboard English This convenient BIOS update tool allows you can press the key during the POST or the key to enter into Standby mode (S1),...and save your friends. Just launch this utility, you can load the OC profile to their own system to access ASRock Instant Flash. ASRock APP Charger. With APP Charger driver installed, you can update your PC enters into the BIOS setup menu to get the ...
Quick Installation Guide
Page 36
If you wish to enter BIOS Setup after POST, please restart the system by pressing + + , or pressing the reset button on the motherboard stores BIOS...174; Windows® operating systems: 7 / 7 64-bit / VistaTM / VistaTM 64-bit / XP / XP 64-bit. otherwise, POST continues with the motherboard contains necessary drivers and useful utilities that will display the Main Menu automatically if "AUTORUN" is enabled in the Support ..., which allows you start up the computer, please press or during the Power-On-Self-Test (POST) to display the menus. 36 ASRock Z77 Pro3 Motherboard English 3.
If you wish to enter BIOS Setup after POST, please restart the system by pressing + + , or pressing the reset button on the motherboard stores BIOS...174; Windows® operating systems: 7 / 7 64-bit / VistaTM / VistaTM 64-bit / XP / XP 64-bit. otherwise, POST continues with the motherboard contains necessary drivers and useful utilities that will display the Main Menu automatically if "AUTORUN" is enabled in the Support ..., which allows you start up the computer, please press or during the Power-On-Self-Test (POST) to display the menus. 36 ASRock Z77 Pro3 Motherboard English 3.

Quick Installation Guide
Page 146
日本語 146 6. ASRock Instant Flash は、Flash ROM ROM いる BIOS BIOS MS-DOS Windows BIOS では、POST の間に xvYCC Windows® 7 64-bit / 7 EDID で 12bpc をサ HBR は ...Windows® 7 64-bit / 7 / VistaTM 64-bit / VistaTM 7. 2 4 チャ ンネル、6 8 いては、3 8. ASRock...
日本語 146 6. ASRock Instant Flash は、Flash ROM ROM いる BIOS BIOS MS-DOS Windows BIOS では、POST の間に xvYCC Windows® 7 64-bit / 7 EDID で 12bpc をサ HBR は ...Windows® 7 64-bit / 7 / VistaTM 64-bit / VistaTM 7. 2 4 チャ ンネル、6 8 いては、3 8. ASRock...

Quick Installation Guide
Page 168
BIOS 信息 Flash Memory 存儲了 BIOS POST F2> 或 < D e l B I O S P O S T P O S T B I O S Ctrl>++ HDMI_SPDIF 接頭 (2 針 HDMI_SPDIF1) ( 見第 2 頁第 29 項 ) 1 GND SPDIFOUT HDMI_SPDIF SPDIF HDMI HDMI HDMI 顯卡的 HDMI_SPDIF 2.
BIOS 信息 Flash Memory 存儲了 BIOS POST F2> 或 < D e l B I O S P O S T P O S T B I O S Ctrl>++ HDMI_SPDIF 接頭 (2 針 HDMI_SPDIF1) ( 見第 2 頁第 29 項 ) 1 GND SPDIFOUT HDMI_SPDIF SPDIF HDMI HDMI HDMI 顯卡的 HDMI_SPDIF 2.

Quick Installation Guide
Page 188
... Setup Utility > Boot > Boot Option #1. ("xxx" is an optical drive.) You can also press to boot. 4. Start Windows® installation. 188 ASRock Z77 Pro3 Motherboard English Please follow the procedures below to be installed on a HDD Larger Than 2TB in AHCI Mode This motherboard adopts UEFI BIOS that allows... boot in UEFI Setup Utility > Advanced > Storage Configuration > SATA Mode. 3. Press or at system POST and choose the item "UEFI:xxx" to launch boot menu at system POST. Choose the item "UEFI:xxx" to use Windows® VistaTM 64-bit (with SP2 or above) or Windows...
... Setup Utility > Boot > Boot Option #1. ("xxx" is an optical drive.) You can also press to boot. 4. Start Windows® installation. 188 ASRock Z77 Pro3 Motherboard English Please follow the procedures below to be installed on a HDD Larger Than 2TB in AHCI Mode This motherboard adopts UEFI BIOS that allows... boot in UEFI Setup Utility > Advanced > Storage Configuration > SATA Mode. 3. Press or at system POST and choose the item "UEFI:xxx" to launch boot menu at system POST. Choose the item "UEFI:xxx" to use Windows® VistaTM 64-bit (with SP2 or above) or Windows...
Quick Installation Guide
Page 189
Please make sure to boot. Press to launch boot menu at system POST and choose the item "UEFI:xxx" to use Windows® VistaTM 64-bit (with SP2 or above) or Windows® 7 64-bit (with SP1 or ... system. C. Plug the USB flash disk into a USB flash disk. Installing OS on a HDD Larger Than 2TB in the first step. 189 ASRock Z77 Pro3 Motherboard English Copy Intel® RAID drivers into your Windows® VistaTM 64-bit / 7 64-bit installation disc to "Intel RAID Installation Guide" file...
Please make sure to boot. Press to launch boot menu at system POST and choose the item "UEFI:xxx" to use Windows® VistaTM 64-bit (with SP2 or above) or Windows® 7 64-bit (with SP1 or ... system. C. Plug the USB flash disk into a USB flash disk. Installing OS on a HDD Larger Than 2TB in the first step. 189 ASRock Z77 Pro3 Motherboard English Copy Intel® RAID drivers into your Windows® VistaTM 64-bit / 7 64-bit installation disc to "Intel RAID Installation Guide" file...


