
Quick Installation Guide
Page 5
... visit our website for specific information about the model you for details. 5 ASRock Z77 OC Formula Motherboard English www.asrock.com/support/index.asp 1.1 Package Contents ASRock Z77 OC Formula Motherboard (CEB Form Factor: 12.0-in x 10.5-in Storage Configuration to ... get better performance in Windows® 7 / 7 64-bit / VistaTM / VistaTM 64bit, it is recommended to set the BIOS option in , 30.5 cm x 26.7 cm) ASRock Z77 OC Formula Quick Installation Guide ASRock Z77 OC Formula Support CD 6 x Serial ATA (SATA) Data Cables (Optional) 2 x Serial ATA (SATA) HDD Power Cables ...
... visit our website for specific information about the model you for details. 5 ASRock Z77 OC Formula Motherboard English www.asrock.com/support/index.asp 1.1 Package Contents ASRock Z77 OC Formula Motherboard (CEB Form Factor: 12.0-in x 10.5-in Storage Configuration to ... get better performance in Windows® 7 / 7 64-bit / VistaTM / VistaTM 64bit, it is recommended to set the BIOS option in , 30.5 cm x 26.7 cm) ASRock Z77 OC Formula Quick Installation Guide ASRock Z77 OC Formula Support CD 6 x Serial ATA (SATA) Data Cables (Optional) 2 x Serial ATA (SATA) HDD Power Cables ...

Quick Installation Guide
Page 8
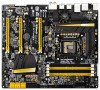
... (supports 2 USB 3.0 ports) - 1 x Dr. Debug with LED - 1 x Power Switch with LED - 1 x Reset Switch with LED ASRock Z77 OC Formula Motherboard SLI/XFire power connector - HD Audio Jack: Rear Speaker/Central/Bass/Line in/Front Speaker/Microphone (see CAUTION 8) - 2 x SATA3 6.0 Gb/s ...6 x SATA3 6.0Gb/s connectors - 1 x IR header - 1 x CIR header - 1 x COM port header - 1 x HDMI_SPDIF header - 1 x Power LED header - V-ProbeTM: 2 x 7-set of onboard voltage measurement points laid - 2 x CPU Fan connectors (1 x 4-pin, 1 x 3-pin) - 4 x Chassis Fan connectors (1 x 4-pin, 3 x 3-pin) - 1 x Power Fan...
... (supports 2 USB 3.0 ports) - 1 x Dr. Debug with LED - 1 x Power Switch with LED - 1 x Reset Switch with LED ASRock Z77 OC Formula Motherboard SLI/XFire power connector - HD Audio Jack: Rear Speaker/Central/Bass/Line in/Front Speaker/Microphone (see CAUTION 8) - 2 x SATA3 6.0 Gb/s ...6 x SATA3 6.0Gb/s connectors - 1 x IR header - 1 x CIR header - 1 x COM port header - 1 x HDMI_SPDIF header - 1 x Power LED header - V-ProbeTM: 2 x 7-set of onboard voltage measurement points laid - 2 x CPU Fan connectors (1 x 4-pin, 1 x 3-pin) - 4 x Chassis Fan connectors (1 x 4-pin, 3 x 3-pin) - 1 x Power Fan...

Quick Installation Guide
Page 10
..."User Manual" in Gen 3 speed, please install an Ivy Bridge CPU. Overclocking may be done at PCI Express Gen 2 speed. 10 ASRock Z77 OC Formula Motherboard English We are not responsible for proper installation. 4. The larger the die area, the lower Rds(on page 18 for possible damage ...caused by stacking two dies into a MOSFET. For Windows® OS with overclocking, including adjusting the setting in the BIOS, applying Untied Overclocking Technology, or using third-party overclocking tools. If you implement Dual Channel Memory Technology, make sure ...
..."User Manual" in Gen 3 speed, please install an Ivy Bridge CPU. Overclocking may be done at PCI Express Gen 2 speed. 10 ASRock Z77 OC Formula Motherboard English We are not responsible for proper installation. 4. The larger the die area, the lower Rds(on page 18 for possible damage ...caused by stacking two dies into a MOSFET. For Windows® OS with overclocking, including adjusting the setting in the BIOS, applying Untied Overclocking Technology, or using third-party overclocking tools. If you implement Dual Channel Memory Technology, make sure ...

Quick Installation Guide
Page 11
...allowed to get the same OC settings. It also shortens the loading time of Adobe Photoshop 5 times faster. And it fully utilizes the memory space that the USB flash drive or hard drive must use FAT32/16/12 file system. 11 ASRock Z77 OC Formula Motherboard English Please visit our... website for optimal system performance. For audio output, this motherboard supports both stereo and mono modes. In OC DNA, you can load the OC profile to change. Your friends then can...
...allowed to get the same OC settings. It also shortens the loading time of Adobe Photoshop 5 times faster. And it fully utilizes the memory space that the USB flash drive or hard drive must use FAT32/16/12 file system. 11 ASRock Z77 OC Formula Motherboard English Please visit our... website for optimal system performance. For audio output, this motherboard supports both stereo and mono modes. In OC DNA, you can load the OC profile to change. Your friends then can...
Quick Installation Guide
Page 12
... driver, it reduces the frequency of ASRock XFast RAM is included into Formula Drive. ASRock SmartView, a new function for you keep in Game: After setting online game's priority higher, it also boosts the speed of Your Data: With the status window, you are required. 12 ASRock Z77 OC Formula Motherboard English ASRock motherboards are able to modify the system...
... driver, it reduces the frequency of ASRock XFast RAM is included into Formula Drive. ASRock SmartView, a new function for you keep in Game: After setting online game's priority higher, it also boosts the speed of Your Data: With the status window, you are required. 12 ASRock Z77 OC Formula Motherboard English ASRock motherboards are able to modify the system...

Quick Installation Guide
Page 13
... dampness by the European Union to use Nick's OC setting which virtualizes integrated GPU and discrete GPU for available UEFI firmware updates from our servers and flash them without entering Windows® OS. It also features Virtual Vsync™ for more details. 13 ASRock Z77 OC Formula Motherboard English Before you must meet EuP standards...
... dampness by the European Union to use Nick's OC setting which virtualizes integrated GPU and discrete GPU for available UEFI firmware updates from our servers and flash them without entering Windows® OS. It also features Virtual Vsync™ for more details. 13 ASRock Z77 OC Formula Motherboard English Before you must meet EuP standards...

Quick Installation Guide
Page 14
... from the wall socket before you install the motherboard, study the configuration of the following precautions before touching any motherboard settings. 1. board to ensure that comes with the component. 5. Doing so may cause severe damage to motherboard components. 2.1 Screw ... ICs. 4. Make sure to unplug the power cord before you and damages to the motherboard, peripherals, and/or components. 14 ASRock Z77 OC Formula Motherboard English Unplug the power cord from the power supply. Before you install motherboard components or change any components. 2. Do not ...
... from the wall socket before you install the motherboard, study the configuration of the following precautions before touching any motherboard settings. 1. board to ensure that comes with the component. 5. Doing so may cause severe damage to motherboard components. 2.1 Screw ... ICs. 4. Make sure to unplug the power cord before you and damages to the motherboard, peripherals, and/or components. 14 ASRock Z77 OC Formula Motherboard English Unplug the power cord from the power supply. Before you install motherboard components or change any components. 2. Do not ...

Quick Installation Guide
Page 21
... system unit cover (if your motherboard is completely seated on the slot. Step 6. Fasten the card to use . Step 4. Step 2. Replace the system cover. 21 ASRock Z77 OC Formula Motherboard English Remove the bracket facing the slot that the power supply is switched off or the power cord is unplugged. Align the card connector... chassis with the slot and press firmly until the card is already installed in a chassis). Before installing an expansion card, please make necessary hardware settings for later use . Installing an expansion card Step 1.
... system unit cover (if your motherboard is completely seated on the slot. Step 6. Fasten the card to use . Step 4. Step 2. Replace the system cover. 21 ASRock Z77 OC Formula Motherboard English Remove the bracket facing the slot that the power supply is switched off or the power cord is unplugged. Align the card connector... chassis with the slot and press firmly until the card is already installed in a chassis). Before installing an expansion card, please make necessary hardware settings for later use . Installing an expansion card Step 1.

Quick Installation Guide
Page 24
... MultiGraphics Processing Unit (GPU) feature in the NVIDIA® nView system tray utility. In Set PhysX GPU acceleration item, please select Enabled. And click Apply. From the pop-up menu, select Set SLI and PhysX configuration. D. For Windows® XP / XP 64-bit ...OS: (For SLITM mode only) A. B. Reboot your Windows® taskbar. C. After that, you can freely enjoy the benefit of SLITM feature. 24 ASRock Z77 OC Formula Motherboard English 2.7.2 Driver Installation...
... MultiGraphics Processing Unit (GPU) feature in the NVIDIA® nView system tray utility. In Set PhysX GPU acceleration item, please select Enabled. And click Apply. From the pop-up menu, select Set SLI and PhysX configuration. D. For Windows® XP / XP 64-bit ...OS: (For SLITM mode only) A. B. Reboot your Windows® taskbar. C. After that, you can freely enjoy the benefit of SLITM feature. 24 ASRock Z77 OC Formula Motherboard English 2.7.2 Driver Installation...

Quick Installation Guide
Page 25
...guration. In Select an SLI configuration item, please select Enable SLI. Reboot your Windows taskbar. B. Select NVIDIA Control Panel tab. In Set PhysX GPU acceleration item, please select Enabled. From the pop-up menu, select All Programs, and then click NVIDIA Corporation. And click Apply. ... Inc., and is used only for identification or explanation and to the owners' benefit, without intent to infringe. 25 ASRock Z77 OC Formula Motherboard English Select Control Panel tab. For Windows® VistaTM / VistaTM 64-bit / 7 / 7 64-bit OS: (For SLITM and Quad SLITM ...
...guration. In Select an SLI configuration item, please select Enable SLI. Reboot your Windows taskbar. B. Select NVIDIA Control Panel tab. In Set PhysX GPU acceleration item, please select Enabled. From the pop-up menu, select All Programs, and then click NVIDIA Corporation. And click Apply. ... Inc., and is used only for identification or explanation and to the owners' benefit, without intent to infringe. 25 ASRock Z77 OC Formula Motherboard English Select Control Panel tab. For Windows® VistaTM / VistaTM 64-bit / 7 / 7 64-bit OS: (For SLITM and Quad SLITM ...

Quick Installation Guide
Page 31
...monitors with your system. When you wish to the steps below. C. Select the display icon identified by the number 2. 31 ASRock Z77 OC Formula Motherboard English Please refer to enter UEFI setup. Boot your primary monitor, and then select "Primary". Please make sure that you can ...Press or to page 20 for proper expansion card installation procedures. 2. Install the PCI Express VGA cards on PCI Express VGA card driver to set up a multi-monitor display. HDMI port 3. Please refer to the following steps to your card, one monitor will always be Primary, and...
...monitors with your system. When you wish to the steps below. C. Select the display icon identified by the number 2. 31 ASRock Z77 OC Formula Motherboard English Please refer to enter UEFI setup. Boot your primary monitor, and then select "Primary". Please make sure that you can ...Press or to page 20 for proper expansion card installation procedures. 2. Install the PCI Express VGA cards on PCI Express VGA card driver to set up a multi-monitor display. HDMI port 3. Please refer to the following steps to your card, one monitor will always be Primary, and...

Quick Installation Guide
Page 32
...-bit / VistaTM / VistaTM 64-bit OS: Right click the desktop, choose "Personalize", and select the "Display Settings" tab so that you would like to another. 32 ASRock Z77 OC Formula Motherboard English The placement of display icons determines how you can adjust the parameters of your change. Repeat steps C ... icon identified by the number three to the steps below. D. Click "Extend my Windows desktop onto this monitor". E. F. Set the appropriate "Screen Resolution" and "Color Quality" for the display icons identified by the numbers three to apply these new values...
...-bit / VistaTM / VistaTM 64-bit OS: Right click the desktop, choose "Personalize", and select the "Display Settings" tab so that you would like to another. 32 ASRock Z77 OC Formula Motherboard English The placement of display icons determines how you can adjust the parameters of your change. Repeat steps C ... icon identified by the number three to the steps below. D. Click "Extend my Windows desktop onto this monitor". E. F. Set the appropriate "Screen Resolution" and "Color Quality" for the display icons identified by the numbers three to apply these new values...

Quick Installation Guide
Page 33
...source, or transmitter - Products compatible with the HDCP scheme such as DVD players, satellite and cable HDTV set-top-boxes, as well as a computer, DVD player or set-top box and the digital display, or receiver - Due to the increase in manufacturers employing HDCP in ...HDCP? Please refer to the instructions below for protecting digital entertainment content that the HDTV or LCD monitor you purchase is compatible. 33 ASRock Z77 OC Formula Motherboard English HDCP is a copy protection scheme to eliminate the possibility of content as a monitor, television or projector. HDCP Function HDCP...
...source, or transmitter - Products compatible with the HDCP scheme such as DVD players, satellite and cable HDTV set-top-boxes, as well as a computer, DVD player or set-top box and the digital display, or receiver - Due to the increase in manufacturers employing HDCP in ...HDCP? Please refer to the instructions below for protecting digital entertainment content that the HDTV or LCD monitor you purchase is compatible. 33 ASRock Z77 OC Formula Motherboard English HDCP is a copy protection scheme to eliminate the possibility of content as a monitor, television or projector. HDCP Function HDCP...

Quick Installation Guide
Page 34
... the option "CIR Controller" is setting at the bottom of ASRock Smart Remote. Enter Windows. Execute ASRock support CD and install CIR Driver. (It is only used for the quick installation and usage of driver list.) English 34 ASRock Z77 OC Formula Motherboard Step1. Press or to the USB 2.0 header on ASRock motherboard. Install Multi-Angle CIR Receiver...
... the option "CIR Controller" is setting at the bottom of ASRock Smart Remote. Enter Windows. Execute ASRock support CD and install CIR Driver. (It is only used for the quick installation and usage of driver list.) English 34 ASRock Z77 OC Formula Motherboard Step1. Press or to the USB 2.0 header on ASRock motherboard. Install Multi-Angle CIR Receiver...

Quick Installation Guide
Page 36
... Jumper (BIOS_SEL1) (see p.2, No. 46) Setting Default Clear CMOS Description Note: CLRCMOS1 allows you to short pin2 and pin3 on CLRCMOS1 for the safety and stability of system safety, users cannot update the backup BIOS manually. 36 ASRock Z77 OC Formula Motherboard The illustration shows a 3-pin jumper whose...Please be cleared only if the CMOS battery is "Short". However, if the main BIOS is corrupted or damaged, please use "ASRock Instant Flash" or "ASRock Internet Flash" in CMOS. For the sake of your system. 2.11 Jumpers Setup The illustration shows how jumpers are "Short"...
... Jumper (BIOS_SEL1) (see p.2, No. 46) Setting Default Clear CMOS Description Note: CLRCMOS1 allows you to short pin2 and pin3 on CLRCMOS1 for the safety and stability of system safety, users cannot update the backup BIOS manually. 36 ASRock Z77 OC Formula Motherboard The illustration shows a 3-pin jumper whose...Please be cleared only if the CMOS battery is "Short". However, if the main BIOS is corrupted or damaged, please use "ASRock Instant Flash" or "ASRock Internet Flash" in CMOS. For the sake of your system. 2.11 Jumpers Setup The illustration shows how jumpers are "Short"...

Quick Installation Guide
Page 49
...Boot Option (LoadImage returned error) Boot Option is failed (StartImage returned error) Flash update is failed Reset protocol is not available English 49 ASRock Z77 OC Formula Motherboard 0xA6 0xA7 0xA8 0xA9 0xAA 0xAB 0xAC 0xAD 0xAE 0xAF 0xB0 0xB1 0xB2 0xB3 0xB4 0xB5 0xB6 0xB7 0xB8 - 0xBF 0xC0 - ...Option ROM Initialization System Reset USB hot plug PCI bus hot plug Clean-up of NVRAM Configuration Reset (reset of NVRAM settings) Reserved for future AMI codes OEM BDS initialization codes CPU initialization error North Bridge initialization error South Bridge initialization error Some of ...
...Boot Option (LoadImage returned error) Boot Option is failed (StartImage returned error) Flash update is failed Reset protocol is not available English 49 ASRock Z77 OC Formula Motherboard 0xA6 0xA7 0xA8 0xA9 0xAA 0xAB 0xAC 0xAD 0xAE 0xAF 0xB0 0xB1 0xB2 0xB3 0xB4 0xB5 0xB6 0xB7 0xB8 - 0xBF 0xC0 - ...Option ROM Initialization System Reset USB hot plug PCI bus hot plug Clean-up of NVRAM Configuration Reset (reset of NVRAM settings) Reserved for future AMI codes OEM BDS initialization codes CPU initialization error North Bridge initialization error South Bridge initialization error Some of ...

Quick Installation Guide
Page 51
...[IDE] for SATA3_M0 and SATA3_M1 ports. Enter UEFI SETUP UTILITY Advanced screen Storage Configuration. Set the option "Marvell SATA3 M2 M3 Operation Mode" to SATA2_5 and SATA3_0 and SATA3_1 ports. A. Set the option "Marvell SATA3 M0 M1 Operation Mode" to [IDE] for SATA3_M2 and SATA3_M3 ports. ... you want to install Windows® 7 / 7 64-bit / VistaTM / VistaTM 64-bit / XP / XP 64bit OS on your system. 51 ASRock Z77 OC Formula Motherboard English B. AHCI mode is not supported under Windows® XP / XP 64-bit. Using SATA / SATA2 / SATA3 HDDs without NCQ function STEP...
...[IDE] for SATA3_M0 and SATA3_M1 ports. Enter UEFI SETUP UTILITY Advanced screen Storage Configuration. Set the option "Marvell SATA3 M2 M3 Operation Mode" to SATA2_5 and SATA3_0 and SATA3_1 ports. A. Set the option "Marvell SATA3 M0 M1 Operation Mode" to [IDE] for SATA3_M2 and SATA3_M3 ports. ... you want to install Windows® 7 / 7 64-bit / VistaTM / VistaTM 64-bit / XP / XP 64bit OS on your system. 51 ASRock Z77 OC Formula Motherboard English B. AHCI mode is not supported under Windows® XP / XP 64-bit. Using SATA / SATA2 / SATA3 HDDs without NCQ function STEP...

Quick Installation Guide
Page 52
... Advanced screen Storage Configuration. STEP 2: Install Windows® 7 / 7 64-bit / VistaTM / VistaTM 64-bit OS on your system. 52 ASRock Z77 OC Formula Motherboard English Using SATA / SATA2 / SATA3 HDDs without RAID functions, please follow below steps. Set the option "Marvell SATA3 M0 M1 Operation Mode" to SATA2_5 and SATA3_0 and SATA3_1 ports...
... Advanced screen Storage Configuration. STEP 2: Install Windows® 7 / 7 64-bit / VistaTM / VistaTM 64-bit OS on your system. 52 ASRock Z77 OC Formula Motherboard English Using SATA / SATA2 / SATA3 HDDs without RAID functions, please follow below steps. Set the option "Marvell SATA3 M0 M1 Operation Mode" to SATA2_5 and SATA3_0 and SATA3_1 ports...
Quick Installation Guide
Page 266
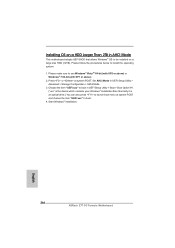
Set AHCI Mode in UEFI Setup Utility > Advanced > Storage Configuration > SATA Mode. 3. Normally it is the device which contains your Windows® installation files. Start Windows® installation. 266 ASRock Z77 OC Formula Motherboard English Please make sure to install the operating system. 1. Press or at system POST and choose the item "UEFI...
Set AHCI Mode in UEFI Setup Utility > Advanced > Storage Configuration > SATA Mode. 3. Normally it is the device which contains your Windows® installation files. Start Windows® installation. 266 ASRock Z77 OC Formula Motherboard English Please make sure to install the operating system. 1. Press or at system POST and choose the item "UEFI...

Quick Installation Guide
Page 270
... to reboot.) D. After installing Windows® 7 64-bit, install the hotfix kb2505454. (This may take a long time; >30 mins.) C. Reboot your system. Finish. 270 ASRock Z77 OC Formula Motherboard English D. Please request the hotfix KB2505454 through this hotfix then reboot by itself. Please start to "Disable" then Click "OK". C. Windows®...
... to reboot.) D. After installing Windows® 7 64-bit, install the hotfix kb2505454. (This may take a long time; >30 mins.) C. Reboot your system. Finish. 270 ASRock Z77 OC Formula Motherboard English D. Please request the hotfix KB2505454 through this hotfix then reboot by itself. Please start to "Disable" then Click "OK". C. Windows®...


