
User Manual
Page 4
... 43 3.1 Introduction 43 3.1.1 UEFI Menu Bar 43 3.1.2 Navigation Keys 44 3.2 Main Screen 44 3.3 OC Tweaker Screen 45 3.4 Advanced Screen 50 3.4.1 CPU Configuration 51 3.4.2 North Bridge Confi...
... 43 3.1 Introduction 43 3.1.1 UEFI Menu Bar 43 3.1.2 Navigation Keys 44 3.2 Main Screen 44 3.3 OC Tweaker Screen 45 3.4 Advanced Screen 50 3.4.1 CPU Configuration 51 3.4.2 North Bridge Confi...
User Manual
Page 8
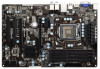
... LAN (see CAUTION 20) - Supports jumperfree - ASRock OMG (Online Management Guard) (see CAUTION 12) - ASRock XFast USB (see CAUTION 16) - Front panel audio connector - 3 x USB 2.0 headers (support 6 USB 2.0 ports) - 1 x USB 3.0 header (supports 2 USB 3.0 ports) - 64Mb AMI UEFI Legal BIOS with processors which are GPU integrated. - CPU Core, IGPU, DRAM, 1.8V PLL, VTT, VCCSA...
... LAN (see CAUTION 20) - Supports jumperfree - ASRock OMG (Online Management Guard) (see CAUTION 12) - ASRock XFast USB (see CAUTION 16) - Front panel audio connector - 3 x USB 2.0 headers (support 6 USB 2.0 ports) - 1 x USB 3.0 header (supports 2 USB 3.0 ports) - 64Mb AMI UEFI Legal BIOS with processors which are GPU integrated. - CPU Core, IGPU, DRAM, 1.8V PLL, VTT, VCCSA...

User Manual
Page 28
...2. Install the PCI Express VGA cards on VGA card is inserted to the steps below. Boot your system. If you do not adjust the UEFI setup, the default value of the add-on PCI Express VGA cards on each monitor. When you have installed the drivers already, there is.... G. Set up a surround display environment: 1. B. Click the "Identify" button to enable the function of surround display feature. Click "Apply" or "OK" to enter UEFI setup. Enter "Share Memory" option to adjust the memory capability to [32MB], [64MB], [128MB], [256MB] or [512MB] to display a large number on PCIE2 and ...
...2. Install the PCI Express VGA cards on VGA card is inserted to the steps below. Boot your system. If you do not adjust the UEFI setup, the default value of the add-on PCI Express VGA cards on each monitor. When you have installed the drivers already, there is.... G. Set up a surround display environment: 1. B. Click the "Identify" button to enable the function of surround display feature. Click "Apply" or "OK" to enter UEFI setup. Enter "Share Memory" option to adjust the memory capability to [32MB], [64MB], [128MB], [256MB] or [512MB] to display a large number on PCIE2 and ...

User Manual
Page 41
...mode is located in the folder at the following path: .. \ Intel Rapid Storage Information If you need to your optical drive first. Enter UEFI SETUP UTILITY Advanced screen Storage Configuration. After the installation of Windows® 7 / 7 64-bit / VistaTM / VistaTM 64-bit OS... Guide STEP 3: Install Windows® 7 / 7 64-bit / VistaTM / VistaTM 64-bit OS on the support CD driver page. STEP 1: Set up UEFI. Please refer to the document in the Support CD for RAID configuration. B. Please follow the steps below. Set the option "SATA Mode Selection...
...mode is located in the folder at the following path: .. \ Intel Rapid Storage Information If you need to your optical drive first. Enter UEFI SETUP UTILITY Advanced screen Storage Configuration. After the installation of Windows® 7 / 7 64-bit / VistaTM / VistaTM 64-bit OS... Guide STEP 3: Install Windows® 7 / 7 64-bit / VistaTM / VistaTM 64-bit OS on the support CD driver page. STEP 1: Set up UEFI. Please refer to the document in the Support CD for RAID configuration. B. Please follow the steps below. Set the option "SATA Mode Selection...

User Manual
Page 42
... 7 / 7 64-bit / VistaTM / VistaTM 64-bit OS on your system. A. Set the option "SATA Mode Selection" to [AHCI]. Enter UEFI SETUP UTILITY Advanced screen Storage Configuration. Set the option "SATA Mode Selection" to [IDE]. STEP 2: Install Windows® XP / XP 64...-bit OS on your SATA / SATA2 / SATA3 HDDs without RAID functions, please follow the steps below . A. Enter UEFI SETUP UTILITY Advanced screen Storage Configuration. Enter UEFI SETUP UTILITY Advanced screen Storage Configuration. Using SATA / SATA2 / SATA3 HDDs without NCQ function STEP 1: Set ...
... 7 / 7 64-bit / VistaTM / VistaTM 64-bit OS on your system. A. Set the option "SATA Mode Selection" to [AHCI]. Enter UEFI SETUP UTILITY Advanced screen Storage Configuration. Set the option "SATA Mode Selection" to [IDE]. STEP 2: Install Windows® XP / XP 64...-bit OS on your SATA / SATA2 / SATA3 HDDs without RAID functions, please follow the steps below . A. Enter UEFI SETUP UTILITY Advanced screen Storage Configuration. Enter UEFI SETUP UTILITY Advanced screen Storage Configuration. Using SATA / SATA2 / SATA3 HDDs without NCQ function STEP 1: Set ...
User Manual
Page 43
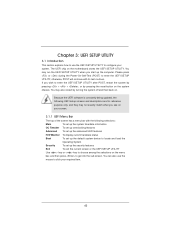
...following selections: Main To set up the system time/date information OC Tweaker To set up overclocking features Advanced To set up the advanced UEFI features H/W Monitor To display current hardware status Boot To set up the default system device to locate and load the Operating System Security To... > key or < > key to choose among the selections on the menu bar, and then press to enter the UEFI SETUP UTILITY, otherwise, POST will continue with the following UEFI setup screens and descriptions are for reference purpose only, and they may not exactly match what you see on . You ...
...following selections: Main To set up the system time/date information OC Tweaker To set up overclocking features Advanced To set up the advanced UEFI features H/W Monitor To display current hardware status Boot To set up the default system device to locate and load the Operating System Security To... > key or < > key to choose among the selections on the menu bar, and then press to enter the UEFI SETUP UTILITY, otherwise, POST will continue with the following UEFI setup screens and descriptions are for reference purpose only, and they may not exactly match what you see on . You ...

User Manual
Page 44
... items Switch to next function To bring up or down to select items + / - System Browser System Browser can let you enter the UEFI SETUP UTILITY, the Main screen will appear and display the system overview. 3.1.2 Navigation Keys Please check the following table for all the settings... Save changes and exit the UEFI SETUP UTILITY Print screen Jump to the Exit Screen or exit the current screen 3.2 Main Screen When you easily check your current system...
... items Switch to next function To bring up or down to select items + / - System Browser System Browser can let you enter the UEFI SETUP UTILITY, the Main screen will appear and display the system overview. 3.1.2 Navigation Keys Please check the following table for all the settings... Save changes and exit the UEFI SETUP UTILITY Print screen Jump to the Exit Screen or exit the current screen 3.2 Main Screen When you easily check your current system...

User Manual
Page 50
...an additional floppy diskette or other complicated flash utility. If you may cause the system to update your UEFI, and reboot your system after the UEFI update process is a UEFI flash utility embedded in this section may set the configurations for the following items: CPU Confi...64258;ash drive or hard drive must use FAT32/16/12 file system. 3.4 Advanced Screen In this tool, then you can update your UEFI only in a few clicks without entering operating systems first like MS-DOS or Windows®. Setting wrong values in Flash ROM. This convenient...
...an additional floppy diskette or other complicated flash utility. If you may cause the system to update your UEFI, and reboot your system after the UEFI update process is a UEFI flash utility embedded in this section may set the configurations for the following items: CPU Confi...64258;ash drive or hard drive must use FAT32/16/12 file system. 3.4 Advanced Screen In this tool, then you can update your UEFI only in a few clicks without entering operating systems first like MS-DOS or Windows®. Setting wrong values in Flash ROM. This convenient...

User Manual
Page 60
...If you have USB compatibility issues, it is recommended to select [Disabled] to use only under legacy OS and UEFI setup when [Disabled] is selected. USB devices are not allowed to use under UEFI setup and Windows / Linux OS. The default value is [Enabled]. OMG (Online Management Guard) Administrators are required... Please refer to enable or disable legacy support for the details of these four options: [Enabled] - USB devices are allowed to enter OS. [UEFI Setup Only] - Enables legacy support if USB devices are four configuration options: [Enabled], [Auto], [Disabled] and...
...If you have USB compatibility issues, it is recommended to select [Disabled] to use only under legacy OS and UEFI setup when [Disabled] is selected. USB devices are not allowed to use under UEFI setup and Windows / Linux OS. The default value is [Enabled]. OMG (Online Management Guard) Administrators are required... Please refer to enable or disable legacy support for the details of these four options: [Enabled] - USB devices are allowed to enter OS. [UEFI Setup Only] - Enables legacy support if USB devices are four configuration options: [Enabled], [Auto], [Disabled] and...

User Manual
Page 64
... 64 Select [Yes] to Launch EFI Shell application (Shell64.efi) from filesystem device Attempts to save the changes and exit the UEFI SETUP UTILITY. Select [Yes] to discard all the setup questions. F9 key can be used for all changes. Discard Changes and Exit When... you select this operation. Discard Changes When you select this option, the following message "Discard changes?" Load UEFI Defaults Load UEFI default values for this option, the following message "Save configuration changes and exit setup?" will pop-out. will pop-out...
... 64 Select [Yes] to Launch EFI Shell application (Shell64.efi) from filesystem device Attempts to save the changes and exit the UEFI SETUP UTILITY. Select [Yes] to discard all the setup questions. F9 key can be used for all changes. Discard Changes and Exit When... you select this operation. Discard Changes When you select this option, the following message "Discard changes?" Load UEFI Defaults Load UEFI default values for this option, the following message "Save configuration changes and exit setup?" will pop-out. will pop-out...
User Manual
Page 66
... operating system. 1. Start Windows® installation. 66 Please follow the procedures below to boot. 4. Set AHCI Mode in AHCI Mode This motherboard adopts UEFI BIOS that allows Windows® OS to be installed on a large size HDD (>2TB). Normally it is the device which contains your Windows® ...installation files. Please make sure to boot in UEFI Setup Utility > Boot > Boot Option #1. ("xxx" is an optical drive.) You can also press to launch boot menu at system POST. Choose the...
... operating system. 1. Start Windows® installation. 66 Please follow the procedures below to boot. 4. Set AHCI Mode in AHCI Mode This motherboard adopts UEFI BIOS that allows Windows® OS to be installed on a large size HDD (>2TB). Normally it is the device which contains your Windows® ...installation files. Please make sure to boot in UEFI Setup Utility > Boot > Boot Option #1. ("xxx" is an optical drive.) You can also press to launch boot menu at system POST. Choose the...
User Manual
Page 67
..."Browse" to install the operating system. 1. Copy Intel® RAID drivers into a USB flash disk OR copy the file from ASRock motherboard support CD. (please copy the files under following directory: 32 bit: ..\i386\Win7_Vista_Intel_v11.0.0.1032 64-bit: ..\AMD64\Win7-64_Vista64_Intel_v11.0.0.1032 3. ...Please follow the procedures below to find the RAID driver. Press to launch boot menu at system POST and choose the item "UEFI:xxx" to be installed on a HDD Larger Than 2TB in the first step. 67 D. page, please click "Load Driver". Start...
..."Browse" to install the operating system. 1. Copy Intel® RAID drivers into a USB flash disk OR copy the file from ASRock motherboard support CD. (please copy the files under following directory: 32 bit: ..\i386\Win7_Vista_Intel_v11.0.0.1032 64-bit: ..\AMD64\Win7-64_Vista64_Intel_v11.0.0.1032 3. ...Please follow the procedures below to find the RAID driver. Press to launch boot menu at system POST and choose the item "UEFI:xxx" to be installed on a HDD Larger Than 2TB in the first step. 67 D. page, please click "Load Driver". Start...

Quick Installation Guide
Page 8
...ASRock Instant Flash (see CAUTION 12) - ASRock XFast USB (see CAUTION 9) - ASRock U-COP (see CAUTION 8) - Good Night LED ASRock Z75 Pro3 Motherboard CPU/Chassis/Power FAN connector - 24 pin ATX power connector - 8 pin 12V power connector - OEM - ASRock Extreme Tuning Utility (AXTU) (see CAUTION 20) - ASRock Instant Boot - ASRock... Trial, ASRock MAGIX Multimedia Suite - ASRock XFast LAN... Option (C.C.O.) (see CAUTION 11) - ASRock SmartView (see CAUTION 21) - English BIOS Feature ...HDMI_SPDIF header - 1 x Power LED header - ASRock Crashless BIOS (see CAUTION 17) * Lucid Virtu ...
...ASRock Instant Flash (see CAUTION 12) - ASRock XFast USB (see CAUTION 9) - ASRock U-COP (see CAUTION 8) - Good Night LED ASRock Z75 Pro3 Motherboard CPU/Chassis/Power FAN connector - 24 pin ATX power connector - 8 pin 12V power connector - OEM - ASRock Extreme Tuning Utility (AXTU) (see CAUTION 20) - ASRock Instant Boot - ASRock... Trial, ASRock MAGIX Multimedia Suite - ASRock XFast LAN... Option (C.C.O.) (see CAUTION 11) - ASRock SmartView (see CAUTION 21) - English BIOS Feature ...HDMI_SPDIF header - 1 x Power LED header - ASRock Crashless BIOS (see CAUTION 17) * Lucid Virtu ...

Quick Installation Guide
Page 25
...icon identified by the numbers three to the corresponding connectors of the system memory. Then connect other monitor cables to six. 25 ASRock Z75 Pro3 Motherboard English Right-click the display icon in the Display Properties dialog that you have installed the drivers already, there is less than the ...cards on PCIE2 and PCIE3 slots. 3. If you can easily enjoy the benefits of D-sub. E. When you do not adjust the UEFI setup, the default value of the multi-monitors according to be your card, one monitor will always be designated as Secondary. If you use multiple...
...icon identified by the numbers three to the corresponding connectors of the system memory. Then connect other monitor cables to six. 25 ASRock Z75 Pro3 Motherboard English Right-click the display icon in the Display Properties dialog that you have installed the drivers already, there is less than the ...cards on PCIE2 and PCIE3 slots. 3. If you can easily enjoy the benefits of D-sub. E. When you do not adjust the UEFI setup, the default value of the multi-monitors according to be your card, one monitor will always be designated as Secondary. If you use multiple...

Quick Installation Guide
Page 34
... XP / XP 64-bit. 2.12 Driver Installation Guide To install the drivers to your system, please insert the support CD to your system. 34 ASRock Z75 Pro3 Motherboard English Then, the drivers compatible to your system can work properly. 2.13 Installing Windows® 7 / 7 64-bit / VistaTM / VistaTM 64...install Windows® 7 / 7 64-bit / VistaTM / VistaTM 64-bit on your SATA / SATA2 / SATA3 HDDs without NCQ function STEP 1: Set Up UEFI. Using SATA / SATA2 / SATA3 HDDs without RAID functions, please follow the steps below according to the OS you install. 2.14.1 Installing Windows® XP ...
... XP / XP 64-bit. 2.12 Driver Installation Guide To install the drivers to your system, please insert the support CD to your system. 34 ASRock Z75 Pro3 Motherboard English Then, the drivers compatible to your system can work properly. 2.13 Installing Windows® 7 / 7 64-bit / VistaTM / VistaTM 64...install Windows® 7 / 7 64-bit / VistaTM / VistaTM 64-bit on your SATA / SATA2 / SATA3 HDDs without NCQ function STEP 1: Set Up UEFI. Using SATA / SATA2 / SATA3 HDDs without RAID functions, please follow the steps below according to the OS you install. 2.14.1 Installing Windows® XP ...

Quick Installation Guide
Page 35
... HDDs without NCQ function STEP 1: Set Up UEFI. A. 2.14.2 Installing Windows® 7 / 7 64-bit / VistaTM / VistaTM 64-bit Without RAID Functions If you want to install Windows® 7 / 7 64-bit / VistaTM / VistaTM 64-bit OS on your system. 35 ASRock Z75 Pro3 Motherboard English STEP 2: Install Windows® 7... / 7 64-bit / VistaTM / VistaTM 64-bit OS on your system. Using SATA / SATA2 / SATA3 HDDs with NCQ function STEP 1: Set Up UEFI.
... HDDs without NCQ function STEP 1: Set Up UEFI. A. 2.14.2 Installing Windows® 7 / 7 64-bit / VistaTM / VistaTM 64-bit Without RAID Functions If you want to install Windows® 7 / 7 64-bit / VistaTM / VistaTM 64-bit OS on your system. 35 ASRock Z75 Pro3 Motherboard English STEP 2: Install Windows® 7... / 7 64-bit / VistaTM / VistaTM 64-bit OS on your system. Using SATA / SATA2 / SATA3 HDDs with NCQ function STEP 1: Set Up UEFI.
Quick Installation Guide
Page 130
...; ) - USB 3.0 헤더 1 개 (2 USB 3.0 2개 ) - 64Mb GUI AMI UEFI 적합형 BIOS ACPI 1.1 SMBIOS 2.3.1 지원 - ASRock Instant Flash ( 주의 9 참조 ) - CPU CPU CPU CPU 한 국 어 130 ASRock Z75 Pro3 Motherboard OEM - ASRock APP Charger ( 주의 10 참조 ) - ASRock U-COP ( 주의 20 참조 ) - B.F.G..(Boot Failure Guard C.C.O.) ( 주...
...; ) - USB 3.0 헤더 1 개 (2 USB 3.0 2개 ) - 64Mb GUI AMI UEFI 적합형 BIOS ACPI 1.1 SMBIOS 2.3.1 지원 - ASRock Instant Flash ( 주의 9 참조 ) - CPU CPU CPU CPU 한 국 어 130 ASRock Z75 Pro3 Motherboard OEM - ASRock APP Charger ( 주의 10 참조 ) - ASRock U-COP ( 주의 20 참조 ) - B.F.G..(Boot Failure Guard C.C.O.) ( 주...

Quick Installation Guide
Page 188
...® installation files. Press or at system POST and choose the item "UEFI:xxx" to launch boot menu at system POST. Start Windows® installation. 188 ASRock Z75 Pro3 Motherboard English Choose the item "UEFI:xxx" to use Windows® VistaTM 64-bit (with SP2 or above) or Windows...® 7 64-bit (with SP1 or above). 2. Please make sure to boot in UEFI Setup Utility > Boot > Boot Option #1. ("...
...® installation files. Press or at system POST and choose the item "UEFI:xxx" to launch boot menu at system POST. Start Windows® installation. 188 ASRock Z75 Pro3 Motherboard English Choose the item "UEFI:xxx" to use Windows® VistaTM 64-bit (with SP2 or above) or Windows...® 7 64-bit (with SP1 or above). 2. Please make sure to boot in UEFI Setup Utility > Boot > Boot Option #1. ("...

Quick Installation Guide
Page 189
... 2TB in the first step. 189 ASRock Z75 Pro3 Motherboard English B. D. Please make sure to be installed on a large size HDD (>2TB). Insert your USB port; C. When you see "Where do you have copied in RAID Mode This motherboard adopts UEFI BIOS that allows Windows® OS to use... system. select "Browse" to install the operating system. 1. You can download the driver from ASRock's website and unzip the file into a USB flash disk OR copy the file from ASRock motherboard support CD. (please copy the files under following directory: 32 bit: ..\i386\...
... 2TB in the first step. 189 ASRock Z75 Pro3 Motherboard English B. D. Please make sure to be installed on a large size HDD (>2TB). Insert your USB port; C. When you see "Where do you have copied in RAID Mode This motherboard adopts UEFI BIOS that allows Windows® OS to use... system. select "Browse" to install the operating system. 1. You can download the driver from ASRock's website and unzip the file into a USB flash disk OR copy the file from ASRock motherboard support CD. (please copy the files under following directory: 32 bit: ..\i386\...

