User Manual
Page 6
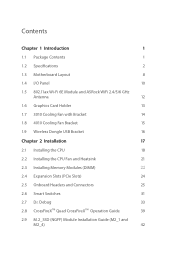
... Chapter 1 Introduction 1 1.1 Package Contents 1 1.2 Specifications 2 1.3 Motherboard Layout 8 1.4 I/O Panel 10 1.5 802.11ax Wi-Fi 6E Module and ASRock WiFi 2.4/5/6 GHz Antenna 12 1.6 Graphics Card Holder 13 1.7 3010 Cooling Fan with Bracket 14 1.8 4010 Cooling Fan Bracket 15 1.9 Wireless Dongle USB Bracket 16 Chapter 2 Installation 17 2.1 Installing the CPU 18 2.2 Installing the CPU Fan and Heatsink 21 2.3 Installing Memory Modules (DIMM) 22 2.4 Expansion Slots (PCIe Slots) 24 2.5 Onboard Headers and Connectors 25 2.6 Smart Switches 31 2.7 Dr. Debug 33...
... Chapter 1 Introduction 1 1.1 Package Contents 1 1.2 Specifications 2 1.3 Motherboard Layout 8 1.4 I/O Panel 10 1.5 802.11ax Wi-Fi 6E Module and ASRock WiFi 2.4/5/6 GHz Antenna 12 1.6 Graphics Card Holder 13 1.7 3010 Cooling Fan with Bracket 14 1.8 4010 Cooling Fan Bracket 15 1.9 Wireless Dongle USB Bracket 16 Chapter 2 Installation 17 2.1 Installing the CPU 18 2.2 Installing the CPU Fan and Heatsink 21 2.3 Installing Memory Modules (DIMM) 22 2.4 Expansion Slots (PCIe Slots) 24 2.5 Onboard Headers and Connectors 25 2.6 Smart Switches 31 2.7 Dr. Debug 33...
User Manual
Page 9
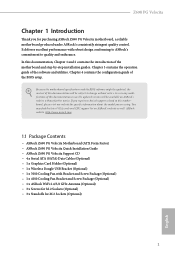
... configuration guide of the software and utilities. Because the motherboard specifications and the BIOS software might be updated, the content of this documentation occur, the updated version will be available on ASRock's website as well. ASRock website http://www.asrock.com. 1.1 Package Contents • ASRock Z690 PG Velocita Motherboard (ATX Form Factor) • ASRock Z690 PG Velocita Quick Installation Guide • ASRock Z690 PG Velocita Support CD • 4 x Serial ATA (SATA) Data Cables (Optional) • 1 x Graphics Card Holder (Optional) • 1 x Wireless Dongle USB...
... configuration guide of the software and utilities. Because the motherboard specifications and the BIOS software might be updated, the content of this documentation occur, the updated version will be available on ASRock's website as well. ASRock website http://www.asrock.com. 1.1 Package Contents • ASRock Z690 PG Velocita Motherboard (ATX Form Factor) • ASRock Z690 PG Velocita Quick Installation Guide • ASRock Z690 PG Velocita Support CD • 4 x Serial ATA (SATA) Data Cables (Optional) • 1 x Graphics Card Holder (Optional) • 1 x Wireless Dongle USB...
User Manual
Page 13
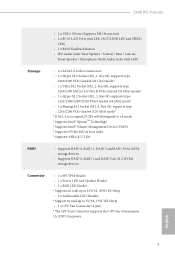
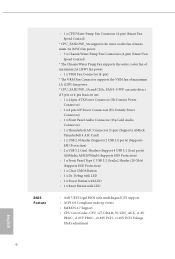
...English 5 Z690 PG Velocita • 2 x USB 2.0 Ports (Supports ESD Protection) • 2 x RJ-45 LAN Ports with LED (ACT/LINK LED and SPEED LED) • 1 x BIOS Flashback Button • HD Audio Jacks: Rear Speaker / Central / Bass / Line in / Front Speaker / Microphone (Gold Audio Jacks with LED) Storage • 6 x SATA3 6.0 Gb/s Connectors • 1 x Hyper M.2 Socket (M2_1, Key M), supports type 2260/2280 PCIe Gen4x4 (64 Gb/s) mode* • 1 x Ultra M.2 Socket (M2_2, Key M), supports type 2260/2280 SATA3 6.0 Gb/s & PCIe Gen3x4 (32 Gb/s) modes* • 1 x Hyper M.2 Socket (M2_3, Key...
...English 5 Z690 PG Velocita • 2 x USB 2.0 Ports (Supports ESD Protection) • 2 x RJ-45 LAN Ports with LED (ACT/LINK LED and SPEED LED) • 1 x BIOS Flashback Button • HD Audio Jacks: Rear Speaker / Central / Bass / Line in / Front Speaker / Microphone (Gold Audio Jacks with LED) Storage • 6 x SATA3 6.0 Gb/s Connectors • 1 x Hyper M.2 Socket (M2_1, Key M), supports type 2260/2280 PCIe Gen4x4 (64 Gb/s) mode* • 1 x Ultra M.2 Socket (M2_2, Key M), supports type 2260/2280 SATA3 6.0 Gb/s & PCIe Gen3x4 (32 Gb/s) modes* • 1 x Hyper M.2 Socket (M2_3, Key...
User Manual
Page 14
... Audio Connector) • 1 x Thunderbolt AIC Connector (5-pin) (Supports ASRock Thunderbolt 4 AIC Card) • 1 x USB 2.0 Header (Supports 2 USB 2.0 ports) (Supports ESD Protection) • 2 x USB 3.2 Gen1 Headers (Support 4 USB 3.2 Gen1 ports) (ASMedia ASM1074 hub) (Supports ESD Protection) • 1 x Front Panel Type C USB 3.2 Gen2x2 Header (20 Gb/s) (Supports ESD Protection) • 1 x Clear CMOS Button • 1 x Dr. Debug with LED • 1 x Power Button with LED • 1 x Reset Button with LED • AMI UEFI Legal BIOS with multilingual GUI support • ACPI 6.0 Compliant...
... Audio Connector) • 1 x Thunderbolt AIC Connector (5-pin) (Supports ASRock Thunderbolt 4 AIC Card) • 1 x USB 2.0 Header (Supports 2 USB 2.0 ports) (Supports ESD Protection) • 2 x USB 3.2 Gen1 Headers (Support 4 USB 3.2 Gen1 ports) (ASMedia ASM1074 hub) (Supports ESD Protection) • 1 x Front Panel Type C USB 3.2 Gen2x2 Header (20 Gb/s) (Supports ESD Protection) • 1 x Clear CMOS Button • 1 x Dr. Debug with LED • 1 x Power Button with LED • 1 x Reset Button with LED • AMI UEFI Legal BIOS with multilingual GUI support • ACPI 6.0 Compliant...
User Manual
Page 17
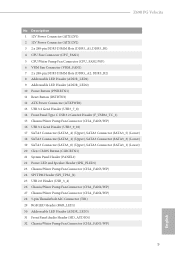
... Connector (SATA3_1) (Lower) 20 Clear CMOS Button (CLRCBTN1) 21 System Panel Header (PANEL1) 22 Power LED and Speaker Header (SPK_PLED1) 23 Chassis/Water Pump Fan Connector (CHA_FAN5/WP) 24 SPI TPM Header (SPI_TPM_J1) 25 USB 2.0 Header (USB_3_4) 26 Chassis/Water Pump Fan Connector (CHA_FAN2/WP) 27 Chassis/Water Pump Fan Connector (CHA_FAN4/WP) 28 5-pin Thunderbolt AIC Connector (TB1) 29 RGB LED Header (RGB_LED1) 30 Addressable LED Header (ADDR_LED3) 31 Front Panel Audio Header (HD_AUDIO1) 32 Chassis/Water Pump Fan Connector (CHA_FAN1/WP) 9 English Z690 PG Velocita...
... Connector (SATA3_1) (Lower) 20 Clear CMOS Button (CLRCBTN1) 21 System Panel Header (PANEL1) 22 Power LED and Speaker Header (SPK_PLED1) 23 Chassis/Water Pump Fan Connector (CHA_FAN5/WP) 24 SPI TPM Header (SPI_TPM_J1) 25 USB 2.0 Header (USB_3_4) 26 Chassis/Water Pump Fan Connector (CHA_FAN2/WP) 27 Chassis/Water Pump Fan Connector (CHA_FAN4/WP) 28 5-pin Thunderbolt AIC Connector (TB1) 29 RGB LED Header (RGB_LED1) 30 Addressable LED Header (ADDR_LED3) 31 Front Panel Audio Header (HD_AUDIO1) 32 Chassis/Water Pump Fan Connector (CHA_FAN1/WP) 9 English Z690 PG Velocita...
User Manual
Page 33
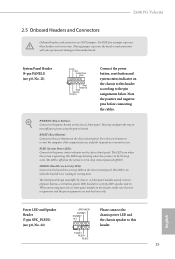
... power button on the chassis front panel. Placing jumper caps over these headers and connectors. PWRBTN (Power Button): Connect to this header. PLED (System Power LED): Connect to this header, make sure the wire assignments and the pin assignments are NOT jumpers. The LED is off your chassis front panel module to the power status indicator on the chassis front panel. You may differ by chassis. PLED+ PLED+ PLED- 25 RESET (Reset Button): Connect to perform a normal restart. Z690 PG Velocita 2.5 Onboard Headers and Connectors Onboard headers...
... power button on the chassis front panel. Placing jumper caps over these headers and connectors. PWRBTN (Power Button): Connect to this header. PLED (System Power LED): Connect to this header, make sure the wire assignments and the pin assignments are NOT jumpers. The LED is off your chassis front panel module to the power status indicator on the chassis front panel. You may differ by chassis. PLED+ PLED+ PLED- 25 RESET (Reset Button): Connect to perform a normal restart. Z690 PG Velocita 2.5 Onboard Headers and Connectors Onboard headers...
User Manual
Page 35
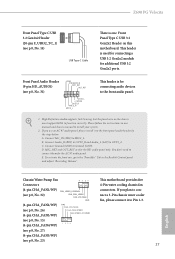
... MIC2_L This header is for the HD audio panel only. If you plan to connect a 3-Pin chassis water cooler fan, please connect it to install your system. 2. MIC_RET and OUT_RET are for connecting audio devices to function correctly. To activate the front mic, go to OUT2_L. B. Z690 PG Velocita Front Panel Type C USB 3.2 Gen2x2 Header (20-pin F_USB32_TC_1) (see p.8, No. 14) USB Type-C Cable There is used for connecting a USB 3.2 Gen2x2 module for additional USB 3.2 Gen2x2 ports. Connect Audio_R...
... MIC2_L This header is for the HD audio panel only. If you plan to connect a 3-Pin chassis water cooler fan, please connect it to install your system. 2. MIC_RET and OUT_RET are for connecting audio devices to function correctly. To activate the front mic, go to OUT2_L. B. Z690 PG Velocita Front Panel Type C USB 3.2 Gen2x2 Header (20-pin F_USB32_TC_1) (see p.8, No. 14) USB Type-C Cable There is used for connecting a USB 3.2 Gen2x2 module for additional USB 3.2 Gen2x2 ports. Connect Audio_R...
User Manual
Page 37
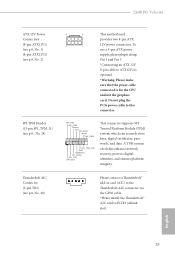
... securely store keys, digital certificates, passwords, and data. A TPM system also helps enhance network security, protects digital identities, and ensures platform integrity. 1 Please connect a Thunderbolt™ add-in card (AIC) to the Thunderbolt AIC connector via the GPIO cable. *Please install the Thunderbolt™ AIC card to this connector. To use a 4-pin ATX power supply, please plug it along Pin 1 and Pin 5. *Connecting an ATX 12V 8-pin cable to ATX12V2 is optional. *Warning...
... securely store keys, digital certificates, passwords, and data. A TPM system also helps enhance network security, protects digital identities, and ensures platform integrity. 1 Please connect a Thunderbolt™ add-in card (AIC) to the Thunderbolt AIC connector via the GPIO cable. *Please install the Thunderbolt™ AIC card to this connector. To use a 4-pin ATX power supply, please plug it along Pin 1 and Pin 5. *Connecting an ATX 12V 8-pin cable to ATX12V2 is optional. *Warning...
User Manual
Page 39
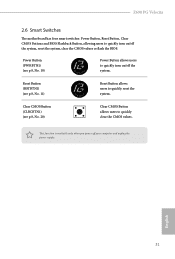
...) Clear CMOS Button allows users to quickly reset the system. Reset Button (RSTBTN1) (see p.8, No. 10) Power Button allows users to quickly turn on /off the system. This function is workable only when you power off the system, reset the system, clear the CMOS values or flash the BIOS. English 31 Z690 PG Velocita 2.6 Smart Switches The motherboard has four smart switches: Power Button, Reset Button, Clear CMOS Buttons and BIOS Flashback Button, allowing users to quickly turn on /off your computer and unplug the power supply. Power Button (PWRBTN1...
...) Clear CMOS Button allows users to quickly reset the system. Reset Button (RSTBTN1) (see p.8, No. 10) Power Button allows users to quickly turn on /off the system. This function is workable only when you power off the system, reset the system, clear the CMOS values or flash the BIOS. English 31 Z690 PG Velocita 2.6 Smart Switches The motherboard has four smart switches: Power Button, Reset Button, Clear CMOS Buttons and BIOS Flashback Button, allowing users to quickly turn on /off your computer and unplug the power supply. Power Button (PWRBTN1...
User Manual
Page 40
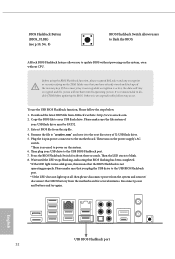
... recovery key. Copy the BIOS file to your USB drive to the USB BIOS Flashback port. **If the LED does not light up at all then please disconnect power from the system and remove/ disconnect the CMOS battery from the motherboard for about three seconds. Then the LED starts to flash the BIOS. To use the USB BIOS Flashback function, Please follow the steps below. 1. Please make sure that you plug the USB drive to the USB BIOS...
... recovery key. Copy the BIOS file to your USB drive to the USB BIOS Flashback port. **If the LED does not light up at all then please disconnect power from the system and remove/ disconnect the CMOS battery from the motherboard for about three seconds. Then the LED starts to flash the BIOS. To use the USB BIOS Flashback function, Please follow the steps below. 1. Please make sure that you plug the USB drive to the USB BIOS...
User Manual
Page 47
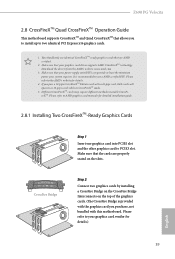
... is recommended to two identical PCI Express x16 graphics cards. 1. If you pair a 12-pipe CrossFireXTM Edition card with this motherboard. Please refer to enable CrossFireXTM. Z690 PG Velocita 2.8 CrossFireXTM Quad CrossFireXTM Operation Guide This motherboard supports CrossFireXTM and Quad CrossFireXTM that allows you to install up to use identical CrossFireXTM-ready graphics cards that are AMD certified. 2. CrossFire Bridge Step 2 Connect two graphics cards by installing a CrossFire Bridge on the CrossFire...
... is recommended to two identical PCI Express x16 graphics cards. 1. If you pair a 12-pipe CrossFireXTM Edition card with this motherboard. Please refer to enable CrossFireXTM. Z690 PG Velocita 2.8 CrossFireXTM Quad CrossFireXTM Operation Guide This motherboard supports CrossFireXTM and Quad CrossFireXTM that allows you to install up to use identical CrossFireXTM-ready graphics cards that are AMD certified. 2. CrossFire Bridge Step 2 Connect two graphics cards by installing a CrossFire Bridge on the CrossFire...
User Manual
Page 49
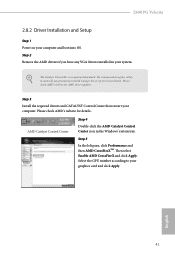
... using this utility to uninstall any VGA drivers installed in the Windows® system tray. Step 3 Install the required drivers and CATALYST Control Center then restart your computer and boot into OS. English 41 Z690 PG Velocita 2.8.2 Driver Installation and Setup Step 1 Power on your computer. Please check AMD's website for AMD driver updates. Step 2 Remove the AMD drivers if you have any previously installed Catalyst drivers prior to your system. The Catalyst Uninstaller is an optional download...
... using this utility to uninstall any VGA drivers installed in the Windows® system tray. Step 3 Install the required drivers and CATALYST Control Center then restart your computer and boot into OS. English 41 Z690 PG Velocita 2.8.2 Driver Installation and Setup Step 1 Power on your computer. Please check AMD's website for AMD driver updates. Step 2 Remove the AMD drivers if you have any previously installed Catalyst drivers prior to your system. The Catalyst Uninstaller is an optional download...
User Manual
Page 63
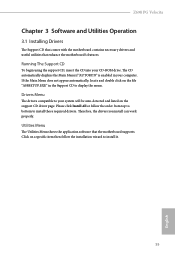
Z690 PG Velocita Chapter 3 Software and Utilities Operation 3.1 Installing Drivers The Support CD that comes with the motherboard contains necessary drivers and useful utilities that the motherboard supports. If the Main Menu does not appear automatically, locate and double click on the file "ASRSETUP.EXE" in your computer. Drivers Menu The drivers compatible to install it. 55 English Please click Install All or follow the installation wizard to your CD-ROM drive. The CD automatically displays the Main Menu if "AUTORUN...
Z690 PG Velocita Chapter 3 Software and Utilities Operation 3.1 Installing Drivers The Support CD that comes with the motherboard contains necessary drivers and useful utilities that the motherboard supports. If the Main Menu does not appear automatically, locate and double click on the file "ASRSETUP.EXE" in your computer. Drivers Menu The drivers compatible to install it. 55 English Please click Install All or follow the installation wizard to your CD-ROM drive. The CD automatically displays the Main Menu if "AUTORUN...
User Manual
Page 103
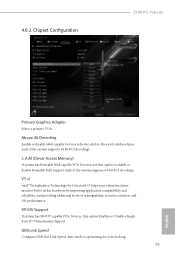
... manageability, security, isolation, and I /O helps your virtual machine monitor better utilize hardware by improving application compatibility and reliability, and providing additional levels of the system supports 64-bit PCI decoding). VT-d Intel® Virtualization Technology for overclocking. 95 English Auto mode is optimizing for Directed I /O performance. DMI Link Speed Configure DMI Slot Link Speed. C.A.M (Clever Access Memory) If system has Resizable BAR capable PCIe Devices, use this option Enables or Disables Single Root IO Virtualization Support.
... manageability, security, isolation, and I /O helps your virtual machine monitor better utilize hardware by improving application compatibility and reliability, and providing additional levels of the system supports 64-bit PCI decoding). VT-d Intel® Virtualization Technology for overclocking. 95 English Auto mode is optimizing for Directed I /O performance. DMI Link Speed Configure DMI Slot Link Speed. C.A.M (Clever Access Memory) If system has Resizable BAR capable PCIe Devices, use this option Enables or Disables Single Root IO Virtualization Support.
User Manual
Page 104
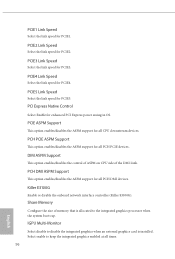
... integrated graphics processor when the system boots up. PCIE1 Link Speed Select the link speed for PCIE4. PCIE2 Link Speed Select the link speed for PCIE3. PCIE3 Link Speed Select the link speed for PCIE2. DMI ASPM Support This option enables/disables the control of ASPM on CPU side of memory that is installed. Share Memory Configure the size of the DMI Link. PCIE5 Link Speed Select the link speed for enhanced PCI Express power...
... integrated graphics processor when the system boots up. PCIE1 Link Speed Select the link speed for PCIE4. PCIE2 Link Speed Select the link speed for PCIE3. PCIE3 Link Speed Select the link speed for PCIE2. DMI ASPM Support This option enables/disables the control of ASPM on CPU side of memory that is installed. Share Memory Configure the size of the DMI Link. PCIE5 Link Speed Select the link speed for enhanced PCI Express power...
User Manual
Page 105
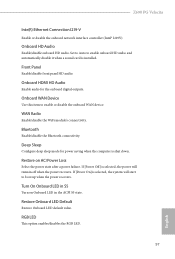
... when the power recovers. RGB LED This option enables/disables the RGB LED. 97 English Onboard HDMI HD Audio Enable audio for power saving when the computer is installed. Onboard HD Audio Enable/disable onboard HD audio. Set to Auto to enable or disable the onboard WAN device. Onboard WAN Device Use this item to enable onboard HD audio and automatically disable it when a sound card is shut down. WAN Radio Enable/disable the WiFi module's connectivity. Z690 PG Velocita Inte(R) Ethernet Connection I219-V Enable or disable the onboard network interface controller (Intel...
... when the power recovers. RGB LED This option enables/disables the RGB LED. 97 English Onboard HDMI HD Audio Enable audio for power saving when the computer is installed. Onboard HD Audio Enable/disable onboard HD audio. Set to Auto to enable or disable the onboard WAN device. Onboard WAN Device Use this item to enable onboard HD audio and automatically disable it when a sound card is shut down. WAN Radio Enable/disable the WiFi module's connectivity. Z690 PG Velocita Inte(R) Ethernet Connection I219-V Enable or disable the onboard network interface controller (Intel...
User Manual
Page 109
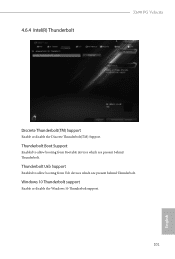
Thunderbolt Boot Support Enabled to allow booting from Usb devices which are present behind Thunderbolt. 4.6.4 Intel(R) Thunderbolt Z690 PG Velocita Discrete Thunderbolt(TM) Support Enable or disable the Discrete Thunderbolt(TM) Support. Windows 10 Thunderbolt support Enable or disable the Windows 10 Thunderbolt support. 101 English Thunderbolt Usb Support Enabled to allow booting from Bootable devices which are present behind Thunderbolt.
Thunderbolt Boot Support Enabled to allow booting from Usb devices which are present behind Thunderbolt. 4.6.4 Intel(R) Thunderbolt Z690 PG Velocita Discrete Thunderbolt(TM) Support Enable or disable the Discrete Thunderbolt(TM) Support. Windows 10 Thunderbolt support Enable or disable the Windows 10 Thunderbolt support. 101 English Thunderbolt Usb Support Enabled to allow booting from Bootable devices which are present behind Thunderbolt.
User Manual
Page 114
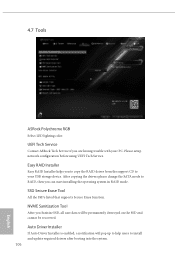
UEFI Tech Service Contact ASRock Tech Service if you to copy the RAID driver from the support CD to install and update required drivers after booting into the system. 106 English Easy RAID Installer Easy RAID Installer helps you are having trouble with your USB storage device. After copying the drivers please change the SATA mode to RAID, then you Sanitize SSD, all user data will pop up to help users to your PC. 4.7 Tools ASRock Polychrome RGB...
UEFI Tech Service Contact ASRock Tech Service if you to copy the RAID driver from the support CD to install and update required drivers after booting into the system. 106 English Easy RAID Installer Easy RAID Installer helps you are having trouble with your USB storage device. After copying the drivers please change the SATA mode to RAID, then you Sanitize SSD, all user data will pop up to help users to your PC. 4.7 Tools ASRock Polychrome RGB...
User Manual
Page 115
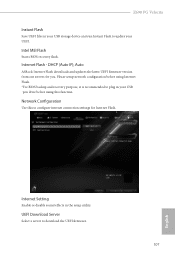
... Flash. Z690 PG Velocita Instant Flash Save UEFI files in your USB storage device and run Instant Flash to download the UEFI firmware. 107 English UEFI Download Server Select a server to update your USB pen drive before using this to plug in the setup utility. Internet Setting Enable or disable sound effects in your UEFI. Please setup network configuration before using Internet Flash. *For BIOS backup and recovery purpose, it is recommended to configure internet connection settings for you. Network Configuration Use this function. Intel MEI Flash Starts BIOS recovery flash...
... Flash. Z690 PG Velocita Instant Flash Save UEFI files in your USB storage device and run Instant Flash to download the UEFI firmware. 107 English UEFI Download Server Select a server to update your USB pen drive before using this to plug in the setup utility. Internet Setting Enable or disable sound effects in your UEFI. Please setup network configuration before using Internet Flash. *For BIOS backup and recovery purpose, it is recommended to configure internet connection settings for you. Network Configuration Use this function. Intel MEI Flash Starts BIOS recovery flash...
User Manual
Page 121
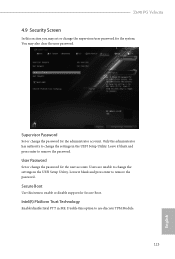
... in the UEFI Setup Utility. You may set or change the supervisor/user password for Secure Boot. User Password Set or change the password for the administrator account. Disable this item to change the settings in ME. Only the administrator has authority to enable or disable support for the system. Leave it blank and press enter to use discrete TPM Module. 113 English Supervisor Password Set or change the password for the user account. Z690 PG Velocita 4.9 Security Screen In...
... in the UEFI Setup Utility. You may set or change the supervisor/user password for Secure Boot. User Password Set or change the password for the administrator account. Disable this item to change the settings in ME. Only the administrator has authority to enable or disable support for the system. Leave it blank and press enter to use discrete TPM Module. 113 English Supervisor Password Set or change the password for the user account. Z690 PG Velocita 4.9 Security Screen In...


