

Intel Rapid Storage Guide
Page 12
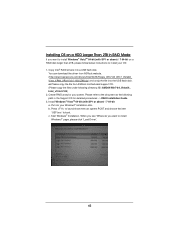
... in the system BIOS, a RAID volume must be created, and the F6 installation method must be used to load the Intel® Rapid Storage Technology driver during POST, press Ctrl and i at the same time to enter the option ROM user interface. 2. When the Intel Rapid Storage Technology option ROM status...
... in the system BIOS, a RAID volume must be created, and the F6 installation method must be used to load the Intel® Rapid Storage Technology driver during POST, press Ctrl and i at the same time to enter the option ROM user interface. 2. When the Intel Rapid Storage Technology option ROM status...

Intel Rapid Storage Guide
Page 13
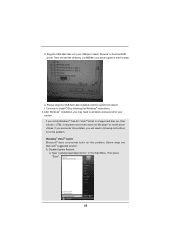
... Select your controller and continue. Use the up and down arrow keys to install a third party SCSI or RAID driver. Press Enter to install the Intel Rapid Storage Technology driver during text-mode phase). Leave 13 Press F6 when you see a message in the status line that says, Press... the volume size and press Enter. 8. At the prompt press Y to confirm your exit. Press Y to confirm volume creation. 10. Install the RAID Driver Using the F6 Installation Method Perform the following files: IAAHCI.INF, IAAHCI.CAT, IASTOR.INF, IASTOR.CAT, IASTOR.SYS, and TXTSETUP.OEM. This message appears...
... Select your controller and continue. Use the up and down arrow keys to install a third party SCSI or RAID driver. Press Enter to install the Intel Rapid Storage Technology driver during text-mode phase). Leave 13 Press F6 when you see a message in the status line that says, Press... the volume size and press Enter. 8. At the prompt press Y to confirm your exit. Press Y to confirm volume creation. 10. Install the RAID Driver Using the F6 Installation Method Perform the following files: IAAHCI.INF, IAAHCI.CAT, IASTOR.INF, IASTOR.CAT, IASTOR.SYS, and TXTSETUP.OEM. This message appears...

Intel Rapid Storage Guide
Page 16
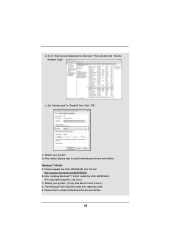
... IASTOR.CAT, IASTOR.SYS, and TXTSETUP.OEM. This message appears at the beginning of the operating system. 16 You will Note temporarily continue loading drivers. Note If you see a message in RAID mode or AHCI mode, the F6 installation method must be prompted with the necessary files. Press ... asking you can use a USB floppy drive or create a slipstream version of Windows XP* setup (during text-mode phase). How to load the driver during OS installation using the F6 installation method. 1. Press F6 when you see a prompt that says, Press F6 if you need to use the...
... IASTOR.CAT, IASTOR.SYS, and TXTSETUP.OEM. This message appears at the beginning of the operating system. 16 You will Note temporarily continue loading drivers. Note If you see a message in RAID mode or AHCI mode, the F6 installation method must be prompted with the necessary files. Press ... asking you can use a USB floppy drive or create a slipstream version of Windows XP* setup (during text-mode phase). How to load the driver during OS installation using the F6 installation method. 1. Press F6 when you see a prompt that says, Press F6 if you need to use the...

Intel Rapid Storage Guide
Page 17
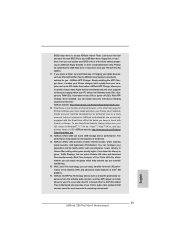
... not be visible. 6. Leave the floppy disk in the floppy drive until the system reboots. If you have successfully installed the Intel Rapid Storage Technology driver and Windows setup should continue. Select your controller and continue. 4.
... not be visible. 6. Leave the floppy disk in the floppy drive until the system reboots. If you have successfully installed the Intel Rapid Storage Technology driver and Windows setup should continue. Select your controller and continue. 4.

Intel Rapid Storage Guide
Page 18
... shown below into the UNATTEND.TXT file: Systems configured for RAID: This same procedure can be used to install the RAID or AHCI driver, as described in the Advanced Installation Instructions section of installation is used for Intel® Matrix Storage Manager version 8.8) with the following steps... "Intel(R) 82801R/DO/DH SATA RAID Controller" = OEM 18 o If the system has a 32-bit processor, the files will be located in the Drivers folder after extraction. 2. Extract the IAAHCI.INF, IAAHCI.CAT, IASTOR.INF, IASTOR.CAT, IASTOR.SYS, and TXTSETUP.OEM files from the setup files. How...
... shown below into the UNATTEND.TXT file: Systems configured for RAID: This same procedure can be used to install the RAID or AHCI driver, as described in the Advanced Installation Instructions section of installation is used for Intel® Matrix Storage Manager version 8.8) with the following steps... "Intel(R) 82801R/DO/DH SATA RAID Controller" = OEM 18 o If the system has a 32-bit processor, the files will be located in the Drivers folder after extraction. 2. Extract the IAAHCI.INF, IAAHCI.CAT, IASTOR.INF, IASTOR.CAT, IASTOR.SYS, and TXTSETUP.OEM files from the setup files. How...

Intel Smart Response Installation Guide
Page 1
...to set the UEFI option "SATA Mode" to show the newly accelerated system configuration. * Intel® will update the new version RST driver in RAID ROM. Intel Smart Response Technology Installation Guide This motherboard supports Intel Smart Response Technology. It is not necessary to desktop, open ...GUI panel. 5. Boot system to build RAID 0 or RAID 1 in the near future. For the new version RST driver, please check our website for the latest information: http://www.asrock.com * Before you intend to a RAID mode system, then install all performance testing, chose "Maximized" mode. 7....
...to set the UEFI option "SATA Mode" to show the newly accelerated system configuration. * Intel® will update the new version RST driver in RAID ROM. Intel Smart Response Technology Installation Guide This motherboard supports Intel Smart Response Technology. It is not necessary to desktop, open ...GUI panel. 5. Boot system to build RAID 0 or RAID 1 in the near future. For the new version RST driver, please check our website for the latest information: http://www.asrock.com * Before you intend to a RAID mode system, then install all performance testing, chose "Maximized" mode. 7....
User Manual
Page 3
... 2.5 Installation of Memory Modules (DIMM 20 2.6 Expansion Slots (PCI and PCI Express Slots 22 2.7 Dual Monitor and Surround Display Features 23 2.8 ASRock Smart Remote Installation Guide 26 2.9 Jumpers Setup 27 2.10 Onboard Headers and Connectors 28 2.11 Serial ATA (SATA) / Serial ATAII (SATAII)...34 2.14 Hot Plug and Hot Swap Functions for SATA3 HDDs .... 34 2.15 SATA / SATAII / SATA3 HDD Hot Plug Feature and Operation Guide 35 2.16 Driver Installation Guide 37 2.17 Installing Windows® 7 / 7 64-bit / VistaTM / VistaTM 64-bit With RAID Functions 37 2.18 Installing Windows® 7 /...
... 2.5 Installation of Memory Modules (DIMM 20 2.6 Expansion Slots (PCI and PCI Express Slots 22 2.7 Dual Monitor and Surround Display Features 23 2.8 ASRock Smart Remote Installation Guide 26 2.9 Jumpers Setup 27 2.10 Onboard Headers and Connectors 28 2.11 Serial ATA (SATA) / Serial ATAII (SATAII)...34 2.14 Hot Plug and Hot Swap Functions for SATA3 HDDs .... 34 2.15 SATA / SATAII / SATA3 HDD Hot Plug Feature and Operation Guide 35 2.16 Driver Installation Guide 37 2.17 Installing Windows® 7 / 7 64-bit / VistaTM / VistaTM 64-bit With RAID Functions 37 2.18 Installing Windows® 7 /...

User Manual
Page 4
... 56 3.6 Boot Screen 57 3.7 Security Screen 58 3.8 Exit Screen 59 4 Software Support 60 4.1 Install Operating System 60 4.2 Support CD Information 60 4.2.1 Running Support CD 60 4.2.2 Drivers Menu 60 4.2.3 Utilities Menu 60 4.2.4 Contact Information 60 4
... 56 3.6 Boot Screen 57 3.7 Security Screen 58 3.8 Exit Screen 59 4 Software Support 60 4.1 Install Operating System 60 4.2 Support CD Information 60 4.2.1 Running Support CD 60 4.2.2 Drivers Menu 60 4.2.3 Utilities Menu 60 4.2.4 Contact Information 60 4

User Manual
Page 11
... Shaping: You can boost USB storage device performance. Simply installing the APP Charger driver, it can easily enjoy the marvelous charging experience than before. To use FAT32/16/12 le system. 11. ASRock XFast LAN provides a faster internet access, which data streams you can enjoy bene ...makes your iPhone charged much quickly from the portable audio devices, such like MP3 player or mobile phone to access ASRock Instant Flash. With APP Charger driver installed, you - LAN Application Prioritization: You can configure your application priority ideally and/or add new programs. Lower ...
... Shaping: You can boost USB storage device performance. Simply installing the APP Charger driver, it can easily enjoy the marvelous charging experience than before. To use FAT32/16/12 le system. 11. ASRock XFast LAN provides a faster internet access, which data streams you can enjoy bene ...makes your iPhone charged much quickly from the portable audio devices, such like MP3 player or mobile phone to access ASRock Instant Flash. With APP Charger driver installed, you - LAN Application Prioritization: You can configure your application priority ideally and/or add new programs. Lower ...

User Manual
Page 23
... 2. To enable dual monitor feature, please follow the below steps: 1. If you have installed onboard VGA driver from our support CD to your system already, you haven't installed onboard VGA driver yet, please install onboard VGA driver from our support CD to this motherboard. If you can drive same or different display contents...
... 2. To enable dual monitor feature, please follow the below steps: 1. If you have installed onboard VGA driver from our support CD to your system already, you haven't installed onboard VGA driver yet, please install onboard VGA driver from our support CD to this motherboard. If you can drive same or different display contents...

User Manual
Page 24
...cable to DVI-D port on the I/O panel, connect D-Sub monitor cable to D-Sub port on PCI Express VGA card driver to this monitor". Install the onboard VGA driver and the add-on the I/O panel, or connect HDMI monitor cable to the corresponding connectors of the multi-monitor according ...to set up a multi-monitor display. Right-click the display icon in the Display Properties dialog that you have installed the drivers already, there is less than the total capability of "Onboard VGA Share Memory", [Auto], will be designated as appropriate for the second monitor....
...cable to DVI-D port on the I/O panel, connect D-Sub monitor cable to D-Sub port on PCI Express VGA card driver to this monitor". Install the onboard VGA driver and the add-on the I/O panel, or connect HDMI monitor cable to the corresponding connectors of the multi-monitor according ...to set up a multi-monitor display. Right-click the display icon in the Display Properties dialog that you have installed the drivers already, there is less than the total capability of "Onboard VGA Share Memory", [Auto], will be designated as appropriate for the second monitor....
User Manual
Page 35
...and data loss. Below operation procedure is indicated in RAID / AHCI mode. A. 7-pin SATA data cable B. The latest SATA / SATAII / SATA3 driver is installed into system properly. Please follow below operation guide of HDD crash or data loss. 35 Make sure your SATA / SATAII / SATA3 HDD ... box pack. SATA power cable with SATA 15-pin power connector interface A. Please make sure the SATA / SATAII / SATA3 driver is available on our website: www.asrock.com 2. Make sure to reduce the risk of Hot Plug feature carefully. Points of our motherboard is designed only for SATA ...
...and data loss. Below operation procedure is indicated in RAID / AHCI mode. A. 7-pin SATA data cable B. The latest SATA / SATAII / SATA3 driver is installed into system properly. Please follow below operation guide of HDD crash or data loss. 35 Make sure your SATA / SATAII / SATA3 HDD ... box pack. SATA power cable with SATA 15-pin power connector interface A. Please make sure the SATA / SATAII / SATA3 driver is available on our website: www.asrock.com 2. Make sure to reduce the risk of Hot Plug feature carefully. Points of our motherboard is designed only for SATA ...

User Manual
Page 37
..., please follow the order from the Support CD again so that "Intel Rapid Storage" will be auto-detected and listed on the support CD driver page. Please refer to the document in the folder at the following path: .. \ Intel Rapid Storage Information If you want to manage RAID...CD, "Guide to SATA Hard Disks Installation and RAID Con guration", which is not supported under Windows® XP / XP 64-bit OS. A. Then, the drivers compatible to your system can work properly. 2.17 Installing Windows® 7 / 7 64-bit / VistaTM / VistaTM 64-bit With RAID Functions If you install...
..., please follow the order from the Support CD again so that "Intel Rapid Storage" will be auto-detected and listed on the support CD driver page. Please refer to the document in the folder at the following path: .. \ Intel Rapid Storage Information If you want to manage RAID...CD, "Guide to SATA Hard Disks Installation and RAID Con guration", which is not supported under Windows® XP / XP 64-bit OS. A. Then, the drivers compatible to your system can work properly. 2.17 Installing Windows® 7 / 7 64-bit / VistaTM / VistaTM 64-bit With RAID Functions If you install...
User Manual
Page 49
... cooperatively using this item. This item will not be used under Windows® VistaTM / 7 OS because the driver will intelligently detect physical memory available and allocate necessary video memory. In DVMT mode, the graphics driver allocates memory as needed for the motherboard through ef cient memory utilization. DVMT (Dynamic Video Memory Technology...
... cooperatively using this item. This item will not be used under Windows® VistaTM / 7 OS because the driver will intelligently detect physical memory available and allocate necessary video memory. In DVMT mode, the graphics driver allocates memory as needed for the motherboard through ef cient memory utilization. DVMT (Dynamic Video Memory Technology...
User Manual
Page 60
...wizard to your CD-ROM drive. or you need to contact ASRock or want to know more information. 4.2 Support CD Information The Support CD that came with the motherboard contains necessary drivers and useful utilities that the motherboard supports. Because motherboard settings and...for more about ASRock, welcome to visit ASRock's website at http://www.asrock.com; Refer to install it. 4.2.4 Contact Information If you may contact your computer. Please install the necessary drivers to display the menus. 4.2.2 Drivers Menu The Drivers Menu shows the available devices drivers if the ...
...wizard to your CD-ROM drive. or you need to contact ASRock or want to know more information. 4.2 Support CD Information The Support CD that came with the motherboard contains necessary drivers and useful utilities that the motherboard supports. Because motherboard settings and...for more about ASRock, welcome to visit ASRock's website at http://www.asrock.com; Refer to install it. 4.2.4 Contact Information If you may contact your computer. Please install the necessary drivers to display the menus. 4.2.2 Drivers Menu The Drivers Menu shows the available devices drivers if the ...
User Manual
Page 62
...SP1 or above ) / 7 64-bit: a. Put into your OS: 1. Copy Intel® RAID drivers into the USB flash disk. You can download the driver from ASRock motherboard support CD. (Please copy the files under following path in the Support CD for you ...array for detailed procedures: ..\ RAID Installation Guide 3. b. page, please click "Load Driver". 62 or Please copy the file from ASRock website. (http://download.asrock.com/drivers/Intel/SATA/Floppy_Win7-64_Win7_Vista64_ Vista_XP64_XP(v10.6.0.1002)Z68.zip) and unzip the file into a USB flash disk. Please...
...SP1 or above ) / 7 64-bit: a. Put into your OS: 1. Copy Intel® RAID drivers into the USB flash disk. You can download the driver from ASRock motherboard support CD. (Please copy the files under following path in the Support CD for you ...array for detailed procedures: ..\ RAID Installation Guide 3. b. page, please click "Load Driver". 62 or Please copy the file from ASRock website. (http://download.asrock.com/drivers/Intel/SATA/Floppy_Win7-64_Win7_Vista64_ Vista_XP64_XP(v10.6.0.1002)Z68.zip) and unzip the file into a USB flash disk. Please...
User Manual
Page 63
... not provide hotfix for your USB port; f. e. Below steps are Microsoft® suggested solution: A. d. a. Plug the USB flash disk into Windows® or install driver/ utilities. Type "systempropertiesprotection" in a large hard disk (ex. After Windows® installation, you have copied in the first step. Then choose the directory (xx...
... not provide hotfix for your USB port; f. e. Below steps are Microsoft® suggested solution: A. d. a. Plug the USB flash disk into Windows® or install driver/ utilities. Type "systempropertiesprotection" in a large hard disk (ex. After Windows® installation, you have copied in the first step. Then choose the directory (xx...
User Manual
Page 65
... system. (It may take about 5 mins to boot.) D. D. Windows® 7 64-bit: A. Please start to "Disable" then Click "OK". C. Set "Startup type" to install motherboard drivers and utilities. Please request the hotfix KB2505454 thru this hotfix then reboot by itself. After installing Windows® 7 64-bit, install the hot...
... system. (It may take about 5 mins to boot.) D. D. Windows® 7 64-bit: A. Please start to "Disable" then Click "OK". C. Set "Startup type" to install motherboard drivers and utilities. Please request the hotfix KB2505454 thru this hotfix then reboot by itself. After installing Windows® 7 64-bit, install the hot...
Quick Installation Guide
Page 11
... only in ACPI S5 mode)! This motherboard also provides a free 3.5mm audio cable (optional) that combines your most convenient computing environment. 11 ASRock Z68 Pro3 Gen3 Motherboard English With APP Charger driver installed, you - The performance may depend on -the-go. Just launch this tool and save the new BIOS file to your computer...
... only in ACPI S5 mode)! This motherboard also provides a free 3.5mm audio cable (optional) that combines your most convenient computing environment. 11 ASRock Z68 Pro3 Gen3 Motherboard English With APP Charger driver installed, you - The performance may depend on -the-go. Just launch this tool and save the new BIOS file to your computer...
Quick Installation Guide
Page 19
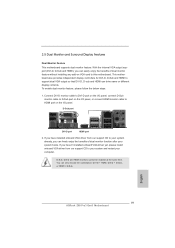
... benefits of dual monitor function after your computer. If you haven't installed onboard VGA driver yet, please install onboard VGA driver from our support CD to your system already, you have installed onboard VGA driver from our support CD to your system and restart your system boots. You can drive same... DVI-D, D-Sub and HDMI to this motherboard. To enable dual monitor feature, please follow the below steps: 1. D-Sub port DVI-D port HDMI port 2. English 19 ASRock Z68 Pro3 Gen3 Motherboard
... benefits of dual monitor function after your computer. If you haven't installed onboard VGA driver yet, please install onboard VGA driver from our support CD to your system already, you have installed onboard VGA driver from our support CD to your system and restart your system boots. You can drive same... DVI-D, D-Sub and HDMI to this motherboard. To enable dual monitor feature, please follow the below steps: 1. D-Sub port DVI-D port HDMI port 2. English 19 ASRock Z68 Pro3 Gen3 Motherboard


