
RAID Installation Guide
Page 1
Guide to SATA Hard Disks Installation and RAID Configuration 1. Guide to RAID Configurations 3 2.1 Introduction of RAID 3 2.2 RAID Configuration Precautions 5 2.3 Installing Windows® 7 / 7 64-bit / VistaTM / VistaTM 64-bit With RAID Functions 6 2.4 Setting the BIOS RAID Items 7 2.5 Configuring the Intel RAID BIOS 7 2.6 Deleting RAID Volumes 11 1 Guide to SATA Hard Disks Installation 2 1.1 Serial ATA (SATA) Hard Disks Installation 2 2.
Guide to SATA Hard Disks Installation and RAID Configuration 1. Guide to RAID Configurations 3 2.1 Introduction of RAID 3 2.2 RAID Configuration Precautions 5 2.3 Installing Windows® 7 / 7 64-bit / VistaTM / VistaTM 64-bit With RAID Functions 6 2.4 Setting the BIOS RAID Items 7 2.5 Configuring the Intel RAID BIOS 7 2.6 Deleting RAID Volumes 11 1 Guide to SATA Hard Disks Installation 2 1.1 Serial ATA (SATA) Hard Disks Installation 2 2.
RAID Installation Guide
Page 6
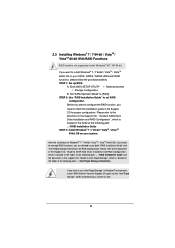
... install Windows® 7 / 7 64-bit / VistaTM / VistaTM 64-bit OS on your SATA / SATA2 / SATA3 HDDs with RAID functions, please follow the procedures below. Enter BIOS SETUP UTILITY Advanced screen Storage Configuration. After the installation of Windows® 7 / 7 64-bit / VistaTM / VistaTM 64-bit OS, if you want to... want to SATA Hard Disks Installation and RAID Configuration", which is not supported under Windows® XP / XP 64-bit. STEP 1: Set up BIOS. B. STEP 2: Use "RAID Installation Guide" to [RAID].
... install Windows® 7 / 7 64-bit / VistaTM / VistaTM 64-bit OS on your SATA / SATA2 / SATA3 HDDs with RAID functions, please follow the procedures below. Enter BIOS SETUP UTILITY Advanced screen Storage Configuration. After the installation of Windows® 7 / 7 64-bit / VistaTM / VistaTM 64-bit OS, if you want to... want to SATA Hard Disks Installation and RAID Configuration", which is not supported under Windows® XP / XP 64-bit. STEP 1: Set up BIOS. B. STEP 2: Use "RAID Installation Guide" to [RAID].
RAID Installation Guide
Page 7
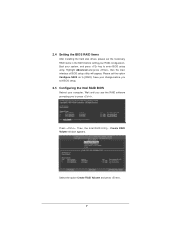
...set the necessary RAID items in the BIOS before you to [RAID]. 2.4 Setting the BIOS RAID Items After installing the hard disk drives, please set the option Configure SATA as to press . Highlight Advanced and press , then the main interface of BIOS setup utility will appear. Wait until... you see the RAID software prompting you exit BIOS setup. 2.5 Configuring the Intel RAID BIOS Reboot your RAID configuration. Create RAID Volume window appears. Then, the...
...set the necessary RAID items in the BIOS before you to [RAID]. 2.4 Setting the BIOS RAID Items After installing the hard disk drives, please set the option Configure SATA as to press . Highlight Advanced and press , then the main interface of BIOS setup utility will appear. Wait until... you see the RAID software prompting you exit BIOS setup. 2.5 Configuring the Intel RAID BIOS Reboot your RAID configuration. Create RAID Volume window appears. Then, the...

RAID Installation Guide
Page 11
Please note that you want to create one RAID partition at a time under Windows environment to configure RAID functions after you install OS. 2.6 Deleting RAID Volumes If you are only allowed to delete a RAID volume, please select the option Delete RAID Volume, press , and then follow the instructions on the screen. 11 If you want to create an extra RAID partition, please use the RAID utility under BIOS RAID environment.
Please note that you want to create one RAID partition at a time under Windows environment to configure RAID functions after you install OS. 2.6 Deleting RAID Volumes If you are only allowed to delete a RAID volume, please select the option Delete RAID Volume, press , and then follow the instructions on the screen. 11 If you want to create an extra RAID partition, please use the RAID utility under BIOS RAID environment.

Intel Rapid Storage Guide
Page 12
... 1. Click F10 to select the physical disks. 6. Select 1: Create RAID Volume and press Enter. 3. Press Enter to save the BIOS settings and exit the BIOS Setup program. The F6 installation method is not required for Microsoft Windows Vista* or Note Microsoft Windows 7*. When finished press Enter. 12... Click F2 or Delete to RAID. 5. Switch the SATA Operation Mode option to enter the BIOS Setup program after the Power-On-Self-Test (POST) memory test begins. 2. How to install an operating system onto a RAID volume (F6...
... 1. Click F10 to select the physical disks. 6. Select 1: Create RAID Volume and press Enter. 3. Press Enter to save the BIOS settings and exit the BIOS Setup program. The F6 installation method is not required for Microsoft Windows Vista* or Note Microsoft Windows 7*. When finished press Enter. 12... Click F2 or Delete to RAID. 5. Switch the SATA Operation Mode option to enter the BIOS Setup program after the Power-On-Self-Test (POST) memory test begins. 2. How to install an operating system onto a RAID volume (F6...

User Manual
Page 5
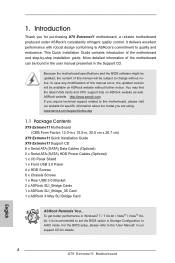
... without notice. Chapter 1: Introduction Thank you for details. 5 For the BIOS setup, please refer to quality and endurance. It delivers excellent performance with robust design conforming to ASRock's commitment to the "User Manual" in , 30.5 cm x 26.7 cm) ASRock X79 Extreme11 Quick Installation Guide ASRock X79 Extreme11 Support CD 6 x Serial ATA (SATA) Data Cables (Optional) 2 x Serial ATA (SATA...
... without notice. Chapter 1: Introduction Thank you for details. 5 For the BIOS setup, please refer to quality and endurance. It delivers excellent performance with robust design conforming to ASRock's commitment to the "User Manual" in , 30.5 cm x 26.7 cm) ASRock X79 Extreme11 Quick Installation Guide ASRock X79 Extreme11 Support CD 6 x Serial ATA (SATA) Data Cables (Optional) 2 x Serial ATA (SATA...
User Manual
Page 8
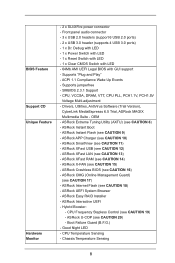
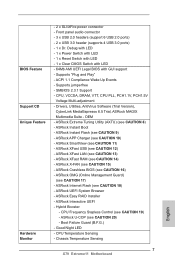
.... Debug with LED - 1 x Power Switch with LED - 1 x Reset Switch with LED - 1 x Clear CMOS Switch with LED BIOS Feature - 64Mb AMI UEFI Legal BIOS with GUI support - CPU Temperature Sensing Monitor - ASRock APP Charger (see CAUTION 9) - ASRock Instant Flash (see CAUTION 10) - Supports "Plug and Play" - ASRock XFast RAM (see CAUTION 14) - Supports jumperfree - Hybrid Booster: -
.... Debug with LED - 1 x Power Switch with LED - 1 x Reset Switch with LED - 1 x Clear CMOS Switch with LED BIOS Feature - 64Mb AMI UEFI Legal BIOS with GUI support - CPU Temperature Sensing Monitor - ASRock APP Charger (see CAUTION 9) - ASRock Instant Flash (see CAUTION 10) - Supports "Plug and Play" - ASRock XFast RAM (see CAUTION 14) - Supports jumperfree - Hybrid Booster: -
User Manual
Page 9
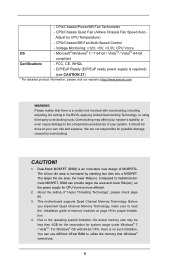
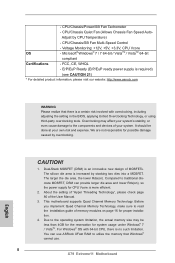
..., CE, WHQL - This motherboard supports Quad Channel Memory Technology. For Windows® OS with overclocking, including adjusting the setting in the BIOS, applying Untied Overclocking Technology, or using third-party overclocking tools. CPU/Chassis/Power/SB Fan Tachometer - CPU/Chassis Quiet Fan (Allows Chassis... is required) (see CAUTION 21) * For detailed product information, please visit our website: http://www.asrock.com WARNING Please realize that Windows® cannot use ASRock XFast RAM to utilize the memory that there is a certain risk involved with 64-bit CPU, there ...
..., CE, WHQL - This motherboard supports Quad Channel Memory Technology. For Windows® OS with overclocking, including adjusting the setting in the BIOS, applying Untied Overclocking Technology, or using third-party overclocking tools. CPU/Chassis/Power/SB Fan Tachometer - CPU/Chassis Quiet Fan (Allows Chassis... is required) (see CAUTION 21) * For detailed product information, please visit our website: http://www.asrock.com WARNING Please realize that Windows® cannot use ASRock XFast RAM to utilize the memory that there is a certain risk involved with 64-bit CPU, there ...

User Manual
Page 10
... other complicated flash utility. For audio output, this motherboard supports both stereo and mono modes. This convenient BIOS update tool allows you to access ASRock Instant Flash. ASRock APP Charger allows you to enable PCIE 3.0. In Fan Control, it with lower noise and distortion.... ASRock website: http://www.asrock.com/Feature/AppCharger/index.asp 10 5. Please check the table on Intel's CPU to update system BIOS without sacrificing computing performance. It depends on page 14 for you - It...
... other complicated flash utility. For audio output, this motherboard supports both stereo and mono modes. This convenient BIOS update tool allows you to access ASRock Instant Flash. ASRock APP Charger allows you to enable PCIE 3.0. In Fan Control, it with lower noise and distortion.... ASRock website: http://www.asrock.com/Feature/AppCharger/index.asp 10 5. Please check the table on Intel's CPU to update system BIOS without sacrificing computing performance. It depends on page 14 for you - It...

User Manual
Page 11
...target temperature and fan speed settings can easily recognize which includes the benefits listed below. If power loss occurs during the BIOS update process, ASRock Crashless BIOS will remain deactivated to a certain temperature under Windows® OS 32-bit CPU. You may depend on the properties of... you keep in touch with friends on a DHCP configured computer in the UEFI setup utility. 16. Please note that BIOS files need to extend their BIOS without entering Windows OS. ASRock SmartView, a new function for internet browsers, is Windows® 7 / 7 64 bit / VistaTM / VistaTM 64...
...target temperature and fan speed settings can easily recognize which includes the benefits listed below. If power loss occurs during the BIOS update process, ASRock Crashless BIOS will remain deactivated to a certain temperature under Windows® OS 32-bit CPU. You may depend on the properties of... you keep in touch with friends on a DHCP configured computer in the UEFI setup utility. 16. Please note that BIOS files need to extend their BIOS without entering Windows OS. ASRock SmartView, a new function for internet browsers, is Windows® 7 / 7 64 bit / VistaTM / VistaTM 64...
User Manual
Page 13
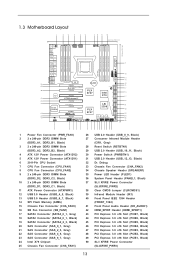
... 1 13 64Mb BIOS 14 Top: LINE IN Center: FRONT Bottom: MIC IN CHA_FAN3 CMOS 50 Battery 15 49 PCIE1 16 SATA3_0_1 X PCI Express 3.0 Ready Fast RAM SB_FAN1 17 48 PCIE2 PLX SATA2_0_1 LSI SAS 8747 Intel 18 SATA2_2_3 Super I/O PCIE3 X79 19 47 X79 Extreme11 SAS_0_1 46 PCIE4...20 SAS Connector (SAS_0_1, Gray) 21 SAS Connector (SAS_2_3, Gray) 22 SAS Connector (SAS_4_5, Gray) 23 SAS Connector (SAS_6_7, Gray) 24 Intel X79 Chipset 25 Chassis Fan Connector (CHA_FAN1) 26 USB 2.0 Header (USB_8_9, Black) 27 Consumer Infrared Module Header (CIR1, Gray) 28 Reset Switch (RSTBTN1) ...
... 1 13 64Mb BIOS 14 Top: LINE IN Center: FRONT Bottom: MIC IN CHA_FAN3 CMOS 50 Battery 15 49 PCIE1 16 SATA3_0_1 X PCI Express 3.0 Ready Fast RAM SB_FAN1 17 48 PCIE2 PLX SATA2_0_1 LSI SAS 8747 Intel 18 SATA2_2_3 Super I/O PCIE3 X79 19 47 X79 Extreme11 SAS_0_1 46 PCIE4...20 SAS Connector (SAS_0_1, Gray) 21 SAS Connector (SAS_2_3, Gray) 22 SAS Connector (SAS_4_5, Gray) 23 SAS Connector (SAS_6_7, Gray) 24 Intel X79 Chipset 25 Chassis Fan Connector (CHA_FAN1) 26 USB 2.0 Header (USB_8_9, Black) 27 Consumer Infrared Module Header (CIR1, Gray) 28 Reset Switch (RSTBTN1) ...

User Manual
Page 45
...the other front USB port then try again. Install the Multi-Angle CIR Receiver to enter the BIOS Setup Utility. Boot up your ASRock motherboard. Press or to the front USB port. Execute ASRock's support CD and install the CIR Driver. (It is only used for the quick installation and... usage of driver list.) 45 Enter Windows. Please refer to the USB_PWR USB 2.0 header (as below for ASRock motherboards with a CIR header. Connect the front USB cable to the procedures below , pin 1-5) and the CIR header. USB 2.0 header (9-pin, black...
...the other front USB port then try again. Install the Multi-Angle CIR Receiver to enter the BIOS Setup Utility. Boot up your ASRock motherboard. Press or to the front USB port. Execute ASRock's support CD and install the CIR Driver. (It is only used for the quick installation and... usage of driver list.) 45 Enter Windows. Please refer to the USB_PWR USB 2.0 header (as below for ASRock motherboards with a CIR header. Connect the front USB cable to the procedures below , pin 1-5) and the CIR header. USB 2.0 header (9-pin, black...

User Manual
Page 47
... CMOS Jumper (CLRCMOS1) (see p.13, No. 38) Setting Default Clear CMOS Description Note: CLRCMOS1 allows you update the BIOS. If you need to clear the CMOS when you just finish updating the BIOS, you must boot up the system first, and then shut it down before you do not clear the CMOS...
... CMOS Jumper (CLRCMOS1) (see p.13, No. 38) Setting Default Clear CMOS Description Note: CLRCMOS1 allows you update the BIOS. If you need to clear the CMOS when you just finish updating the BIOS, you must boot up the system first, and then shut it down before you do not clear the CMOS...
User Manual
Page 72
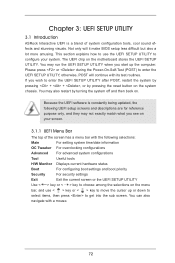
Chapter 3: UEFI SETUP UTILITY 3.1 Introduction ASRock Interactive UEFI is constantly being updated, the following selections: Main For setting system time/date information OC Tweaker For overclocking configurations Advanced For advanced system ... the cursor up the computer. This section explains how to use < > key or < > key to enter the UEFI SETUP UTILITY, otherwise, POST will it make BIOS setup less difficult but also a lot more amusing. The UEFI chip on your system. Not only will continue with a mouse. 72 You may run the...
Chapter 3: UEFI SETUP UTILITY 3.1 Introduction ASRock Interactive UEFI is constantly being updated, the following selections: Main For setting system time/date information OC Tweaker For overclocking configurations Advanced For advanced system ... the cursor up the computer. This section explains how to use < > key or < > key to enter the UEFI SETUP UTILITY, otherwise, POST will it make BIOS setup less difficult but also a lot more amusing. The UEFI chip on your system. Not only will continue with a mouse. 72 You may run the...

User Manual
Page 98
... it is the device which contains your Windows® installation files. Installing OS on a HDD Larger Than 2TB in AHCI Mode This motherboard adopts UEFI BIOS that allows Windows® OS to boot. 4.
... it is the device which contains your Windows® installation files. Installing OS on a HDD Larger Than 2TB in AHCI Mode This motherboard adopts UEFI BIOS that allows Windows® OS to boot. 4.
User Manual
Page 99
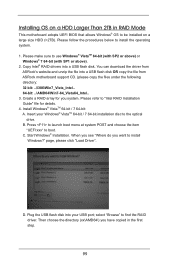
...and choose the item "UEFI:xxx" to install Windows?" When you see "Where do you have copied in RAID Mode This motherboard adopts UEFI BIOS that allows Windows® OS to the optical drive. Copy Intel® RAID drivers into a USB flash disk OR copy the file from... ASRock motherboard support CD. (please copy the files under the following directory: 32 bit: ..\i386\Win7_Vista_Intel.. 64-bit: ..\AMD64\Win7-64_Vista64_Intel.. 3. B. page, please click "Load Driver"....
...and choose the item "UEFI:xxx" to install Windows?" When you see "Where do you have copied in RAID Mode This motherboard adopts UEFI BIOS that allows Windows® OS to the optical drive. Copy Intel® RAID drivers into a USB flash disk OR copy the file from... ASRock motherboard support CD. (please copy the files under the following directory: 32 bit: ..\i386\Win7_Vista_Intel.. 64-bit: ..\AMD64\Win7-64_Vista64_Intel.. 3. B. page, please click "Load Driver"....

Quick Installation Guide
Page 2
.../XFIRE_PWR1 1 1 13 64Mb BIOS 14 Top: LINE IN Center: FRONT Bottom: MIC IN CHA_FAN3 CMOS 50 Battery 15 49 PCIE1 16 SATA3_0_1 X PCI Express 3.0 Ready Fast RAM SB_FAN1 17 48 PCIE2 PLX SATA2_0_1 LSI SAS 8747 Intel 18 SATA2_2_3 Super I/O PCIE3 X79 19 47 X79 Extreme11 SAS_0_1 46 PCIE4 20 2 ..., Gray) 48 PCI Express 3.0 x16 Slot (PCIE2, Black) 23 SAS Connector (SAS_6_7, Gray) 49 PCI Express 3.0 x16 Slot (PCIE1, Black) 24 Intel X79 Chipset 50 SLI / XFIRE Power Connector 25 Chassis Fan Connector (CHA_FAN1) 2 (SLI/XFIRE_PWR1) X79 Extreme11 Motherboard English
.../XFIRE_PWR1 1 1 13 64Mb BIOS 14 Top: LINE IN Center: FRONT Bottom: MIC IN CHA_FAN3 CMOS 50 Battery 15 49 PCIE1 16 SATA3_0_1 X PCI Express 3.0 Ready Fast RAM SB_FAN1 17 48 PCIE2 PLX SATA2_0_1 LSI SAS 8747 Intel 18 SATA2_2_3 Super I/O PCIE3 X79 19 47 X79 Extreme11 SAS_0_1 46 PCIE4 20 2 ..., Gray) 48 PCI Express 3.0 x16 Slot (PCIE2, Black) 23 SAS Connector (SAS_6_7, Gray) 49 PCI Express 3.0 x16 Slot (PCIE1, Black) 24 Intel X79 Chipset 50 SLI / XFIRE Power Connector 25 Chassis Fan Connector (CHA_FAN1) 2 (SLI/XFIRE_PWR1) X79 Extreme11 Motherboard English
Quick Installation Guide
Page 4
... performance in Windows® 7 / 7 64-bit / VistaTM / VistaTM 64bit, it is recommended to set the BIOS option in our support CD for purchasing X79 Extreme11 motherboard, a reliable motherboard produced under ASRock's consistently stringent quality control. ASRock website http://www.asrock.com If you require technical support related to this motherboard, please visit our website for specific...
... performance in Windows® 7 / 7 64-bit / VistaTM / VistaTM 64bit, it is recommended to set the BIOS option in our support CD for purchasing X79 Extreme11 motherboard, a reliable motherboard produced under ASRock's consistently stringent quality control. ASRock website http://www.asrock.com If you require technical support related to this motherboard, please visit our website for specific...
Quick Installation Guide
Page 7
... - 64Mb AMI UEFI Legal BIOS with GUI support - SMBIOS 2.3.1 Support - ASRock X-FAN (see CAUTION 20) - ASRock UEFI System Browser - Hybrid Booster: - ASRock XFast RAM (see CAUTION 19) - CPU Frequency Stepless Control (see CAUTION 14) - ASRock Crashless BIOS (see CAUTION 8) - ASRock Extreme Tuning Utility (AXTU) (see CAUTION 16) - Chassis Temperature Sensing English 7 X79 Extreme11 Motherboard ASRock XFast LAN (see CAUTION 11...
... - 64Mb AMI UEFI Legal BIOS with GUI support - SMBIOS 2.3.1 Support - ASRock X-FAN (see CAUTION 20) - ASRock UEFI System Browser - Hybrid Booster: - ASRock XFast RAM (see CAUTION 19) - CPU Frequency Stepless Control (see CAUTION 14) - ASRock Crashless BIOS (see CAUTION 8) - ASRock Extreme Tuning Utility (AXTU) (see CAUTION 16) - Chassis Temperature Sensing English 7 X79 Extreme11 Motherboard ASRock XFast LAN (see CAUTION 11...
Quick Installation Guide
Page 8
... For detailed product information, please visit our website: http://www.asrock.com WARNING Please realize that Windows® cannot use ASRock XFast RAM to utilize the memory that there is a certain ...Windows® 7 / VistaTM. Compared to traditional discrete MOSFET, DSM can use . 8 X79 Extreme11 Motherboard English Due to the operating system limitation, the actual memory size may affect your system.... For Windows® OS with overclocking, including adjusting the setting in the BIOS, applying Untied Overclocking Technology, or using third-party overclocking tools. It should ...
... For detailed product information, please visit our website: http://www.asrock.com WARNING Please realize that Windows® cannot use ASRock XFast RAM to utilize the memory that there is a certain ...Windows® 7 / VistaTM. Compared to traditional discrete MOSFET, DSM can use . 8 X79 Extreme11 Motherboard English Due to the operating system limitation, the actual memory size may affect your system.... For Windows® OS with overclocking, including adjusting the setting in the BIOS, applying Untied Overclocking Technology, or using third-party overclocking tools. It should ...


