
User Manual
Page 1
X533 User Manual Version 1.0 Published April 2003 Copyright©2003 ASRock INC. All rights reserved. 1
X533 User Manual Version 1.0 Published April 2003 Copyright©2003 ASRock INC. All rights reserved. 1

User Manual
Page 2
..., transcribed, transmitted, or translated in any language, in any form or by any means, except duplication of documentation by ASRock. ASRock Website: http://www.asrock.com 2 Products and corporate names appearing in this manual, ASRock does not provide warranty of any kind, either expressed or implied, including but not limited to the implied warranties or...
..., transcribed, transmitted, or translated in any language, in any form or by any means, except duplication of documentation by ASRock. ASRock Website: http://www.asrock.com 2 Products and corporate names appearing in this manual, ASRock does not provide warranty of any kind, either expressed or implied, including but not limited to the implied warranties or...

User Manual
Page 4
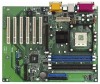
... motherboard specifications and the BIOS software might be updated, the content of this manual will be subject to quality and endurance. ASRock website http://www.asrock.com 1.1 Package Contents ASRock X533 motherboard (ATX form factor: 12.0" x 9.6", 30.5 x 24.4 cm) ASRock X533 Quick Setup Guide ASRock X533 Support CD 1 Cable for IDE devices (1 x ATA 66/100/133) 1 Cable for new...
... motherboard specifications and the BIOS software might be updated, the content of this manual will be subject to quality and endurance. ASRock website http://www.asrock.com 1.1 Package Contents ASRock X533 motherboard (ATX form factor: 12.0" x 9.6", 30.5 x 24.4 cm) ASRock X533 Quick Setup Guide ASRock X533 Support CD 1 Cable for IDE devices (1 x ATA 66/100/133) 1 Cable for new...

User Manual
Page 10
... tab to secure the CPU. Step 3. Step 1 Step 2, 3 Step 4 2.4 Installation of the socket lever. Unlock the socket by lifting the lever up to the instruction manuals of vendors of the pins. Step 2. The CPU fits only in place, press it is locked. 2.3 CPU Installation Step 1. The lever clicks on the socket...
... tab to secure the CPU. Step 3. Step 1 Step 2, 3 Step 4 2.4 Installation of the socket lever. Unlock the socket by lifting the lever up to the instruction manuals of vendors of the pins. Step 2. The CPU fits only in place, press it is locked. 2.3 CPU Installation Step 1. The lever clicks on the socket...

User Manual
Page 18
Highlight "Primary IDE Master" then press to manually enter the IDE hard disk drive parameters. 18 Below are two IDE channels (Primary and Secondary) available in the correct values for the drive. In ... Maximum Capacity LBA Mode Block Mode Fast Programmed I/O Modes 32 Bit Transfer Mode Ultra DMA Mode Auto Off Off Auto Off Auto Select how to manually enter the number of cylinders, heads, and sectors per track for the remaining fields on an older system, the BIOS Setup may detect incorrect parameters...
Highlight "Primary IDE Master" then press to manually enter the IDE hard disk drive parameters. 18 Below are two IDE channels (Primary and Secondary) available in the correct values for the drive. In ... Maximum Capacity LBA Mode Block Mode Fast Programmed I/O Modes 32 Bit Transfer Mode Ultra DMA Mode Auto Off Off Auto Off Auto Select how to manually enter the number of cylinders, heads, and sectors per track for the remaining fields on an older system, the BIOS Setup may detect incorrect parameters...
User Manual
Page 21
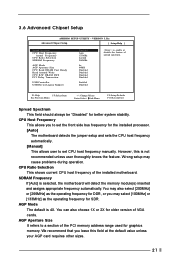
... side bus frequency for the installed processor. [Auto] The motherboard detects the jumper setup and sets the CPU host frequency automatically. [Manual] This allows user to set CPU host frequency manually. You can also choose 1X or 2X for SDR. AGP Mode The default is 4X. Wrong setup may also select [200MHz...
... side bus frequency for the installed processor. [Auto] The motherboard detects the jumper setup and sets the CPU host frequency automatically. [Manual] This allows user to set CPU host frequency manually. You can also choose 1X or 2X for SDR. AGP Mode The default is 4X. Wrong setup may also select [200MHz...
