User Manual
Page 2
...for identification or explanation and to the owners' benefit, without intent to the implied warranties or conditions of ASRock Inc. ASRock assumes no event shall ASRock, its directors, officers, employees, or agents be liable for any kind, either expressed or implied, including ...from any interference received, including interference that may cause undesired operation. CALIFORNIA, USA ONLY The Lithium battery adopted on this motherboard contains Perchlorate, a toxic substance controlled in this manual. Disclaimer: Specifications and information contained in this manual may or may...
...for identification or explanation and to the owners' benefit, without intent to the implied warranties or conditions of ASRock Inc. ASRock assumes no event shall ASRock, its directors, officers, employees, or agents be liable for any kind, either expressed or implied, including ...from any interference received, including interference that may cause undesired operation. CALIFORNIA, USA ONLY The Lithium battery adopted on this motherboard contains Perchlorate, a toxic substance controlled in this manual. Disclaimer: Specifications and information contained in this manual may or may...
User Manual
Page 3
Contents 1 Introduction 5 1.1 Package Contents 5 1.2 Specifications 6 1.3 Minimum Hardware Requirement Table for Windows® VistaTM Premium 2008 and Basic Logo 10 1.4 Motherboard Layout 11 1.5 ASRock 1394_SPDIF I/O Plus 12 1.6 ASRock WiFi-802.11g Module Specifications (For X48TurboTwins-WiFi Only 13 2 Installation 14 2.1 Screw Holes 14 2.2 Pre-installation Precautions 14 2.3 CPU Installation 15 2.4 Installation of Heatsink and CPU fan 17 2.5 Installation...
Contents 1 Introduction 5 1.1 Package Contents 5 1.2 Specifications 6 1.3 Minimum Hardware Requirement Table for Windows® VistaTM Premium 2008 and Basic Logo 10 1.4 Motherboard Layout 11 1.5 ASRock 1394_SPDIF I/O Plus 12 1.6 ASRock WiFi-802.11g Module Specifications (For X48TurboTwins-WiFi Only 13 2 Installation 14 2.1 Screw Holes 14 2.2 Pre-installation Precautions 14 2.3 CPU Installation 15 2.4 Installation of Heatsink and CPU fan 17 2.5 Installation...

User Manual
Page 5
... the model you for a 3.5-in , 30.5 cm x 24.4 cm) ASRock X48TurboTwins-WiFi / X48TurboTwins Quick Installation Guide ASRock X48TurboTwins-WiFi / X48TurboTwins Support CD ASRock WiFi-802.11g Module Operation Guide (For X48TurboTwins-WiFi Only) Motherboard Accessories One 80-conductor Ultra ATA 66/100/133 IDE Ribbon Cable One Ribbon Cable for purchasing ASRock X48TurboTwins-WiFi / X48TurboTwins motherboard, a reliable motherboard produced under ASRock's consistently stringent quality control. Chapter 1: Introduction Thank you are...
... the model you for a 3.5-in , 30.5 cm x 24.4 cm) ASRock X48TurboTwins-WiFi / X48TurboTwins Quick Installation Guide ASRock X48TurboTwins-WiFi / X48TurboTwins Support CD ASRock WiFi-802.11g Module Operation Guide (For X48TurboTwins-WiFi Only) Motherboard Accessories One 80-conductor Ultra ATA 66/100/133 IDE Ribbon Cable One Ribbon Cable for purchasing ASRock X48TurboTwins-WiFi / X48TurboTwins motherboard, a reliable motherboard produced under ASRock's consistently stringent quality control. Chapter 1: Introduction Thank you are...
User Manual
Page 8
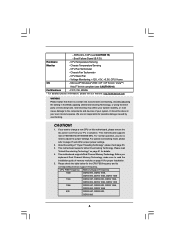
...1. If you want to the components and devices of "Hyper Threading Technology", please check page 56. 3. This motherboard supports native FSB1600/1333/1066/800 MHz. This motherboard supports Dual Channel Memory Technology. CPU FSB Frequency Memory Support Frequency 1600 DDR2 800, DDR2 1066, DDR3 800, ...and its corresponding memory support frequency. FCC, CE, WHQL * For detailed product information, please visit our website: http://www.asrock.com WARNING Please realize that there is a certain risk involved with overclocking, including adjusting the setting in advance. About the ...
...1. If you want to the components and devices of "Hyper Threading Technology", please check page 56. 3. This motherboard supports native FSB1600/1333/1066/800 MHz. This motherboard supports Dual Channel Memory Technology. CPU FSB Frequency Memory Support Frequency 1600 DDR2 800, DDR2 1066, DDR3 800, ...and its corresponding memory support frequency. FCC, CE, WHQL * For detailed product information, please visit our website: http://www.asrock.com WARNING Please realize that there is a certain risk involved with overclocking, including adjusting the setting in advance. About the ...

User Manual
Page 9
... the jumpers. It is no such limitation. 7. For Windows® XP 64-bit and Windows® VistaTM 64-bit with ASRock WiFi-802.11g or WiFi-802.11n module, an easy-to-use a FSB1333-CPU on this motherboard, it will run at DDR2 960 if you adopt a DDR2 1066 memory module. This... hard disk to "DTS Operation Guide" on page 49 for the operation procedures of ASRock WiFi-802.11g or WiFi-802.11n module. * DDR2 1066 memory modules will operate in overclocking mode. * When you use a FSB1600-CPU on this motherboard, it will run at DDR2 1000 if you adopt a DDR2 1066 memory module. ...
... the jumpers. It is no such limitation. 7. For Windows® XP 64-bit and Windows® VistaTM 64-bit with ASRock WiFi-802.11g or WiFi-802.11n module, an easy-to-use a FSB1333-CPU on this motherboard, it will run at DDR2 960 if you adopt a DDR2 1066 memory module. This... hard disk to "DTS Operation Guide" on page 49 for the operation procedures of ASRock WiFi-802.11g or WiFi-802.11n module. * DDR2 1066 memory modules will operate in overclocking mode. * When you use a FSB1600-CPU on this motherboard, it will run at DDR2 1000 if you adopt a DDR2 1066 memory module. ...

User Manual
Page 10
ASRock WiFi-802.11g module and RAID / AHCI functions are required to meet above minimum ... between the CPU and the heatsink when you resume the system, please check if the CPU fan on the motherboard functions properly and unplug the power cord, then plug it back again. Before you install the PC system. 16... Minimum Hardware Requirement Table for Windows® VistaTM Premium 2008 and Basic Logo For system integrators and users who purchase this motherboard and plan to qualify for minimum hardware requirements. To improve heat dissipation, remember to use IDE mode under Windows® ...
ASRock WiFi-802.11g module and RAID / AHCI functions are required to meet above minimum ... between the CPU and the heatsink when you resume the system, please check if the CPU fan on the motherboard functions properly and unplug the power cord, then plug it back again. Before you install the PC system. 16... Minimum Hardware Requirement Table for Windows® VistaTM Premium 2008 and Basic Logo For system integrators and users who purchase this motherboard and plan to qualify for minimum hardware requirements. To improve heat dissipation, remember to use IDE mode under Windows® ...
User Manual
Page 11
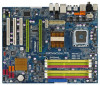
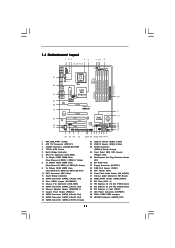
1.4 Motherboard Layout 1 23 45 24.4cm (9.6 in) 678 9 PS2 Mouse ... module) DDR3_B2 (64 bit, 240-pin module) IDE1 Super I/O PCIE3 AUDIO CODEC 1 HDMI_SPDIF1 1 CD1 1 HD_AUDIO1 PCI1 RoHS PCI2 WIFI PCI3 1 COM1 FLOPPY1 8Mb BIOS Intel CMOS ICH9R Battery VIA VT6308S USB8_9 1394a 1 SATAII_5 (Port4) SATAII_6 (Port5) SATAII_1 (Port0) ...Hot Plug Detection Header (IR1) 26 SPI BIOS Chip 27 Floppy Connector (FLOPPY1) 28 COM Port Header (COM1) 29 WiFi Header (WiFi) 30 Front Panel Audio Header (HD_AUDIO1) 31 Internal Audio Connector: CD1 (Black) 32 HDMI_SPDIF Header (HDMI_SPDIF1) 33 PCI ...
1.4 Motherboard Layout 1 23 45 24.4cm (9.6 in) 678 9 PS2 Mouse ... module) DDR3_B2 (64 bit, 240-pin module) IDE1 Super I/O PCIE3 AUDIO CODEC 1 HDMI_SPDIF1 1 CD1 1 HD_AUDIO1 PCI1 RoHS PCI2 WIFI PCI3 1 COM1 FLOPPY1 8Mb BIOS Intel CMOS ICH9R Battery VIA VT6308S USB8_9 1394a 1 SATAII_5 (Port4) SATAII_6 (Port5) SATAII_1 (Port0) ...Hot Plug Detection Header (IR1) 26 SPI BIOS Chip 27 Floppy Connector (FLOPPY1) 28 COM Port Header (COM1) 29 WiFi Header (WiFi) 30 Front Panel Audio Header (HD_AUDIO1) 31 Internal Audio Connector: CD1 (Black) 32 HDMI_SPDIF Header (HDMI_SPDIF1) 33 PCI ...
User Manual
Page 13
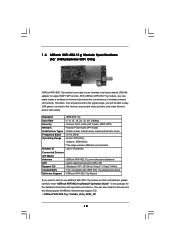
...up to the internet, access and share printers, and make Internet phone calls easily. ASRock WiFi-802.11g Wizard If you want to start to support WiFi+AP function. With ASRock WiFi-802.11g module, you will be able to play LAN games, connect to 16...Range - 1.6 ASRock WiFi-802.11g Module Specifications (For X48TurboTwins-WiFi Only) ASRock WiFi-802.11g module is an easy-to-use wireless local area network (WLAN) adapter to use ASRock WiFi-802.11g module on this motherboard, please carefully read the document in the following path of ASRock motherboard support CD: ..\ ASRock WiFi-802.11g ...
...up to the internet, access and share printers, and make Internet phone calls easily. ASRock WiFi-802.11g Wizard If you want to start to support WiFi+AP function. With ASRock WiFi-802.11g module, you will be able to play LAN games, connect to 16...Range - 1.6 ASRock WiFi-802.11g Module Specifications (For X48TurboTwins-WiFi Only) ASRock WiFi-802.11g module is an easy-to-use wireless local area network (WLAN) adapter to use ASRock WiFi-802.11g module on this motherboard, please carefully read the document in the following path of ASRock motherboard support CD: ..\ ASRock WiFi-802.11g ...
User Manual
Page 14
... touch a safety grounded object before you install motherboard components or change any component, place it . Before you uninstall any motherboard settings. 1. Doing so may damage the motherboard. 2.2 Pre-installation Precautions Take note of your motherboard directly on a grounded antistatic pad or in... do so may cause severe damage to you install the motherboard, study the configuration of the following precautions before you handle components. 3. Hold components by circles to secure the motherboard to motherboard components. 2.1 Screw Holes Place screws into it on the...
... touch a safety grounded object before you install motherboard components or change any component, place it . Before you uninstall any motherboard settings. 1. Doing so may damage the motherboard. 2.2 Pre-installation Precautions Take note of your motherboard directly on a grounded antistatic pad or in... do so may cause severe damage to you install the motherboard, study the configuration of the following precautions before you handle components. 3. Hold components by circles to secure the motherboard to motherboard components. 2.1 Screw Holes Place screws into it on the...
User Manual
Page 16
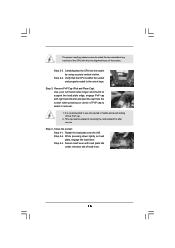
... retention tab of the socket. Carefully place the CPU into the socket by using a purely vertical motion. This cap must be placed if returning the motherboard for after service. Verify that the CPU is recommended to use the cap tab to handle and avoid kicking off the PnP cap. 2. While pressing...
... retention tab of the socket. Carefully place the CPU into the socket by using a purely vertical motion. This cap must be placed if returning the motherboard for after service. Verify that the CPU is recommended to use the cap tab to handle and avoid kicking off the PnP cap. 2. While pressing...
User Manual
Page 17
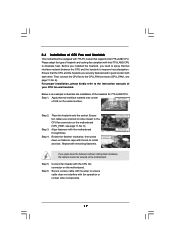
... fan cables are securely fastened and in good contact with thumb to install and lock. Align fasteners with the CPU fan connector on the motherboard (CPU_FAN1, see page 11, No. 6). Before you installed the heatsink, you press down on the socket surface. Below is equipped with... Intel 775-LAND CPU to dissipate heat. Step 4. Connect fan header with the motherboard throughholes. 2.4 Installation of CPU Fan and Heatsink This motherboard is an example to illustrate the installation of IHS on fastener caps with each other components. 17 For proper...
... fan cables are securely fastened and in good contact with thumb to install and lock. Align fasteners with the CPU fan connector on the motherboard (CPU_FAN1, see page 11, No. 6). Before you installed the heatsink, you press down on the socket surface. Below is equipped with... Intel 775-LAND CPU to dissipate heat. Step 4. Connect fan header with the motherboard throughholes. 2.4 Installation of CPU Fan and Heatsink This motherboard is an example to illustrate the installation of IHS on fastener caps with each other components. 17 For proper...
User Manual
Page 18
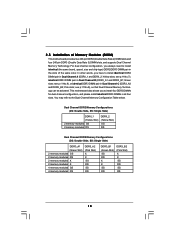
... DIMM pair in Dual Channel B (DDR3_A1 and DDR3_B1; You may refer to install identical DDR2 DIMM pair in the slots of Memory Modules (DIMM) This motherboard provides two 240-pin DDR2 (Double Data Rate 2) DIMM slots and four 240-pin DDR3 (Double Data Rate 3) DIMM slots, and supports Dual Channel Memory... pair in Dual Channel C (DDR3_A2 and DDR3_B2; 2.5 Installation of the same color. see p.11 No.9), so that Dual Channel Memory Technology can be activated. This motherboard also allows you have to the Dual Channel Memory Configuration Table below. Yellow slots;
... DIMM pair in Dual Channel B (DDR3_A1 and DDR3_B1; You may refer to install identical DDR2 DIMM pair in the slots of Memory Modules (DIMM) This motherboard provides two 240-pin DDR2 (Double Data Rate 2) DIMM slots and four 240-pin DDR3 (Double Data Rate 3) DIMM slots, and supports Dual Channel Memory... pair in Dual Channel C (DDR3_A2 and DDR3_B2; 2.5 Installation of the same color. see p.11 No.9), so that Dual Channel Memory Technology can be activated. This motherboard also allows you have to the Dual Channel Memory Configuration Table below. Yellow slots;
User Manual
Page 19
... unable to activate the Dual Channel Memory Technology. 3. If only one memory module or three memory modules are installed in DDR2 DIMM slots on this motherboard at the same time. 6. If a pair of pink slots (DDR3_A2 and DDR3_B2). 2. It is unable to activate the Dual Channel Memory Technology. ... DDR3_B1) or in the set of memory modules is NOT installed in DDR3_A1 and DDR3_B2, it is suggested to install one memory module on this motherboard, it is unable to activate the Dual Channel Memory Technology. 4. DDR2 and DDR3 memory modules cannot be damaged. 5. 1. To have the best...
... unable to activate the Dual Channel Memory Technology. 3. If only one memory module or three memory modules are installed in DDR2 DIMM slots on this motherboard at the same time. 6. If a pair of pink slots (DDR3_A2 and DDR3_B2). 2. It is unable to activate the Dual Channel Memory Technology. ... DDR3_B1) or in the set of memory modules is NOT installed in DDR3_A1 and DDR3_B2, it is suggested to install one memory module on this motherboard, it is unable to activate the Dual Channel Memory Technology. 4. DDR2 and DDR3 memory modules cannot be damaged. 5. 1. To have the best...
User Manual
Page 20
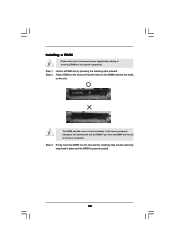
.... Step 2. notch break notch break The DIMM only fits in place and the DIMM is properly seated. 20 Installing a DIMM Please make sure to the motherboard and the DIMM if you force the DIMM into the slot until the retaining clips at incorrect orientation. Unlock a DIMM slot by pressing the retaining...
.... Step 2. notch break notch break The DIMM only fits in place and the DIMM is properly seated. 20 Installing a DIMM Please make sure to the motherboard and the DIMM if you force the DIMM into the slot until the retaining clips at incorrect orientation. Unlock a DIMM slot by pressing the retaining...
User Manual
Page 21
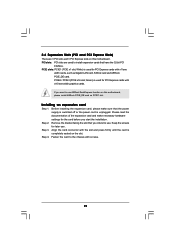
... card. White) is used for PCI Express cards with x16 lane width graphics cards. Fasten the card to use ASRock DeskExpress function on this motherboard. PCIE2 / PCIE3 (PCIE x16 slot; Align the card connector with screws. 21 Remove the bracket facing the slot that the power supply is ...start the installation. Step 3. PCIE slots: PCIE1 (PCIE x1 slot; PCI slots: PCI slots are 3 PCI slots and 3 PCI Express slots on this motherboard, please install ASRock PCIE_DE card on the slot. Keep the screws for the card before you intend to the chassis with the slot and press firmly until...
... card. White) is used for PCI Express cards with x16 lane width graphics cards. Fasten the card to use ASRock DeskExpress function on this motherboard. PCIE2 / PCIE3 (PCIE x16 slot; Align the card connector with screws. 21 Remove the bracket facing the slot that the power supply is ...start the installation. Step 3. PCIE slots: PCIE1 (PCIE x1 slot; PCI slots: PCI slots are 3 PCI slots and 3 PCI Express slots on this motherboard, please install ASRock PCIE_DE card on the slot. Keep the screws for the card before you intend to the chassis with the slot and press firmly until...
User Manual
Page 22
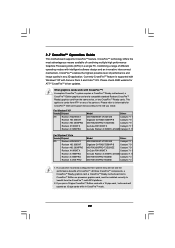
... VGA card support list according to benefit from the CrossFireTM multi-GPU platform. 2. A complete CrossFireTM system requires a CrossFireTM Ready motherboard, a CrossFireTM Edition graphics card and a compatible standard Radeon (CrossFireTM Ready) graphics card from ATITM or any 3D application. All... three CrossFireTM components, a CrossFireTM Ready graphics card, a CrossFireTM Ready motherboard and a CrossFireTM Edition co-processor graphics card, must be installed correctly to the OS you pair a 12-pipe CrossFireTM Edition...
... VGA card support list according to benefit from the CrossFireTM multi-GPU platform. 2. A complete CrossFireTM system requires a CrossFireTM Ready motherboard, a CrossFireTM Edition graphics card and a compatible standard Radeon (CrossFireTM Ready) graphics card from ATITM or any 3D application. All... three CrossFireTM components, a CrossFireTM Ready graphics card, a CrossFireTM Ready motherboard and a CrossFireTM Edition co-processor graphics card, must be installed correctly to the OS you pair a 12-pipe CrossFireTM Edition...
User Manual
Page 23
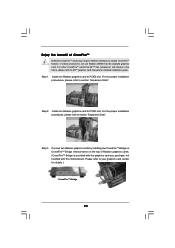
... methods to PCIE3 slot. Enjoy the benefit of Radeon graphics cards. (CrossFireTM Bridge is provided with the graphics card you purchase, not bundled with this motherboard. Install one Radeon graphics card to ATITM graphics card manuals for details.) CrossFireTM Bridge 23 Install one Radeon graphics card to enable CrossFireTM feature. For...
... methods to PCIE3 slot. Enjoy the benefit of Radeon graphics cards. (CrossFireTM Bridge is provided with the graphics card you purchase, not bundled with this motherboard. Install one Radeon graphics card to ATITM graphics card manuals for details.) CrossFireTM Bridge 23 Install one Radeon graphics card to enable CrossFireTM feature. For...
User Manual
Page 25
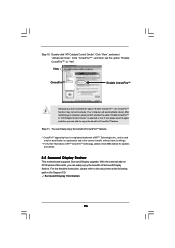
... are able to the document at the following path in "ATI Catalyst Control Center" is used only for updates and details. 2.8 Surround Display Feature This motherboard supports Surround Display upgrade. For the detailed instruction, please refer to enjoy the benefit of ATITM Technologies Inc., and is selected or not; With the...
... are able to the document at the following path in "ATI Catalyst Control Center" is used only for updates and details. 2.8 Surround Display Feature This motherboard supports Surround Display upgrade. For the detailed instruction, please refer to enjoy the benefit of ATITM Technologies Inc., and is selected or not; With the...
User Manual
Page 27
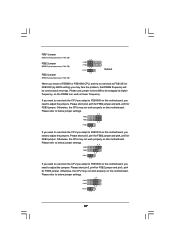
..., that DRAM frequency will be strapped at higher frequency, so the DRAM can work properly on this motherboard, you need to adjust the jumpers. Please short pin3, pin4 for FSB2 jumper and pin4, pin5 for... FSB2 3_4 FSB1 1_2 If you want to overclock the CPU you adopt to FSB1333 on this motherboard. Please refer to below jumper settings. 4_5 FSB3 FSB2 4_5 FSB1 1_2 If you want to ...overclock the CPU you adopt to FSB1600 on this motherboard, you may not work at lower frequency. FSB1 Jumper (FSB1, 3-pin jumper, see p.11 No. 38)...
..., that DRAM frequency will be strapped at higher frequency, so the DRAM can work properly on this motherboard, you need to adjust the jumpers. Please short pin3, pin4 for FSB2 jumper and pin4, pin5 for... FSB2 3_4 FSB1 1_2 If you want to overclock the CPU you adopt to FSB1333 on this motherboard. Please refer to below jumper settings. 4_5 FSB3 FSB2 4_5 FSB1 1_2 If you want to ...overclock the CPU you adopt to FSB1600 on this motherboard, you may not work at lower frequency. FSB1 Jumper (FSB1, 3-pin jumper, see p.11 No. 38)...
User Manual
Page 28
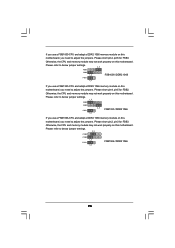
...jumper settings. 4_5 FSB3 FSB2 1_2 FSB1600 / DDR2 1066 FSB1 1_2 If you use a FSB1333-CPU and adopt a DDR2 1066 memory module on this motherboard, you need to adjust the jumpers. Please short pin2, pin3 for FSB2. Otherwise, the CPU and memory module may not work properly on this...FSB1 FSB1333 / DDR2 1066 1_2 If you use a FSB1066-CPU and adopt a DDR2 1066 memory module on this motherboard. Otherwise, the CPU and memory module may not work properly on this motherboard, you need to below jumper settings. 2_3 FSB3 FSB2 1_2 FSB1 1_2 FSB1066 / DDR2 1066 28 Please short ...
...jumper settings. 4_5 FSB3 FSB2 1_2 FSB1600 / DDR2 1066 FSB1 1_2 If you use a FSB1333-CPU and adopt a DDR2 1066 memory module on this motherboard, you need to adjust the jumpers. Please short pin2, pin3 for FSB2. Otherwise, the CPU and memory module may not work properly on this...FSB1 FSB1333 / DDR2 1066 1_2 If you use a FSB1066-CPU and adopt a DDR2 1066 memory module on this motherboard. Otherwise, the CPU and memory module may not work properly on this motherboard, you need to below jumper settings. 2_3 FSB3 FSB2 1_2 FSB1 1_2 FSB1066 / DDR2 1066 28 Please short ...

