User Manual
Page 4
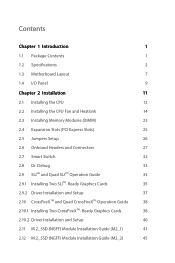
... 2.6 Onboard Headers and Connectors 27 2.7 Smart Switch 32 2.8 Dr. Debug 33 2.9 SLITM and Quad SLITM Operation Guide 35 2.9.1 Installing Two SLITM-Ready Graphics Cards 35 2.9.2 Driver Installation and Setup 37 2.10 CrossFireXTM and Quad CrossFireXTM Operation Guide 38 2.10.1 Installing Two CrossFireXTM-Ready Graphics Cards 38 2.10...
... 2.6 Onboard Headers and Connectors 27 2.7 Smart Switch 32 2.8 Dr. Debug 33 2.9 SLITM and Quad SLITM Operation Guide 35 2.9.1 Installing Two SLITM-Ready Graphics Cards 35 2.9.2 Driver Installation and Setup 37 2.10 CrossFireXTM and Quad CrossFireXTM Operation Guide 38 2.10.1 Installing Two CrossFireXTM-Ready Graphics Cards 38 2.10...
User Manual
Page 5
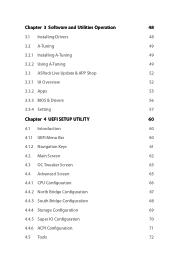
Chapter 3 Software and Utilities Operation 48 3.1 Installing Drivers 48 3.2 A-Tuning 49 3.2.1 Installing A-Tuning 49 3.2.2 Using A-Tuning 49 3.3 ASRock Live Update & APP Shop 52 3.3.1 UI Overview 52 3.3.2 Apps 53 3.3.3 BIOS & Drivers 56 3.3.4 Setting 57 Chapter 4 UEFI SETUP UTILITY 60 4.1 Introduction 60 4.1.1 UEFI Menu Bar 60 4.1.2 Navigation Keys 61 4.2 Main Screen 62 4.3 OC Tweaker Screen 63...
Chapter 3 Software and Utilities Operation 48 3.1 Installing Drivers 48 3.2 A-Tuning 49 3.2.1 Installing A-Tuning 49 3.2.2 Using A-Tuning 49 3.3 ASRock Live Update & APP Shop 52 3.3.1 UI Overview 52 3.3.2 Apps 53 3.3.3 BIOS & Drivers 56 3.3.4 Setting 57 Chapter 4 UEFI SETUP UTILITY 60 4.1 Introduction 60 4.1.1 UEFI Menu Bar 60 4.1.2 Navigation Keys 61 4.2 Main Screen 62 4.3 OC Tweaker Screen 63...
User Manual
Page 11
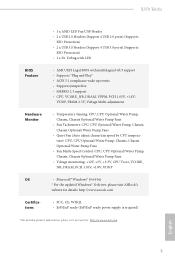
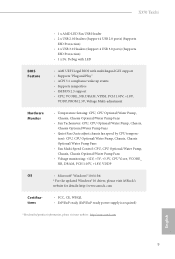
X370 Taichi • 1 x AMD LED Fan USB Header • 2 x USB 2.0 Headers (Support 4 USB 2.0 ports) (Supports ESD Protection) • 2 x USB 3.0 Headers (Support 4 USB 3.0 ports) (Supports ESD Protection) • 1 x ... NB, DRAM, PCH 1.05V, +1.8V, VDDP OS • Microsoft® Windows® 10 64-bit * For the updated Windows® 10 driver, please visit ASRock's website for details: http://www.asrock.com Certifications • FCC, CE, WHQL • ErP/EuP ready (ErP/EuP ready power supply is required) * For detailed product information, please...
X370 Taichi • 1 x AMD LED Fan USB Header • 2 x USB 2.0 Headers (Support 4 USB 2.0 ports) (Supports ESD Protection) • 2 x USB 3.0 Headers (Support 4 USB 3.0 ports) (Supports ESD Protection) • 1 x ... NB, DRAM, PCH 1.05V, +1.8V, VDDP OS • Microsoft® Windows® 10 64-bit * For the updated Windows® 10 driver, please visit ASRock's website for details: http://www.asrock.com Certifications • FCC, CE, WHQL • ErP/EuP ready (ErP/EuP ready power supply is required) * For detailed product information, please...
User Manual
Page 41
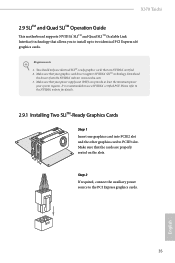
...Ready Graphics Cards Step 1 Insert one graphics card into PCIE2 slot and the other graphics card to the PCI Express graphics cards. 35 English X370 Taichi 2.9 SLITM and Quad SLITM Operation Guide This motherboard supports NVIDIA® SLITM and Quad SLITM (Scalable Link Interface) technology that your system requires... x16 graphics cards. Make sure that are properly seated on the slots. You should only use a NVIDIA® certified PSU. Download the drivers from the NVIDIA® website: www.nvidia.com 3. Make sure that your power supply unit (PSU) can provide at least the minimum ...
...Ready Graphics Cards Step 1 Insert one graphics card into PCIE2 slot and the other graphics card to the PCI Express graphics cards. 35 English X370 Taichi 2.9 SLITM and Quad SLITM Operation Guide This motherboard supports NVIDIA® SLITM and Quad SLITM (Scalable Link Interface) technology that your system requires... x16 graphics cards. Make sure that are properly seated on the slots. You should only use a NVIDIA® certified PSU. Download the drivers from the NVIDIA® website: www.nvidia.com 3. Make sure that your power supply unit (PSU) can provide at least the minimum ...
User Manual
Page 43
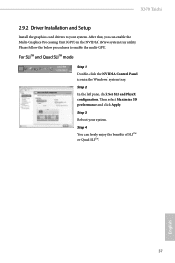
... the left pane, click Set SLI and PhysX configuration. Step 3 Reboot your system. Then select Maximize 3D performance and click Apply. X370 Taichi 2.9.2 Driver Installation and Setup Install the graphics card drivers to enable the multi-GPU. Step 4 You can enable the Multi-Graphics Processing Unit (GPU) in the Windows® system tray. After...
... the left pane, click Set SLI and PhysX configuration. Step 3 Reboot your system. Then select Maximize 3D performance and click Apply. X370 Taichi 2.9.2 Driver Installation and Setup Install the graphics card drivers to enable the multi-GPU. Step 4 You can enable the Multi-Graphics Processing Unit (GPU) in the Windows® system tray. After...
User Manual
Page 44
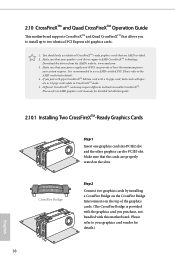
Download the drivers from the AMD's website: www.amd.com 3. Make sure that allows you to install up to PCIE3 slot. Please refer to the AMD's website for ... AMD certified. 2. Please refer to enable CrossFireXTM. You should only use a AMD certified PSU. Different CrossFireXTM cards may require different methods to your graphics card driver supports AMD CrossFireXTM technology.
Download the drivers from the AMD's website: www.amd.com 3. Make sure that allows you to install up to PCIE3 slot. Please refer to the AMD's website for ... AMD certified. 2. Please refer to enable CrossFireXTM. You should only use a AMD certified PSU. Different CrossFireXTM cards may require different methods to your graphics card driver supports AMD CrossFireXTM technology.
User Manual
Page 46
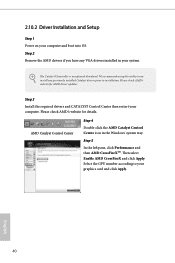
... Catalyst Control Center icon in your graphics card and click Apply. Please check AMD's website for details. Step 3 Install the required drivers and CATALYST Control Center then restart your computer and boot into OS. English 40 The Catalyst Uninstaller is an optional download. Step 5... In the left pane, click Performance and then AMD CrossFireXTM. Step 2 Remove the AMD drivers if you have any previously installed Catalyst drivers prior to installation. Then select Enable AMD CrossFireX and click Apply. We recommend using this utility to your system...
... Catalyst Control Center icon in your graphics card and click Apply. Please check AMD's website for details. Step 3 Install the required drivers and CATALYST Control Center then restart your computer and boot into OS. English 40 The Catalyst Uninstaller is an optional download. Step 5... In the left pane, click Performance and then AMD CrossFireXTM. Step 2 Remove the AMD drivers if you have any previously installed Catalyst drivers prior to installation. Then select Enable AMD CrossFireX and click Apply. We recommend using this utility to your system...
User Manual
Page 54
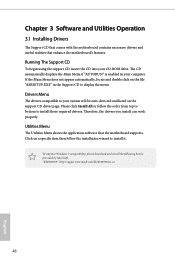
... install can work properly. Chapter 3 Software and Utilities Operation 3.1 Installing Drivers The Support CD that comes with the motherboard contains necessary drivers and useful utilities that the motherboard supports. To improve Windows 7 compatibility, please download and install the ... application software that enhance the motherboard's features. Click on the file "ASRSETUP.EXE" in your computer. Drivers Menu The drivers compatible to install those required drivers. "KB2720599": http://support.microsoft.com/kb/2720599/en-us 48 English Running The Support CD To begin using...
... install can work properly. Chapter 3 Software and Utilities Operation 3.1 Installing Drivers The Support CD that comes with the motherboard contains necessary drivers and useful utilities that the motherboard supports. To improve Windows 7 compatibility, please download and install the ... application software that enhance the motherboard's features. Click on the file "ASRSETUP.EXE" in your computer. Drivers Menu The drivers compatible to install those required drivers. "KB2720599": http://support.microsoft.com/kb/2720599/en-us 48 English Running The Support CD To begin using...

User Manual
Page 62
Click on Step 2 to see a list of recommended or critical updates for the BIOS or drivers. Please update them all soon. 3.3.3 BIOS & Drivers Installing BIOS or Drivers When the "BIOS & Drivers" tab is selected, you want to update. Step 1 Please check the item information before update. Step 3 Click Update to select one or more items you will see more details. Click to start the update process. 56 English
Click on Step 2 to see a list of recommended or critical updates for the BIOS or drivers. Please update them all soon. 3.3.3 BIOS & Drivers Installing BIOS or Drivers When the "BIOS & Drivers" tab is selected, you want to update. Step 1 Please check the item information before update. Step 3 Click Update to select one or more items you will see more details. Click to start the update process. 56 English
User Manual
Page 78
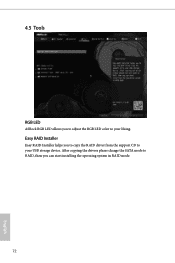
Easy RAID Installer Easy RAID Installer helps you to copy the RAID driver from the support CD to your USB storage device. 4.5 Tools RGB LED ASRock RGB LED allows you to adjust the RGB LED color to your liking. After copying the drivers please change the SATA mode to RAID, then you can start installing the operating system in RAID mode. 72 English
Easy RAID Installer Easy RAID Installer helps you to copy the RAID driver from the support CD to your USB storage device. 4.5 Tools RGB LED ASRock RGB LED allows you to adjust the RGB LED color to your liking. After copying the drivers please change the SATA mode to RAID, then you can start installing the operating system in RAID mode. 72 English
Quick Installation Guide
Page 11
X370 Taichi • 1 x AMD LED Fan USB Header • 2 x USB 2.0 Headers (Support 4 USB 2.0 ports) (Supports ESD Protection) • 2 x USB 3.0 Headers (Support 4 USB 3.0 ports) (Supports ESD Protection) • 1 x ... NB, DRAM, PCH 1.05V, +1.8V, VDDP OS • Microsoft® Windows® 10 64-bit * For the updated Windows® 10 driver, please visit ASRock's website for details: http://www.asrock.com Certifications • FCC, CE, WHQL • ErP/EuP ready (ErP/EuP ready power supply is required) * For detailed product information, please...
X370 Taichi • 1 x AMD LED Fan USB Header • 2 x USB 2.0 Headers (Support 4 USB 2.0 ports) (Supports ESD Protection) • 2 x USB 3.0 Headers (Support 4 USB 3.0 ports) (Supports ESD Protection) • 1 x ... NB, DRAM, PCH 1.05V, +1.8V, VDDP OS • Microsoft® Windows® 10 64-bit * For the updated Windows® 10 driver, please visit ASRock's website for details: http://www.asrock.com Certifications • FCC, CE, WHQL • ErP/EuP ready (ErP/EuP ready power supply is required) * For detailed product information, please...
RAID Installation Guide
Page 2
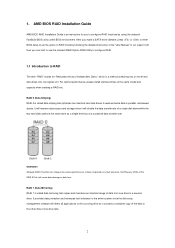
... hard disks perform the same work as it does not provide any HDDs of the "User Manual" in our support CD, then you make a SATA driver diskette, press or to enter BIOS setup to a second drive. Hot-Plug any fault tolerance. After you can improve the access performance, it contains a complete...
... hard disks perform the same work as it does not provide any HDDs of the "User Manual" in our support CD, then you make a SATA driver diskette, press or to enter BIOS setup to a second drive. Hot-Plug any fault tolerance. After you can improve the access performance, it contains a complete...
RAID Installation Guide
Page 5
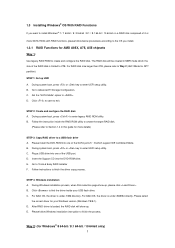
...SATA Mode" option to finish the process. D. B. During system boot, press to enter UEFI setup utility. C. B. For 32bit OS, the driver is under /I386 directory. During system boot, press or key to enter legacy RAID ROM utility. STEP 4: Windows installation A. 1.3 Installing Windows...STEP 1: Set up , please click . C. Follow the instruction inside your Windows version (Windows 7/8/8.1). E. Follow instructions to find the driver inside the RAID ROM utility to create the target RAID disk. (Please refer to Section 1.4 in MBR mode which support IDE Combined ...
...SATA Mode" option to finish the process. D. B. During system boot, press to enter UEFI setup utility. C. B. For 32bit OS, the driver is under /I386 directory. During system boot, press or key to enter legacy RAID ROM utility. STEP 4: Windows installation A. 1.3 Installing Windows...STEP 1: Set up , please click . C. Follow the instruction inside your Windows version (Windows 7/8/8.1). E. Follow instructions to find the driver inside the RAID ROM utility to create the target RAID disk. (Please refer to Section 1.4 in MBR mode which support IDE Combined ...
RAID Installation Guide
Page 9
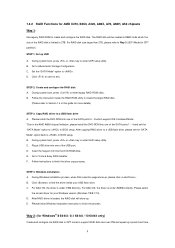
... USB flash drive A. D. STEP 4: Windows installation A. During Windows installation process, when Disk selection page show up system boot time. 9 For 64bit OS, the driver is under /AMD64 directly. Way 2: (for Windows® 8 64-bit / 8.1 64-bit / 10 64-bit only) Create and configure the RAID disk ...larger than 2TB, please refer to enter UEFI setup utility. E. B. 1.3.2 RAID Functions for AMD X370, B350, A320, A88X, A78, A68H, A58 chipsets Way 1: Use legacy RAID ROM to find the driver inside the RAID ROM utility to create the target RAID disk. (Please refer to Section 1.4 ...
... USB flash drive A. D. STEP 4: Windows installation A. During Windows installation process, when Disk selection page show up system boot time. 9 For 64bit OS, the driver is under /AMD64 directly. Way 2: (for Windows® 8 64-bit / 8.1 64-bit / 10 64-bit only) Create and configure the RAID disk ...larger than 2TB, please refer to enter UEFI setup utility. E. B. 1.3.2 RAID Functions for AMD X370, B350, A320, A88X, A78, A68H, A58 chipsets Way 1: Use legacy RAID ROM to find the driver inside the RAID ROM utility to create the target RAID disk. (Please refer to Section 1.4 ...
RAID Installation Guide
Page 10
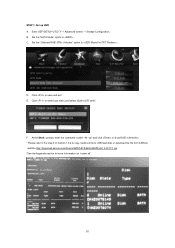
... to show RAID information. * Please refer to the step 3 of Section 1.3.2 to copy rcadm.efi file to USB flash disk or download the file from ASRock website http://download.asrock.com/drivers/AMD/SATA/BoltonRAID(v6.1.0.00117).zip. *See the Appendix section for more information on "rcadm.efi". 10
... to show RAID information. * Please refer to the step 3 of Section 1.3.2 to copy rcadm.efi file to USB flash disk or download the file from ASRock website http://download.asrock.com/drivers/AMD/SATA/BoltonRAID(v6.1.0.00117).zip. *See the Appendix section for more information on "rcadm.efi". 10
RAID Installation Guide
Page 26
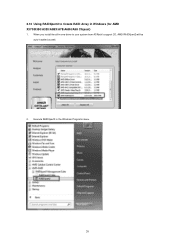
Execute RAIDXpert2 in -one driver to Create RAID Array in Windows (for AMD X370/B350/A320/A88X/A78/A68H/A58 Chipset) 1. When you install the all-in the Windows Programs menu. 26 2.10 Using RAIDXpert2 to your system from ASRock's support CD, AMD RAIDXpert2 will be auto-installed as well. 2.
Execute RAIDXpert2 in -one driver to Create RAID Array in Windows (for AMD X370/B350/A320/A88X/A78/A68H/A58 Chipset) 1. When you install the all-in the Windows Programs menu. 26 2.10 Using RAIDXpert2 to your system from ASRock's support CD, AMD RAIDXpert2 will be auto-installed as well. 2.


