User Manual
Page 6
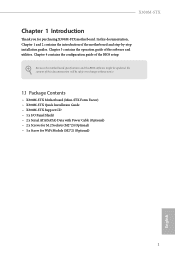
... of the motherboard and step-by-step installation guides. Because the motherboard specifications and the BIOS software might be subject to change without notice. 1.1 Package Contents • X300M-STX Motherboard (Mini-STX Form Factor) • X300M-STX Quick Installation Guide • X300M-STX Support CD • 1 x I/O Panel Shield • 2 x Serial ATA(SATA) Data with Power Cable (Optional) •...
... of the motherboard and step-by-step installation guides. Because the motherboard specifications and the BIOS software might be subject to change without notice. 1.1 Package Contents • X300M-STX Motherboard (Mini-STX Form Factor) • X300M-STX Quick Installation Guide • X300M-STX Support CD • 1 x I/O Panel Shield • 2 x Serial ATA(SATA) Data with Power Cable (Optional) •...

User Manual
Page 9
... Connectors (2 x 4-pin) • 1 x Front Panel Header • 1 x USB 2.0 Header (Supports 2 USB 2.0 ports) (Supports ESD Protection) • 1 x Audio Header • 1 x MONO Speaker Header BIOS Feature • AMI UEFI Legal BIOS with GUI support • Supports "Plug and Play" • ACPI 5.1 compliance wake up events • Supports jumperfree • SMBIOS 2.3 support • DRAM Voltage...
... Connectors (2 x 4-pin) • 1 x Front Panel Header • 1 x USB 2.0 Header (Supports 2 USB 2.0 ports) (Supports ESD Protection) • 1 x Audio Header • 1 x MONO Speaker Header BIOS Feature • AMI UEFI Legal BIOS with GUI support • Supports "Plug and Play" • ACPI 5.1 compliance wake up events • Supports jumperfree • SMBIOS 2.3 support • DRAM Voltage...
User Manual
Page 10
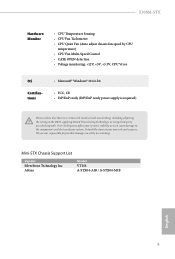
... cause damage to the components and devices of your own risk and expense. It should be done at your system. Mini-STX Chassis Support List Vendor SilverStone Technology Inc. We are not responsible for possible damage caused by CPU temperature) • CPU Fan...there is a certain risk involved with overclocking, including adjusting the setting in the BIOS, applying Untied Overclocking Technology, or using third-party overclocking tools. AKasa Model VT01S A-STX04-A1B / A-STX04-M1B English 5 X300M-STX Hardware Monitor • CPU Temperature Sensing • CPU Fan Tachometer •...
... cause damage to the components and devices of your own risk and expense. It should be done at your system. Mini-STX Chassis Support List Vendor SilverStone Technology Inc. We are not responsible for possible damage caused by CPU temperature) • CPU Fan...there is a certain risk involved with overclocking, including adjusting the setting in the BIOS, applying Untied Overclocking Technology, or using third-party overclocking tools. AKasa Model VT01S A-STX04-A1B / A-STX04-M1B English 5 X300M-STX Hardware Monitor • CPU Temperature Sensing • CPU Fan Tachometer •...

User Manual
Page 11
1.3 Motherboard Layout DC Jack 1 USB_4_5 CLRMOS1 1 2 Super 1 1 I/O SPEAKER1 1 CI1 3 M.2 PCIe SSD 4 M.2 WiFi DP1 HDMI1 VGA1 T: USB 2.0 USB2 B: USB 3.1 Gen1 USB3 Top: RJ-45 CPU_FAN2 CPU_FAN1 9 8 SOCKET AM4 RoHS DDR4_A1 BIOS ROM DDR4_B1 Mic In USB 3.1 Gen1 USB_TC_1 USB 3.1 Gen1 USB_1 5 PANEL1 PLED PWRBTN 1 HDLED RESET Audio CODEC AUDIO3 1 Headphone / Headset 7 6 English 6
1.3 Motherboard Layout DC Jack 1 USB_4_5 CLRMOS1 1 2 Super 1 1 I/O SPEAKER1 1 CI1 3 M.2 PCIe SSD 4 M.2 WiFi DP1 HDMI1 VGA1 T: USB 2.0 USB2 B: USB 3.1 Gen1 USB3 Top: RJ-45 CPU_FAN2 CPU_FAN1 9 8 SOCKET AM4 RoHS DDR4_A1 BIOS ROM DDR4_B1 Mic In USB 3.1 Gen1 USB_TC_1 USB 3.1 Gen1 USB_1 5 PANEL1 PLED PWRBTN 1 HDLED RESET Audio CODEC AUDIO3 1 Headphone / Headset 7 6 English 6

User Manual
Page 26
... may be detected. Please adjust the BIOS option "Clear Status" to remove the jumper cap after clearing the CMOS. If you to clear the data in CMOS includes system setup information such as system password, date, time, and system setup parameters. The data in CMOS. X300M-STX 2.4 Jumpers Setup The illustration shows how... setup, please turn off the computer and unplug the power cord, then use a jumper cap to clear the CMOS when you just finish updating the BIOS, you must boot up the system first, and then shut it down before you do the clear-CMOS action.
... may be detected. Please adjust the BIOS option "Clear Status" to remove the jumper cap after clearing the CMOS. If you to clear the data in CMOS includes system setup information such as system password, date, time, and system setup parameters. The data in CMOS. X300M-STX 2.4 Jumpers Setup The illustration shows how... setup, please turn off the computer and unplug the power cord, then use a jumper cap to clear the CMOS when you just finish updating the BIOS, you must boot up the system first, and then shut it down before you do the clear-CMOS action.
User Manual
Page 49
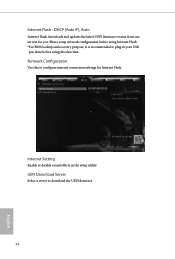
Network Configuration Use this function. Internet Setting Enable or disable sound effects in your USB pen drive before using this to configure internet connection settings for you. DHCP (Auto IP), Auto Internet Flash downloads and updates the latest UEFI firmware version from our servers for Internet Flash. UEFI Download Server Select a server to plug in the setup utility. Please setup network configuration before using Internet Flash. *For BIOS backup and recovery purpose, it is recommended to download the UEFI firmware. 44 English Internet Flash -
Network Configuration Use this function. Internet Setting Enable or disable sound effects in your USB pen drive before using this to configure internet connection settings for you. DHCP (Auto IP), Auto Internet Flash downloads and updates the latest UEFI firmware version from our servers for Internet Flash. UEFI Download Server Select a server to plug in the setup utility. Please setup network configuration before using Internet Flash. *For BIOS backup and recovery purpose, it is recommended to download the UEFI firmware. 44 English Internet Flash -

RAID Installation Guide
Page 1
AMD BIOS RAID Installation Guide ...2 1.1 Introduction to RAID...2 1.2 RAID Configurations Precautions 4 1.3 UEFI RAID Configuration ...5 2. AMD Windows RAID Installation Guide 14 1 AMD RAID Installation Guide 1.
AMD BIOS RAID Installation Guide ...2 1.1 Introduction to RAID...2 1.2 RAID Configurations Precautions 4 1.3 UEFI RAID Configuration ...5 2. AMD Windows RAID Installation Guide 14 1 AMD RAID Installation Guide 1.

RAID Installation Guide
Page 2
... ROM Utility to configure RAID. 1.1 Introduction to RAID The term "RAID" stands for you make a SATA driver diskette, press or to enter BIOS setup to configure RAID functions by following the detailed instruction of a single disk alone while the two hard disks perform the same work as it... to the entire system since it contains a complete copy of data from one drive fails. 2 After you to set . AMD BIOS RAID Installation Guide AMD BIOS RAID Installation Guide is called data mirroring that optimizes two identical hard disk drives to the surviving drive as a single drive but at...
... ROM Utility to configure RAID. 1.1 Introduction to RAID The term "RAID" stands for you make a SATA driver diskette, press or to enter BIOS setup to configure RAID functions by following the detailed instruction of a single disk alone while the two hard disks perform the same work as it... to the entire system since it contains a complete copy of data from one drive fails. 2 After you to set . AMD BIOS RAID Installation Guide AMD BIOS RAID Installation Guide is called data mirroring that optimizes two identical hard disk drives to the surviving drive as a single drive but at...

RAID Installation Guide
Page 6
I. Go to save your changes and exit, and then enter the BIOS Setup again. Click to AdvancedRAIDXpert2 Configuration Utility Array Management, and then delete the existing disk arrays before creating a new array. H. After saving the previously changed settings via F10 and rebooting the system, "RAIDXpert2 Configuration Utility" submenu becomes available. G. Even if you have not configured any RAID array yet, you might have to use "Delete Array" first. 6
I. Go to save your changes and exit, and then enter the BIOS Setup again. Click to AdvancedRAIDXpert2 Configuration Utility Array Management, and then delete the existing disk arrays before creating a new array. H. After saving the previously changed settings via F10 and rebooting the system, "RAIDXpert2 Configuration Utility" submenu becomes available. G. Even if you have not configured any RAID array yet, you might have to use "Delete Array" first. 6


