

Intel Smart Response Installation Guide
Page 1
...://www.asrock.com * Before you use the full SSD as Cache device or only 20GB, and if you intend to use Enhanced or Maximized Mode. 6. Boot system to show the newly accelerated system configuration. * Intel® will update the new version RST driver in system at this point! 3. Intel Smart Response Technology Installation Guide This motherboard supports Intel Smart Response Technology. After clicking OK button...
...://www.asrock.com * Before you use the full SSD as Cache device or only 20GB, and if you intend to use Enhanced or Maximized Mode. 6. Boot system to show the newly accelerated system configuration. * Intel® will update the new version RST driver in system at this point! 3. Intel Smart Response Technology Installation Guide This motherboard supports Intel Smart Response Technology. After clicking OK button...

Intel Rapid Storage Guide
Page 1
... longer battery life with Link Power Management (LPM), which can be accessed on each drive simultaneously, speeding up data protection can reduce the power consumption of the chipset and Serial ATA (SATA) hard drive. 1 Intel Rapid Storage Technology provides benefits to users of faster boot times and data reads. Through AHCI, storage performance is improved through Native Command Queuing (NCQ). When using one drive, the user...
... longer battery life with Link Power Management (LPM), which can be accessed on each drive simultaneously, speeding up data protection can reduce the power consumption of the chipset and Serial ATA (SATA) hard drive. 1 Intel Rapid Storage Technology provides benefits to users of faster boot times and data reads. Through AHCI, storage performance is improved through Native Command Queuing (NCQ). When using one drive, the user...
Intel Rapid Storage Guide
Page 12
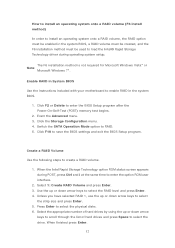
... the BIOS settings and exit the BIOS Setup program. Select 1: Create RAID Volume and press Enter. 3. Switch the SATA Operation Mode option to select the physical disks. 6. Press Enter to RAID. 5. Click F2 or Delete to enter the option ROM user interface. 2. How to install an operating system onto a RAID volume (F6 install method) In order to install an operating system onto a RAID volume, the RAID option must be enabled in the system BIOS. 1. Select the appropriate number of hard drives by using...
... the BIOS settings and exit the BIOS Setup program. Select 1: Create RAID Volume and press Enter. 3. Switch the SATA Operation Mode option to select the physical disks. 6. Press Enter to RAID. 5. Click F2 or Delete to enter the option ROM user interface. 2. How to install an operating system onto a RAID volume (F6 install method) In order to install an operating system onto a RAID volume, the RAID option must be enabled in the system BIOS. 1. Select the appropriate number of hard drives by using...
Intel Rapid Storage Guide
Page 13
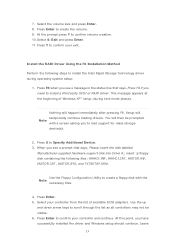
... drivers. Select your controller from the list of Windows XP* setup (during operating system setup: 1. Select the volume size and press Enter. 8. Use the Floppy Configuration Utility to create a floppy disk with a screen asking you see a message in the status line that says, Please insert the disk labeled Manufacturer-supplied hardware support disk into Drive A:, insert ;a floppy disk containing the following steps to load support for mass storage device(s). 2. When you to install...
... drivers. Select your controller from the list of Windows XP* setup (during operating system setup: 1. Select the volume size and press Enter. 8. Use the Floppy Configuration Utility to create a floppy disk with a screen asking you see a message in the status line that says, Please insert the disk labeled Manufacturer-supplied hardware support disk into Drive A:, insert ;a floppy disk containing the following steps to load support for mass storage device(s). 2. When you to install...

Intel Rapid Storage Guide
Page 15
... (ICH). If your RAID controller is not enabled, enabling the RAID controller is not recommended or supported when a SATA hard drive is enabled. If your system does not have a RAID ICH, you will need to a RAID volume that includes that hard drive plus the newly added hard drive(s). Enabling the RAID controller may cause an immediate blue screen with an 0x0000007b error code, followed by a reboot. Turn off the system and install one or more additional hard drives. 3. If both...
... (ICH). If your RAID controller is not enabled, enabling the RAID controller is not recommended or supported when a SATA hard drive is enabled. If your system does not have a RAID ICH, you will need to a RAID volume that includes that hard drive plus the newly added hard drive(s). Enabling the RAID controller may cause an immediate blue screen with an 0x0000007b error code, followed by a reboot. Turn off the system and install one or more additional hard drives. 3. If both...
RAID Installation Guide
Page 1
... 6 2.3 Installing Windows® 8 / 8 64-bit / 7 / 7 64-bit With RAID Functions 7 2.4 Setting the BIOS RAID Items 8 2.5 Configuring a RAID array 8 2.5.1 Configuring a RAID array Using UEFI Setup Utility....... 8 2.5.2 Configuring a RAID array Using Intel RAID BIOS....... 13 3. Guide to SATA Hard Disks Installation 2 1.1 Serial ATA (SATA) Hard Disks Installation 2 2. Installing Windows® on a HDD larger than 2TB in RAID mode 17 4. Installing Windows® on a HDD under 2TB in RAID mode 18 1 Guide to SATA Hard Disks Installation and RAID Configuration 1.
... 6 2.3 Installing Windows® 8 / 8 64-bit / 7 / 7 64-bit With RAID Functions 7 2.4 Setting the BIOS RAID Items 8 2.5 Configuring a RAID array 8 2.5.1 Configuring a RAID array Using UEFI Setup Utility....... 8 2.5.2 Configuring a RAID array Using Intel RAID BIOS....... 13 3. Guide to SATA Hard Disks Installation 2 1.1 Serial ATA (SATA) Hard Disks Installation 2 2. Installing Windows® on a HDD larger than 2TB in RAID mode 17 4. Installing Windows® on a HDD under 2TB in RAID mode 18 1 Guide to SATA Hard Disks Installation and RAID Configuration 1.
RAID Installation Guide
Page 2
Guide to the Intel southbridge chipset that your motherboard adopts. Please read the RAID configurations in this motherboard for internal storage devices. This section will guide you how to create RAID on this guide carefully according to SATA Hard Disks Installation 1.1 Serial ATA (SATA) Hard Disks Installation Intel chipset supports Serial ATA (SATA) hard disks with RAID functions, including RAID 0, RAID 1, RAID 5, RAID 10 and Intel Rapid Storage. 1. You may install SATA hard disks on SATA ports. 2
Guide to the Intel southbridge chipset that your motherboard adopts. Please read the RAID configurations in this motherboard for internal storage devices. This section will guide you how to create RAID on this guide carefully according to SATA Hard Disks Installation 1.1 Serial ATA (SATA) Hard Disks Installation Intel chipset supports Serial ATA (SATA) hard disks with RAID functions, including RAID 0, RAID 1, RAID 5, RAID 10 and Intel Rapid Storage. 1. You may install SATA hard disks on SATA ports. 2
RAID Installation Guide
Page 3
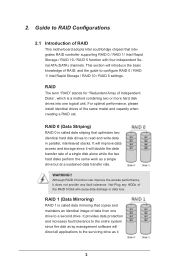
..., interleaved stacks. 2. RAID 0 (Data Striping) RAID 0 is called data mirroring that integrates RAID controller supporting RAID 0 / RAID 1/ Intel Rapid Storage / RAID 10 / RAID 5 function with four independent Serial ATA (SATA) channels. It will improve data access and storage since the disk array management software will cause data damage or data loss. RAID 1 (Data Mirroring) RAID 1 is a method combining two or more hard disk drives into one drive to a second drive. It provides...
..., interleaved stacks. 2. RAID 0 (Data Striping) RAID 0 is called data mirroring that integrates RAID controller supporting RAID 0 / RAID 1/ Intel Rapid Storage / RAID 10 / RAID 5 function with four independent Serial ATA (SATA) channels. It will improve data access and storage since the disk array management software will cause data damage or data loss. RAID 1 (Data Mirroring) RAID 1 is a method combining two or more hard disk drives into one drive to a second drive. It provides...
RAID Installation Guide
Page 7
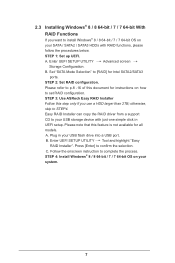
... RAID driver from a support CD to install Windows® 8 / 8 64-bit / 7 / 7 64-bit OS on your system. 7 STEP 3: Use ASRock Easy RAID Installer Follow this step only if you want to your USB flash drive into a USB port B. Enter UEFI SETUP UTILITY Advanced screen Storage Configuration. Set "SATA Mode Selection" to confirm the selection C. STEP 1: Set up UEFI. B. STEP 2: Set RAID configuration. Plug in your USB storage device with RAID functions, please follow the procedures below. Press [Enter] to [RAID] for all models...
... RAID driver from a support CD to install Windows® 8 / 8 64-bit / 7 / 7 64-bit OS on your system. 7 STEP 3: Use ASRock Easy RAID Installer Follow this step only if you want to your USB flash drive into a USB port B. Enter UEFI SETUP UTILITY Advanced screen Storage Configuration. Set "SATA Mode Selection" to confirm the selection C. STEP 1: Set up UEFI. B. STEP 2: Set RAID configuration. Plug in your USB storage device with RAID functions, please follow the procedures below. Press [Enter] to [RAID] for all models...
RAID Installation Guide
Page 18
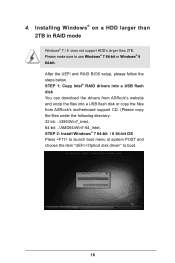
STEP 1: Copy Intel® RAID drivers into a USB flash disk You can download the drivers from ASRock's website and unzip the files into a USB flash disk or copy the files from ASRock's motherboard support CD. (Please copy the files under the following directory: 32 bit: ..\i386\Win7_Intel.. 64-bit: ..\AMD64\Win7-64_Intel.. STEP 2: Install Windows® 7 64-bit / 8 64-bit OS Press to launch boot menu at system POST...
STEP 1: Copy Intel® RAID drivers into a USB flash disk You can download the drivers from ASRock's website and unzip the files into a USB flash disk or copy the files from ASRock's motherboard support CD. (Please copy the files under the following directory: 32 bit: ..\i386\Win7_Intel.. 64-bit: ..\AMD64\Win7-64_Intel.. STEP 2: Install Windows® 7 64-bit / 8 64-bit OS Press to launch boot menu at system POST...
User Manual
Page 4
... ventilation openings. • Use this product near water or a heated source such as a result of attempting to products (including HDD, ODD, memory and warranty seal) that the total ampere rating of the devices plugged into the system. • The system does not function properly even if you follow all power, modem, and network cables from the power outlets before you operate...
... ventilation openings. • Use this product near water or a heated source such as a result of attempting to products (including HDD, ODD, memory and warranty seal) that the total ampere rating of the devices plugged into the system. • The system does not function properly even if you follow all power, modem, and network cables from the power outlets before you operate...

User Manual
Page 10
... micro USB 11pin-to5pin adapter Please realize that there is a certain risk involved with overclocking, including adjusting the setting in the BIOS, applying Untied Overclocking Technology, or using third-party overclocking tools. VisionX Series Bluetooth • Bluetooth 4.0/3.0 HS class II Remote Controller • Support MCE function Power • 120W/19V Adapter Dimension • 200mm(W)x70mm(H)x200mm(L) Volume • 2.8L *For barebone systems, CPU, memory, HDDs...
... micro USB 11pin-to5pin adapter Please realize that there is a certain risk involved with overclocking, including adjusting the setting in the BIOS, applying Untied Overclocking Technology, or using third-party overclocking tools. VisionX Series Bluetooth • Bluetooth 4.0/3.0 HS class II Remote Controller • Support MCE function Power • 120W/19V Adapter Dimension • 200mm(W)x70mm(H)x200mm(L) Volume • 2.8L *For barebone systems, CPU, memory, HDDs...

User Manual
Page 12
VisionX Series NOTE 1. SATA and Power Connections SATA & Power Connections HDD ODD Connect to ODD Connect to HDD Connect to SATA Connector (4) Connect to ATX5V Power Connector (3) Connect to SATA Connector (1) 2. Fan Connection Fan connector Rotation +12V Ground English 5
VisionX Series NOTE 1. SATA and Power Connections SATA & Power Connections HDD ODD Connect to ODD Connect to HDD Connect to SATA Connector (4) Connect to ATX5V Power Connector (3) Connect to SATA Connector (1) 2. Fan Connection Fan connector Rotation +12V Ground English 5
User Manual
Page 24
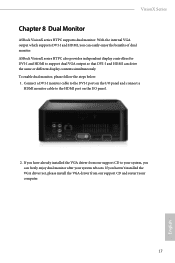
ASRock VisionX series HTPC also provides independent display controllers for DVI-I and HDMI to the HDMI port on the I/O panel and connect a HDMI monitor cable to support dual VGA output so that DVI-I and HDMI, you have already installed the VGA driver from our support CD and restart your system reboots. To enable dual monitor, please follow the steps below: 1. If you haven't installed the VGA driver yet, please install the VGA driver from our support CD to your system, you can easily...
ASRock VisionX series HTPC also provides independent display controllers for DVI-I and HDMI to the HDMI port on the I/O panel and connect a HDMI monitor cable to support dual VGA output so that DVI-I and HDMI, you have already installed the VGA driver from our support CD and restart your system reboots. To enable dual monitor, please follow the steps below: 1. If you haven't installed the VGA driver yet, please install the VGA driver from our support CD to your system, you can easily...
User Manual
Page 25
... drivers. Therefore, the drivers you install can work properly. "KB2720599": http://support.microsoft.com/kb/2720599/en-us 18 English Chapter 9 Software and Utilities Operation 9.1 Installing Drivers The Support CD that comes with this system contains necessary drivers and useful utilities that the motherboard supports. To improve Windows 7 compatibility, please download and install the following hot fix provided by Microsoft. Utilities Menu The Utilities Menu shows the application software that enhance the system's features. Running...
... drivers. Therefore, the drivers you install can work properly. "KB2720599": http://support.microsoft.com/kb/2720599/en-us 18 English Chapter 9 Software and Utilities Operation 9.1 Installing Drivers The Support CD that comes with this system contains necessary drivers and useful utilities that the motherboard supports. To improve Windows 7 compatibility, please download and install the following hot fix provided by Microsoft. Utilities Menu The Utilities Menu shows the application software that enhance the system's features. Running...

User Manual
Page 27
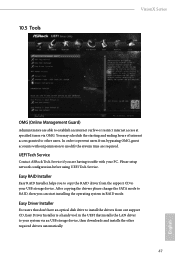
... the Power/HDD/LAN LEDs when the system is only supported by Windows 8 and the VBIOS must support UEFI GOP if you are using an external graphics card. Good Night LED Switch off the Power and Keyboard LEDs when the system enters into Standby/ Hibernation mode. 20 English Fast Boot Fast Boot minimizes your internet connection! OMG Schedule the starting and ending hours of your computer's boot time. Tools Various tools and utilities. Select a specific mode for making...
... the Power/HDD/LAN LEDs when the system is only supported by Windows 8 and the VBIOS must support UEFI GOP if you are using an external graphics card. Good Night LED Switch off the Power and Keyboard LEDs when the system enters into Standby/ Hibernation mode. 20 English Fast Boot Fast Boot minimizes your internet connection! OMG Schedule the starting and ending hours of your computer's boot time. Tools Various tools and utilities. Select a specific mode for making...
User Manual
Page 54
... via OMG. You may schedule the starting and ending hours of internet access granted to your PC. Easy RAID Installer Easy RAID Installer helps you can start installing the operating system in the UEFI that don't have an optical disk drive to install the drivers from the support CD to other required drivers automatically. 47 English UEFI Tech Service Contact ASRock Tech Service if you are having trouble with your USB storage device.
... via OMG. You may schedule the starting and ending hours of internet access granted to your PC. Easy RAID Installer Easy RAID Installer helps you can start installing the operating system in the UEFI that don't have an optical disk drive to install the drivers from the support CD to other required drivers automatically. 47 English UEFI Tech Service Contact ASRock Tech Service if you are having trouble with your USB storage device.
User Manual
Page 55
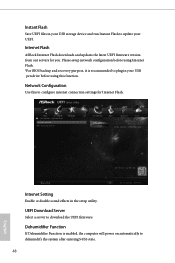
... firmware. Network Configuration Use this function. Internet Setting Enable or disable sound effects in the setup utility. UEFI Download Server Select a server to dehumidify the system after entering S4/S5 state. 48 English Dehumidifier Function If Dehumidifier Function is recommended to configure internet connection settings for you. Instant Flash Save UEFI files in your USB storage device and run Instant Flash to update your USB pen drive before using this to plug in your UEFI. Internet Flash ASRock Internet Flash downloads and updates the latest UEFI firmware...
... firmware. Network Configuration Use this function. Internet Setting Enable or disable sound effects in the setup utility. UEFI Download Server Select a server to dehumidify the system after entering S4/S5 state. 48 English Dehumidifier Function If Dehumidifier Function is recommended to configure internet connection settings for you. Instant Flash Save UEFI files in your USB storage device and run Instant Flash to update your USB pen drive before using this to plug in your UEFI. Internet Flash ASRock Internet Flash downloads and updates the latest UEFI firmware...
User Manual
Page 58
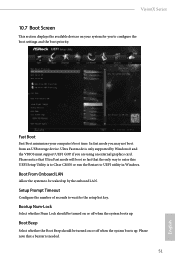
... Clear CMOS or run the Restart to wait for you are using an external graphics card. Ultra Fast mode is only supported by the onboard LAN. Boot Beep Select whether the Boot Beep should be waked up . Please note that the only way to configure the boot settings and the boot priority. VisionX Series 10.7 Boot Screen This section displays the available devices on your computer's boot time. In fast mode you may not boot from an USB storage device. Boot...
... Clear CMOS or run the Restart to wait for you are using an external graphics card. Ultra Fast mode is only supported by the onboard LAN. Boot Beep Select whether the Boot Beep should be waked up . Please note that the only way to configure the boot settings and the boot priority. VisionX Series 10.7 Boot Screen This section displays the available devices on your computer's boot time. In fast mode you may not boot from an USB storage device. Boot...
Quick Installation Guide
Page 2
.../HDD Installing the second HDD Reinstalling the DIMMs Reinstalling the MXM card Safety instructions 1. Disconnect the ODD/HDD SATA power cable, and take out the ODD/HDD bracket. 3. Unlock the DIMM slots by pressing the retaining clips outward to change the DIMMs. Reinstalling the CPU 1. Rotate the screw on the corners of the crossed out wheeled bin indicates that you read the following technical problems...
.../HDD Installing the second HDD Reinstalling the DIMMs Reinstalling the MXM card Safety instructions 1. Disconnect the ODD/HDD SATA power cable, and take out the ODD/HDD bracket. 3. Unlock the DIMM slots by pressing the retaining clips outward to change the DIMMs. Reinstalling the CPU 1. Rotate the screw on the corners of the crossed out wheeled bin indicates that you read the following technical problems...

