
User Manual
Page 3
...environments with ambient temperatures between 0o C and 40o C. • If you follow the operating instructions. • The system was dropped or the cabinet is damaged. • The system performance changes. Do not block or cover these openings. Always unplug all power, modem, and network cables from the ...power outlets before you operate your system. • Do not use this product near water or a heated source such as a radiator. • Set up your retailer. • The...
...environments with ambient temperatures between 0o C and 40o C. • If you follow the operating instructions. • The system was dropped or the cabinet is damaged. • The system performance changes. Do not block or cover these openings. Always unplug all power, modem, and network cables from the ...power outlets before you operate your system. • Do not use this product near water or a heated source such as a radiator. • Set up your retailer. • The...
User Manual
Page 4
... cautions and warnings Optical Drive Safety Information Optical drives sold with this product or impede the airflow in any way. 4 Do not attempt to this system contains a CLASS 1 LASER PRODUCT. Product disposal notice IMPORTANT: This symbol of direct sunlight, high-humidity or wet conditions. Replace only with optical instruments. Do not...
... cautions and warnings Optical Drive Safety Information Optical drives sold with this product or impede the airflow in any way. 4 Do not attempt to this system contains a CLASS 1 LASER PRODUCT. Product disposal notice IMPORTANT: This symbol of direct sunlight, high-humidity or wet conditions. Replace only with optical instruments. Do not...

User Manual
Page 5
Contents 1 Introduction 7 1.1 Package Contents 7 1.2 Specifications 8 1.3 System Motherboard Components 10 1.4 Rear Panel 12 1.5 System Chassis 13 1.6 Remote Controller 14 2 Opening the Chassis 15 3 Reinstalling the ODD/HDD 16 4 Installing the second HDD 17 5 Reinstalling ...20 8 Dual Monitor 21 9 Driver Installation 22 10 Utility Menu 23 10.1 Instant Boot 23 10.1.1 Introduction 23 10.1.2 Installation 24 10.2 ASRock Extreme Tuning Utility (AXTU 27 10.2.1 Introduction 27 10.2.2 Installation 27 10.2.3 Function 27 10.3 Symantec Norton AntiVirus Software free bundle (Trial version...
Contents 1 Introduction 7 1.1 Package Contents 7 1.2 Specifications 8 1.3 System Motherboard Components 10 1.4 Rear Panel 12 1.5 System Chassis 13 1.6 Remote Controller 14 2 Opening the Chassis 15 3 Reinstalling the ODD/HDD 16 4 Installing the second HDD 17 5 Reinstalling ...20 8 Dual Monitor 21 9 Driver Installation 22 10 Utility Menu 23 10.1 Instant Boot 23 10.1.1 Introduction 23 10.1.2 Installation 24 10.2 ASRock Extreme Tuning Utility (AXTU 27 10.2.1 Introduction 27 10.2.2 Installation 27 10.2.3 Function 27 10.3 Symantec Norton AntiVirus Software free bundle (Trial version...

User Manual
Page 6
....5 Hardware Health Event Monitoring Screen 56 11.6 Boot Screen 57 11.7 Security Screen 58 11.8 Exit Screen 59 12 Software Support 60 12.1 Install Operating System 60 12.2 Support CD Information 60 12.2.1 Running Support CD 60 12.2.2 Drivers Menu 60 12.2.3 Utilities Menu 60 12.2.4 Contact Information 60 6
....5 Hardware Health Event Monitoring Screen 56 11.6 Boot Screen 57 11.7 Security Screen 58 11.8 Exit Screen 59 12 Software Support 60 12.1 Install Operating System 60 12.2 Support CD Information 60 12.2.1 Running Support CD 60 12.2.2 Drivers Menu 60 12.2.3 Utilities Menu 60 12.2.4 Contact Information 60 6

User Manual
Page 8
...(H)x200m(L) Volume (liters) 2.8L Free bundle software: *31. Symantec Norton AntiVirus Software (trial version) 3. CyberLink MediaEspresso 6.5 (trial version) 4. ASRock MAGIX Multimedia Suite (OEM version) 5. ASRock XFast LAN, XFast RAM, XFast USB 8 1.2 Specifications * For barebone systems, CPU, memory, HDDs and ODDs may not be included. Processor Intel® Mobile Ivy Bridge Processor. Supports 3rd Generation...
...(H)x200m(L) Volume (liters) 2.8L Free bundle software: *31. Symantec Norton AntiVirus Software (trial version) 3. CyberLink MediaEspresso 6.5 (trial version) 4. ASRock MAGIX Multimedia Suite (OEM version) 5. ASRock XFast LAN, XFast RAM, XFast USB 8 1.2 Specifications * For barebone systems, CPU, memory, HDDs and ODDs may not be included. Processor Intel® Mobile Ivy Bridge Processor. Supports 3rd Generation...

User Manual
Page 9
... to the components and devices of your own risk and expense. WARNING Please realize that there is a certain risk involved with VisionX BD series only. It should be done at your system. IDE mode does not support Hot Plug. *3 CyberLink PowerDVD 10 OEM software is bundled with overclocking, including adjusting the setting...
... to the components and devices of your own risk and expense. WARNING Please realize that there is a certain risk involved with VisionX BD series only. It should be done at your system. IDE mode does not support Hot Plug. *3 CyberLink PowerDVD 10 OEM software is bundled with overclocking, including adjusting the setting...

User Manual
Page 10
Fan connector 7. Infrared module header 10. Fan connector 13. HM77 PCH chipset 8. Memory socket 9. CPU 12. SATA 3.0 connector: For HDD SATA data cables 2. ATX5V output power connector for second HDD 6. Clear CMOS jumper 14. SATA 3.0 connector: For HDD SATA data cables 3. Mini-PCI Express expansion slot: For WiFi module 15. MXM 3.0 slot 10 mSATA slot 11. SATA connector: For ODD SATA data cables 5. SATA power cable connector (+5V/+12V) for slim ODD & 2.5" HDD 4. 1.3 System Motherboard Components 1.
Fan connector 7. Infrared module header 10. Fan connector 13. HM77 PCH chipset 8. Memory socket 9. CPU 12. SATA 3.0 connector: For HDD SATA data cables 2. ATX5V output power connector for second HDD 6. Clear CMOS jumper 14. SATA 3.0 connector: For HDD SATA data cables 3. Mini-PCI Express expansion slot: For WiFi module 15. MXM 3.0 slot 10 mSATA slot 11. SATA connector: For ODD SATA data cables 5. SATA power cable connector (+5V/+12V) for slim ODD & 2.5" HDD 4. 1.3 System Motherboard Components 1.

User Manual
Page 13
1.5 System Chassis 29. Microphone 31. Power ON/OFF button with status indicator 34. Slot-in -1 Card reader (MMC/SD3.0/MS/MS Pro) 33. USB3.0 ports: USB devices 32. 4-in Optical Disc Drive 13 Headphone 30.
1.5 System Chassis 29. Microphone 31. Power ON/OFF button with status indicator 34. Slot-in -1 Card reader (MMC/SD3.0/MS/MS Pro) 33. USB3.0 ports: USB devices 32. 4-in Optical Disc Drive 13 Headphone 30.

User Manual
Page 14
This product is designed to use these functions. 1.6 Remote Controller Some remote controller functions listed above are only available with the system, you adopt are not allowed to meet MCE standards. 14 If the hardware equipments you are not compatible with the relative hardware equipments.
This product is designed to use these functions. 1.6 Remote Controller Some remote controller functions listed above are only available with the system, you adopt are not allowed to meet MCE standards. 14 If the hardware equipments you are not compatible with the relative hardware equipments.

User Manual
Page 19
Chapter 6 Reinstalling the CPU 1. Unscrew the screws of the CPU socket. 3. Rotate the screw on the top of the CPU fan. 2. Now you can reinstall a new CPU to the system. 19
Chapter 6 Reinstalling the CPU 1. Unscrew the screws of the CPU socket. 3. Rotate the screw on the top of the CPU fan. 2. Now you can reinstall a new CPU to the system. 19

User Manual
Page 20
Now you can reinstall a new MXM card to remove the CPU fan. Lift the MXM card slightly upwards, then gently pull it out of the MXM card. 2. Chapter 7 Reinstalling the MXM card 1. Please follow step 1 from page 19 to the system. 20 Then unscrew the two screws on top of the MXM slot. 3.
Now you can reinstall a new MXM card to remove the CPU fan. Lift the MXM card slightly upwards, then gently pull it out of the MXM card. 2. Chapter 7 Reinstalling the MXM card 1. Please follow step 1 from page 19 to the system. 20 Then unscrew the two screws on top of the MXM slot. 3.
User Manual
Page 21
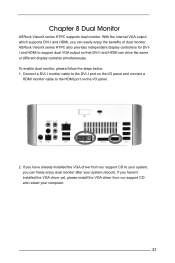
...the steps below: 1. If you have already installed the VGA driver from our support CD and restart your system reboots. Chapter 8 Dual Monitor ASRock VisionX series HTPC supports dual monitor. ASRock VisionX series HTPC also provides independent display controllers for DVII and HDMI to support dual VGA output so that DVI-I...install the VGA driver from our support CD to the HDMI port on the I/O panel and connect a HDMI monitor cable to your system, you can drive the same or different display contents simultaneously. With the internal VGA output which supports DVI-I and HDMI, you can ...
...the steps below: 1. If you have already installed the VGA driver from our support CD and restart your system reboots. Chapter 8 Dual Monitor ASRock VisionX series HTPC supports dual monitor. ASRock VisionX series HTPC also provides independent display controllers for DVII and HDMI to support dual VGA output so that DVI-I...install the VGA driver from our support CD to the HDMI port on the I/O panel and connect a HDMI monitor cable to your system, you can drive the same or different display contents simultaneously. With the internal VGA output which supports DVI-I and HDMI, you can ...
User Manual
Page 22
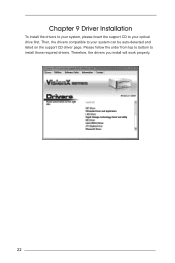
Chapter 9 Driver Installation To install the drivers to your system, please insert the support CD to your system can be auto-detected and listed on the support CD driver page. Please follow the order from top to bottom to your optical drive first. Therefore, the drivers you install will work properly. 22 Then, the drivers compatible to install those required drivers.
Chapter 9 Driver Installation To install the drivers to your system, please insert the support CD to your system can be auto-detected and listed on the support CD driver page. Please follow the order from top to bottom to your optical drive first. Therefore, the drivers you install will work properly. 22 Then, the drivers compatible to install those required drivers.

User Manual
Page 23
... software that this product supports. 10.1 Instant Boot 10.1.1 Introduction Instant Boot, a user-friendly tool that do not secure ID and Password to their systems. * The boot time depends on your PC in a few seconds, provides a much more efficient way to save energy, time, money, and improves the... system's running speed *. By calling S3 and S4 at specific times during the shutdown and startup process, Instant Boot allows you to turn on hardware configuration...
... software that this product supports. 10.1 Instant Boot 10.1.1 Introduction Instant Boot, a user-friendly tool that do not secure ID and Password to their systems. * The boot time depends on your PC in a few seconds, provides a much more efficient way to save energy, time, money, and improves the... system's running speed *. By calling S3 and S4 at specific times during the shutdown and startup process, Instant Boot allows you to turn on hardware configuration...

User Manual
Page 26
After entering into the OS the system will restart automatically. G. The system will shutdown again. H. Next time when you turn on your system, you can enjoy Instant Boot. 26
After entering into the OS the system will restart automatically. G. The system will shutdown again. H. Next time when you turn on your system, you can enjoy Instant Boot. 26
User Manual
Page 27
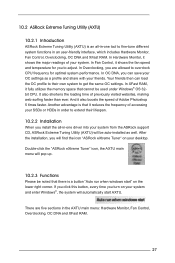
... OC DNA, you install the all -in-one driver into your system and enter Windows®, the system will be used under Windows® OS 32bit CPU. After the installation, you turn on your system from the ASRock support CD, ASRock Extreme Tuning Utility (AXTU) will automatically start " on the lower ... menu: Hardware Monitor, Fan Control, Overclocking, OC DNA and XFast RAM. 27 Double-click the "ASRock eXtreme Tuner" icon, the AXTU main menu will find the icon "ASRock eXtreme Tuner" on your system. If you click this button, every time you will pop up. 10.2.3 Functions Please be noted ...
... OC DNA, you install the all -in-one driver into your system and enter Windows®, the system will be used under Windows® OS 32bit CPU. After the installation, you turn on your system from the ASRock support CD, ASRock Extreme Tuning Utility (AXTU) will automatically start " on the lower ... menu: Hardware Monitor, Fan Control, Overclocking, OC DNA and XFast RAM. 27 Double-click the "ASRock eXtreme Tuner" icon, the AXTU main menu will find the icon "ASRock eXtreme Tuner" on your system. If you click this button, every time you will pop up. 10.2.3 Functions Please be noted ...

User Manual
Page 28
... and CPU ratio. In Voltage, there are two major chapters: Temperature and CPU Fan. In Clock, there are able to your system. In Temperature, it shows the major readings of your system's temperature. The main readings include Clock, Fan & Temperature, and Voltage. You may find out if there's any abnormal situations occuring...
... and CPU ratio. In Voltage, there are two major chapters: Temperature and CPU Fan. In Clock, there are able to your system. In Temperature, it shows the major readings of your system's temperature. The main readings include Clock, Fan & Temperature, and Voltage. You may find out if there's any abnormal situations occuring...

User Manual
Page 29
... a convenient way to record the OC settings and share with your system. ASRock is not responsible for parameter settings adjustment in pursuit of overclocking settings.... the display panel. After confirming the settings, please click on the same motherboards. 29 If system hangs after overclocking, please remove the AC power cord and plug the AC power cord again...It should be shared and worked on the "APPLY" button. Overclocking and over-voltage may affect your system's stability, or even cause damage to your own risk and expense. Overclocking In the Overclocking section, ...
... a convenient way to record the OC settings and share with your system. ASRock is not responsible for parameter settings adjustment in pursuit of overclocking settings.... the display panel. After confirming the settings, please click on the same motherboards. 29 If system hangs after overclocking, please remove the AC power cord and plug the AC power cord again...It should be shared and worked on the "APPLY" button. Overclocking and over-voltage may affect your system's stability, or even cause damage to your own risk and expense. Overclocking In the Overclocking section, ...
User Manual
Page 35
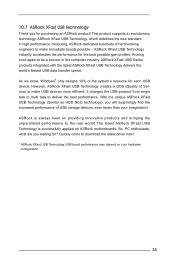
... USB Technology delivers the world's fastest USB data transfer speed. With the unique ASRock XFast USB Technology (Similar as HDD NCQ technology), you will surprisingly find the increased performance of the system's resource for ? As we know, Windows® only assigns 10% of USB storage... devices, even faster than your hardware configuration. 35 So, PC enthusiasts, what are you waiting for each USB device. ASRock XFast USB Technology instantly accelerates ...
... USB Technology delivers the world's fastest USB data transfer speed. With the unique ASRock XFast USB Technology (Similar as HDD NCQ technology), you will surprisingly find the increased performance of the system's resource for ? As we know, Windows® only assigns 10% of USB storage... devices, even faster than your hardware configuration. 35 So, PC enthusiasts, what are you waiting for each USB device. ASRock XFast USB Technology instantly accelerates ...

User Manual
Page 36
...carefully before you install the all-in-one driver to your system from ASRock's support CD. You will be auto-installed as well. A. After ASRock XFast USB driver is installed to get the latest utility: http://www.asrock.com/Feature/XFastUSB/index.asp B. You may click the ...following link to your system successfully. When you install ASRock XFast USB Technology. Please read the procedures below ...
...carefully before you install the all-in-one driver to your system from ASRock's support CD. You will be auto-installed as well. A. After ASRock XFast USB driver is installed to get the latest utility: http://www.asrock.com/Feature/XFastUSB/index.asp B. You may click the ...following link to your system successfully. When you install ASRock XFast USB Technology. Please read the procedures below ...
