
User Manual
Page 3
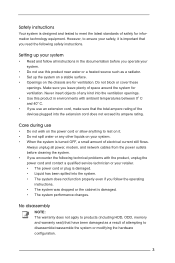
... you use • Do not walk on the chassis are for ventilation. Do not block or cover these openings. Always unplug all instructions in environments with the product, unplug the power cord and contact a qualified service technician or your retailer. • The power cord or plug is turned OFF, a small amount of electrical current still flows. Make sure you operate your...
... you use • Do not walk on the chassis are for ventilation. Do not block or cover these openings. Always unplug all instructions in environments with the product, unplug the power cord and contact a qualified service technician or your retailer. • The power cord or plug is turned OFF, a small amount of electrical current still flows. Make sure you operate your...

User Manual
Page 5
Contents 1 Introduction 7 1.1 Package Contents 7 1.2 Specifications 8 1.3 System Motherboard Components 10 1.4 Rear Panel 12 1.5 System Chassis 13 1.6 Remote Controller 14 2 Opening the Chassis 15 3 Reinstalling the ODD/HDD 16 4 Installing the second HDD 17 5 Reinstalling the DIMMs 18 6 Reinstalling the CPU 19 7 Reinstalling the MXM Card 20 8 Dual Monitor 21 9 Driver Installation 22 10 Utility Menu 23 10.1 Instant Boot 23 10.1.1 Introduction 23 10.1.2 Installation 24 10.2 ASRock Extreme Tuning Utility (AXTU 27 10...
Contents 1 Introduction 7 1.1 Package Contents 7 1.2 Specifications 8 1.3 System Motherboard Components 10 1.4 Rear Panel 12 1.5 System Chassis 13 1.6 Remote Controller 14 2 Opening the Chassis 15 3 Reinstalling the ODD/HDD 16 4 Installing the second HDD 17 5 Reinstalling the DIMMs 18 6 Reinstalling the CPU 19 7 Reinstalling the MXM Card 20 8 Dual Monitor 21 9 Driver Installation 22 10 Utility Menu 23 10.1 Instant Boot 23 10.1.1 Introduction 23 10.1.2 Installation 24 10.2 ASRock Extreme Tuning Utility (AXTU 27 10...

User Manual
Page 6
... Configuration 49 11.4.5 Intel(R) Rapid Start Technology 50 11.4.6 Intel(R) Smart Connect Technology 51 11.4.7 Super IO Configuration 52 11.4.8 ACPI Configuration 53 11.4.9 USB Configuration 54 11.4.10 Network Configuration 55 11.5 Hardware Health Event Monitoring Screen 56 11.6 Boot Screen 57 11.7 Security Screen 58 11.8 Exit Screen 59 12 Software Support 60 12.1 Install Operating System 60 12.2 Support CD Information 60 12.2.1 Running Support CD 60 12.2.2 Drivers Menu 60 12.2.3 Utilities Menu...
... Configuration 49 11.4.5 Intel(R) Rapid Start Technology 50 11.4.6 Intel(R) Smart Connect Technology 51 11.4.7 Super IO Configuration 52 11.4.8 ACPI Configuration 53 11.4.9 USB Configuration 54 11.4.10 Network Configuration 55 11.5 Hardware Health Event Monitoring Screen 56 11.6 Boot Screen 57 11.7 Security Screen 58 11.8 Exit Screen 59 12 Software Support 60 12.1 Install Operating System 60 12.2 Support CD Information 60 12.2.1 Running Support CD 60 12.2.2 Drivers Menu 60 12.2.3 Utilities Menu...
User Manual
Page 7
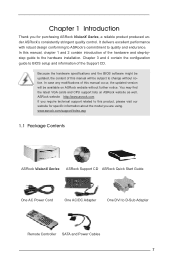
... the hardware installation. www.asrock.com/support/index.asp 1.1 Package Contents ASRock VisionX Series ASRock Support CD ASRock Quick Start Guide One AC Power Cord One AC/DC Adapter One DVI to BIOS setup and information of the hardware and step-bystep guide to quality and endurance. You may find the latest VGA cards and CPU support lists on ASRock website without notice. Chapter 3 and 4 contain the configuration guide to D-Sub Adapter Remote Controller SATA and Power Cables 7 Because the hardware specifications and the BIOS software...
... the hardware installation. www.asrock.com/support/index.asp 1.1 Package Contents ASRock VisionX Series ASRock Support CD ASRock Quick Start Guide One AC Power Cord One AC/DC Adapter One DVI to BIOS setup and information of the hardware and step-bystep guide to quality and endurance. You may find the latest VGA cards and CPU support lists on ASRock website without notice. Chapter 3 and 4 contain the configuration guide to D-Sub Adapter Remote Controller SATA and Power Cables 7 Because the hardware specifications and the BIOS software...

User Manual
Page 8
..., 4-in-1 Card reader (MMC/SD3.0/MS/MS PRO) Rear I/O 1x HDMI, 1x DVI-I (Dual-Link), 4x USB 2.0, 1x S/PDIF, 1x eSATA2*2, 2x USB3.0 Audio 7.1 Ch HD Audio with THX TruStudioTM LAN Gigabit LAN WiFi 2T2R 802.11 a/b/g/n wireless LAN (300Mbps, 5GHz/2.4GHz Dual-Band access) Bluetooth Bluetooth 4.0/3.0 HS class II Remote Controller Support MCE function Power 120W/19V Adapter Dimension 200mm(W)x70mm(H)x200m(L) Volume (liters) 2.8L Free bundle software: *31. Supports 3rd Generation...
..., 4-in-1 Card reader (MMC/SD3.0/MS/MS PRO) Rear I/O 1x HDMI, 1x DVI-I (Dual-Link), 4x USB 2.0, 1x S/PDIF, 1x eSATA2*2, 2x USB3.0 Audio 7.1 Ch HD Audio with THX TruStudioTM LAN Gigabit LAN WiFi 2T2R 802.11 a/b/g/n wireless LAN (300Mbps, 5GHz/2.4GHz Dual-Band access) Bluetooth Bluetooth 4.0/3.0 HS class II Remote Controller Support MCE function Power 120W/19V Adapter Dimension 200mm(W)x70mm(H)x200m(L) Volume (liters) 2.8L Free bundle software: *31. Supports 3rd Generation...

User Manual
Page 13
Power ON/OFF button with status indicator 34. USB3.0 ports: USB devices 32. 4-in Optical Disc Drive 13 Slot-in -1 Card reader (MMC/SD3.0/MS/MS Pro) 33. 1.5 System Chassis 29. Microphone 31. Headphone 30.
Power ON/OFF button with status indicator 34. USB3.0 ports: USB devices 32. 4-in Optical Disc Drive 13 Slot-in -1 Card reader (MMC/SD3.0/MS/MS Pro) 33. 1.5 System Chassis 29. Microphone 31. Headphone 30.
User Manual
Page 21
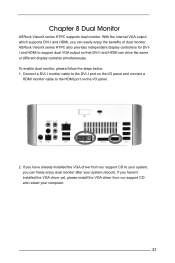
... display contents simultaneously. Connect a DVI-I monitor cable to the DVI-I port on the I/O panel. 2. If you can freely enjoy dual monitor after your computer. 21 If you have already installed the VGA driver from our support CD and restart your system reboots. To enable dual monitor, please follow the steps below: 1. Chapter 8 Dual Monitor ASRock VisionX series HTPC supports dual monitor. ASRock VisionX series HTPC also provides independent display controllers for DVII and HDMI to support dual VGA output so that DVI-I /O panel and connect a HDMI monitor cable...
... display contents simultaneously. Connect a DVI-I monitor cable to the DVI-I port on the I/O panel. 2. If you can freely enjoy dual monitor after your computer. 21 If you have already installed the VGA driver from our support CD and restart your system reboots. To enable dual monitor, please follow the steps below: 1. Chapter 8 Dual Monitor ASRock VisionX series HTPC supports dual monitor. ASRock VisionX series HTPC also provides independent display controllers for DVII and HDMI to support dual VGA output so that DVI-I /O panel and connect a HDMI monitor cable...
User Manual
Page 22
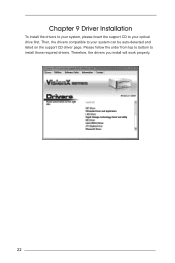
Therefore, the drivers you install will work properly. 22 Please follow the order from top to bottom to your optical drive first. Chapter 9 Driver Installation To install the drivers to your system, please insert the support CD to your system can be auto-detected and listed on the support CD driver page. Then, the drivers compatible to install those required drivers.
Therefore, the drivers you install will work properly. 22 Please follow the order from top to bottom to your optical drive first. Chapter 9 Driver Installation To install the drivers to your system, please insert the support CD to your system can be auto-detected and listed on the support CD driver page. Then, the drivers compatible to install those required drivers.

User Manual
Page 23
... to Windows® 7 / 7 64-bit / XP / XP 64-bit. By calling S3 and S4 at specific times during the shutdown and startup process, Instant Boot allows you to turn on hardware configuration. 23 Chapter 10 Utility Menu The utility menu shows the applications and other software that this product supports. 10.1 Instant Boot 10.1.1 Introduction Instant Boot, a user-friendly tool that do not secure ID and Password...
... to Windows® 7 / 7 64-bit / XP / XP 64-bit. By calling S3 and S4 at specific times during the shutdown and startup process, Instant Boot allows you to turn on hardware configuration. 23 Chapter 10 Utility Menu The utility menu shows the applications and other software that this product supports. 10.1 Instant Boot 10.1.1 Introduction Instant Boot, a user-friendly tool that do not secure ID and Password...

User Manual
Page 24
... utility and BIOS: http://www.asrock.com/feature/InstantBoot/download.asp B. Then click "Next". You may click the following link to . 10.1.2 Installation Please read the procedures below carefully before you want to continue. Click "Next" to . Execute the Instant Boot installation program under Windows®. You may choose a different folder if you install Instant Boot. c. Select a location. Please follow the instructions...
... utility and BIOS: http://www.asrock.com/feature/InstantBoot/download.asp B. Then click "Next". You may click the following link to . 10.1.2 Installation Please read the procedures below carefully before you want to continue. Click "Next" to . Execute the Instant Boot installation program under Windows®. You may choose a different folder if you install Instant Boot. c. Select a location. Please follow the instructions...
User Manual
Page 25
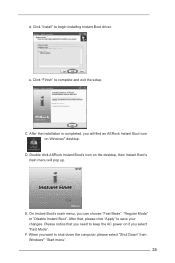
... on if you need to shut down the computer, please select "Shut Down" from Windows® "Start menu". 25 Please notice that , please click "Apply" to complete and exit the setup. When you want to keep the AC power on Windows® desktop. e. F. d. Click "Install" to begin installing Instant Boot driver. After the installation is completed, you can choose "Fast Mode", "Regular Mode" or "Disable Instant Boot". E.
... on if you need to shut down the computer, please select "Shut Down" from Windows® "Start menu". 25 Please notice that , please click "Apply" to complete and exit the setup. When you want to keep the AC power on Windows® desktop. e. F. d. Click "Install" to begin installing Instant Boot driver. After the installation is completed, you can choose "Fast Mode", "Regular Mode" or "Disable Instant Boot". E.
User Manual
Page 27
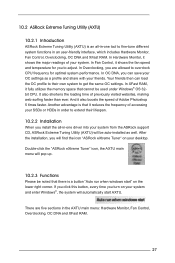
... noted that cannot be auto-installed as a profile and share with your friends. And it shows the major readings of previously visited websites, making web surfing faster than ever. In Fan Control, it fully utilizes the memory space that there is a button "Auto run when windows start AXTU. 10.2 ASRock Extreme Tuning Utility (AXTU) 10.2.1 Introduction ASRock Extreme Tuning Utility (AXTU) is an all...
... noted that cannot be auto-installed as a profile and share with your friends. And it shows the major readings of previously visited websites, making web surfing faster than ever. In Fan Control, it fully utilizes the memory space that there is a button "Auto run when windows start AXTU. 10.2 ASRock Extreme Tuning Utility (AXTU) 10.2.1 Introduction ASRock Extreme Tuning Utility (AXTU) is an all...
User Manual
Page 32
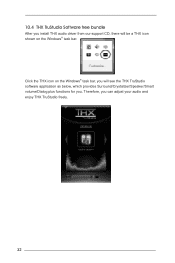
Click the THX icon on the Windows® task bar. Therefore, you . 10.4 THX TruStudio Software free bundle After you install THX audio driver from our support CD, there will be a THX icon shown on the Windows® task bar, you will see the THX TruStudio software application as below, which provides Surround/Crystalizer/Speaker/Smart volume/Dialog plus functions for you can adjust your audio and enjoy THX TruStudio freely. 32
Click the THX icon on the Windows® task bar. Therefore, you . 10.4 THX TruStudio Software free bundle After you install THX audio driver from our support CD, there will be a THX icon shown on the Windows® task bar, you will see the THX TruStudio software application as below, which provides Surround/Crystalizer/Speaker/Smart volume/Dialog plus functions for you can adjust your audio and enjoy THX TruStudio freely. 32
User Manual
Page 39
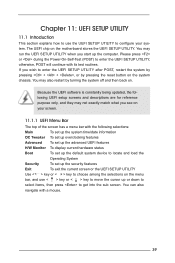
... overclocking features Advanced To set up the advanced UEFI features H/W Monitor To display current hardware status Boot To set up the default system device to locate and load the Operating System Security To set up the security features Exit To exit the current screen or the UEFI SETUP UTILITY Use < > key or < > key to choose among the selections on the menu bar, and use < > key or < > key to move the cursor...
... overclocking features Advanced To set up the advanced UEFI features H/W Monitor To display current hardware status Boot To set up the default system device to locate and load the Operating System Security To set up the security features Exit To exit the current screen or the UEFI SETUP UTILITY Use < > key or < > key to choose among the selections on the menu bar, and use < > key or < > key to move the cursor...

User Manual
Page 44
... must use FAT32/16/12 file system. Just launch this tool and save the new UEFI file to your USB flash drive, floppy disk or hard drive, then you can auto-detect the latest UEFI from our servers. Please be running on a DHCP configured computer in this section may set the configurations for available UEFI firmware updates from our servers and flash them without entering Windows OS. 11.4 Advanced Screen...
... must use FAT32/16/12 file system. Just launch this tool and save the new UEFI file to your USB flash drive, floppy disk or hard drive, then you can auto-detect the latest UEFI from our servers. Please be running on a DHCP configured computer in this section may set the configurations for available UEFI firmware updates from our servers and flash them without entering Windows OS. 11.4 Advanced Screen...

User Manual
Page 46
... Intel Architecture. This option will be hidden if the current CPU does not support No-Excute Memory Protection. No-Execution (NX) Memory Protection Technology is set to [Enabled], a VMM (Virtual Machine Architecture) can prevent data pages from being used by Vanderpool Technology. An IA-32 processor with "No Execute (NX) Memory Protection" can utilize the additional hardware capabilities provided by malicious software to execute...
... Intel Architecture. This option will be hidden if the current CPU does not support No-Excute Memory Protection. No-Execution (NX) Memory Protection Technology is set to [Enabled], a VMM (Virtual Machine Architecture) can prevent data pages from being used by Vanderpool Technology. An IA-32 processor with "No Execute (NX) Memory Protection" can utilize the additional hardware capabilities provided by malicious software to execute...

User Manual
Page 49
... SATA Controller(s) Use this to enable or disable SATA Aggressive Link Power Management. Configuration options: [IDE Mode], [AHCI Mode] and [RAID]. SATA Aggressive Link Power Management Use this item to enable or disable the SATA Controller feature. SATA Mode Selection Use this item to select SATA mode. AHCI (Advanced Host Controller Interface) supports NCQ and other new features that will improve SATA disk performance but IDE mode does not have these advantages. Configuration options: [Disabled] and [Enabled]. 49 Use this to enable or disable the S.M.A.R.T. (Self-Monitoring...
... SATA Controller(s) Use this to enable or disable SATA Aggressive Link Power Management. Configuration options: [IDE Mode], [AHCI Mode] and [RAID]. SATA Aggressive Link Power Management Use this item to enable or disable the SATA Controller feature. SATA Mode Selection Use this item to select SATA mode. AHCI (Advanced Host Controller Interface) supports NCQ and other new features that will improve SATA disk performance but IDE mode does not have these advantages. Configuration options: [Disabled] and [Enabled]. 49 Use this to enable or disable the S.M.A.R.T. (Self-Monitoring...

User Manual
Page 50
The default is a new zero power hibernation mode which allows users to enable or disable Active Page Threshold Support. 11.4.5 Intel(R) Rapid Start Technology Intel(R) Rapid Start Technology Use this item to enable RTC wake timer at S3 entry. Intel(R) Rapid Start Technology is [Disabled]. 50 The default is [Enabled]. Entry After Select a time to enable or disable Intel(R) Rapid Start Technology. Active Page Threshold Support This allows you to resume in just 5-6 seconds. The default is [10 minutes].
The default is a new zero power hibernation mode which allows users to enable or disable Active Page Threshold Support. 11.4.5 Intel(R) Rapid Start Technology Intel(R) Rapid Start Technology Use this item to enable RTC wake timer at S3 entry. Intel(R) Rapid Start Technology is [Disabled]. 50 The default is [Enabled]. Entry After Select a time to enable or disable Intel(R) Rapid Start Technology. Active Page Threshold Support This allows you to resume in just 5-6 seconds. The default is [10 minutes].
User Manual
Page 60
..., locate and double click on a specific item then follow the installation wizard to install it. 12.2.4 Contact Information If you may contact your computer. Please install the necessary drivers to your CD-ROM drive. or you need to contact ASRock or want to know more information. 12.2 Support CD Information The Support CD contains necessary drivers and useful utilities that the system supports. The CD automatically displays...
..., locate and double click on a specific item then follow the installation wizard to install it. 12.2.4 Contact Information If you may contact your computer. Please install the necessary drivers to your CD-ROM drive. or you need to contact ASRock or want to know more information. 12.2 Support CD Information The Support CD contains necessary drivers and useful utilities that the system supports. The CD automatically displays...
Quick Installation Guide
Page 2
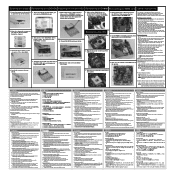
... and follow the operating instructions. • The system was dropped or the cabinet is important that the total ampere rating of the MXM slot. For your safety, it out of the devices plugged into the extension cord does not exceed its ampere rating. 2. English Opening the chassis 1. Connect the SATA and power cables. 3. Unscrew the screws of the CPU fan. 2. Desenrosque los...
... and follow the operating instructions. • The system was dropped or the cabinet is important that the total ampere rating of the MXM slot. For your safety, it out of the devices plugged into the extension cord does not exceed its ampere rating. 2. English Opening the chassis 1. Connect the SATA and power cables. 3. Unscrew the screws of the CPU fan. 2. Desenrosque los...

