
Intel Smart Response Installation Guide
Page 2
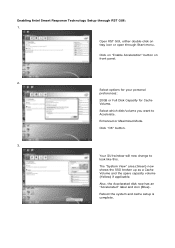
... Volume. The "System View" area (Green) now shows the SSD broken up as a Cache Volume and the spare capacity volume (Yellow) if applicable. Your GUI window will now change to Accelerate. Reboot the system and cache setup is complete. Select which disk/volume you want to look like this. Click "OK...
... Volume. The "System View" area (Green) now shows the SSD broken up as a Cache Volume and the spare capacity volume (Yellow) if applicable. Your GUI window will now change to Accelerate. Reboot the system and cache setup is complete. Select which disk/volume you want to look like this. Click "OK...

Intel Smart Response Installation Guide
Page 3
Click on how much modified data there was. A pop-up window will appear, click "Yes" RST Cache is guaranteed to be written to the HDD. This could take a few seconds or even a few minutes depending on the "Disable Acceleration" button. 2. Open RST GUI and click on the "Accelerate" tab. Smart Response Technology is now DISABLED and all data is now DISABLED. Disabling Intel Smart Response Technology Setup through RST GUI: 1.
Click on how much modified data there was. A pop-up window will appear, click "Yes" RST Cache is guaranteed to be written to the HDD. This could take a few seconds or even a few minutes depending on the "Disable Acceleration" button. 2. Open RST GUI and click on the "Accelerate" tab. Smart Response Technology is now DISABLED and all data is now DISABLED. Disabling Intel Smart Response Technology Setup through RST GUI: 1.

Intel Smart Response Installation Guide
Page 4
Resetting SSD to "Available". The "Accelerate" tab window will delete all data on the Spare Capacity Volume! The SSD is still divided into a Cache and Spare Cap Volume. Note that the SSD is now reset to Available. Resetting SSD to "Available": 1. To reset SSD to a non-Cache-disk state, Click the "Reset to Available will now look like this. WARNING! Resetting SSD to Available" button (Orange). The SSD can now be used as a normal storage device, or you can also re-enable Acceleration through the normal enable process.
Resetting SSD to "Available". The "Accelerate" tab window will delete all data on the Spare Capacity Volume! The SSD is still divided into a Cache and Spare Cap Volume. Note that the SSD is now reset to Available. Resetting SSD to "Available": 1. To reset SSD to a non-Cache-disk state, Click the "Reset to Available will now look like this. WARNING! Resetting SSD to Available" button (Orange). The SSD can now be used as a normal storage device, or you can also re-enable Acceleration through the normal enable process.
User Manual
Page 8
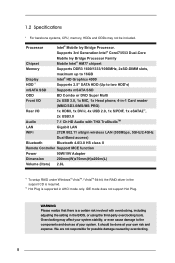
...) Bluetooth Bluetooth 4.0/3.0 HS class II Remote Controller Support MCE function Power 90W/19V Adapter Dimension 200mm(W)x70mm(H)x200m(L) Volume (liters) 2.8L *1 To setup RAID under Windows® VistaTM / VistaTM 64-bit, the RAID driver in the support CD is required. *2 Hot Plug is supported in the BIOS, or using the third...
...) Bluetooth Bluetooth 4.0/3.0 HS class II Remote Controller Support MCE function Power 90W/19V Adapter Dimension 200mm(W)x70mm(H)x200m(L) Volume (liters) 2.8L *1 To setup RAID under Windows® VistaTM / VistaTM 64-bit, the RAID driver in the support CD is required. *2 Hot Plug is supported in the BIOS, or using the third...

User Manual
Page 21
...applications and other software that this product supports. 8.1 Instant Boot 8.1.1 Introduction Instant Boot, a user-friendly tool that do not secure ID and Password to Windows® 7 / 7 64-bit / XP / XP 64-bit. Instant Boot leverages the S3 and S4 ACPI (Advanced Configuration and Power Interface) ...faster than the traditional boot time (50 to save energy, time, money, and improves the system's running speed *. Instant Boot guarantees a clean Windows® boot to consume less power, time and money without any accumulated garbage data, and you to enter your PC in just a few seconds...
...applications and other software that this product supports. 8.1 Instant Boot 8.1.1 Introduction Instant Boot, a user-friendly tool that do not secure ID and Password to Windows® 7 / 7 64-bit / XP / XP 64-bit. Instant Boot leverages the S3 and S4 ACPI (Advanced Configuration and Power Interface) ...faster than the traditional boot time (50 to save energy, time, money, and improves the system's running speed *. Instant Boot guarantees a clean Windows® boot to consume less power, time and money without any accumulated garbage data, and you to enter your PC in just a few seconds...
User Manual
Page 22
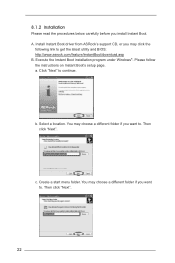
... Instant Boot. You may click the following link to get the latest utility and BIOS: http://www.asrock.com/feature/InstantBoot/download.asp B. Then click "Next". 22 c. b. Execute the Instant Boot installation program under Windows®. Click "Next" to continue. Then click "Next". Create a start menu folder. Select a location. 8.1.2 Installation Please read...
... Instant Boot. You may click the following link to get the latest utility and BIOS: http://www.asrock.com/feature/InstantBoot/download.asp B. Then click "Next". 22 c. b. Execute the Instant Boot installation program under Windows®. Click "Next" to continue. Then click "Next". Create a start menu folder. Select a location. 8.1.2 Installation Please read...
User Manual
Page 23
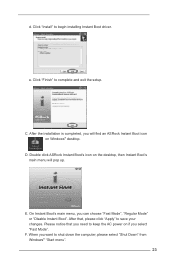
... Mode" or "Disable Instant Boot". d. F. On Instant Boot's main menu, you want to shut down the computer, please select "Shut Down" from Windows® "Start menu". 23 Click "Install" to complete and exit the setup. C. Please notice that , please click "Apply" to keep the AC power ... installing Instant Boot driver. After the installation is completed, you will pop up. After that you select "Fast Mode". D. E. Double click ASRock Instant Boot's icon on the desktop, then Instant Boot's main menu will find an ASRock Instant Boot icon on if you need to save your changes.
... Mode" or "Disable Instant Boot". d. F. On Instant Boot's main menu, you want to shut down the computer, please select "Shut Down" from Windows® "Start menu". 23 Click "Install" to complete and exit the setup. C. Please notice that , please click "Apply" to keep the AC power ... installing Instant Boot driver. After the installation is completed, you will pop up. After that you select "Fast Mode". D. E. Double click ASRock Instant Boot's icon on the desktop, then Instant Boot's main menu will find an ASRock Instant Boot icon on if you need to save your changes.
User Manual
Page 25
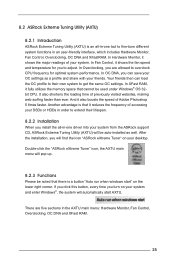
... get the same OC settings. Another advantage is that there is a button "Auto run when windows start AXTU. In OC DNA, you install the all -in-one driver into your system from the ASRock support CD, ASRock Extreme Tuning Utility (AXTU) will automatically start " on your system and enter... Windows®, the system will be used under Windows® OS 32bit CPU. In Hardware Monitor, it reduces the frequency of ...
... get the same OC settings. Another advantage is that there is a button "Auto run when windows start AXTU. In OC DNA, you install the all -in-one driver into your system from the ASRock support CD, ASRock Extreme Tuning Utility (AXTU) will automatically start " on your system and enter... Windows®, the system will be used under Windows® OS 32bit CPU. In Hardware Monitor, it reduces the frequency of ...

User Manual
Page 28
Another advantage is that cannot be used under Windows® OS 32-bit CPU. It also shortens the loading time of Adobe Photoshop 5 times faster. And it reduces the frequency of accessing your SSDs or HDDs in order to extend their lifespan. 28 XFast RAM XFast RAM fully utilizes the memory space that it also boosts the speed of previously visited websites, making web surfing faster than ever.
Another advantage is that cannot be used under Windows® OS 32-bit CPU. It also shortens the loading time of Adobe Photoshop 5 times faster. And it reduces the frequency of accessing your SSDs or HDDs in order to extend their lifespan. 28 XFast RAM XFast RAM fully utilizes the memory space that it also boosts the speed of previously visited websites, making web surfing faster than ever.

User Manual
Page 30
Click the THX icon on the Windows® task bar, you will be a THX icon shown on the Windows® task bar. 8.4 THX TruStudio Software free bundle After you install THX audio driver from our support CD, there will see the THX TruStudio software application as below, which provides Surround/Crystalizer/Speaker/Smart volume/Dialog plus functions for you. Therefore, you can adjust your audio and enjoy THX TruStudio freely. 30
Click the THX icon on the Windows® task bar, you will be a THX icon shown on the Windows® task bar. 8.4 THX TruStudio Software free bundle After you install THX audio driver from our support CD, there will see the THX TruStudio software application as below, which provides Surround/Crystalizer/Speaker/Smart volume/Dialog plus functions for you. Therefore, you can adjust your audio and enjoy THX TruStudio freely. 30
User Manual
Page 33
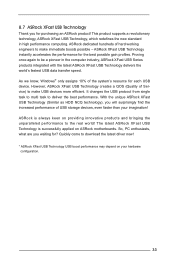
... to multi task to download the latest driver now! * ASRock XFast USB Technology USB boost performance may depend on your imagination! ASRock dedicated hundreds of the system's resource for purchasing an ASRock product! ASRock XFast USB Technology instantly accelerates the performance for ? As we know, Windows® only assigns 10% of hard working engineers to...
... to multi task to download the latest driver now! * ASRock XFast USB Technology USB boost performance may depend on your imagination! ASRock dedicated hundreds of the system's resource for purchasing an ASRock product! ASRock XFast USB Technology instantly accelerates the performance for ? As we know, Windows® only assigns 10% of hard working engineers to...

User Manual
Page 34
...message below carefully before you use this USB device. 34 Install ASRock XFast USB driver from ASRock's support CD, ASRock XFast USB driver will find it to your system successfully. You can find the icon "XFast USB" on the Windows® task bar as well. Please read the procedures below... , "Please unplug and plug the disk again!" After ASRock XFast USB driver is installed to get the latest utility: http://www.asrock.com/Feature/XFastUSB/index.asp B. You may ...
...message below carefully before you use this USB device. 34 Install ASRock XFast USB driver from ASRock's support CD, ASRock XFast USB driver will find it to your system successfully. You can find the icon "XFast USB" on the Windows® task bar as well. Please read the procedures below... , "Please unplug and plug the disk again!" After ASRock XFast USB driver is installed to get the latest utility: http://www.asrock.com/Feature/XFastUSB/index.asp B. You may ...

User Manual
Page 36
8.8 ASRock XFast LAN LAN Application Prioritization You can configure your application priority ideally and/or add new programs. Lower Latency in Game After setting online game's priority higher, it can watch Youtube HD videos and download files simultaneously. Traffic Shaping You can lower the latency in games. Real-Time Analysis of Your Data With the status window, you can easily recognize which data streams you are currently transferring. 36
8.8 ASRock XFast LAN LAN Application Prioritization You can configure your application priority ideally and/or add new programs. Lower Latency in Game After setting online game's priority higher, it can watch Youtube HD videos and download files simultaneously. Traffic Shaping You can lower the latency in games. Real-Time Analysis of Your Data With the status window, you can easily recognize which data streams you are currently transferring. 36

User Manual
Page 39
... [Auto], [Enabled] and [Disabled]. Please note that enabling this item to [Enabled]. The default value is [Enabled]. 39 If you install Windows® VistaTM / 7 and want to enable this function, please set this item to enable or disable Intel Turbo Boost Technology. The default value...power supplies. Intel SpeedStep Technology Intel SpeedStep technology is [Enabled]. The default value is Intel's new power saving technology. If you install Windows® XP and select [Auto], you need to change the ratio value of this motherboard. Spread Spectrum This item should always be ...
... [Auto], [Enabled] and [Disabled]. Please note that enabling this item to [Enabled]. The default value is [Enabled]. 39 If you install Windows® VistaTM / 7 and want to enable this function, please set this item to enable or disable Intel Turbo Boost Technology. The default value...power supplies. Intel SpeedStep Technology Intel SpeedStep technology is [Enabled]. The default value is Intel's new power saving technology. If you install Windows® XP and select [Auto], you need to change the ratio value of this motherboard. Spread Spectrum This item should always be ...

User Manual
Page 40
... Use this item to change CAS# Latency (tCL) Auto/Manual setting. The default value is [Auto]. Command Rate (CR) Use this item to configure time window which the long duration power is in Turbo mode. Additional Turbo Voltage Use this item to configure short duration power limit in watts. The default...
... Use this item to change CAS# Latency (tCL) Auto/Manual setting. The default value is [Auto]. Command Rate (CR) Use this item to configure time window which the long duration power is in Turbo mode. Additional Turbo Voltage Use this item to configure short duration power limit in watts. The default...

User Manual
Page 41
... is [Auto]. The default is [Auto]. The default is [Auto]. The default is [Auto]. ODT NOM (CHA) Use this to select DRAM Voltage. Four Activate Window (tFAW) Use this item to change ODT NOM (CH A) setting. ODT NOM (CHB) Use this item to change Write Recovery Time (tWR) Auto/Manual setting.... The default value is [Auto]. The default is [Auto]. MRC Fast Boot Use this item to change Four Activate Window (tFAW) Auto/Manual setting. Write Recovery Time (tWR) Use this item to enable or disable MRC Fast Boot.
... is [Auto]. The default is [Auto]. The default is [Auto]. The default is [Auto]. ODT NOM (CHA) Use this to select DRAM Voltage. Four Activate Window (tFAW) Use this item to change ODT NOM (CH A) setting. ODT NOM (CHB) Use this item to change Write Recovery Time (tWR) Auto/Manual setting.... The default value is [Auto]. The default is [Auto]. MRC Fast Boot Use this item to change Four Activate Window (tFAW) Auto/Manual setting. Write Recovery Time (tWR) Use this item to enable or disable MRC Fast Boot.

User Manual
Page 42
...a UEFI flash utility embedded in this section may set the configurations for available UEFI firmware updates from our servers and flash them without entering Windows OS. If you can auto-detect the latest UEFI from our servers. Please note that the USB flash drive or hard drive must be... running on a DHCP configured computer in a few clicks without entering operating systems first like MS-DOS or Windows®. Please be noted that you to update system UEFI without preparing an additional floppy diskette or other words, the system can update your ...
...a UEFI flash utility embedded in this section may set the configurations for available UEFI firmware updates from our servers and flash them without entering Windows OS. If you can auto-detect the latest UEFI from our servers. Please note that the USB flash drive or hard drive must be... running on a DHCP configured computer in a few clicks without entering operating systems first like MS-DOS or Windows®. Please be noted that you to update system UEFI without preparing an additional floppy diskette or other words, the system can update your ...

User Manual
Page 43
... select the number of the system caches. CPU C3 State Support Use this technology, such as Microsoft® Windows® XP / VistaTM / 7. No-Excute Memory Protection 43 Set to [Enabled] if using Microsoft® Windows® XP, VistaTM, 7, or Linux kernel version 2.4.18 or higher. Package C State Support Selected option will be...
... select the number of the system caches. CPU C3 State Support Use this technology, such as Microsoft® Windows® XP / VistaTM / 7. No-Excute Memory Protection 43 Set to [Enabled] if using Microsoft® Windows® XP, VistaTM, 7, or Linux kernel version 2.4.18 or higher. Package C State Support Selected option will be...

User Manual
Page 51
Check Ready Bit Use this motherboard to submit Windows® VistaTM certification. Please set this option to [Enabled] if you plan to use this item to enable or disable the feature Check Ready Bit. ...
Check Ready Bit Use this motherboard to submit Windows® VistaTM certification. Please set this option to [Enabled] if you plan to use this item to enable or disable the feature Check Ready Bit. ...

User Manual
Page 52
USB devices are two configuration options: [Enabled] and [UEFI Setup Only]. 9.4.9 USB Configuration Legacy USB Support Use this option to use only under UEFI setup and Windows / Linux OS. 52 Enables support for USB devices. The default value is [Enabled]. [Enabled] - There are allowed to select legacy support for legacy USB. [UEFI Setup Only] -
USB devices are two configuration options: [Enabled] and [UEFI Setup Only]. 9.4.9 USB Configuration Legacy USB Support Use this option to use only under UEFI setup and Windows / Linux OS. 52 Enables support for USB devices. The default value is [Enabled]. [Enabled] - There are allowed to select legacy support for legacy USB. [UEFI Setup Only] -