User Manual
Page 3
.... Do not block or cover these openings. Make sure you follow all power, modem, and network cables from the power outlets before you read the following technical problems with ambient temperatures between 0o C and 40o C. • If you use • Do not walk on the power cord or allow anything to disassemble/reassemble the system or modifying the hardware configuration. 3 However...
.... Do not block or cover these openings. Make sure you follow all power, modem, and network cables from the power outlets before you read the following technical problems with ambient temperatures between 0o C and 40o C. • If you use • Do not walk on the power cord or allow anything to disassemble/reassemble the system or modifying the hardware configuration. 3 However...

User Manual
Page 5
Exclusive download software for ASRock cuntomers 41 8.11 ASRock XFast USB Technology - Contents 1 Introduction 7 1.1 Package Contents 7 1.2 Specifications 8 1.3 System Motherboard Components 9 1.4 Rear Panel Connections 11 1.5 System Chassis 12 1.6 Remote Controller 13 2 Opening the chassis 14 3 Reinstalling the ODD/HDD 15 4 Reinstalling the DIMMs 16 5 Reinstalling the CPU 17 6 Reinstalling the MXM card 18 7 Driver Installation 19 8 UTILITY MEMU 20 8.1 Instant Boot 20 8.1.1 Introduction 20 8.1.2 Installation 21 8.2 ASRock Extreme Tuning Utility (AXTU 23...
Exclusive download software for ASRock cuntomers 41 8.11 ASRock XFast USB Technology - Contents 1 Introduction 7 1.1 Package Contents 7 1.2 Specifications 8 1.3 System Motherboard Components 9 1.4 Rear Panel Connections 11 1.5 System Chassis 12 1.6 Remote Controller 13 2 Opening the chassis 14 3 Reinstalling the ODD/HDD 15 4 Reinstalling the DIMMs 16 5 Reinstalling the CPU 17 6 Reinstalling the MXM card 18 7 Driver Installation 19 8 UTILITY MEMU 20 8.1 Instant Boot 20 8.1.1 Introduction 20 8.1.2 Installation 21 8.2 ASRock Extreme Tuning Utility (AXTU 23...
User Manual
Page 7
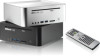
... with robust design conforming to ASRock's commitment to D-Sub Adapter Remote Controller SATA and Power Cables 3.5mm Audio Cable 7 Because the hardware specifications and the BIOS software might be updated, the content of this product, please visit our website for purchasing ASRock Vision 3D Series, a reliable product produced under ASRock's consistently stringent quality control. ASRock website http://www.asrock.com If you are using. In case any modifications of...
... with robust design conforming to ASRock's commitment to D-Sub Adapter Remote Controller SATA and Power Cables 3.5mm Audio Cable 7 Because the hardware specifications and the BIOS software might be updated, the content of this product, please visit our website for purchasing ASRock Vision 3D Series, a reliable product produced under ASRock's consistently stringent quality control. ASRock website http://www.asrock.com If you are using. In case any modifications of...
User Manual
Page 8
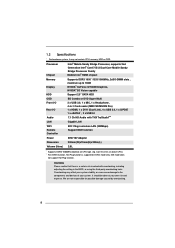
...; 3D Vision capable HDD Support 2.5" SATA HDD ODD BD Combo or DVD Super Multi Front I/O Rear I/O Audio 2 x USB 3.0, 1 x MIC, 1 x Head phone, 4-in-1 Card reader (MMC/SD/MS/MS Pro) 1 x HDMI, 1 x DVI-I (Dual-Link), 4 x USB 2.0, 1 x S/PDIF, 1 x eSATA3*2, 2 x USB3.0 7.1 Ch HD Audio with overclocking, including adjusting the setting in AHCI mode only. Overclocking may not contain CPU, memory, HDD or ODD. IDE mode does not support Hot Plug function. Processor Chipset Intel® Mobile Sandy Bridge Processor, supports 2nd...
...; 3D Vision capable HDD Support 2.5" SATA HDD ODD BD Combo or DVD Super Multi Front I/O Rear I/O Audio 2 x USB 3.0, 1 x MIC, 1 x Head phone, 4-in-1 Card reader (MMC/SD/MS/MS Pro) 1 x HDMI, 1 x DVI-I (Dual-Link), 4 x USB 2.0, 1 x S/PDIF, 1 x eSATA3*2, 2 x USB3.0 7.1 Ch HD Audio with overclocking, including adjusting the setting in AHCI mode only. Overclocking may not contain CPU, memory, HDD or ODD. IDE mode does not support Hot Plug function. Processor Chipset Intel® Mobile Sandy Bridge Processor, supports 2nd...

User Manual
Page 10
NOTE. 1. SATA and Power Connections SATA & Power Connections HDD ODD Connect to ODD Connect to HDD Connect to SATA Connector (4) Connect to ATX5V Power Connector (3) Connect to SATA Connector (1) 2. Fan Connection Fan connector Rotation +12V Ground 10
NOTE. 1. SATA and Power Connections SATA & Power Connections HDD ODD Connect to ODD Connect to HDD Connect to SATA Connector (4) Connect to ATX5V Power Connector (3) Connect to SATA Connector (1) 2. Fan Connection Fan connector Rotation +12V Ground 10

User Manual
Page 12
USB3.0 ports: USB devices 30. 4-in Optical Disc Drive 12 Slot-in -1 Card reader (MMC/SD/MS/MS Pro) 31. Power ON/OFF button with status indicator 32. Microphone 29. Headphone 28. 1.5 System Chassis 27.
USB3.0 ports: USB devices 30. 4-in Optical Disc Drive 12 Slot-in -1 Card reader (MMC/SD/MS/MS Pro) 31. Power ON/OFF button with status indicator 32. Microphone 29. Headphone 28. 1.5 System Chassis 27.
User Manual
Page 19
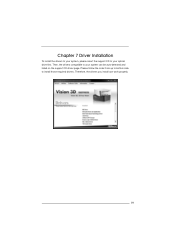
Then, the drivers compatible to your system can work properly. 19 Therefore, the drivers you install can be auto-detected and listed on the support CD driver page. Chapter 7 Driver Installation To install the drivers to your system, please insert the support CD to your optical drive first. Please follow the order from up to bottom side to install those required drivers.
Then, the drivers compatible to your system can work properly. 19 Therefore, the drivers you install can be auto-detected and listed on the support CD driver page. Chapter 7 Driver Installation To install the drivers to your system, please insert the support CD to your optical drive first. Please follow the order from up to bottom side to install those required drivers.

User Manual
Page 20
..., money, and improves system running speed for OS to resume to working state, which normally enable the Sleep/Standby and Hibernation modes in a few seconds. Chapter 8 Utility Menu The utilities meu shows the applications and other software that this product supports. 8.1 Instant Boot 8.1.1 Introduction Instant Boot, a user-friendly tool that does not secure ID and Password to their systems. * The boot up time depends on your...
..., money, and improves system running speed for OS to resume to working state, which normally enable the Sleep/Standby and Hibernation modes in a few seconds. Chapter 8 Utility Menu The utilities meu shows the applications and other software that this product supports. 8.1 Instant Boot 8.1.1 Introduction Instant Boot, a user-friendly tool that does not secure ID and Password to their systems. * The boot up time depends on your...
User Manual
Page 21
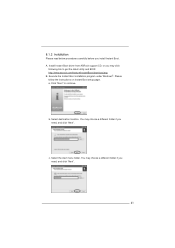
... link to continue. c. A. Click "Next" to get the latest utility and BIOS: http://www.asrock.com/feature/InstantBoot/download.asp B. Please follow the instructions on Instant Boot setup page. a. Select the start menu folder. Install Instant Boot driver from ASRock support CD, or you need , and click "Next". Execute the Instant Boot installation program under Windows®. Select destination location. b. You may choose a different folder if you may choose...
... link to continue. c. A. Click "Next" to get the latest utility and BIOS: http://www.asrock.com/feature/InstantBoot/download.asp B. Please follow the instructions on Instant Boot setup page. a. Select the start menu folder. Install Instant Boot driver from ASRock support CD, or you need , and click "Next". Execute the Instant Boot installation program under Windows®. Select destination location. b. You may choose a different folder if you may choose...
User Manual
Page 22
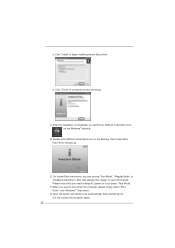
... choose "Fast Mode", "Regular Mode" or "Disable Instant Boot". Now, the system will find an ASRock Instant Boot icon on the Windows® desktop. D. G. Click "Finish" to begin installing Instant Boot driver. Double click ASRock Instant Boot icon on if you will restart once automatically. e. After that you need to shut down the computer, please simply select "Shut Down" from Windows® "Start menu". After reentering...
... choose "Fast Mode", "Regular Mode" or "Disable Instant Boot". Now, the system will find an ASRock Instant Boot icon on the Windows® desktop. D. G. Click "Finish" to begin installing Instant Boot driver. Double click ASRock Instant Boot icon on if you will restart once automatically. e. After that you need to shut down the computer, please simply select "Shut Down" from Windows® "Start menu". After reentering...
User Manual
Page 23
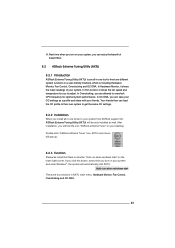
...fit of your desktop. In Fan Control, it shows the major readings of Instant Boot. 8.2 ASRock Extreme Tuning Utility (AXTU) 8.2.1 Introduction ASRock Extreme Tuning Utility (AXTU) is a button "Auto run when windows start AXTU. After installation, you will automatically start " on your system, you are four sections in a user-friendly interface, which is including Hardware Monitor, Fan Control, Overclocking and OC DNA. In Hardware Monitor, it shows the fan speed and temperature for...
...fit of your desktop. In Fan Control, it shows the major readings of Instant Boot. 8.2 ASRock Extreme Tuning Utility (AXTU) 8.2.1 Introduction ASRock Extreme Tuning Utility (AXTU) is a button "Auto run when windows start AXTU. After installation, you will automatically start " on your system, you are four sections in a user-friendly interface, which is including Hardware Monitor, Fan Control, Overclocking and OC DNA. In Hardware Monitor, it shows the fan speed and temperature for...
User Manual
Page 30
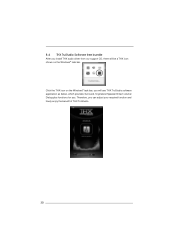
Click the THX icon on the Windows® task bar, you will see THX TruStudio software application as below, which provides Surround /Crystalizer/Speaker/Smart volume/ Dialog plus functions for you install THX audio driver from our support CD, there will be a THX icon shown on the Windows® task bar. 8.6 THX TruStudio Software free bundle After you . Therefore, you can adjust your required function and freely enjoy the benefit of THX TruStudio. 30
Click the THX icon on the Windows® task bar, you will see THX TruStudio software application as below, which provides Surround /Crystalizer/Speaker/Smart volume/ Dialog plus functions for you install THX audio driver from our support CD, there will be a THX icon shown on the Windows® task bar. 8.6 THX TruStudio Software free bundle After you . Therefore, you can adjust your required function and freely enjoy the benefit of THX TruStudio. 30

User Manual
Page 36
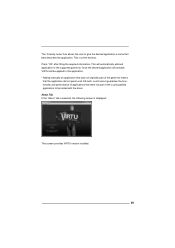
..., use mouse right click while pointing at the icon, will display the following screen: Clicking on the system tray, it is shown on the "Enable" option, will open a new window with VIRTU control panel. Click using the following instructions: 1. Once activated, the Lucid logo shows on "VIRTU Control Panel". Clicking on the "Open control panel" option will activate the VIRTU. Click "Start", "Programs" and "VIRTU". 2. Clicking on "Disable" option, allows the user to...
..., use mouse right click while pointing at the icon, will display the following screen: Clicking on the system tray, it is shown on the "Enable" option, will open a new window with VIRTU control panel. Click using the following instructions: 1. Once activated, the Lucid logo shows on "VIRTU Control Panel". Clicking on the "Open control panel" option will activate the VIRTU. Click "Start", "Programs" and "VIRTU". 2. Clicking on "Disable" option, allows the user to...

User Manual
Page 37
... screen. 2. In case of the current running applications. "Performance optimization" - The following window is displayed: By pressing a big "On" button VIRTU solution is recommended to change the setting to Quality. 37 "Chose a Corner" - Test on the system tray together with the rest of new application some issues may rarely happen it is activated. 8.8.4 VIRTU Control Panel Main Tab When activating the VIRTU control panel...
... screen. 2. In case of the current running applications. "Performance optimization" - The following window is displayed: By pressing a big "On" button VIRTU solution is recommended to change the setting to Quality. 37 "Chose a Corner" - Test on the system tray together with the rest of new application some issues may rarely happen it is activated. 8.8.4 VIRTU Control Panel Main Tab When activating the VIRTU control panel...
User Manual
Page 39
... allows the user to give the desired application a name that was not originally part of the Lucid qualified application list provided with the driver. Once the desired application will activate, VIRTU will automatically add and application to this application. * Adding manually an application that best describes the application. This is displayed: This screen provides VIRTU version installed. 39...
... allows the user to give the desired application a name that was not originally part of the Lucid qualified application list provided with the driver. Once the desired application will activate, VIRTU will automatically add and application to this application. * Adding manually an application that best describes the application. This is displayed: This screen provides VIRTU version installed. 39...

User Manual
Page 46
... Menu Bar The top of the screen has a menu bar with its test routines. If you start up the security features Exit To exit the current screen or the UEFI SETUP UTILITY Use < > key or < > key to choose among the selections on . You may run the UEFI SETUP UTILITY when you wish to enter the UEFI SETUP UTILITY after POST, restart the system by pressing + + , or by turning...
... Menu Bar The top of the screen has a menu bar with its test routines. If you start up the security features Exit To exit the current screen or the UEFI SETUP UTILITY Use < > key or < > key to choose among the selections on . You may run the UEFI SETUP UTILITY when you wish to enter the UEFI SETUP UTILITY after POST, restart the system by pressing + + , or by turning...

User Manual
Page 55
... will be disabled when PCI Sound Card is enabled, Deep Sx will enter Deep S5 for the onboard HD Audio feature. The default value is [Disabled]. 55 The default value is [Enabled]. If [Power On] is selected, user can use USB connector to enable or disable On/Off Play Technology. Legacy Support This allows you select [Auto], the onboard HD Audio will be disabled. If you to enable or disable the onboard card reader. When...
... will be disabled when PCI Sound Card is enabled, Deep Sx will enter Deep S5 for the onboard HD Audio feature. The default value is [Disabled]. 55 The default value is [Enabled]. If [Power On] is selected, user can use USB connector to enable or disable On/Off Play Technology. Legacy Support This allows you select [Auto], the onboard HD Audio will be disabled. If you to enable or disable the onboard card reader. When...

User Manual
Page 57
The default value is [Enabled]. Use this item to select SATA mode. Hard Disk S.M.A.R.T. 9.4.4 Storage Configuration SATA Mode Use this to enable or disable the S.M.A.R.T. (Self-Monitoring, Analysis, and Reporting Technology) feature. AHCI (Advanced Host Controller Interface) supports NCQ and other new features that will improve SATA disk performance but IDE mode does not have these advantages. SATA Aggressive Link Power Management Use this to enable or disable SATA Aggressive Link Power Management. Configuration options: [Disabled] and [Enabled]. 57 The default value...
The default value is [Enabled]. Use this item to select SATA mode. Hard Disk S.M.A.R.T. 9.4.4 Storage Configuration SATA Mode Use this to enable or disable the S.M.A.R.T. (Self-Monitoring, Analysis, and Reporting Technology) feature. AHCI (Advanced Host Controller Interface) supports NCQ and other new features that will improve SATA disk performance but IDE mode does not have these advantages. SATA Aggressive Link Power Management Use this to enable or disable SATA Aggressive Link Power Management. Configuration options: [Disabled] and [Enabled]. 57 The default value...
User Manual
Page 65
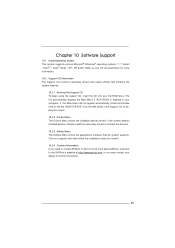
... contact ASRock or want to install it. 10.2.4 Contact Information If you may contact your CD-ROM drive. If the Main Menu did not appear automatically, locate and double click on a specific item then follow the installation wizard to know more information. 10.2 Support CD Information The Support CD contains necessary drivers and useful utilities that the system supports. Chapter 10 Software Support 10.1 Install Operating...
... contact ASRock or want to install it. 10.2.4 Contact Information If you may contact your CD-ROM drive. If the Main Menu did not appear automatically, locate and double click on a specific item then follow the installation wizard to know more information. 10.2 Support CD Information The Support CD contains necessary drivers and useful utilities that the system supports. Chapter 10 Software Support 10.1 Install Operating...
Quick Installation Guide
Page 2
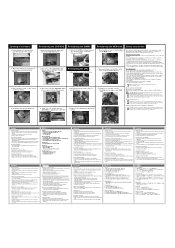
... a CPU 1. Press the button on the rear I /O posteriore per aggiornare il sistema. Do not stare into the system. • The system does not function properly even if you can change a new MXM card. 繁體中文 1.按後面I /O to disassemble the optical drive. Danger of electronic products. Reinstalling the ODD/HDD 1. Desconecte todos los cables de alimentación SATA de...
... a CPU 1. Press the button on the rear I /O posteriore per aggiornare il sistema. Do not stare into the system. • The system does not function properly even if you can change a new MXM card. 繁體中文 1.按後面I /O to disassemble the optical drive. Danger of electronic products. Reinstalling the ODD/HDD 1. Desconecte todos los cables de alimentación SATA de...

