

User Manual
Page 4
... 1 Introduction 1 1.1 Package Contents 1 1.2 Speciications 2 1.3 Motherboard Layout 5 1.4 I/O Panel 7 Chapter 2 Installation 9 2.1 Installing Memory Modules (DIMM) 10 2.2 Expansion Slot (PCI Express Slots) 12 2.3 Jumpers Setup 13 2.4 Onboard Headers and Connectors 14 Chapter 3 Software and Utilities Operation 17 3.1 Installing Drivers 17 3.2 ASRock APP Shop 18 3.2.1 UI Overview 18 3.2.2 Apps 19 3.2.3 BIOS & Drivers 22 3.2.4 Setting 23 Chapter 4 UEFI SETUP UTILITY 24 4.1 Introduction 24 4.1.1 UEFI Menu Bar 24 4.1.2 Navigation Keys 25 4.2 Main Screen 26
... 1 Introduction 1 1.1 Package Contents 1 1.2 Speciications 2 1.3 Motherboard Layout 5 1.4 I/O Panel 7 Chapter 2 Installation 9 2.1 Installing Memory Modules (DIMM) 10 2.2 Expansion Slot (PCI Express Slots) 12 2.3 Jumpers Setup 13 2.4 Onboard Headers and Connectors 14 Chapter 3 Software and Utilities Operation 17 3.1 Installing Drivers 17 3.2 ASRock APP Shop 18 3.2.1 UI Overview 18 3.2.2 Apps 19 3.2.3 BIOS & Drivers 22 3.2.4 Setting 23 Chapter 4 UEFI SETUP UTILITY 24 4.1 Introduction 24 4.1.1 UEFI Menu Bar 24 4.1.2 Navigation Keys 25 4.2 Main Screen 26
User Manual
Page 6
... and utilities. You may ind the latest VGA cards and CPU support list on ASRock's website without notice. If you require technical support related to this manual, Chapter 1 and 2 contains the introduction of the motherboard and step-by-step installation guides. ASRock website http://www.asrock.com. 1.1 Package Contents • ASRock QC5000M-ITX/PH Motherboard (Mini-ITX Form Factor) • ASRock QC5000M-ITX/PH Quick Installation Guide • ASRock QC5000M-ITX/PH Support CD • 2 x Serial ATA (SATA) Data Cables (Optional) • 1 x I/O Panel Shield 1 English In case...
... and utilities. You may ind the latest VGA cards and CPU support list on ASRock's website without notice. If you require technical support related to this manual, Chapter 1 and 2 contains the introduction of the motherboard and step-by-step installation guides. ASRock website http://www.asrock.com. 1.1 Package Contents • ASRock QC5000M-ITX/PH Motherboard (Mini-ITX Form Factor) • ASRock QC5000M-ITX/PH Quick Installation Guide • ASRock QC5000M-ITX/PH Support CD • 2 x Serial ATA (SATA) Data Cables (Optional) • 1 x I/O Panel Shield 1 English In case...
User Manual
Page 8
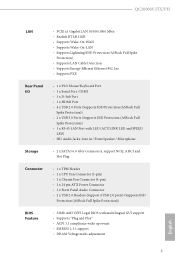
...in / Front Speaker / Microphone • 2 x SATA3 6.0 Gb/s Connectors, support NCQ, AHCI and Hot Plug • 1 x TPM Header • 1 x CPU Fan Connector (3-pin) • 1 x Chassis Fan Connector (4-pin) • 1 x 24 pin ATX Power Connector • 1 x Front Panel Audio Connector • 2 x USB 2.0 Headers (Support 4 USB 2.0 ports) (Supports ESD Protection (ASRock Full Spike Protection)) • 32Mb AMI UEFI Legal BIOS with multilingual GUI support • Supports "Plug and Play" • ACPI 1.1 compliance wake up events • SMBIOS 2.3.1 support • DRAM Voltage multi-adjustment...
...in / Front Speaker / Microphone • 2 x SATA3 6.0 Gb/s Connectors, support NCQ, AHCI and Hot Plug • 1 x TPM Header • 1 x CPU Fan Connector (3-pin) • 1 x Chassis Fan Connector (4-pin) • 1 x 24 pin ATX Power Connector • 1 x Front Panel Audio Connector • 2 x USB 2.0 Headers (Support 4 USB 2.0 ports) (Supports ESD Protection (ASRock Full Spike Protection)) • 32Mb AMI UEFI Legal BIOS with multilingual GUI support • Supports "Plug and Play" • ACPI 1.1 compliance wake up events • SMBIOS 2.3.1 support • DRAM Voltage multi-adjustment...

User Manual
Page 9
... involved with overclocking, including adjusting the setting in the BIOS, applying Untied Overclocking Technology, or using thirdparty overclocking tools. We are not responsible for possible damage caused by Windows® XP * For the updated Windows® 10 driver, please visit ASRock's website for system usage under Windows® 8.1 / 8 / 7 / XP. You can use . Hardware Monitor • CPU/Chassis temperature sensing • CPU/Chassis Fan Tachometer • CPU/Chassis Quiet Fan • CPU/Chassis Fan multi-speed control • Voltage monitoring: +12V, +5V...
... involved with overclocking, including adjusting the setting in the BIOS, applying Untied Overclocking Technology, or using thirdparty overclocking tools. We are not responsible for possible damage caused by Windows® XP * For the updated Windows® 10 driver, please visit ASRock's website for system usage under Windows® 8.1 / 8 / 7 / XP. You can use . Hardware Monitor • CPU/Chassis temperature sensing • CPU/Chassis Fan Tachometer • CPU/Chassis Quiet Fan • CPU/Chassis Fan multi-speed control • Voltage monitoring: +12V, +5V...

User Manual
Page 10
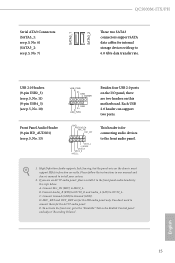
PS2 Keyboard/ Mouse 1.3 Motherboard Layout USB 2.0 T: USB0 B: USB1 QC5000M-ITX/PH 1 CMOS Battery CLRCMOS1 1 2 CHA_FAN1 3 ATXPWR1 QC5000M-ITX/PH DDR3_A1 (64 bit, 240-FpinSBmo8d0ul0e) DDR3_A2 (64 bit, 240-pin module) COM1 VGA1 HDMI1 RoHS USB 3.0 T: USB0 B: USB1 USB 3.0 RJ-45 LAN Top: LINE IN Center: FRONT Bottom: MIC IN USB 2.0 T: USB2 B: USB3 LAN HD_AUDIO1 1 AUDIO CODEC CPU_FAN1 TPMS1 1 USB4_5 1 USB2_3 1 32Mb BIOS SPEAKER1 1 PCIE1 13 12 11 10 9 8 SATA3_1 SATA3_2 4 PANEL 1 PLED PWRBTN 5 1 HDLED RESET 6 7 English 5
PS2 Keyboard/ Mouse 1.3 Motherboard Layout USB 2.0 T: USB0 B: USB1 QC5000M-ITX/PH 1 CMOS Battery CLRCMOS1 1 2 CHA_FAN1 3 ATXPWR1 QC5000M-ITX/PH DDR3_A1 (64 bit, 240-FpinSBmo8d0ul0e) DDR3_A2 (64 bit, 240-pin module) COM1 VGA1 HDMI1 RoHS USB 3.0 T: USB0 B: USB1 USB 3.0 RJ-45 LAN Top: LINE IN Center: FRONT Bottom: MIC IN USB 2.0 T: USB2 B: USB3 LAN HD_AUDIO1 1 AUDIO CODEC CPU_FAN1 TPMS1 1 USB4_5 1 USB2_3 1 32Mb BIOS SPEAKER1 1 PCIE1 13 12 11 10 9 8 SATA3_1 SATA3_2 4 PANEL 1 PLED PWRBTN 5 1 HDLED RESET 6 7 English 5
User Manual
Page 14
... uninstall any motherboard settings. • Make sure to unplug the power cord before you handle the components. • Hold components by the edges and do not overtighten the screws! Pre-installation Precautions Take note of your motherboard directly on a grounded anti-static pad or in the bag that the motherboard its into it. QC5000M-ITX/PH Chapter 2 Installation his is...
... uninstall any motherboard settings. • Make sure to unplug the power cord before you handle the components. • Hold components by the edges and do not overtighten the screws! Pre-installation Precautions Take note of your motherboard directly on a grounded anti-static pad or in the bag that the motherboard its into it. QC5000M-ITX/PH Chapter 2 Installation his is...

User Manual
Page 17
Please read the documentation of the expansion card and make sure that the power supply is switched of or the power cord is used for the card before you start the installation. Before installing an expansion card, please make necessary hardware settings for PCI Express x4 lane width graphics cards. 12 English PCIe slots: PCIE1 (PCIe 2.0 x16 slot) is unplugged. 2.2 Expansion Slot (PCI Express Slots) here is one PCI Express slot on the motherboard.
Please read the documentation of the expansion card and make sure that the power supply is switched of or the power cord is used for the card before you start the installation. Before installing an expansion card, please make necessary hardware settings for PCI Express x4 lane width graphics cards. 12 English PCIe slots: PCIE1 (PCIe 2.0 x16 slot) is unplugged. 2.2 Expansion Slot (PCI Express Slots) here is one PCI Express slot on the motherboard.

User Manual
Page 18
... to default setup, please turn of the computer and unplug the power cord from the power supply. English 13 Please be noted that the password, date, time, and user default proile will be cleared only if the CMOS battery is "Open". QC5000M-ITX/PH 2.3 Jumpers Setup he illustration shows a 3-pin jumper whose pin1 and pin2 are setup. Clear CMOS Jumper (CLRCMOS1) (see p.5, No. 2) Default Clear CMOS CLRCMOS1 allows you do not clear the CMOS right ater you update the BIOS...
... to default setup, please turn of the computer and unplug the power cord from the power supply. English 13 Please be noted that the password, date, time, and user default proile will be cleared only if the CMOS battery is "Open". QC5000M-ITX/PH 2.3 Jumpers Setup he illustration shows a 3-pin jumper whose pin1 and pin2 are setup. Clear CMOS Jumper (CLRCMOS1) (see p.5, No. 2) Default Clear CMOS CLRCMOS1 allows you do not clear the CMOS right ater you update the BIOS...
User Manual
Page 20
... USB 2.0 ports on the I/O panel, there are for the HD audio panel only. If you use an AC'97 audio panel, please install it to connect them for internal storage devices with up to the "FrontMic" Tab in our manual and chassis manual to MIC2_L. Each USB 2.0 header can support two ports. USB 2.0 Headers (9-pin USB2_3) (see p.5, No. 11) (9-pin USB4_5) (see p.5, No. 10) Front Panel Audio Header (9-pin HD_AUDIO1) (see p.5, No. 7) SATA3_1 SATA3_2 QC5000M-ITX/PH hese two SATA3 connectors support SATA data cables...
... USB 2.0 ports on the I/O panel, there are for the HD audio panel only. If you use an AC'97 audio panel, please install it to connect them for internal storage devices with up to the "FrontMic" Tab in our manual and chassis manual to MIC2_L. Each USB 2.0 header can support two ports. USB 2.0 Headers (9-pin USB2_3) (see p.5, No. 11) (9-pin USB4_5) (see p.5, No. 10) Front Panel Audio Header (9-pin HD_AUDIO1) (see p.5, No. 7) SATA3_1 SATA3_2 QC5000M-ITX/PH hese two SATA3 connectors support SATA data cables...

User Manual
Page 21
... Please connect fan cables to the fan connectors and match the black wire to the ground pin. 12 24 1 13 his connector supports Trusted Platform Module (TPM) system, which can securely store keys, digital certiicates, passwords, and data. his motherboard provides a 24-pin ATX power connector. A TPM system also helps enhance network security, protects digital identities, and ensures platform integrity. Chassis Speaker Header (4-pin SPEAKER1) (see p.5, No. 8) Chassis Fan Connector (4-pin CHA_FAN1) (see p.5, No. 3) CPU Fan Connector (3-pin CPU_FAN1...
... Please connect fan cables to the fan connectors and match the black wire to the ground pin. 12 24 1 13 his connector supports Trusted Platform Module (TPM) system, which can securely store keys, digital certiicates, passwords, and data. his motherboard provides a 24-pin ATX power connector. A TPM system also helps enhance network security, protects digital identities, and ensures platform integrity. Chassis Speaker Header (4-pin SPEAKER1) (see p.5, No. 8) Chassis Fan Connector (4-pin CHA_FAN1) (see p.5, No. 3) CPU Fan Connector (3-pin CPU_FAN1...
User Manual
Page 22
... work properly. he CD automatically displays the Main Menu if "AUTORUN" is enabled in the Support CD to install it. Click on the support CD driver page. Drivers Menu he drivers compatible to install those required drivers. Please click Install All or follow the order from top to bottom to your CD-ROM drive. To improve Windows 7 compatibility, please download and install the following hot ix provided by Microsot. QC5000M-ITX/PH Chapter 3 Software and Utilities Operation 3.1 Installing Drivers...
... work properly. he CD automatically displays the Main Menu if "AUTORUN" is enabled in the Support CD to install it. Click on the support CD driver page. Drivers Menu he drivers compatible to install those required drivers. Please click Install All or follow the order from top to bottom to your CD-ROM drive. To improve Windows 7 compatibility, please download and install the following hot ix provided by Microsot. QC5000M-ITX/PH Chapter 3 Software and Utilities Operation 3.1 Installing Drivers...

User Manual
Page 29
... the reset button on the computer, otherwise, the Power-On-Self-Test (POST) will it make BIOS setup less diicult but also a lot more amusing. Chapter 4 UEFI SETUP UTILITY 4.1 Introduction ASRock Interactive UEFI is constantly being updated, the following selections: Main For setting system time/date information OC Tweaker For overclocking conigurations Advanced For advanced system conigurations Tool Useful tools H/W Monitor Displays current hardware status Boot For coniguring boot settings and boot...
... the reset button on the computer, otherwise, the Power-On-Self-Test (POST) will it make BIOS setup less diicult but also a lot more amusing. Chapter 4 UEFI SETUP UTILITY 4.1 Introduction ASRock Interactive UEFI is constantly being updated, the following selections: Main For setting system time/date information OC Tweaker For overclocking conigurations Advanced For advanced system conigurations Tool Useful tools H/W Monitor Displays current hardware status Boot For coniguring boot settings and boot...
User Manual
Page 32
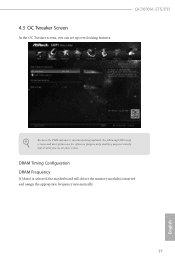
4.3 OC Tweaker Screen In the OC Tweaker screen, you see on your screen. DRAM Timing Coniguration DRAM Frequency If [Auto] is constantly being updated, the following UEFI setup screens and descriptions are for reference purpose only, and they may not exactly match what you can set up overclocking features. QC5000M-ITX/PH Because the UEFI sotware is selected, the motherboard will detect the memory module(s) inserted and assign the appropriate frequency automatically. 27 English
4.3 OC Tweaker Screen In the OC Tweaker screen, you see on your screen. DRAM Timing Coniguration DRAM Frequency If [Auto] is constantly being updated, the following UEFI setup screens and descriptions are for reference purpose only, and they may not exactly match what you can set up overclocking features. QC5000M-ITX/PH Because the UEFI sotware is selected, the motherboard will detect the memory module(s) inserted and assign the appropriate frequency automatically. 27 English

User Manual
Page 36
... [Enabled]. 31 English 4.4.1 CPU Coniguration QC5000M-ITX/PH Cool 'n' Quiet Use this item to enable or disable Core C6 mode. he default value is [Enabled]. Please note that enabling this function may reduce CPU voltage and memory frequency, and lead to [Disable] if above issue occurs. Coniguration options: [Enabled] and [Disabled]. he default value is set to [Enabled]. Please set this item to system stability or compatibility issue with some memory modules or power supplies. Coniguration options: [Enabled] and [Disabled]. If you install Windows...
... [Enabled]. 31 English 4.4.1 CPU Coniguration QC5000M-ITX/PH Cool 'n' Quiet Use this item to enable or disable Core C6 mode. he default value is [Enabled]. Please note that enabling this function may reduce CPU voltage and memory frequency, and lead to [Disable] if above issue occurs. Coniguration options: [Enabled] and [Disabled]. he default value is set to [Enabled]. Please set this item to system stability or compatibility issue with some memory modules or power supplies. Coniguration options: [Enabled] and [Disabled]. If you install Windows...

User Manual
Page 37
Onboard HD Audio Enable/disable onboard HD audio. Set to Auto to enable onboard HD audio and automatically disable it when a sound card is allocated to the integrated graphics processor when the system boots up. Primary Graphics Adapter Select a primary VGA. Onboard HDMI HD Audio Enable audio for the onboard digital outputs. Front Panel Enable/disable front panel HD audio. 4.4.2 Chipset Coniguration Share Memory Conigure the size of memory that is installed. Onboard LAN Enable or disable the onboard network interface controller. 32 English
Onboard HD Audio Enable/disable onboard HD audio. Set to Auto to enable onboard HD audio and automatically disable it when a sound card is allocated to the integrated graphics processor when the system boots up. Primary Graphics Adapter Select a primary VGA. Onboard HDMI HD Audio Enable audio for the onboard digital outputs. Front Panel Enable/disable front panel HD audio. 4.4.2 Chipset Coniguration Share Memory Conigure the size of memory that is installed. Onboard LAN Enable or disable the onboard network interface controller. 32 English

User Manual
Page 40
Serial Port Address Select the address of the Serial port. 35 English 4.4.4 Super IO Coniguration QC5000M-ITX/PH PS2 Y-Cable Enable the PS2 Y-Cable or set this option to Auto. Serial Port Enable or disable the Serial port.
Serial Port Address Select the address of the Serial port. 35 English 4.4.4 Super IO Coniguration QC5000M-ITX/PH PS2 Y-Cable Enable the PS2 Y-Cable or set this option to Auto. Serial Port Enable or disable the Serial port.

User Manual
Page 43
Legacy USB Support Enable or disable Legacy OS Support for USB 3.0 devices. 38 English Select UEFI Setup Only to disable legacy USB support. USB 3.0 Controller Enable or disable all the USB ports. 4.4.6 USB Coniguration USB Controller Enable or disable all the USB 3.0 ports. If you encounter USB compatibility issues it is recommended to support USB devices under the UEFI setup and Windows/Linux operating systems only. Legacy USB 3.0 Support Enable or disable Legacy OS Support for USB 2.0 devices.
Legacy USB Support Enable or disable Legacy OS Support for USB 3.0 devices. 38 English Select UEFI Setup Only to disable legacy USB support. USB 3.0 Controller Enable or disable all the USB ports. 4.4.6 USB Coniguration USB Controller Enable or disable all the USB 3.0 ports. If you encounter USB compatibility issues it is recommended to support USB devices under the UEFI setup and Windows/Linux operating systems only. Legacy USB 3.0 Support Enable or disable Legacy OS Support for USB 2.0 devices.
User Manual
Page 45
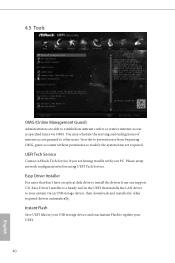
... drivers automatically. Please setup network coniguration before using UEFI Tech Service. UEFI Tech Service Contact ASRock Tech Service if you are required. Easy Driver Installer For users that installs the LAN driver to your system via OMG. 4.5 Tools OMG (Online Management Guard) Administrators are able to modify the system time are having trouble with your PC. You may schedule the starting and ending hours of internet access granted to update...
... drivers automatically. Please setup network coniguration before using UEFI Tech Service. UEFI Tech Service Contact ASRock Tech Service if you are required. Easy Driver Installer For users that installs the LAN driver to your system via OMG. 4.5 Tools OMG (Online Management Guard) Administrators are able to modify the system time are having trouble with your PC. You may schedule the starting and ending hours of internet access granted to update...
User Manual
Page 46
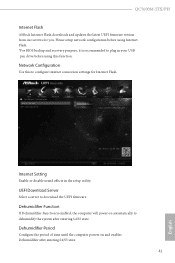
... entering S4/S5 state. Please setup network coniguration before using Internet Flash. *For BIOS backup and recovery purpose, it is enabled, the computer will power on and enables Dehumidiier ater entering S4/S5 state. 41 English UEFI Download Server Select a server to conigure internet connection settings for you. Internet Setting Enable or disable sound efects in your USB pen drive before using this to download the UEFI irmware. QC5000M-ITX/PH Internet Flash ASRock Internet Flash downloads and updates the latest UEFI irmware version...
... entering S4/S5 state. Please setup network coniguration before using Internet Flash. *For BIOS backup and recovery purpose, it is enabled, the computer will power on and enables Dehumidiier ater entering S4/S5 state. 41 English UEFI Download Server Select a server to conigure internet connection settings for you. Internet Setting Enable or disable sound efects in your USB pen drive before using this to download the UEFI irmware. QC5000M-ITX/PH Internet Flash ASRock Internet Flash downloads and updates the latest UEFI irmware version...
User Manual
Page 49
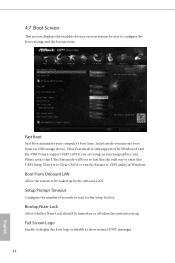
... key. Bootup Num-Lock Select whether Num Lock should be waked up . Full Screen Logo Enable to display the boot logo or disable to UEFI utility in Windows. Ultra Fast mode is to Clear CMOS or run the Restart to show normal POST messages. 44 English Please notice that Ultra Fast mode will boot so fast that the only way to enter this UEFI Setup Utility is only supported by the onboard LAN...
... key. Bootup Num-Lock Select whether Num Lock should be waked up . Full Screen Logo Enable to display the boot logo or disable to UEFI utility in Windows. Ultra Fast mode is to Clear CMOS or run the Restart to show normal POST messages. 44 English Please notice that Ultra Fast mode will boot so fast that the only way to enter this UEFI Setup Utility is only supported by the onboard LAN...


