
User Manual
Page 4
... 36 3.1 Introduction 36 3.1.1 BIOS Menu Bar 36 3.1.2 Navigation Keys 37 3.2 Main Screen 37 3.3 Advanced Screen 38 3.3.1 CPU Configuration 38 3.3.2 Chipset Configuration 40 3.3.3 ACPI Configuration 43 3.3.4 IDE Configuration 44 3.3.5 PCIPnP ...
... 36 3.1 Introduction 36 3.1.1 BIOS Menu Bar 36 3.1.2 Navigation Keys 37 3.2 Main Screen 37 3.3 Advanced Screen 38 3.3.1 CPU Configuration 38 3.3.2 Chipset Configuration 40 3.3.3 ACPI Configuration 43 3.3.4 IDE Configuration 44 3.3.5 PCIPnP ...

User Manual
Page 5
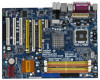
... the motherboard specifications and the BIOS software might be updated, the content of this manual, chapter 1 and 2 contain introduction of the Support CD. www.asrock.com/support/index.asp 1.1 Package Contents 1 x ASRock Penryn1600SLI-110dB Motherboard (ATX Form Factor: 12.0-in x 9.0-in, 30.5 cm x 22.9 cm) 1 x ASRock SLI Bridge 1 x ASRock Penryn1600SLI-110dB Quick Installation Guide 1 x ASRock Penryn1600SLI-110dB Support CD 1 x Ultra ATA 66...
... the motherboard specifications and the BIOS software might be updated, the content of this manual, chapter 1 and 2 contain introduction of the Support CD. www.asrock.com/support/index.asp 1.1 Package Contents 1 x ASRock Penryn1600SLI-110dB Motherboard (ATX Form Factor: 12.0-in x 9.0-in, 30.5 cm x 22.9 cm) 1 x ASRock SLI Bridge 1 x ASRock Penryn1600SLI-110dB Quick Installation Guide 1 x ASRock Penryn1600SLI-110dB Support CD 1 x Ultra ATA 66...
User Manual
Page 7
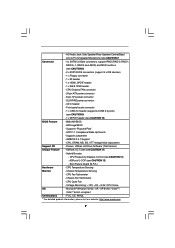
...BIOS - Drivers, Utilities, AntiVirus Software (Trial Version) Unique Feature - CPU Temperature Sensing Monitor - FCC, CE, WHQL * For detailed product information, please visit our website: http://www.asrock.com 7 SLI/XFIRE power connector - AMBIOS 2.3.1 Support - ASRock OC Tuner (see CAUTION 13) - ASRock...- Hybrid Booster: - - CPU/Chassis FAN connector - 24 pin ATX power connector - 8 pin 12V power connector - AMI Legal BIOS - Supports jumperfree - CPU Frequency Stepless Control (see CAUTION 12) - CPU Quiet Fan - Voltage Monitoring: +12V, +5V, +3.3V...
...BIOS - Drivers, Utilities, AntiVirus Software (Trial Version) Unique Feature - CPU Temperature Sensing Monitor - FCC, CE, WHQL * For detailed product information, please visit our website: http://www.asrock.com 7 SLI/XFIRE power connector - AMBIOS 2.3.1 Support - ASRock OC Tuner (see CAUTION 13) - ASRock...- Hybrid Booster: - - CPU/Chassis FAN connector - 24 pin ATX power connector - 8 pin 12V power connector - AMI Legal BIOS - Supports jumperfree - CPU Frequency Stepless Control (see CAUTION 12) - CPU Quiet Fan - Voltage Monitoring: +12V, +5V, +3.3V...
User Manual
Page 8
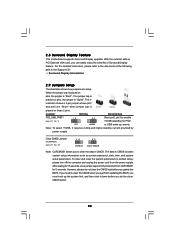
...channel, and 8-channel modes. It allows you implement Dual Channel Memory Technology, make sure to create a wireless environment and enjoy the convenience of ASRock WiFi-802.11g or WiFi-802.11n module. This motherboard supports NVIDIA® SLITM technology. You can also connect SATA hard disk to -use... read the installation guide of memory modules on page 31 to adjust your own risk and expense. FSB1600-CPU will operate in the BIOS, applying Untied Overclocking Technology, or using the thirdparty overclocking tools. For Windows® XP 64-bit and Windows® VistaTM 64-...
...channel, and 8-channel modes. It allows you implement Dual Channel Memory Technology, make sure to create a wireless environment and enjoy the convenience of ASRock WiFi-802.11g or WiFi-802.11n module. This motherboard supports NVIDIA® SLITM technology. You can also connect SATA hard disk to -use... read the installation guide of memory modules on page 31 to adjust your own risk and expense. FSB1600-CPU will operate in the BIOS, applying Untied Overclocking Technology, or using the thirdparty overclocking tools. For Windows® XP 64-bit and Windows® VistaTM 64-...
User Manual
Page 24
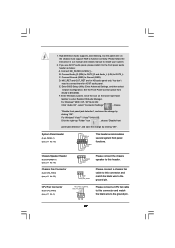
... Description PS2_USB_PWR1 (see p.11 No. 17) 1_2 2_3 Default Clear CMOS Note: CLRCMOS1 allows you to clear the CMOS when you just finish updating the BIOS, you do not clear the CMOS right after you can easily enjoy the benefits of Surround Display feature. lustration shows a 3-pin jumper whose pin1 and... pin2 are setup. With the external add-on pins, the jumper is placed on PCI Express VGA card, you update the BIOS. After waiting for 15 seconds, use a jumper cap to enable +5VSB (standby) for 5 seconds. When the jumper cap is "Short".
... Description PS2_USB_PWR1 (see p.11 No. 17) 1_2 2_3 Default Clear CMOS Note: CLRCMOS1 allows you to clear the CMOS when you just finish updating the BIOS, you do not clear the CMOS right after you can easily enjoy the benefits of Surround Display feature. lustration shows a 3-pin jumper whose pin1 and... pin2 are setup. With the external add-on pins, the jumper is placed on PCI Express VGA card, you update the BIOS. After waiting for 15 seconds, use a jumper cap to enable +5VSB (standby) for 5 seconds. When the jumper cap is "Short".
User Manual
Page 27
... change by clicking "OK". High Definition Audio supports Jack Sensing, but the panel wire on the lower right hand taskbar to the ground pin. Enter BIOS Setup Utility. Enter Windows system. 1. Connect Audio_R (RIN) to OUT2_R and Audio_L (LIN) to [Enabled]. D. Set the Front Panel Control option from [Auto] to OUT2_L...
... change by clicking "OK". High Definition Audio supports Jack Sensing, but the panel wire on the lower right hand taskbar to the ground pin. Enter BIOS Setup Utility. Enter Windows system. 1. Connect Audio_R (RIN) to OUT2_R and Audio_L (LIN) to [Enabled]. D. Set the Front Panel Control option from [Auto] to OUT2_L...
User Manual
Page 32
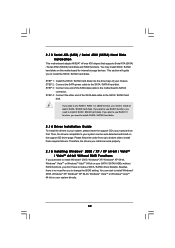
... disks. Besides, there is no need to install 3 SATA / SATAII hard disks. STEP 4: Connect the other end of the SATA data cable to change the BIOS setting. 2 . 1 3 Serial ATA (SATA) / Serial ATAII (SATAII) Hard Disks Installation This motherboard adopts NVIDIA® nForce 430 chipset that supports Serial ATA (SATA) / Serial ATAII...
... disks. Besides, there is no need to install 3 SATA / SATAII hard disks. STEP 4: Connect the other end of the SATA data cable to change the BIOS setting. 2 . 1 3 Serial ATA (SATA) / Serial ATAII (SATAII) Hard Disks Installation This motherboard adopts NVIDIA® nForce 430 chipset that supports Serial ATA (SATA) / Serial ATAII...
User Manual
Page 33
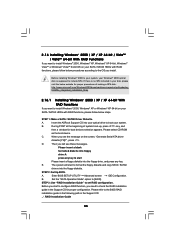
... / XP / XP 64-bit / VistaTM / VistaTM 64-bit With RAID Functions If you want to the OS you install. Insert the ASRock Support CD into your optical drive to format the floppy diskette and copy SATA / SATAII drivers into the floppy diskette. The system will see the...selection appears. When you will start Please insert a floppy diskette into floppy drive A: press any key. If there is supposed to the BIOS RAID installation guide in the following path in your SATA / SATAII HDDs with RAID functions, please follow below website for proper procedures of ...
... / XP / XP 64-bit / VistaTM / VistaTM 64-bit With RAID Functions If you want to the OS you install. Insert the ASRock Support CD into your optical drive to format the floppy diskette and copy SATA / SATAII drivers into the floppy diskette. The system will see the...selection appears. When you will start Please insert a floppy diskette into floppy drive A: press any key. If there is supposed to the BIOS RAID installation guide in the following path in your SATA / SATAII HDDs with RAID functions, please follow below website for proper procedures of ...
User Manual
Page 34
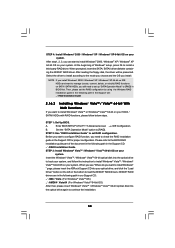
...3, you want to [RAID]. After reading the floppy disk, the driver will be presented. Then, please set up "SATA Operation Mode" to [RAID] in BIOS first. B. Insert the Windows® VistaTM / Windows® VistaTM 64-bit optical disk into the optical drive to install Windows® VistaTM / Windows® ... UTILITY Advanced screen IDE Configuration. STEP 2: Use "RAID Installation Guide" to load the NVIDIA® RAID drivers. " page, please insert the ASRock Support CD into the optical drive again to install Windows® 2000 / Windows® XP / Windows® XP 64-bit OS on your ...
...3, you want to [RAID]. After reading the floppy disk, the driver will be presented. Then, please set up "SATA Operation Mode" to [RAID] in BIOS first. B. Insert the Windows® VistaTM / Windows® VistaTM 64-bit optical disk into the optical drive to install Windows® VistaTM / Windows® ... UTILITY Advanced screen IDE Configuration. STEP 2: Use "RAID Installation Guide" to load the NVIDIA® RAID drivers. " page, please insert the ASRock Support CD into the optical drive again to install Windows® 2000 / Windows® XP / Windows® XP 64-bit OS on your ...
User Manual
Page 35
... apply Untied Overclocking Technology. 35 Please refer to the warning on SATA / SATAII HDDs, you enable Untied Overclocking function, please enter "Overclock Mode" option of BIOS setup to set the selection from [Auto] to fixed PCI / PCIE buses. Therefore, CPU FSB is untied during overclocking, but PCI / PCIE buses are in... in the following path in the fixed mode so that FSB can operate under a more stable overclocking environment. Before you still need to [RAID] in BIOS first.
... apply Untied Overclocking Technology. 35 Please refer to the warning on SATA / SATAII HDDs, you enable Untied Overclocking function, please enter "Overclock Mode" option of BIOS setup to set the selection from [Auto] to fixed PCI / PCIE buses. Therefore, CPU FSB is untied during overclocking, but PCI / PCIE buses are in... in the following path in the fixed mode so that FSB can operate under a more stable overclocking environment. Before you still need to [RAID] in BIOS first.
User Manual
Page 36
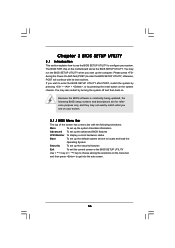
... otherwise, POST will continue with the following selections: Main To set up the system time/date information Advanced To set up the advanced BIOS features H/W Monitor To display current hardware status Boot To set up the default system device to locate and load the Operating System Security To... set up the computer. If you see on . Because the BIOS software is constantly being updated, the following BIOS setup screens and descriptions are for reference purpose only, and they may also restart by pressing the reset button on ...
... otherwise, POST will continue with the following selections: Main To set up the system time/date information Advanced To set up the advanced BIOS features H/W Monitor To display current hardware status Boot To set up the default system device to locate and load the Operating System Security To... set up the computer. If you see on . Because the BIOS software is constantly being updated, the following BIOS setup screens and descriptions are for reference purpose only, and they may also restart by pressing the reset button on ...

User Manual
Page 37
... UTILITY H/W Monitor Boot System Overview System Time System Date [14:00:09] [Wed 12/26/2007] BIOS Version : Penryn1600SLI-110dB P1.00 Processor Type : Intel (R) Core(TM)2 CPU @ 2.00GHz (64bit) Processor Speed : 2000MHz Microcode Update : 6F2/56 Cache Size : 2048KB Total Memory DDRII...] Use this item to select a field. 3.1.2 Navigation Keys Please check the following table for all the settings To save changes and exit the BIOS SETUP UTILITY To jump to specify the system time. Navigation Key(s) / / + / Function Description Moves cursor left or right to select Screens ...
... UTILITY H/W Monitor Boot System Overview System Time System Date [14:00:09] [Wed 12/26/2007] BIOS Version : Penryn1600SLI-110dB P1.00 Processor Type : Intel (R) Core(TM)2 CPU @ 2.00GHz (64bit) Processor Speed : 2000MHz Microcode Update : 6F2/56 Cache Size : 2048KB Total Memory DDRII...] Use this item to select a field. 3.1.2 Navigation Keys Please check the following table for all the settings To save changes and exit the BIOS SETUP UTILITY To jump to specify the system time. Navigation Key(s) / / + / Function Description Moves cursor left or right to select Screens ...
User Manual
Page 38
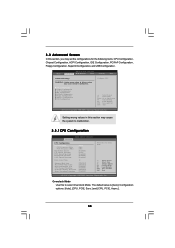
..., Chipset Configuration, ACPI Configuration, IDE Configuration, PCIPnP Configuration, Floppy Configuration, SuperIO Configuration, and USB Configuration. BIOS SETUP UTILITY Main Advanced H/W Monitor Boot Security Exit Advanced Settings WARNING : Setting wrong values in this to malfunction. 3.3.1CPU Configuration... BIOS SETUP UTILITY Advanced CPU Configuration Overclock Mode CPU Frequency (MHz) PCIE Frequency (MHz) Boot Failure Guard CPU Spread...
..., Chipset Configuration, ACPI Configuration, IDE Configuration, PCIPnP Configuration, Floppy Configuration, SuperIO Configuration, and USB Configuration. BIOS SETUP UTILITY Main Advanced H/W Monitor Boot Security Exit Advanced Settings WARNING : Setting wrong values in this to malfunction. 3.3.1CPU Configuration... BIOS SETUP UTILITY Advanced CPU Configuration Overclock Mode CPU Frequency (MHz) PCIE Frequency (MHz) Boot Failure Guard CPU Spread...
User Manual
Page 40
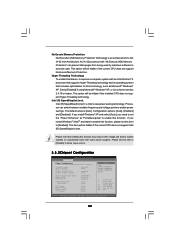
... does not support Hyper-Threading technology. Processor can prevent data pages from being used by malicious software to [Disable] if above issue occurs. 3.3.2Chipset Configuration BIOS SETUP UTILITY Advanced Chipset Configuration DRAM Frequency Flexibility Option Memory Timings Memory Remap Feature Primary Graphics Adapter Hyper Transport Link Speed Onboard LAN OnBoard 1394...
... does not support Hyper-Threading technology. Processor can prevent data pages from being used by malicious software to [Disable] if above issue occurs. 3.3.2Chipset Configuration BIOS SETUP UTILITY Advanced Chipset Configuration DRAM Frequency Flexibility Option Memory Timings Memory Remap Feature Primary Graphics Adapter Hyper Transport Link Speed Onboard LAN OnBoard 1394...
User Manual
Page 43
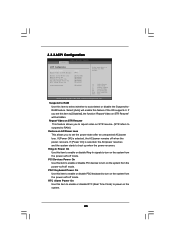
... Devices Power On Use this item to enable or disable RTC (Real Time Clock) to auto-detect or disable the Suspend-toRAM feature. 3.3.3 ACPI Configuration BIOS SETUP UTILITY Advanced ACPI Configuration Suspend To RAM Repost Video on STR Resume Restore on AC/Power Loss This allows you set the power state...
... Devices Power On Use this item to enable or disable RTC (Real Time Clock) to auto-detect or disable the Suspend-toRAM feature. 3.3.3 ACPI Configuration BIOS SETUP UTILITY Advanced ACPI Configuration Suspend To RAM Repost Video on STR Resume Restore on AC/Power Loss This allows you set the power state...
User Manual
Page 44
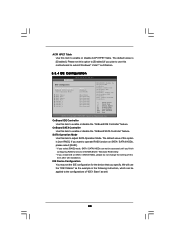
SATA Operation Mode Use this item to submit Windows® VistaTM certification. 3.3.4 IDE Configuration BIOS SETUP UTILITY Advanced IDE Configuration OnBoard IDE Controller OnBoard SATA Controller SATA Operation Mode IDE1 Master IDE1 Slave IDE2 Master IDE2 Slave SATAII_1 SATAII_2 SATAII_3... the IDE configuration for the device that you select [RAID] mode, SATA / SATAII HDDs can be accessed until you finish configuring RAID functions in NVIDIA BIOS / Windows RAID Utility. * If you plan to use the "IDE1 Master" as well. 44 If you want to operate RAID function on SATA / SATAII ...
SATA Operation Mode Use this item to submit Windows® VistaTM certification. 3.3.4 IDE Configuration BIOS SETUP UTILITY Advanced IDE Configuration OnBoard IDE Controller OnBoard SATA Controller SATA Operation Mode IDE1 Master IDE1 Slave IDE2 Master IDE2 Slave SATAII_1 SATAII_2 SATAII_3... the IDE configuration for the device that you select [RAID] mode, SATA / SATAII HDDs can be accessed until you finish configuring RAID functions in NVIDIA BIOS / Windows RAID Utility. * If you plan to use the "IDE1 Master" as well. 44 If you want to operate RAID function on SATA / SATAII ...
User Manual
Page 45
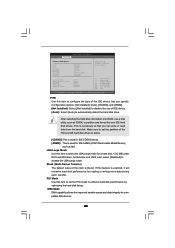
... capability allows the improved transfer-speed and data-integrity for IDE CD/DVD drives. [ARMD]: This is [Auto]. After selecting the hard disk information into BIOS, use of the Primary IDE hard disk drives to disable the LBA/Large mode. for Netware and UNIX user, select [Disabled] to active. [CD/DVD...]: This is used for a hard disk > 512 MB under DOS and Windows; PIO Mode Use this item is used for compatible IDE devices. 45 BIOS SETUP UTILITY Advanced Primary IDE Master Device Vendor Size LBA Mode Block Mode PIO Mode Async DMA Ultra DMA S.M.A.R.T.
... capability allows the improved transfer-speed and data-integrity for IDE CD/DVD drives. [ARMD]: This is [Auto]. After selecting the hard disk information into BIOS, use of the Primary IDE hard disk drives to disable the LBA/Large mode. for Netware and UNIX user, select [Disabled] to active. [CD/DVD...]: This is used for a hard disk > 512 MB under DOS and Windows; PIO Mode Use this item is used for compatible IDE devices. 45 BIOS SETUP UTILITY Advanced Primary IDE Master Device Vendor Size LBA Mode Block Mode PIO Mode Async DMA Ultra DMA S.M.A.R.T.
User Manual
Page 46
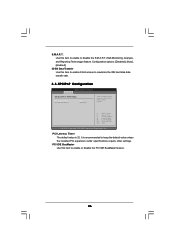
Configuration options: [Disabled], [Auto], [Enabled]. 32-Bit Data Transfer Use this item to maximize the IDE hard disk data transfer rate. 3.3.5PCIPnP Configuration BIOS SETUP UTILITY Advanced Advanced PCI / PnP Settings PCI Latency Timer PCI IDE BusMaster [32] [Enabled] Value in units of PCI clocks for PCI device latency ...
Configuration options: [Disabled], [Auto], [Enabled]. 32-Bit Data Transfer Use this item to maximize the IDE hard disk data transfer rate. 3.3.5PCIPnP Configuration BIOS SETUP UTILITY Advanced Advanced PCI / PnP Settings PCI Latency Timer PCI IDE BusMaster [32] [Enabled] Value in units of PCI clocks for PCI device latency ...

User Manual
Page 47
...Help Load Defaults Save and Exit Exit v02.54 (C) Copyright 1985-2005, American Megatrends, Inc. 3.3.7 Super IO Configuration BIOS SETUP UTILITY Advanced Configure Super IO Chipset OnBoard Floppy Controller Serial Port Address Infrared Port Address Parallel Port Address Parallel Port Mode...], [3F8 / IRQ4], [2F8 / IRQ3], [3E8 / IRQ4], [2E8 / IRQ3]. Configuration options: [Disabled], [2F8 / IRQ3], and [2E8 / IRQ3]. 47 BIOS SETUP UTILITY Advanced Floppy Configuration Floppy A [1.44 MB 312"] Select the type of your floppy drive. Infrared Port Address Use this item to enable or...
...Help Load Defaults Save and Exit Exit v02.54 (C) Copyright 1985-2005, American Megatrends, Inc. 3.3.7 Super IO Configuration BIOS SETUP UTILITY Advanced Configure Super IO Chipset OnBoard Floppy Controller Serial Port Address Infrared Port Address Parallel Port Address Parallel Port Mode...], [3F8 / IRQ4], [2F8 / IRQ3], [3E8 / IRQ4], [2E8 / IRQ3]. Configuration options: [Disabled], [2F8 / IRQ3], and [2E8 / IRQ3]. 47 BIOS SETUP UTILITY Advanced Floppy Configuration Floppy A [1.44 MB 312"] Select the type of your floppy drive. Infrared Port Address Use this item to enable or...
User Manual
Page 49
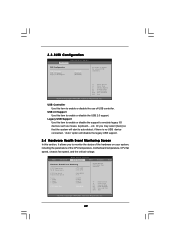
3.3.8USB Configuration BIOS SETUP UTILITY Advanced USB Configuration USB Controller USB 2.0 Support Legacy USB Support [Enabled] [Enabled] [Disabled] To enable or disable the onboard USB controllers. +F1 F9 ...] F1 F9 F10 ESC Select Screen Select Item General Help Load Defaults Save and Exit Exit v02.54 (C) Copyright 1985-2003, American Megatrends, Inc. 49 BIOS SETUP UTILITY Main Advanced H/W Monitor Boot Security Exit Hardware Health Event Monitoring CPU Temperature M / B Temperature : 37 C / 98 F : 31 C / 87 F Enable/Disable CPU Quiet Fan Function...
3.3.8USB Configuration BIOS SETUP UTILITY Advanced USB Configuration USB Controller USB 2.0 Support Legacy USB Support [Enabled] [Enabled] [Disabled] To enable or disable the onboard USB controllers. +F1 F9 ...] F1 F9 F10 ESC Select Screen Select Item General Help Load Defaults Save and Exit Exit v02.54 (C) Copyright 1985-2003, American Megatrends, Inc. 49 BIOS SETUP UTILITY Main Advanced H/W Monitor Boot Security Exit Hardware Health Event Monitoring CPU Temperature M / B Temperature : 37 C / 98 F : 31 C / 87 F Enable/Disable CPU Quiet Fan Function...


