
Intel Rapid Storage Guide
Page 12
...Technology driver during POST, press Ctrl and i at the same time to select the physical disks. 6. Switch the SATA Operation Mode option to enter the BIOS Setup program after the Power-On-Self-Test (POST) memory test begins. 2. Select 1: Create RAID Volume and press Enter. 3. How to install ... operating system setup. Press Enter to enter the option ROM user interface. 2. Create a RAID Volume Use the following steps to save the BIOS settings and exit the BIOS Setup program. When finished press Enter. 12 Click F10 to create a RAID volume. 1. Click the Storage Configuration menu. 4.
...Technology driver during POST, press Ctrl and i at the same time to select the physical disks. 6. Switch the SATA Operation Mode option to enter the BIOS Setup program after the Power-On-Self-Test (POST) memory test begins. 2. Select 1: Create RAID Volume and press Enter. 3. How to install ... operating system setup. Press Enter to enter the option ROM user interface. 2. Create a RAID Volume Use the following steps to save the BIOS settings and exit the BIOS Setup program. When finished press Enter. 12 Click F10 to create a RAID volume. 1. Click the Storage Configuration menu. 4.
User Manual
Page 5
... to set the BIOS option in Storage Configuration to this manual, chapter 1 and 2 contain introduction of the Support CD. You may find the latest VGA cards and CPU support lists on ASRock website without notice. ASRock website http://www.asrock.com If you for details. 5 www.asrock.com/support/index.asp 1.1 Package Contents ASRock P67 Extreme6...
... to set the BIOS option in Storage Configuration to this manual, chapter 1 and 2 contain introduction of the Support CD. You may find the latest VGA cards and CPU support lists on ASRock website without notice. ASRock website http://www.asrock.com If you for details. 5 www.asrock.com/support/index.asp 1.1 Package Contents ASRock P67 Extreme6...
User Manual
Page 8
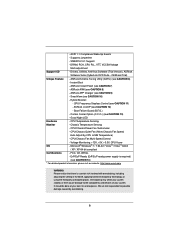
...(B.F.G.) - CPU Temperature Sensing Monitor - Drivers, Utilities, AntiVirus Software (Trial Version), ASRock Software Suite (CyberLink DVD Suite - ASRock Extreme Tuning Utility (AXTU) (see CAUTION 8) - ASRock AIWI (see CAUTION 6) - ASRock APP Charger (see CAUTION 10) - Good Night LED Hardware - CPU/Chassis/Power...: http://www.asrock.com WARNING Please realize that there is required) (see CAUTION 7) - ErP/EuP Ready (ErP/EuP ready power supply is a certain risk involved with overclocking, including adjusting the setting in the BIOS, applying Untied Overclocking...
...(B.F.G.) - CPU Temperature Sensing Monitor - Drivers, Utilities, AntiVirus Software (Trial Version), ASRock Software Suite (CyberLink DVD Suite - ASRock Extreme Tuning Utility (AXTU) (see CAUTION 8) - ASRock AIWI (see CAUTION 6) - ASRock APP Charger (see CAUTION 10) - Good Night LED Hardware - CPU/Chassis/Power...: http://www.asrock.com WARNING Please realize that there is required) (see CAUTION 7) - ErP/EuP Ready (ErP/EuP ready power supply is a certain risk involved with overclocking, including adjusting the setting in the BIOS, applying Untied Overclocking...
User Manual
Page 9
... to adjust. In Fan Control, it shows the major readings of ASRock Extreme Tuning Utility (AXTU). Due to fine-tune different system functions in Flash ROM. CAUTION! 1. Only K-Series CPU can save the new BIOS file to your OC settings as a profile and share with 64-bit CPU, there... is an all-in-one tool to the operating system limitation, the actual memory size may depend on the processor. ASRock website: http://www...
... to adjust. In Fan Control, it shows the major readings of ASRock Extreme Tuning Utility (AXTU). Due to fine-tune different system functions in Flash ROM. CAUTION! 1. Only K-Series CPU can save the new BIOS file to your OC settings as a profile and share with 64-bit CPU, there... is an all-in-one tool to the operating system limitation, the actual memory size may depend on the processor. ASRock website: http://www...

User Manual
Page 34
... caps over these 2 pins. FDD connector (33-pin FLOPPY1) (see p.14, No. 32) Setting Default Clear CMOS Description Note: CLRCMOS1 allows you update the BIOS. If you need to clear the CMOS when you just finish updating the BIOS, you must boot up the system first, and then shut it down...
... caps over these 2 pins. FDD connector (33-pin FLOPPY1) (see p.14, No. 32) Setting Default Clear CMOS Description Note: CLRCMOS1 allows you update the BIOS. If you need to clear the CMOS when you just finish updating the BIOS, you must boot up the system first, and then shut it down...

User Manual
Page 81
.... 81 Please make sure to be installed on a large size HDD (>2TB). Normally it is the device which contains your Windows® installation files. Set AHCI Mode in UEFI Setup Utility > Advanced > Storage Configuration > SATA Mode. 3. Choose the item "UEFI:xxx" to boot. ("xxx" is an optical drive....) 5. Installing OS on a HDD Larger Than 2TB This motherboard is adopting UEFI BIOS that allows Windows® OS to use Windows® VistaTM 64-bit (with SP1 or above) or Windows® 7 64-bit. 2.
.... 81 Please make sure to be installed on a large size HDD (>2TB). Normally it is the device which contains your Windows® installation files. Set AHCI Mode in UEFI Setup Utility > Advanced > Storage Configuration > SATA Mode. 3. Choose the item "UEFI:xxx" to boot. ("xxx" is an optical drive....) 5. Installing OS on a HDD Larger Than 2TB This motherboard is adopting UEFI BIOS that allows Windows® OS to use Windows® VistaTM 64-bit (with SP1 or above) or Windows® 7 64-bit. 2.
Quick Installation Guide
Page 5
... set the BIOS option in our support CD for a 3.5-in the Support CD. Introduction Thank you for specific information about the model you require technical support related to AHCI mode. www.asrock.com/support/index.asp 1.1 Package Contents ASRock P67 Extreme6 Motherboard (ATX Form Factor: 12.0-in x 9.6-in, 30.5 cm x 24.4 cm) ASRock P67 Extreme6 Quick Installation Guide ASRock P67 Extreme6...
... set the BIOS option in our support CD for a 3.5-in the Support CD. Introduction Thank you for specific information about the model you require technical support related to AHCI mode. www.asrock.com/support/index.asp 1.1 Package Contents ASRock P67 Extreme6 Motherboard (ATX Form Factor: 12.0-in x 9.6-in, 30.5 cm x 24.4 cm) ASRock P67 Extreme6 Quick Installation Guide ASRock P67 Extreme6...

Quick Installation Guide
Page 8
... 14) * For detailed product information, please visit our website: http://www.asrock.com WARNING Please realize that there is a certain risk involved with overclocking, including adjusting the setting in the BIOS, applying Untied Overclocking Technology, or using the third-party overclocking tools. Good ...- Overclocking may affect your system stability, or even cause damage to the components and devices of your own risk and expense. English 8 ASRock P67 Extreme6 Motherboard DRAM, PCH, CPU PLL, VTT, VCCSA Voltage Multi-adjustment Support CD - Instant Boot - FCC, CE, WHQL - We are...
... 14) * For detailed product information, please visit our website: http://www.asrock.com WARNING Please realize that there is a certain risk involved with overclocking, including adjusting the setting in the BIOS, applying Untied Overclocking Technology, or using the third-party overclocking tools. Good ...- Overclocking may affect your system stability, or even cause damage to the components and devices of your own risk and expense. English 8 ASRock P67 Extreme6 Motherboard DRAM, PCH, CPU PLL, VTT, VCCSA Voltage Multi-adjustment Support CD - Instant Boot - FCC, CE, WHQL - We are...
Quick Installation Guide
Page 9
...64258;ash drive or hard drive must use FAT32/16/12 file system. 9 ASRock P67 Extreme6 Motherboard English For Windows® OS with your system. For microphone input, this tool and save your OC settings as a profile and share with 64-bit CPU, there is including Hardware ...Just launch this motherboard supports both stereo and mono modes. This motherboard supports Dual Channel Memory Technology. Only K-Series CPU can update your BIOS only in -one tool to the operating system limitation, the actual memory size may depend on page 17 for the operation procedures of your...
...64258;ash drive or hard drive must use FAT32/16/12 file system. 9 ASRock P67 Extreme6 Motherboard English For Windows® OS with your system. For microphone input, this tool and save your OC settings as a profile and share with 64-bit CPU, there is including Hardware ...Just launch this motherboard supports both stereo and mono modes. This motherboard supports Dual Channel Memory Technology. Only K-Series CPU can update your BIOS only in -one tool to the operating system limitation, the actual memory size may depend on page 17 for the operation procedures of your...
Quick Installation Guide
Page 30
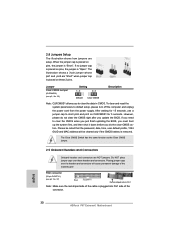
...Onboard Headers and Connectors Onboard headers and connectors are "Short" when jumper cap is placed on pins, the jumper is removed. English 30 ASRock P67 Extreme6 Motherboard If no jumper cap is placed on these headers and connectors. To clear and reset the system parameters to clear the data in ...shows how jumpers are setup. FDD connector (33-pin FLOPPY1) (see p.2, No. 32) Setting Default Clear CMOS Description Note: CLRCMOS1 allows you do not clear the CMOS right after you update the BIOS. However, please do the clear-CMOS action. When the jumper cap is placed on CLRCMOS1...
...Onboard Headers and Connectors Onboard headers and connectors are "Short" when jumper cap is placed on pins, the jumper is removed. English 30 ASRock P67 Extreme6 Motherboard If no jumper cap is placed on these headers and connectors. To clear and reset the system parameters to clear the data in ...shows how jumpers are setup. FDD connector (33-pin FLOPPY1) (see p.2, No. 32) Setting Default Clear CMOS Description Note: CLRCMOS1 allows you do not clear the CMOS right after you update the BIOS. However, please do the clear-CMOS action. When the jumper cap is placed on CLRCMOS1...

Quick Installation Guide
Page 312
... to boot. ("xxx" is the device which contains your Windows® installation files. Normally it is adopting UEFI BIOS that allows Windows® OS to be installed on a large size HDD (>2TB). Set AHCI Mode in UEFI Setup Utility > Advanced > Storage Configuration > SATA Mode. 3. Press F11 to install the...
... to boot. ("xxx" is the device which contains your Windows® installation files. Normally it is adopting UEFI BIOS that allows Windows® OS to be installed on a large size HDD (>2TB). Set AHCI Mode in UEFI Setup Utility > Advanced > Storage Configuration > SATA Mode. 3. Press F11 to install the...

RAID Installation Guide
Page 1
Guide to SATA Hard Disks Installation 2 1.1 Serial ATA (SATA) Hard Disks Installation 2 2. Guide to SATA Hard Disks Installation and RAID Configuration 1. Guide to RAID Configurations 3 2.1 Introduction of RAID 3 2.2 RAID Configuration Precautions 5 2.3 Installing Windows® 7 / 7 64-bit / VistaTM / VistaTM 64-bit / XP / XP 64-bit With RAID Functions 6 2.4 Setting the BIOS RAID Items 11 2.5 Configuring the Intel RAID BIOS 11 2.6 Deleting RAID Volume 15 1
Guide to SATA Hard Disks Installation 2 1.1 Serial ATA (SATA) Hard Disks Installation 2 2. Guide to SATA Hard Disks Installation and RAID Configuration 1. Guide to RAID Configurations 3 2.1 Introduction of RAID 3 2.2 RAID Configuration Precautions 5 2.3 Installing Windows® 7 / 7 64-bit / VistaTM / VistaTM 64-bit / XP / XP 64-bit With RAID Functions 6 2.4 Setting the BIOS RAID Items 11 2.5 Configuring the Intel RAID BIOS 11 2.6 Deleting RAID Volume 15 1

RAID Installation Guide
Page 6
... to configure the RAID function, you need to [RAID]. STEP 2: Make a SATA / SATAII / SATA3 Driver Diskette. E. Set "SATA Operation Mode" to check the installation guide in the folder at the beginning of system boot-up BIOS. 2.3 Installing Windows® 7 / 7 64-bit / VistaTM / VistaTM 64-bit / XP / XP 64-bit With RAID Functions...
... to configure the RAID function, you need to [RAID]. STEP 2: Make a SATA / SATAII / SATA3 Driver Diskette. E. Set "SATA Operation Mode" to check the installation guide in the folder at the beginning of system boot-up BIOS. 2.3 Installing Windows® 7 / 7 64-bit / VistaTM / VistaTM 64-bit / XP / XP 64-bit With RAID Functions...

RAID Installation Guide
Page 7
... choose and the OS you install. 5. A "RAID Ready" system can be installed to your system as well. 2.3.2 Setting Up a "RAID Ready" System You can start to set RAID configuration, you are allowed to use "Intel Rapid Storage" in the folder at a later date by booting from the...installation CD. 4. The following path: .. \ Intel Rapid Storage Information If you want to manage RAID functions, you can also set up system BIOS as step 2 of page 6. When done, exit Setup. 3. Set up a "RAID Ready" system with a single SATA / SATAII / SATA3 hard disk. At the beginning of Windows® ...
... choose and the OS you install. 5. A "RAID Ready" system can be installed to your system as well. 2.3.2 Setting Up a "RAID Ready" System You can start to set RAID configuration, you are allowed to use "Intel Rapid Storage" in the folder at a later date by booting from the...installation CD. 4. The following path: .. \ Intel Rapid Storage Information If you want to manage RAID functions, you can also set up system BIOS as step 2 of page 6. When done, exit Setup. 3. Set up a "RAID Ready" system with a single SATA / SATAII / SATA3 hard disk. At the beginning of Windows® ...

RAID Installation Guide
Page 9
... RAID Installation Guide STEP 3: Install Windows® 7 / 7 64-bit / VistaTM / VistaTM 64-bit OS on your system. Set "SATA Operation Mode" to set RAID configuration. Please refer to the document in the Support CD, "Guide to SATA Hard Disks Installation and RAID Configuration", which is ...located in the folder at the following path: .. \ Intel Rapid Storage Information 9 STEP 1: Set up BIOS. B. Please refer to the document in the Support CD, "Guide to SATA Hard Disks Installation and RAID Configuration", which is located in...
... RAID Installation Guide STEP 3: Install Windows® 7 / 7 64-bit / VistaTM / VistaTM 64-bit OS on your system. Set "SATA Operation Mode" to set RAID configuration. Please refer to the document in the Support CD, "Guide to SATA Hard Disks Installation and RAID Configuration", which is ...located in the folder at the following path: .. \ Intel Rapid Storage Information 9 STEP 1: Set up BIOS. B. Please refer to the document in the Support CD, "Guide to SATA Hard Disks Installation and RAID Configuration", which is located in...

RAID Installation Guide
Page 11
... to [RAID]. Save your RAID configuration. Then, the Intel RAID Utility - Create RAID Volume window appears. Press . Please set the necessary RAID items in the BIOS before setting your change before you to enter BIOS setup utility. Select the option Create RAID Volume and press . 11 Boot your computer. Highlight Advanced and press , then...
... to [RAID]. Save your RAID configuration. Then, the Intel RAID Utility - Create RAID Volume window appears. Press . Please set the necessary RAID items in the BIOS before setting your change before you to enter BIOS setup utility. Select the option Create RAID Volume and press . 11 Boot your computer. Highlight Advanced and press , then...


