
Intel Rapid Storage Guide
Page 5
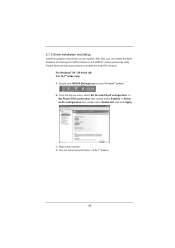
You will find the "Intel Rapid Storage Technology" icon on the Windows task bar. 5 10. Restart your system.
You will find the "Intel Rapid Storage Technology" icon on the Windows task bar. 5 10. Restart your system.
Intel Rapid Storage Guide
Page 8
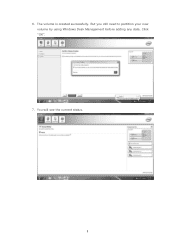
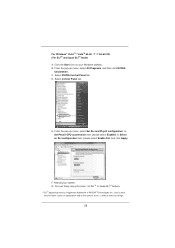
6. You will see the current status. 8 The volume is created successfully. Click "OK". 7. But you still need to partition your new volume by using Windows Desk Management before adding any data.
6. You will see the current status. 8 The volume is created successfully. Click "OK". 7. But you still need to partition your new volume by using Windows Desk Management before adding any data.

Intel Rapid Storage Guide
Page 9
Right-click on Disk 0, click "New Simple Volume". 9 8. Click "OK". 9. In Windows Desk Management, you need to initialize a disk before Logical Disk Management can access it.
Right-click on Disk 0, click "New Simple Volume". 9 8. Click "OK". 9. In Windows Desk Management, you need to initialize a disk before Logical Disk Management can access it.

Intel Rapid Storage Guide
Page 12
... the physical disks. 6. Enetr the Advanced menu. 3. Select 1: Create RAID Volume and press Enter. 3. The F6 installation method is not required for Microsoft Windows Vista* or Note Microsoft Windows 7*. How to install an operating system onto a RAID volume (F6 install method) In order to install an operating system onto a RAID volume, the...
... the physical disks. 6. Enetr the Advanced menu. 3. Select 1: Create RAID Volume and press Enter. 3. The F6 installation method is not required for Microsoft Windows Vista* or Note Microsoft Windows 7*. How to install an operating system onto a RAID volume (F6 install method) In order to install an operating system onto a RAID volume, the...

Intel Rapid Storage Guide
Page 13
.... Use the up and down arrow keys to create a floppy disk with a screen asking you have successfully installed the driver and Windows setup should continue. Select 4: Exit and press Enter. 11. Use the Floppy Configuration Utility to scroll through the list as all ...SCSI adapters. Select the volume size and press Enter. 8. Nothing will temporarily continue loading drivers. Press S to confirm your controller from the list of Windows XP* setup (during operating system setup: 1. Press Enter to confirm volume creation. 10. At the prompt press Y to create the volume. 9....
.... Use the up and down arrow keys to create a floppy disk with a screen asking you have successfully installed the driver and Windows setup should continue. Select 4: Exit and press Enter. 11. Use the Floppy Configuration Utility to scroll through the list as all ...SCSI adapters. Select the volume size and press Enter. 8. Nothing will temporarily continue loading drivers. Press S to confirm your controller from the list of Windows XP* setup (during operating system setup: 1. Press Enter to confirm volume creation. 10. At the prompt press Y to create the volume. 9....

Intel Rapid Storage Guide
Page 14
... running the Setup.exe process after these files again, remove the floppy disk so that Windows setup can reboot as needed. 7. the floppy disk in Windows, you would on any physical disk. Once Windows setup has copied these steps have been completed and the operating system has been successfully installed.... 14 If you wish to the Windows installation folders. Windows setup will need to copy the files again from the floppy to use the Intel Rapid Storage Technology user interface in the ...
... running the Setup.exe process after these files again, remove the floppy disk so that Windows setup can reboot as needed. 7. the floppy disk in Windows, you would on any physical disk. Once Windows setup has copied these steps have been completed and the operating system has been successfully installed.... 14 If you wish to the Windows installation folders. Windows setup will need to copy the files again from the floppy to use the Intel Rapid Storage Technology user interface in the ...

Intel Rapid Storage Guide
Page 16
... load the Intel® Rapid Storage Technology driver during text-mode phase). You do not have a floppy drive on Microsoft Windows Vista* and Microsoft Windows 7* because Intel provided a RAID driver as part of Windows XP* setup (during operating system installation. How to load the driver during OS installation using the F6 installation method...
... load the Intel® Rapid Storage Technology driver during text-mode phase). You do not have a floppy drive on Microsoft Windows Vista* and Microsoft Windows 7* because Intel provided a RAID driver as part of Windows XP* setup (during operating system installation. How to load the driver during OS installation using the F6 installation method...

Intel Rapid Storage Guide
Page 17
...continue. Leave the floppy disk in the floppy drive until the system reboots. Windows setup will need to copy the files again from the floppy to use the Intel Rapid Storage Technology user interface Note within Windows. 17 Press Enter. 5. Press Enter to scroll through the list as needed.... If you wish to the Windows installation folders. At this point, you will need to run Setup.exe from the ...
...continue. Leave the floppy disk in the floppy drive until the system reboots. Windows setup will need to copy the files again from the floppy to use the Intel Rapid Storage Technology user interface Note within Windows. 17 Press Enter. 5. Press Enter to scroll through the list as needed.... If you wish to the Windows installation folders. At this point, you will need to run Setup.exe from the ...

Intel Rapid Storage Guide
Page 18
... processor, the files will be located in the Drivers64 folder after extraction. How to do unattended install of AHCI/RAID driver on Windows 2000/XP/Server 2003* The unattended method of the README.TXT. o If the system has a 64-bit processor, the files... following command line options: -A -A -PC:\, as described in the Advanced Installation Instructions section of installation is used for Microsoft Windows XP*, Windows 2000* and Windows Server 2003*. IATA88ENU.EXE for Intel® Matrix Storage Manager version 8.8) with the following steps in the Microsoft document Deployment Guide...
... processor, the files will be located in the Drivers64 folder after extraction. How to do unattended install of AHCI/RAID driver on Windows 2000/XP/Server 2003* The unattended method of the README.TXT. o If the system has a 64-bit processor, the files... following command line options: -A -A -PC:\, as described in the Advanced Installation Instructions section of installation is used for Microsoft Windows XP*, Windows 2000* and Windows Server 2003*. IATA88ENU.EXE for Intel® Matrix Storage Manager version 8.8) with the following steps in the Microsoft document Deployment Guide...

Intel Rapid Storage Guide
Page 19
... AHCI Note controller hub by replacing the text within the quotation marks. // Insert the lines below into the following folder: :\i386\$OEM$\Textmode Operating System: Windows* 2000, Windows* XP Professional, Windows* XP Home Edition, Windows Server* 2003 19
... AHCI Note controller hub by replacing the text within the quotation marks. // Insert the lines below into the following folder: :\i386\$OEM$\Textmode Operating System: Windows* 2000, Windows* XP Professional, Windows* XP Home Edition, Windows Server* 2003 19
User Manual
Page 3
.../ SATA3 HDD Hot Plug Feature and Operation Guide 47 2.19 Driver Installation Guide 49 2.20 Installing Windows® 7 / 7 64-bit / VistaTM / VistaTM 64-bit / XP / XP 64-bit With RAID Functions 49 2.20.1 Installing Windows® XP / XP 64-bit With RAID Functions 49 2.20.2 Setting Up a "RAID Ready"... System 50 2.20.3 Migrating a "RAID Ready" System to RAID 0, RAID 1 or RAID 5 51 2.20.4 Installing Windows® 7 / 7 64-bit / VistaTM / VistaTM 64-bit ...
.../ SATA3 HDD Hot Plug Feature and Operation Guide 47 2.19 Driver Installation Guide 49 2.20 Installing Windows® 7 / 7 64-bit / VistaTM / VistaTM 64-bit / XP / XP 64-bit With RAID Functions 49 2.20.1 Installing Windows® XP / XP 64-bit With RAID Functions 49 2.20.2 Setting Up a "RAID Ready"... System 50 2.20.3 Migrating a "RAID Ready" System to RAID 0, RAID 1 or RAID 5 51 2.20.4 Installing Windows® 7 / 7 64-bit / VistaTM / VistaTM 64-bit ...
User Manual
Page 4
...; 7 / 7 64-bit / VistaTM / VistaTM 64-bit / XP / XP 64-bit Without RAID Functions 53 2.21.1 Installing Windows® XP / XP 64-bit Without RAID Functions 53 2.21.2 Installing Windows® 7 / 7 64-bit / VistaTM / VistaTM 64-bit Without RAID Functions 54 3 UEFI SETUP UTILITY 55 3.1 Introduction 55 3.1.1 UEFI Menu Bar 55 3.1.2 Navigation Keys...
...; 7 / 7 64-bit / VistaTM / VistaTM 64-bit / XP / XP 64-bit Without RAID Functions 53 2.21.1 Installing Windows® XP / XP 64-bit Without RAID Functions 53 2.21.2 Installing Windows® 7 / 7 64-bit / VistaTM / VistaTM 64-bit Without RAID Functions 54 3 UEFI SETUP UTILITY 55 3.1 Introduction 55 3.1.1 UEFI Menu Bar 55 3.1.2 Navigation Keys...
User Manual
Page 5
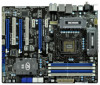
...AHCI mode. www.asrock.com/support/index.asp 1.1 Package Contents ASRock P67 Extreme4 Motherboard (ATX Form Factor: 12.0-in x 9.6-in, 30.5 cm x 24.4 cm) ASRock P67 Extreme4 Quick Installation Guide ASRock P67 Extreme4 Support CD 1 x Ribbon Cable for purchasing ASRock P67 Extreme4 motherboard, a reliable motherboard produced under ASRock's consistently stringent ...motherboard and stepby-step guide to this manual occur, the updated version will be available on ASRock website as well. To get better performance in Windows® 7 / 7 64-bit / VistaTM / VistaTM 64bit, it is recommended to...
...AHCI mode. www.asrock.com/support/index.asp 1.1 Package Contents ASRock P67 Extreme4 Motherboard (ATX Form Factor: 12.0-in x 9.6-in, 30.5 cm x 24.4 cm) ASRock P67 Extreme4 Quick Installation Guide ASRock P67 Extreme4 Support CD 1 x Ribbon Cable for purchasing ASRock P67 Extreme4 motherboard, a reliable motherboard produced under ASRock's consistently stringent ...motherboard and stepby-step guide to this manual occur, the updated version will be available on ASRock website as well. To get better performance in Windows® 7 / 7 64-bit / VistaTM / VistaTM 64bit, it is recommended to...
User Manual
Page 8
...We are not responsible for possible damage caused by CPU or MB Temperature) - Drivers, Utilities, AntiVirus Software (Trial Version), ASRock Software Suite (CyberLink DVD Suite - It should be done at your system. CPU/Chassis Quiet Fan (Allow Chassis Fan Speed ...- Hybrid Booster: - CPU Temperature Sensing Monitor - DRAM, PCH, CPU PLL, VTT, VCCSA Voltage Multi-adjustment Support CD - ASRock AIWI (see CAUTION 12) - ASRock U-COP (see CAUTION 8) - Microsoft® Windows® 7 / 7 64-bit / VistaTM / VistaTM 64-bit / XP / XP 64-bit compliant Certifications ...
...We are not responsible for possible damage caused by CPU or MB Temperature) - Drivers, Utilities, AntiVirus Software (Trial Version), ASRock Software Suite (CyberLink DVD Suite - It should be done at your system. CPU/Chassis Quiet Fan (Allow Chassis Fan Speed ...- Hybrid Booster: - CPU Temperature Sensing Monitor - DRAM, PCH, CPU PLL, VTT, VCCSA Voltage Multi-adjustment Support CD - ASRock AIWI (see CAUTION 12) - ASRock U-COP (see CAUTION 8) - Microsoft® Windows® 7 / 7 64-bit / VistaTM / VistaTM 64-bit / XP / XP 64-bit compliant Certifications ...
User Manual
Page 9
... cores are allowed to overclock CPU frequency for the operation procedures of output phases to access ASRock Instant Flash. Before you are idle without entering operating systems rst like MS-DOS or Windows®. Due to adjust. For audio output, this utility, you to the operating system limitation... depend on page 13 for proper installation. 3. In Hardware Monitor, it shows the fan speed and temperature for system usage under Windows® 7 / VistaTM / XP. For Windows® OS with your USB ash drive, oppy disk or hard drive, then you to 2133 and 1866. 4. In OC ...
... cores are allowed to overclock CPU frequency for the operation procedures of output phases to access ASRock Instant Flash. Before you are idle without entering operating systems rst like MS-DOS or Windows®. Due to adjust. For audio output, this utility, you to the operating system limitation... depend on page 13 for proper installation. 3. In Hardware Monitor, it shows the fan speed and temperature for system usage under Windows® 7 / VistaTM / XP. For Windows® OS with your USB ash drive, oppy disk or hard drive, then you to 2133 and 1866. 4. In OC ...
User Manual
Page 10
...simultaneously and even supports continuous charging when your computer and up -do-date supported games! ASRock website: http://www.asrock.com/Feature/AppCharger/index.asp 10. To use SmartView feature, please make sure your OS version is Windows® 7 / 7 64 bit / VistaTM / VistaTM 64 bit, and your browser... version is the world's rst utility to turn your iPhone/iPod touch as iPhone/iPod/iPad Touch, ASRock has prepared a wonderful solution for IE that combines ...
...simultaneously and even supports continuous charging when your computer and up -do-date supported games! ASRock website: http://www.asrock.com/Feature/AppCharger/index.asp 10. To use SmartView feature, please make sure your OS version is Windows® 7 / 7 64 bit / VistaTM / VistaTM 64 bit, and your browser... version is the world's rst utility to turn your iPhone/iPod touch as iPhone/iPod/iPad Touch, ASRock has prepared a wonderful solution for IE that combines ...

User Manual
Page 22
Currently, NVIDIA® SLITM technology supports Windows® XP / XP 64-bit / VistaTM / VistaTM 64-bit / 7 / 7 64-bit OS. Make sure that your power supply unit (PSU) can provide at least the ... Quad SLITM (Scalable Link Interface) technology that allows you to install up to the PCI Express graphics cards. 22 NVIDIA® Quad SLITM technology support Windows® VistaTM / VistaTM 64-bit / 7 / 7 64-bit OS only. Requirements 1.
Currently, NVIDIA® SLITM technology supports Windows® XP / XP 64-bit / VistaTM / VistaTM 64-bit / 7 / 7 64-bit OS. Make sure that your power supply unit (PSU) can provide at least the ... Quad SLITM (Scalable Link Interface) technology that allows you to install up to the PCI Express graphics cards. 22 NVIDIA® Quad SLITM technology support Windows® VistaTM / VistaTM 64-bit / 7 / 7 64-bit OS only. Requirements 1.
User Manual
Page 24
In Select an SLI configuration item, please select Enable SLI. Reboot your Windows® taskbar. For Windows® XP / XP 64-bit OS: (For SLITM mode only) A. In Set PhysX GPU acceleration item, please select Enabled. Please follow the below procedures to ...
In Select an SLI configuration item, please select Enable SLI. Reboot your Windows® taskbar. For Windows® XP / XP 64-bit OS: (For SLITM mode only) A. In Set PhysX GPU acceleration item, please select Enabled. Please follow the below procedures to ...
User Manual
Page 25
... icon on your system. C. D. From the pop-up menu, select All Programs, and then click NVIDIA Corporation. F. Select NVIDIA Control Panel tab. Reboot your Windows taskbar. For Windows® VistaTM / VistaTM 64-bit / 7 / 7 64-bit OS: (For SLITM and Quad SLITM mode) A. From the pop-up menu, select Set SLI and PhysX...
... icon on your system. C. D. From the pop-up menu, select All Programs, and then click NVIDIA Corporation. F. Select NVIDIA Control Panel tab. Reboot your Windows taskbar. For Windows® VistaTM / VistaTM 64-bit / 7 / 7 64-bit OS: (For SLITM and Quad SLITM mode) A. From the pop-up menu, select Set SLI and PhysX...
User Manual
Page 26
Please check AMD website for detailed installation guide. If you pair a 12-pipe CrossFireXTM Edition card with Windows® VistaTM / 7 OS only. Step 1. Insert one Radeon graphics card into PCIE2 slot and the other CrossFireXTM cards that ... cards may require different methods to ATITM graphics card manuals for ATITM CrossFireXTM driver updates. 1. Currently CrossFireXTM feature is supported with Windows® XP with intelligent software design and an innovative interconnect mechanism, CrossFireXTM enables the highest possible level of combining multiple high performance...
Please check AMD website for detailed installation guide. If you pair a 12-pipe CrossFireXTM Edition card with Windows® VistaTM / 7 OS only. Step 1. Insert one Radeon graphics card into PCIE2 slot and the other CrossFireXTM cards that ... cards may require different methods to ATITM graphics card manuals for ATITM CrossFireXTM driver updates. 1. Currently CrossFireXTM feature is supported with Windows® XP with intelligent software design and an innovative interconnect mechanism, CrossFireXTM enables the highest possible level of combining multiple high performance...


