User Manual
Page 3
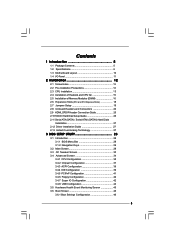
... Layout 10 1.4 I/O Panel 11 2 Installation 12 2.1 Screw Holes 12 2.2 Pre-installation Precautions 12 2.3 CPU Installation 13 2.4 Installation of Heatsink and CPU fan 15 2.5 Installation of Memory Modules (DIMM 16 2.6 Expansion Slots (PCI and PCI Express Slots 18 2.7 Jumpers Setup 19 2.8 Onboard Headers and Connectors 20 2.9 HDMI_SPDIF Header Connection Guide 25 2.10...
... Layout 10 1.4 I/O Panel 11 2 Installation 12 2.1 Screw Holes 12 2.2 Pre-installation Precautions 12 2.3 CPU Installation 13 2.4 Installation of Heatsink and CPU fan 15 2.5 Installation of Memory Modules (DIMM 16 2.6 Expansion Slots (PCI and PCI Express Slots 18 2.7 Jumpers Setup 19 2.8 Onboard Headers and Connectors 20 2.9 HDMI_SPDIF Header Connection Guide 25 2.10...

User Manual
Page 6
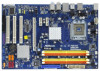
...10/100/1000 Mb/s - Northbridge: Intel® P965 - Supports DDR2 800/667/533 non-ECC, un-buffered memory (see CAUTION 2) - Max. 1.2 Specifications Platform CPU Chipset Memory Expansion Slot Audio LAN Rear Panel I /O Panel - 1 x PS/2 Mouse Port - 1 x PS/2 ... 1 x Print port header - 1 x COM port header - 1 x HDMI_SPDIF header 6 capacity of system memory: 8GB (see CAUTION 3) - 4 x DDR2 DIMM slots - Supports Wake-On-LAN I /O Connector - Realtek RTL8111DL - Dual Channel DDR2 Memory Technology (see CAUTION 5) - 1 x PCI Express x16 slot - 2 x PCI Express x1 slots - ...
...10/100/1000 Mb/s - Northbridge: Intel® P965 - Supports DDR2 800/667/533 non-ECC, un-buffered memory (see CAUTION 2) - Max. 1.2 Specifications Platform CPU Chipset Memory Expansion Slot Audio LAN Rear Panel I /O Panel - 1 x PS/2 Mouse Port - 1 x PS/2 ... 1 x Print port header - 1 x COM port header - 1 x HDMI_SPDIF header 6 capacity of system memory: 8GB (see CAUTION 3) - 4 x DDR2 DIMM slots - Supports Wake-On-LAN I /O Connector - Realtek RTL8111DL - Dual Channel DDR2 Memory Technology (see CAUTION 5) - 1 x PCI Express x16 slot - 2 x PCI Express x1 slots - ...
User Manual
Page 8
...Windows® XP and Windows® VistaTM. It is a user-friendly ASRock overclocking tool which allows you implement Dual Channel Memory Technology, make sure to SATAII connector directly. 8. About the setting of ASRock OC Tuner. Please check the table on page 26 to surveil your ...system. ASRock website: http://www.asrock.com 8 bit with 64-bit CPU, there is ...
...Windows® XP and Windows® VistaTM. It is a user-friendly ASRock overclocking tool which allows you implement Dual Channel Memory Technology, make sure to SATAII connector directly. 8. About the setting of ASRock OC Tuner. Please check the table on page 26 to surveil your ...system. ASRock website: http://www.asrock.com 8 bit with 64-bit CPU, there is ...

User Manual
Page 17
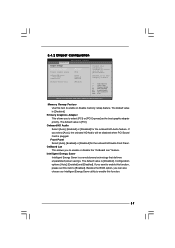
... dual channel configuration, and please install identical DDR2 DIMMs in all four slots. 1. see p.10 No.6), so that Dual Channel Memory Technology can be damaged. 17 You may be activated. It is unable to install identical DDR2 DIMM pair in Dual Channel B ...in Dual Channel A (DDRII_1 and DDRII_3; This motherboard also allows you have to activate the Dual Channel Memory Technology. 3. If you always need to the Dual Channel Memory Configuration Table below. Populated (3)* Populated Populated Populated Populated * For the configuration (3), please install identical DDR2...
... dual channel configuration, and please install identical DDR2 DIMMs in all four slots. 1. see p.10 No.6), so that Dual Channel Memory Technology can be damaged. 17 You may be activated. It is unable to install identical DDR2 DIMM pair in Dual Channel B ...in Dual Channel A (DDRII_1 and DDRII_3; This motherboard also allows you have to activate the Dual Channel Memory Technology. 3. If you always need to the Dual Channel Memory Configuration Table below. Populated (3)* Populated Populated Populated Populated * For the configuration (3), please install identical DDR2...
User Manual
Page 28
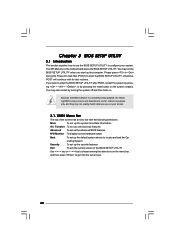
... status Boot To set up the computer. Please press or during the Power-On-Self-Test (POST) to locate and load the Op- The SPI Memory on . Chapter 3 BIOS SETUP UTILITY 3.1 Introduction This section explains how to use the BIOS SETUP UTILITY to get into the sub screen. 28 erating System...
... status Boot To set up the computer. Please press or during the Power-On-Self-Test (POST) to locate and load the Op- The SPI Memory on . Chapter 3 BIOS SETUP UTILITY 3.1 Introduction This section explains how to use the BIOS SETUP UTILITY to get into the sub screen. 28 erating System...

User Manual
Page 29
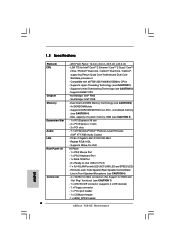
... Exit System Overview System Time System Date [14:00:09] [Fri 08/14/2009] BIOS Version : P5B-DE P1.00 Processor Type : Intel (R) CPU 3.33GHz (64bit) Processor Speed : 3333MHz Microcode Update : F49/3 Cache Size : 256KB Total Memory DDRII_1 DDRII_2 DDRII_3 DDRII_4 : 1024MB : 1024MB/266MHz (DDR2 533) : None : None : None Use [Enter], [TAB] or...
... Exit System Overview System Time System Date [14:00:09] [Fri 08/14/2009] BIOS Version : P5B-DE P1.00 Processor Type : Intel (R) CPU 3.33GHz (64bit) Processor Speed : 3333MHz Microcode Update : F49/3 Cache Size : 256KB Total Memory DDRII_1 DDRII_2 DDRII_3 DDRII_4 : 1024MB : 1024MB/266MHz (DDR2 533) : None : None : None Use [Enter], [TAB] or...
User Manual
Page 30
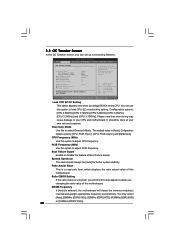
..., PCIE, Async.] and [Optimized]. Please note that overclocing may cause damage to your CPU and motherboard. The default value is unlocked, you will detect the memory module(s) inserted and assigns appropriate frequency automatically. You may cause damage to your CPU and motherboard. PCIE Frequency (MHz) Use this motherboard. Ratio Actual Value...
..., PCIE, Async.] and [Optimized]. Please note that overclocing may cause damage to your CPU and motherboard. The default value is unlocked, you will detect the memory module(s) inserted and assigns appropriate frequency automatically. You may cause damage to your CPU and motherboard. PCIE Frequency (MHz) Use this motherboard. Ratio Actual Value...
User Manual
Page 35
...support the Halt State (C1). Hyper Threading Technology To enable this feature, it requires a computer system with "No Execute (NX) Memory Protection" can utilize the additional hardware capabilities provided by malicious software to [Enabled], a VMM (Virtual Machine Architecture) can prevent data ...pages from overheated. CPU Thermal Throttling No-Execute Memory Protection Intel (R) SpeedStep (tm) tech. [Disabled] [Enabled] [Enabled] [Disabled] [Auto] This should be hidden if the current CPU...
...support the Halt State (C1). Hyper Threading Technology To enable this feature, it requires a computer system with "No Execute (NX) Memory Protection" can utilize the additional hardware capabilities provided by malicious software to [Enabled], a VMM (Virtual Machine Architecture) can prevent data ...pages from overheated. CPU Thermal Throttling No-Execute Memory Protection Intel (R) SpeedStep (tm) tech. [Disabled] [Enabled] [Enabled] [Disabled] [Auto] This should be hidden if the current CPU...
User Manual
Page 37
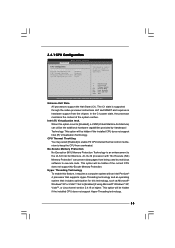
... disabled when PCI Sound Card is plugged. DISABLE: Do not allow remapping of overlapped PCI memory above the total physical memory. 3.4.2 Chipset Configuration BIOS SETUP UTILITY Advanced Chipset Settings Memory Remap Feature [Disabled] Primary Graphics Adapter [PCI] Onboard HD Audio Front Panel OnBoard Lan... [Auto] [Enabled] [Enabled] Intelligent Energy Saver [Disabled] ENABLE: Allow remapping of memory. +F1 F9 F10 ESC Select Screen Select Item Change Option General Help Load Defaults Save and Exit Exit v02.54 (C) Copyright 1985...
... disabled when PCI Sound Card is plugged. DISABLE: Do not allow remapping of overlapped PCI memory above the total physical memory. 3.4.2 Chipset Configuration BIOS SETUP UTILITY Advanced Chipset Settings Memory Remap Feature [Disabled] Primary Graphics Adapter [PCI] Onboard HD Audio Front Panel OnBoard Lan... [Auto] [Enabled] [Enabled] Intelligent Energy Saver [Disabled] ENABLE: Allow remapping of memory. +F1 F9 F10 ESC Select Screen Select Item Change Option General Help Load Defaults Save and Exit Exit v02.54 (C) Copyright 1985...
Quick Installation Guide
Page 6
... Mb/s - HD Audio Jack: Side Speaker/Rear Speaker/Central/Bass/ Line in , 30.5 cm x 20.3 cm - Dual Channel DDR2 Memory Technology (see CAUTION 5) - 1 x PCI Express x16 slot - 2 x PCI Express x1 slots - 3 x PCI slots - 7.1 CH... connector (supports 2 x IDE devices) - 1 x Floppy connector - 1 x Print port header - 1 x COM port header - 1 x HDMI_SPDIF header ASRock P5B-DE Motherboard English Supports Wake-On-LAN I /O Connector 6 - 1.2 Specifications Platform CPU Chipset Memory Expansion Slot Audio LAN Rear Panel I /O Panel - 1 x PS/2 Mouse Port - 1 x PS/2 Keyboard Port - 1 x IEEE 1394 Port - ...
... Mb/s - HD Audio Jack: Side Speaker/Rear Speaker/Central/Bass/ Line in , 30.5 cm x 20.3 cm - Dual Channel DDR2 Memory Technology (see CAUTION 5) - 1 x PCI Express x16 slot - 2 x PCI Express x1 slots - 3 x PCI slots - 7.1 CH... connector (supports 2 x IDE devices) - 1 x Floppy connector - 1 x Print port header - 1 x COM port header - 1 x HDMI_SPDIF header ASRock P5B-DE Motherboard English Supports Wake-On-LAN I /O Connector 6 - 1.2 Specifications Platform CPU Chipset Memory Expansion Slot Audio LAN Rear Panel I /O Panel - 1 x PS/2 Mouse Port - 1 x PS/2 Keyboard Port - 1 x IEEE 1394 Port - ...

Quick Installation Guide
Page 8
... details. 3. Before you to SATAII connector, please read the installation guide of memory modules on page 26 of ASRock OC Tuner. sponding memory support frequency. It should be less than 4GB for the reservation for the operation...Memory Technology, make sure to adjust your own risk and expense. About the setting of "Hyper Threading Technology", please check page 35 of your hardware devices to SATAII connector directly. 8. We are not responsible for USB 2.0 works fine under Windows® environment. ASRock website: http://www.asrock.com English 8 ASRock P5B-DE...
... details. 3. Before you to SATAII connector, please read the installation guide of memory modules on page 26 of ASRock OC Tuner. sponding memory support frequency. It should be less than 4GB for the reservation for the operation...Memory Technology, make sure to adjust your own risk and expense. About the setting of "Hyper Threading Technology", please check page 35 of your hardware devices to SATAII connector directly. 8. We are not responsible for USB 2.0 works fine under Windows® environment. ASRock website: http://www.asrock.com English 8 ASRock P5B-DE...

Quick Installation Guide
Page 13
...DDRII_4; see p.2 No.6), so that Dual Channel Memory Technology can be damaged. Dual Channel Memory Configurations DDRII_1 DDRII_2 DDRII_3 DDRII_4 (Yellow Slot) (Orange Slot) (Yellow Slot) (Orange Slot) (1) Populated - English 13 ASRock P5B-DE Motherboard In other words, install them in the set... of the same color. Orange slots; You may be activated. In other words, you always need to activate the Dual Channel Memory Technology. 3. see p.2 No.5) or...
...DDRII_4; see p.2 No.6), so that Dual Channel Memory Technology can be damaged. Dual Channel Memory Configurations DDRII_1 DDRII_2 DDRII_3 DDRII_4 (Yellow Slot) (Orange Slot) (Yellow Slot) (Orange Slot) (1) Populated - English 13 ASRock P5B-DE Motherboard In other words, install them in the set... of the same color. Orange slots; You may be activated. In other words, you always need to activate the Dual Channel Memory Technology. 3. see p.2 No.5) or...

Quick Installation Guide
Page 22
BIOS Information The Flash Memory on the system chassis. When you wish to scroll through its test routines. The BIOS Setup program is a menu-driven program, which allows you to ...; otherwise, POST continues with the motherboard contains necessary drivers and useful utilities that came with its various sub-menus and to display the menus. 22 ASRock P5B-DE Motherboard English If the Main Menu does not appear automatically, locate and doubleclick on the file "ASSETUP.EXE" from the BIN folder in the Support...
BIOS Information The Flash Memory on the system chassis. When you wish to scroll through its test routines. The BIOS Setup program is a menu-driven program, which allows you to ...; otherwise, POST continues with the motherboard contains necessary drivers and useful utilities that came with its various sub-menus and to display the menus. 22 ASRock P5B-DE Motherboard English If the Main Menu does not appear automatically, locate and doubleclick on the file "ASSETUP.EXE" from the BIN folder in the Support...

