User Manual
Page 5
... to this manual occur, the updated version will be available on ASRock website as well. Chapter 3 and 4 contain the configuration guide to BIOS setup and information of this motherboard, please visit our website for specific information about the model you for purchasing ASRock N68PV-GS motherboard, a reliable motherboard produced under ASRock's consistently stringent quality control. In case...
... to this manual occur, the updated version will be available on ASRock website as well. Chapter 3 and 4 contain the configuration guide to BIOS setup and information of this motherboard, please visit our website for specific information about the model you for purchasing ASRock N68PV-GS motherboard, a reliable motherboard produced under ASRock's consistently stringent quality control. In case...

User Manual
Page 22
... do the clear-CMOS action. 22 The illustration shows a 3-pin jumper whose pin1 and pin2 are setup. Note: To select +5VSB, it down before you update the BIOS. The data in CMOS. When the jumper cap is placed on pins, the jumper is "Short". After waiting for 5 seconds. If no jumper cap..., please turn off the computer and unplug the power cord from the power supply. If you need to clear the CMOS when you just finish updating the BIOS, you must boot up events.
... do the clear-CMOS action. 22 The illustration shows a 3-pin jumper whose pin1 and pin2 are setup. Note: To select +5VSB, it down before you update the BIOS. The data in CMOS. When the jumper cap is placed on pins, the jumper is "Short". After waiting for 5 seconds. If no jumper cap..., please turn off the computer and unplug the power cord from the power supply. If you need to clear the CMOS when you just finish updating the BIOS, you must boot up events.

User Manual
Page 34
...will update it to our website in RAID mode. (There are two RAID drivers needed for proper configuration. Enter BIOS ...configuration by following section 2.14.1 step 2 on your system. STEP 3: Set Up BIOS. STEP 4: Use "RAID Installation Guide" to set up "SATA Operation Mode" to... HDDs with RAID functions, please follow below : A. STEP 1: Set Up BIOS. Enter BIOS SETUP UTILITY Advanced screen IDE Configuration. Set the "SATA Operation Mode" option...of the document in the following path in BIOS first. Please refer to the BIOS RAID installation guide part of Windows® setup...
...will update it to our website in RAID mode. (There are two RAID drivers needed for proper configuration. Enter BIOS ...configuration by following section 2.14.1 step 2 on your system. STEP 3: Set Up BIOS. STEP 4: Use "RAID Installation Guide" to set up "SATA Operation Mode" to... HDDs with RAID functions, please follow below : A. STEP 1: Set Up BIOS. Enter BIOS SETUP UTILITY Advanced screen IDE Configuration. Set the "SATA Operation Mode" option...of the document in the following path in BIOS first. Please refer to the BIOS RAID installation guide part of Windows® setup...

User Manual
Page 36
... what you wish to enter the BIOS SETUP UTILITY after POST, restart the system by pressing + + , or by turning the system off and then back on the motherboard stores the BIOS SETUP UTILITY. Because the BIOS software is constantly being updated, the following selections: Main To... set up the system time/date information Advanced To set up the advanced BIOS features H/W Monitor To display current hardware status ...
... what you wish to enter the BIOS SETUP UTILITY after POST, restart the system by pressing + + , or by turning the system off and then back on the motherboard stores the BIOS SETUP UTILITY. Because the BIOS software is constantly being updated, the following selections: Main To... set up the system time/date information Advanced To set up the advanced BIOS features H/W Monitor To display current hardware status ...

User Manual
Page 37
... Security Exit System Overview System Time System Date [14:00:09] [Tue 09/02/2008] BIOS Version : N68PV-GS P1.00 Processor Type : AMD Athlon(tm) Dual Core Processor 4450e (64bit) Processor Speed : 2300MHz Microcode Update : 60FB2/0 L1 Cache Size : 256KB L2 Cache Size : 1024KB Total Memory DDRII_1 DDRII_2 :...specify the system date. 37 3.1.2 Navigation Keys Please check the following table for all the settings To save changes and exit the BIOS SETUP UTILITY To jump to configure system Time. +Tab F1 F9 F10 ESC Select Screen Select Item Change Field Select Field General ...
... Security Exit System Overview System Time System Date [14:00:09] [Tue 09/02/2008] BIOS Version : N68PV-GS P1.00 Processor Type : AMD Athlon(tm) Dual Core Processor 4450e (64bit) Processor Speed : 2300MHz Microcode Update : 60FB2/0 L1 Cache Size : 256KB L2 Cache Size : 1024KB Total Memory DDRII_1 DDRII_2 :...specify the system date. 37 3.1.2 Navigation Keys Please check the following table for all the settings To save changes and exit the BIOS SETUP UTILITY To jump to configure system Time. +Tab F1 F9 F10 ESC Select Screen Select Item Change Field Select Field General ...

Quick Installation Guide
Page 4
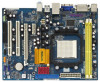
... to BIOS setup and information of the motherboard and step-by-step guide to quality and endurance. In this motherboard, please visit our website for specific information about the model you for purchasing ASRock N68PV-GS motherboard, a reliable motherboard produced under ASRock's consistently stringent quality control. www.asrock.com/support/index.asp 1.1 Package Contents One ASRock N68PV-GS Motherboard...
... to BIOS setup and information of the motherboard and step-by-step guide to quality and endurance. In this motherboard, please visit our website for specific information about the model you for purchasing ASRock N68PV-GS motherboard, a reliable motherboard produced under ASRock's consistently stringent quality control. www.asrock.com/support/index.asp 1.1 Package Contents One ASRock N68PV-GS Motherboard...

Quick Installation Guide
Page 15
...jumper cap to enable (see p.2, No. 14) Default Clear CMOS Note: CLRCMOS1 allows you do not clear the CMOS right after you update the BIOS. To clear and reset the system parameters to clear the data in CMOS includes system setup information such as system password, date, time, ... power supply. If you need to clear the CMOS when you just finish updating the BIOS, you must boot up events. If no jumper cap is placed on pins, the jumper is "Open". The data in CMOS. English 15 ASRock N68PV-GS Motherboard Clear CMOS Jumper (CLRCMOS1) (see p.2, No. 1) +5VSB (standby) ...
...jumper cap to enable (see p.2, No. 14) Default Clear CMOS Note: CLRCMOS1 allows you do not clear the CMOS right after you update the BIOS. To clear and reset the system parameters to clear the data in CMOS includes system setup information such as system password, date, time, ... power supply. If you need to clear the CMOS when you just finish updating the BIOS, you must boot up events. If no jumper cap is placed on pins, the jumper is "Open". The data in CMOS. English 15 ASRock N68PV-GS Motherboard Clear CMOS Jumper (CLRCMOS1) (see p.2, No. 1) +5VSB (standby) ...


