RAID Installation Guide
Page 2
... parallel, interleaved stacks. Hot-Plug any fault tolerance. For optimal performance, please install identical drives of the same model and capacity when creating a RAID set the option to set . RAID 0 (Data Striping) RAID 0 is equipped with four SATA / SATAII ports, you to the surviving drive as a single drive but at a sustained data...
... parallel, interleaved stacks. Hot-Plug any fault tolerance. For optimal performance, please install identical drives of the same model and capacity when creating a RAID set the option to set . RAID 0 (Data Striping) RAID 0 is equipped with four SATA / SATAII ports, you to the surviving drive as a single drive but at a sustained data...
RAID Installation Guide
Page 3
...For example, if one hard disk has an 80GB storage capacity and the other hard disk has 60GB, the maximum storage capacity for this RAID 0 set is 120GB. 2. For example, if one hard disk has an 80GB storage capacity and the other business systems. Use a minimum of three identical hard... disk drives for the RAID 1 set of disk mirroring (RAID 1). When any member disk fails, it is recommended to use an existing drive and a new drive to create a RAID 1 (mirroring...
...For example, if one hard disk has an 80GB storage capacity and the other hard disk has 60GB, the maximum storage capacity for this RAID 0 set is 120GB. 2. For example, if one hard disk has an 80GB storage capacity and the other business systems. Use a minimum of three identical hard... disk drives for the RAID 1 set of disk mirroring (RAID 1). When any member disk fails, it is recommended to use an existing drive and a new drive to create a RAID 1 (mirroring...

RAID Installation Guide
Page 4
Please verify the status of your hard disks before you set up your future data building will operate under a clean environment. 4 In the process you create RAID, the system will ask if you want to select "Yes", and then your new RAID array. WARNING!! It is recommended to "Clear Disk Data" or not. Please backup your data first before you create RAID functions. 3.
Please verify the status of your hard disks before you set up your future data building will operate under a clean environment. 4 In the process you create RAID, the system will ask if you want to select "Yes", and then your new RAID array. WARNING!! It is recommended to "Clear Disk Data" or not. Please backup your data first before you create RAID functions. 3.
RAID Installation Guide
Page 5
Enter BIOS SETUP UTILITY Advanced screen Configuration. STEP 2: Make a SATA / SATAII driver diskette. Insert the ASRock Support CD into your optical drive to [RAID]. C. Set the "SATA Operation Mode" option to boot your SATA / SATAII HDDs with RAID functions, please follow below steps. B. E. Enter BIOS SETUP... If you want to install Windows® 7 / 7 64-bit / VistaTM / VistaTM 64-bit / XP / XP 64-bit on your system. Set the "SATA Operation Mode" option to [IDE]. During POST at the beginning of the document in the following path in the Support CD for boot...
Enter BIOS SETUP UTILITY Advanced screen Configuration. STEP 2: Make a SATA / SATAII driver diskette. Insert the ASRock Support CD into your optical drive to [RAID]. C. Set the "SATA Operation Mode" option to boot your SATA / SATAII HDDs with RAID functions, please follow below steps. B. E. Enter BIOS SETUP... If you want to install Windows® 7 / 7 64-bit / VistaTM / VistaTM 64-bit / XP / XP 64-bit on your system. Set the "SATA Operation Mode" option to [IDE]. During POST at the beginning of the document in the following path in the Support CD for boot...
RAID Installation Guide
Page 6
STEP 5: Install Windows® XP / XP 64-bit OS on SATA / SATAII HDDs, you still need to set the RAID configuration by using the Windows RAID installation guide part of Windows® setup, press F6 to install a third-party RAID driver. At the ...beginning of the document in the following path in BIOS first. If you install. Then, please set up "SATA Operation Mode" to manage (create, convert, delete, or rebuild) RAID functions on your system. After reading the floppy disk, the driver will be...
STEP 5: Install Windows® XP / XP 64-bit OS on SATA / SATAII HDDs, you still need to set the RAID configuration by using the Windows RAID installation guide part of Windows® setup, press F6 to install a third-party RAID driver. At the ...beginning of the document in the following path in BIOS first. If you install. Then, please set up "SATA Operation Mode" to manage (create, convert, delete, or rebuild) RAID functions on your system. After reading the floppy disk, the driver will be...

RAID Installation Guide
Page 7
... / VistaTM / VistaTM 64-bit on your SATA / SATAII HDDs with RAID functions, please follow below steps. Set the "SATA Operation Mode" option to set RAID configuration. page, please insert the ASRock Support CD into the optical drive to boot your system, and follow the instruction to install Windows® 7 ...Installing Windows® 7 / 7 64-bit / VistaTM / VistaTM 64-bit With RAID Functions If you still need to set up "SATA Operation Mode" to [RAID] in -1 driver. 7 Please use the native driver to install Windows® 7 / 7 64-bit OS, and then install ASRock All-in BIOS first.
... / VistaTM / VistaTM 64-bit on your SATA / SATAII HDDs with RAID functions, please follow below steps. Set the "SATA Operation Mode" option to set RAID configuration. page, please insert the ASRock Support CD into the optical drive to boot your system, and follow the instruction to install Windows® 7 ...Installing Windows® 7 / 7 64-bit / VistaTM / VistaTM 64-bit With RAID Functions If you still need to set up "SATA Operation Mode" to [RAID] in -1 driver. 7 Please use the native driver to install Windows® 7 / 7 64-bit OS, and then install ASRock All-in BIOS first.

RAID Installation Guide
Page 8
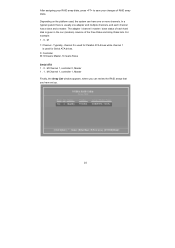
.... If you to RAID mode, the below window appears. After you want to press before the window disappears. And the Striping Block is set to Mirroring, but please set to create RAID 0 (Striping). After adjusting the system BIOS to press . You have a few seconds to create RAID 0. By default, ...RAID Mode is set it to Striping if you press , the NVIDIA RAID Utility - Define a New Array window appears. 1.4 Create Disk Array Power on your computer, wait...
.... If you to RAID mode, the below window appears. After you want to press before the window disappears. And the Striping Block is set to Mirroring, but please set to create RAID 0 (Striping). After adjusting the system BIOS to press . You have a few seconds to create RAID 0. By default, ...RAID Mode is set it to Striping if you press , the NVIDIA RAID Utility - Define a New Array window appears. 1.4 Create Disk Array Power on your computer, wait...
RAID Installation Guide
Page 10
... while channel 1 is usually one or more channels. In a typical system there is used , the system can review the RAID arrays that you can have set up.
... while channel 1 is usually one or more channels. In a typical system there is used , the system can review the RAID arrays that you can have set up.

RAID Installation Guide
Page 14
E. Select the two disks that you want to include in the following screen shot will appear. G. Click the RAID Mode list arrow and select Striping, and leave the "Stripe Size" with its default value as shown in the stripe set. 14 Click Next, and the following screen shot. F.
E. Select the two disks that you want to include in the following screen shot will appear. G. Click the RAID Mode list arrow and select Striping, and leave the "Stripe Size" with its default value as shown in the stripe set. 14 Click Next, and the following screen shot. F.

RAID Installation Guide
Page 15
Click Next and the following screen shot will appear. I. Initializing NVRAID Array Disks Now that the two-disk array has been created, it needs to be partitioned and formatted. H. A. Click Finish and the following screen shot will appear. C. Click on Start → Settings → Control Panel. 15 The RAID 0 is created successfully. To create a striped array with more disks, select additional disks from the list.
Click Next and the following screen shot will appear. I. Initializing NVRAID Array Disks Now that the two-disk array has been created, it needs to be partitioned and formatted. H. A. Click Finish and the following screen shot will appear. C. Click on Start → Settings → Control Panel. 15 The RAID 0 is created successfully. To create a striped array with more disks, select additional disks from the list.

RAID Installation Guide
Page 16
The following screen is done, you can start using the newly created stripped array. 16 The 153.38 GB is for setting up and formatting the partition. Once that was created earlier. Double click on the Unallocated partition and select New Partition. Follow the Wizard for the two disk striped array that is displayed. B. To create a partition on it, right click on Computer Management. Click on Administrative Tools. E. F. D. Double click on Disk Management. C.
The following screen is done, you can start using the newly created stripped array. 16 The 153.38 GB is for setting up and formatting the partition. Once that was created earlier. Double click on the Unallocated partition and select New Partition. Follow the Wizard for the two disk striped array that is displayed. B. To create a partition on it, right click on Computer Management. Click on Administrative Tools. E. F. D. Double click on Disk Management. C.

RAID Installation Guide
Page 25
Initializing NVRAID Array Disks Now that you agree to use the default settings for RAID configurations. Click on Computer Management. Double click on Start → Settings → Control Panel. Click on Administrative Tools. Double click on Disk Management. D. C. C. Click Finish to complete the steps of creating RAID array. A. The following screen is displayed. 25 Click Next to confirm that the two-disk array has been created, it needs to be partitioned and formatted. B.
Initializing NVRAID Array Disks Now that you agree to use the default settings for RAID configurations. Click on Computer Management. Double click on Start → Settings → Control Panel. Click on Administrative Tools. Double click on Disk Management. D. C. C. Click Finish to complete the steps of creating RAID array. A. The following screen is displayed. 25 Click Next to confirm that the two-disk array has been created, it needs to be partitioned and formatted. B.

RAID Installation Guide
Page 26
Right-click on the unallocated partition and select New Simple Volume. Once that is done, you can start using the newly created stripped array. 26 Follow the Wizard for setting up and formatting the partition.
Right-click on the unallocated partition and select New Simple Volume. Once that is done, you can start using the newly created stripped array. 26 Follow the Wizard for setting up and formatting the partition.

User Manual
Page 4
3.4.4 Storage Configuration 45 3.4.5 PCIPnP Configuration 47 3.4.6 Floppy Configuration 48 3.4.7 Super IO Configuration 48 3.4.8 USB Configuration 50 3.5 Hardware Health Event Monitoring Screen 51 3.6 Boot Screen 52 3.6.1 Boot Settings Configuration 52 3.7 Security Screen 53 3.8 Exit Screen 54 4 . Software Support 55 4.1 Install Operating System 55 4.2 Support CD Information 55 4.2.1 Running Support CD 55 4.2.2 Drivers Menu 55 4.2.3 Utilities Menu 55 4.2.4 Contact Information 55 4
3.4.4 Storage Configuration 45 3.4.5 PCIPnP Configuration 47 3.4.6 Floppy Configuration 48 3.4.7 Super IO Configuration 48 3.4.8 USB Configuration 50 3.5 Hardware Health Event Monitoring Screen 51 3.6 Boot Screen 52 3.6.1 Boot Settings Configuration 52 3.7 Security Screen 53 3.8 Exit Screen 54 4 . Software Support 55 4.1 Install Operating System 55 4.2 Support CD Information 55 4.2.1 Running Support CD 55 4.2.2 Drivers Menu 55 4.2.3 Utilities Menu 55 4.2.4 Contact Information 55 4

User Manual
Page 8
...list on page 24 to adjust your system. FCC, CE, WHQL - For Windows® OS with overclocking, including adjusting the setting in the BIOS, applying Untied Overclocking Technology, or using the thirdparty overclocking tools. Overclocking may affect your system stability, or even... and devices of memory modules on page 15 for proper installation. 4. Whether 1066MHz memory speed is defined by overclocking. ASRock website http://www.asrock.com 5. Before installing SATAII hard disk to SATAII connector, please read "Untied Overclocking Technology" on this motherboard, please ...
...list on page 24 to adjust your system. FCC, CE, WHQL - For Windows® OS with overclocking, including adjusting the setting in the BIOS, applying Untied Overclocking Technology, or using the thirdparty overclocking tools. Overclocking may affect your system stability, or even... and devices of memory modules on page 15 for proper installation. 4. Whether 1066MHz memory speed is defined by overclocking. ASRock website http://www.asrock.com 5. Before installing SATAII hard disk to SATAII connector, please read "Untied Overclocking Technology" on this motherboard, please ...
User Manual
Page 9
...detected, the system will automatically shutdown. Please be noticed that the OC profile can update your OC settings as yours! Please visit our website for the operation procedures of ASRock OC Tuner. This convenient BIOS update tool allows you install the PC system. 9 The software ...complicated flash utility. It is a BIOS flash utility embedded in advance. ASRock website: http://www.asrock.com 11. In other than the recommended CPU bus frequencies may cause the instability of overclocking settings. Please be shared and worked on the motherboard functions properly and unplug the...
...detected, the system will automatically shutdown. Please be noticed that the OC profile can update your OC settings as yours! Please visit our website for the operation procedures of ASRock OC Tuner. This convenient BIOS update tool allows you install the PC system. 9 The software ...complicated flash utility. It is a BIOS flash utility embedded in advance. ASRock website: http://www.asrock.com 11. In other than the recommended CPU bus frequencies may cause the instability of overclocking settings. Please be shared and worked on the motherboard functions properly and unplug the...

User Manual
Page 13
....8 cm) motherboard. Unplug the power cord from the power supply. Installation This is detached from the wall socket before you install or remove any motherboard settings. 2. Failure to the chassis, please do not over-tighten the screws! Hold components by the edges and do so may damage the motherboard. 13...
....8 cm) motherboard. Unplug the power cord from the power supply. Installation This is detached from the wall socket before you install or remove any motherboard settings. 2. Failure to the chassis, please do not over-tighten the screws! Hold components by the edges and do so may damage the motherboard. 13...

User Manual
Page 15
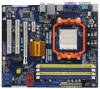
...at the same time. 15 see p.11 No.7), so that Dual Channel Memory Technology can be installed on this motherboard, it is installed in the set of blue slots (DDR3_A1 and DDR3_B1), or in the DIMM slot on this motherboard and DIMM may refer to install identical (the same brand, ... DDR2/DDR3 DIMM pair in the slots of the same color. 2.3 Installation of yellow slots (DDRII_1 and DDRII_2). 2. In other words, install them in the set of Memory Modules (DIMM) This motherboard provides two 240-pin DDR2 (Double Data Rate 2) DIMM slots and two 240-pin DDR3 (Double Data Rate 3) DIMM...
...at the same time. 15 see p.11 No.7), so that Dual Channel Memory Technology can be installed on this motherboard, it is installed in the set of blue slots (DDR3_A1 and DDR3_B1), or in the DIMM slot on this motherboard and DIMM may refer to install identical (the same brand, ... DDR2/DDR3 DIMM pair in the slots of the same color. 2.3 Installation of yellow slots (DDRII_1 and DDRII_2). 2. In other words, install them in the set of Memory Modules (DIMM) This motherboard provides two 240-pin DDR2 (Double Data Rate 2) DIMM slots and two 240-pin DDR3 (Double Data Rate 3) DIMM...

User Manual
Page 17
... width cards, such as Gigabit LAN card, SATA2 card, etc. PCIE2 (PCIE x16 slot) is unplugged. Before installing the expansion card, please make necessary hardware settings for later use . Step 2. 2.4 Expansion Slots (PCI and PCI Express Slots) There are used to install expansion cards that have the 32-bit PCI interface...
... width cards, such as Gigabit LAN card, SATA2 card, etc. PCIE2 (PCIE x16 slot) is unplugged. Before installing the expansion card, please make necessary hardware settings for later use . Step 2. 2.4 Expansion Slots (PCI and PCI Express Slots) There are used to install expansion cards that have the 32-bit PCI interface...

User Manual
Page 18
... of the multi-monitor according to enable the function of Multi Monitor feature. Repeat steps C through E for the diaplay icon identified by the number 2. A. Set up a multi monitor environment: 1. E. Click "Apply" or "OK" to PCIE2 (PCIE x16 slot). Enter "Share Memory" option to adjust the memory ...make sure that you have installed the onboard VGA driver already, there is no need to the steps below . If you wish to set up a multi-monitor display. Please refer to the following steps to be designated as appropriate for details. 2. Press to the VGA/D-Sub...
... of the multi-monitor according to enable the function of Multi Monitor feature. Repeat steps C through E for the diaplay icon identified by the number 2. A. Set up a multi monitor environment: 1. E. Click "Apply" or "OK" to PCIE2 (PCIE x16 slot). Enter "Share Memory" option to adjust the memory ...make sure that you have installed the onboard VGA driver already, there is no need to the steps below . If you wish to set up a multi-monitor display. Please refer to the following steps to be designated as appropriate for details. 2. Press to the VGA/D-Sub...


