User Manual
Page 3
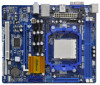
Contents 1 . Introduction ...5 1.1 1.2 1.3 1.4 1.5 Package Contents ...Specifications ...Motherboard Layout (N68-VGS3 UCC / N68-VS3 UCC) ...I/O Panel (N68-VGS3 UCC) ...I/O Panel (N68-VS3 UCC) ...5 6 11 12 13 14 15 15 16 17 18 19 20 24 25 25 26 28 28 28 29 30 ...) / Serial ATAII (SATAII) Hard Disks Installation ...Hot Plug and Hot Swap Functions for SATA / SATAII HDDs ...SATA / SATAII HDD Hot Plug Feature and Operation Guide ...Driver Installation Guide ...Installing Windows® 7 / 7 64-bit / VistaTM / VistaTM 64-bit / XP / XP 64-bit Without RAID Functions ...Installing Windows® 7 / 7 64...
Contents 1 . Introduction ...5 1.1 1.2 1.3 1.4 1.5 Package Contents ...Specifications ...Motherboard Layout (N68-VGS3 UCC / N68-VS3 UCC) ...I/O Panel (N68-VGS3 UCC) ...I/O Panel (N68-VS3 UCC) ...5 6 11 12 13 14 15 15 16 17 18 19 20 24 25 25 26 28 28 28 29 30 ...) / Serial ATAII (SATAII) Hard Disks Installation ...Hot Plug and Hot Swap Functions for SATA / SATAII HDDs ...SATA / SATAII HDD Hot Plug Feature and Operation Guide ...Driver Installation Guide ...Installing Windows® 7 / 7 64-bit / VistaTM / VistaTM 64-bit / XP / XP 64-bit Without RAID Functions ...Installing Windows® 7 / 7 64...
User Manual
Page 4
Software Support ...52 4 3.5 3.6 3.7 3.8 4.1 4.2 3.4.7 USB Configuration ...Hardware Health Event Monitoring Screen ...Boot Screen ...3.6.1 Boot Settings Configuration ...Security Screen ...Exit Screen ...Install Operating System ...Support CD Information ...4.2.1 Running Support CD ...4.2.2 Drivers Menu ...4.2.3 Utilities Menu ...4.2.4 Contact Information ... 47 48 49 49 50 51 52 52 52 52 52 52 4 .
Software Support ...52 4 3.5 3.6 3.7 3.8 4.1 4.2 3.4.7 USB Configuration ...Hardware Health Event Monitoring Screen ...Boot Screen ...3.6.1 Boot Settings Configuration ...Security Screen ...Exit Screen ...Install Operating System ...Support CD Information ...4.2.1 Running Support CD ...4.2.2 Drivers Menu ...4.2.3 Utilities Menu ...4.2.4 Contact Information ... 47 48 49 49 50 51 52 52 52 52 52 52 4 .
User Manual
Page 7
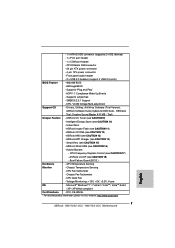
...Trial) - Supports "Plug and Play" - Supports jumperfree - Instant Boot - CPU Temperature Sensing - Drivers, Utilities, AntiVirus Software (Trial Version), ASRock Software Suite (CyberLink DVD Suite - ASRock OC Tuner (see CAUTION 15) - CPU Frequency Stepless Control (see CAUTION 14) - CPU Quiet Fan...detailed product information, please visit our website: http://www.asrock.com 7 ASRock APP Charger (see CAUTION 17) - Creative Sound Blaster X-Fi MB - Chassis Fan Tachometer - ASRock XFast USB (see CAUTION 13) - ASRock AIWI (see CAUTION 16) - Boot Failure Guard ...
...Trial) - Supports "Plug and Play" - Supports jumperfree - Instant Boot - CPU Temperature Sensing - Drivers, Utilities, AntiVirus Software (Trial Version), ASRock Software Suite (CyberLink DVD Suite - ASRock OC Tuner (see CAUTION 15) - CPU Frequency Stepless Control (see CAUTION 14) - CPU Quiet Fan...detailed product information, please visit our website: http://www.asrock.com 7 ASRock APP Charger (see CAUTION 17) - Creative Sound Blaster X-Fi MB - Chassis Fan Tachometer - ASRock XFast USB (see CAUTION 13) - ASRock AIWI (see CAUTION 16) - Boot Failure Guard ...
User Manual
Page 10
...marvelous charging experience than ever. The performance may cause the instability of charging your Apple devices, such as iPhone/iPod/iPad Touch, ASRock has prepared a wonderful solution for a more personal Internet experience. While CPU overheat is not recommended to perform over-clocking. To.... 17. Although this motherboard offers stepless control, it is detected, the system will automatically shutdown. Before you - Simply installing the APP Charger driver, it back again. To use SmartView feature, please make sure your OS version is Windows® 7 / 7 64 bit / VistaTM /...
...marvelous charging experience than ever. The performance may cause the instability of charging your Apple devices, such as iPhone/iPod/iPad Touch, ASRock has prepared a wonderful solution for a more personal Internet experience. While CPU overheat is not recommended to perform over-clocking. To.... 17. Although this motherboard offers stepless control, it is detected, the system will automatically shutdown. Before you - Simply installing the APP Charger driver, it back again. To use SmartView feature, please make sure your OS version is Windows® 7 / 7 64 bit / VistaTM /...
User Manual
Page 18
... 64-bit OS: Right click the desktop, choose "Personalize", and select the "Display Settings" tab so that the value you have installed the onboard VGA driver already, there is inserted to the steps below . A. Install the NVIDIA® PCI Express VGA card to apply these new values. Connect the DVI-D ... the D-Sub monitor cable to the VGA/D-Sub port on VGA card is no need to your system. Boot your system. Install the onboard VGA driver to install it again. 5. For Windows® XP / XP 64-bit OS: Right click the desktop, choose "Properties", and select the "Settings" tab so ...
... 64-bit OS: Right click the desktop, choose "Personalize", and select the "Display Settings" tab so that the value you have installed the onboard VGA driver already, there is inserted to the steps below . A. Install the NVIDIA® PCI Express VGA card to apply these new values. Connect the DVI-D ... the D-Sub monitor cable to the VGA/D-Sub port on VGA card is no need to your system. Boot your system. Install the onboard VGA driver to install it again. 5. For Windows® XP / XP 64-bit OS: Right click the desktop, choose "Properties", and select the "Settings" tab so ...

User Manual
Page 26
... is designed only for SATA / SATAII HDD in the product spec on our support website: www.asrock.com 4. Make sure your dealer or HDD user manual. The latest SATA / SATAII driver is installed into system properly. Make sure to support Hot Plug and will be damaged under the ...1x4-pin conventional power connector interface is indicated in RAID mode. A. 7-pin SATA data cable B. Please make sure the SATA / SATAII driver is available on our website: www.asrock.com 2. Before you process the Hot Plug: 1. SATA power cable SATA 7-pin connector The SATA 15-pin power connector (Black) ...
... is designed only for SATA / SATAII HDD in the product spec on our support website: www.asrock.com 4. Make sure your dealer or HDD user manual. The latest SATA / SATAII driver is installed into system properly. Make sure to support Hot Plug and will be damaged under the ...1x4-pin conventional power connector interface is indicated in RAID mode. A. 7-pin SATA data cable B. Please make sure the SATA / SATAII driver is available on our website: www.asrock.com 2. Before you process the Hot Plug: 1. SATA power cable SATA 7-pin connector The SATA 15-pin power connector (Black) ...
User Manual
Page 28
...7 / 7 64-bit OS, and then install ASRock All-in-1 driver. 28 You can be auto-detected and listed on the support CD driver page. STEP 1: Set Up BIOS. Please use the native driver to your optical drive first. Then, the drivers compatible to your SATA / SATAII HDDs with RAID ...functions, please follow the order from ASRock support CD. B. For Windows® 7 / ...
...7 / 7 64-bit OS, and then install ASRock All-in-1 driver. 28 You can be auto-detected and listed on the support CD driver page. STEP 1: Set Up BIOS. Please use the native driver to your optical drive first. Then, the drivers compatible to your SATA / SATAII HDDs with RAID ...functions, please follow the order from ASRock support CD. B. For Windows® 7 / ...
User Manual
Page 52
...appear automatically, locate and double click on a specific item then follow the installation wizard to your computer. Please install the necessary drivers to activate the devices. 4.2.3 Utilities Menu The Utilities Menu shows the applications software that enhance the motherboard features. 4.2.1 Running ...the support CD, insert the CD into your dealer for more about ASRock, welcome to know more information. 4.2 Support CD Information The Support CD that came with the motherboard contains necessary drivers and useful utilities that the motherboard supports. or you need to contact...
...appear automatically, locate and double click on a specific item then follow the installation wizard to your computer. Please install the necessary drivers to activate the devices. 4.2.3 Utilities Menu The Utilities Menu shows the applications software that enhance the motherboard features. 4.2.1 Running ...the support CD, insert the CD into your dealer for more about ASRock, welcome to know more information. 4.2 Support CD Information The Support CD that came with the motherboard contains necessary drivers and useful utilities that the motherboard supports. or you need to contact...
Quick Installation Guide
Page 7
... - FCC, CE, WHQL * For detailed product information, please visit our website: http://www.asrock.com English 7 ASRock N68-VGS3 UCC / N68-VS3 UCC Motherboard AMI Legal BIOS - Drivers, Utilities, AntiVirus Software (Trial Version), ASRock Software Suite (CyberLink DVD Suite - ASRock OC DNA (see CAUTION 16) - Supports jumperfree - ASRock XFast USB (see CAUTION 12) - Boot Failure Guard (B.F.G.) Hardware - CPU/Chassis FAN connector...
... - FCC, CE, WHQL * For detailed product information, please visit our website: http://www.asrock.com English 7 ASRock N68-VGS3 UCC / N68-VS3 UCC Motherboard AMI Legal BIOS - Drivers, Utilities, AntiVirus Software (Trial Version), ASRock Software Suite (CyberLink DVD Suite - ASRock OC DNA (see CAUTION 16) - Supports jumperfree - ASRock XFast USB (see CAUTION 12) - Boot Failure Guard (B.F.G.) Hardware - CPU/Chassis FAN connector...
Quick Installation Guide
Page 10
14. Simply installing the APP Charger driver, it makes your iPhone charged much quickly from your computer and up to spray thermal grease between the CPU and the heatsink when you install the PC system. 10 ASRock N68-VGS3 UCC / N68-VS3 UCC Motherboard English SmartView, a new function of the system or... damage the CPU. 18. While CPU overheat is IE8. With APP Charger driver installed, you resume the system, please check if the CPU fan...
14. Simply installing the APP Charger driver, it makes your iPhone charged much quickly from your computer and up to spray thermal grease between the CPU and the heatsink when you install the PC system. 10 ASRock N68-VGS3 UCC / N68-VS3 UCC Motherboard English SmartView, a new function of the system or... damage the CPU. 18. While CPU overheat is IE8. With APP Charger driver installed, you resume the system, please check if the CPU fan...

Quick Installation Guide
Page 15
... then select "Primary". Install the onboard VGA driver to page 14 for proper expansion card installation procedures for details. 2. A. Click "Extend my Windows desktop onto this motherboard. 4. Click the number "2" icon. 15 ASRock N68-VGS3 UCC / N68-VS3 UCC Motherboard English Please make sure that you can easily... by the number 2. Right-click the display icon in the Display Properties dialog that the value you have installed the onboard VGA driver already, there is inserted to apply these new values. C. E. Set the "Screen Resolution" and "Color Quality" as Secondary....
... then select "Primary". Install the onboard VGA driver to page 14 for proper expansion card installation procedures for details. 2. A. Click "Extend my Windows desktop onto this motherboard. 4. Click the number "2" icon. 15 ASRock N68-VGS3 UCC / N68-VS3 UCC Motherboard English Please make sure that you can easily... by the number 2. Right-click the display icon in the Display Properties dialog that the value you have installed the onboard VGA driver already, there is inserted to apply these new values. C. E. Set the "Screen Resolution" and "Color Quality" as Secondary....
Quick Installation Guide
Page 20
... the BIOS setting. Failing to do so will cause power up to bottom side to install those required drivers. Therefore, the drivers you install can start to install Windows® 7 / 7 64-bit / VistaTM / VistaTM 64-... install Windows® 7 / 7 64-bit / VistaTM / VistaTM 64-bit / XP / XP 64bit on the support CD driver page. You can work properly. 2.9 Installing Windows® 7 / 7 64-bit / VistaTM / VistaTM 64-bit / XP ...is no need for detailed procedures: ..\ RAID Installation Guide English 20 ASRock N68-VGS3 UCC / N68-VS3 UCC Motherboard Please follow the order from up failure.
... the BIOS setting. Failing to do so will cause power up to bottom side to install those required drivers. Therefore, the drivers you install can start to install Windows® 7 / 7 64-bit / VistaTM / VistaTM 64-... install Windows® 7 / 7 64-bit / VistaTM / VistaTM 64-bit / XP / XP 64bit on the support CD driver page. You can work properly. 2.9 Installing Windows® 7 / 7 64-bit / VistaTM / VistaTM 64-bit / XP ...is no need for detailed procedures: ..\ RAID Installation Guide English 20 ASRock N68-VGS3 UCC / N68-VS3 UCC Motherboard Please follow the order from up failure.
Quick Installation Guide
Page 21
...8 for the possible overclocking risk before you apply Untied Overclocking Technology. 3. If you to display the menus. 21 ASRock N68-VGS3 UCC / N68-VS3 UCC Motherboard English It will enhance motherboard features. The BIOS Setup program is a menu-driven program, which means during overclocking,... buses are in the Support CD to scroll through its test routines. otherwise, POST continues with the motherboard contains necessary drivers and useful utilities that FSB can operate under a more stable overclocking environment. When you enable Untied Overclocking function, please ...
...8 for the possible overclocking risk before you apply Untied Overclocking Technology. 3. If you to display the menus. 21 ASRock N68-VGS3 UCC / N68-VS3 UCC Motherboard English It will enhance motherboard features. The BIOS Setup program is a menu-driven program, which means during overclocking,... buses are in the Support CD to scroll through its test routines. otherwise, POST continues with the motherboard contains necessary drivers and useful utilities that FSB can operate under a more stable overclocking environment. When you enable Untied Overclocking function, please ...
RAID Installation Guide
Page 2
... an identical image of the "User Manual" in this section to create RAID arrays. 1.1 Introduction to the SATA / SATAII HDDs amount you make a SATA / SATAII driver diskette, press to enter BIOS setup to set . WARNING!! It provides data protection and increases fault tolerance to the entire system since it contains a complete...
... an identical image of the "User Manual" in this section to create RAID arrays. 1.1 Introduction to the SATA / SATAII HDDs amount you make a SATA / SATAII driver diskette, press to enter BIOS setup to set . WARNING!! It provides data protection and increases fault tolerance to the entire system since it contains a complete...
RAID Installation Guide
Page 5
... install Windows® XP / XP 64-bit on the screen, "Generate Serial ATA driver diskette [YN]?", press . Before you start to format the floppy diskette and copy SATA / SATAII drivers into your optical drive to boot your system. Then you will start to configure RAID ...function, you need to check the RAID installation guide in the Support CD: .. \ RAID Installation Guide 5 Enter BIOS SETUP UTILITY Advanced screen Storage Configuration. Insert the ASRock Support CD...
... install Windows® XP / XP 64-bit on the screen, "Generate Serial ATA driver diskette [YN]?", press . Before you start to format the floppy diskette and copy SATA / SATAII drivers into your optical drive to boot your system. Then you will start to configure RAID ...function, you need to check the RAID installation guide in the Support CD: .. \ RAID Installation Guide 5 Enter BIOS SETUP UTILITY Advanced screen Storage Configuration. Insert the ASRock Support CD...
RAID Installation Guide
Page 6
..., or rebuild) RAID functions on your system. Then, please set up "SATA Operation Mode" to install a third-party RAID driver. When prompted, insert the SATA / SATAII driver diskette containing the NVIDIA® RAID driver. At the beginning of the document in the following path in BIOS first. You can start to install Windows... CD: .. \ RAID Installation Guide 6 If you install. STEP 5: Install Windows® XP / XP 64-bit OS on your system. After reading the floppy disk, the driver will be presented. NOTE.
..., or rebuild) RAID functions on your system. Then, please set up "SATA Operation Mode" to install a third-party RAID driver. When prompted, insert the SATA / SATAII driver diskette containing the NVIDIA® RAID driver. At the beginning of the document in the following path in BIOS first. You can start to install Windows... CD: .. \ RAID Installation Guide 6 If you install. STEP 5: Install Windows® XP / XP 64-bit OS on your system. After reading the floppy disk, the driver will be presented. NOTE.
RAID Installation Guide
Page 7
...screen Storage Configuration. STEP 2: Use "RAID Installation Guide" to [RAID]. Before you start to configure RAID function, you need to load RAID driver from ASRock support CD. Insert the Windows® 7 / 7 64-bit / VistaTM / VistaTM 64-bit optical disk into the optical drive again to... do not need to install Windows® 7 / 7 64-bit OS, and then install ASRock All-in the Support CD for proper configuration. Please use the native driver to check the RAID installation guide in -1 driver. 7 1.3.2 Installing Windows® 7 / 7 64-bit / VistaTM / VistaTM 64-bit With...
...screen Storage Configuration. STEP 2: Use "RAID Installation Guide" to [RAID]. Before you start to configure RAID function, you need to load RAID driver from ASRock support CD. Insert the Windows® 7 / 7 64-bit / VistaTM / VistaTM 64-bit optical disk into the optical drive again to... do not need to install Windows® 7 / 7 64-bit OS, and then install ASRock All-in the Support CD for proper configuration. Please use the native driver to check the RAID installation guide in -1 driver. 7 1.3.2 Installing Windows® 7 / 7 64-bit / VistaTM / VistaTM 64-bit With...
RAID Installation Guide
Page 11
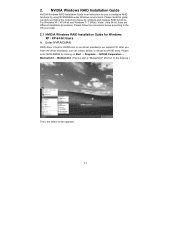
... an instruction for Windows XP / XP 64-bit Users A. Please enter NVRAIDMAN by using NVIDIAMAN under Windows environment. After you finish the driver installation, you install. 2.1 NVIDIA Windows RAID Installation Guide for you to configure RAID functions by clicking on Start → Programs → ...Then, the below screen appears. 11 NVIDIA Windows RAID Installation Guide NVIDIA Windows RAID Installation Guide is built in NVIDIA ALL in one driver provided in our support CD. Please read this guide carefully and follow the instructions below to the OS you can create, delete, ...
... an instruction for Windows XP / XP 64-bit Users A. Please enter NVRAIDMAN by using NVIDIAMAN under Windows environment. After you finish the driver installation, you install. 2.1 NVIDIA Windows RAID Installation Guide for you to configure RAID functions by clicking on Start → Programs → ...Then, the below screen appears. 11 NVIDIA Windows RAID Installation Guide NVIDIA Windows RAID Installation Guide is built in NVIDIA ALL in one driver provided in our support CD. Please read this guide carefully and follow the instructions below to the OS you can create, delete, ...
RAID Installation Guide
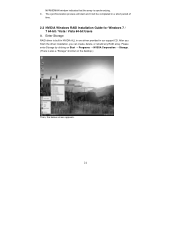
Page 21
... will start and it will be completed in our support CD. NVRAIDMAN window indicates that the array is built in NVIDIA ALL in one driver provided in a short period of time. 2.2 NVIDIA Windows RAID Installation Guide for Windows 7 / 7 64-bit / Vista / Vista 64-bit... Users A. After you finish the driver installation, you can create, delete, or rebuild any RAID array. C. Enter Storage RAID driver is synchronizing. Please enter Storage by clicking on Start → Programs → NVIDIA Corporation → Storage. (...
... will start and it will be completed in our support CD. NVRAIDMAN window indicates that the array is built in NVIDIA ALL in one driver provided in a short period of time. 2.2 NVIDIA Windows RAID Installation Guide for Windows 7 / 7 64-bit / Vista / Vista 64-bit... Users A. After you finish the driver installation, you can create, delete, or rebuild any RAID array. C. Enter Storage RAID driver is synchronizing. Please enter Storage by clicking on Start → Programs → NVIDIA Corporation → Storage. (...


