User Manual
Page 5
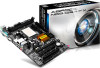
Because the motherboard specifications and the BIOS software might be updated, the content of this motherboard, please visit our website for specific information about the model you for purchasing ASRock N68-GS4 FX / N68-S4 FX motherboard, a reliable motherboard produced under ASRock's consistently stringent quality control. ASRock website http://www.asrock.com If you require technical support related to this manual will...
Because the motherboard specifications and the BIOS software might be updated, the content of this motherboard, please visit our website for specific information about the model you for purchasing ASRock N68-GS4 FX / N68-S4 FX motherboard, a reliable motherboard produced under ASRock's consistently stringent quality control. ASRock website http://www.asrock.com If you require technical support related to this manual will...
User Manual
Page 9
... or other complicated flash utility. This convenient BIOS update tool allows you to enter your system. With OC DNA, you to surveil your overclocking record under WindowsR environment. Your friends then can update your OC settings as a profile and share with others. ASRock Instant Flash ASRock Instant Flash is a BIOS flash utility embedded in a few seconds...
... or other complicated flash utility. This convenient BIOS update tool allows you to enter your system. With OC DNA, you to surveil your overclocking record under WindowsR environment. Your friends then can update your OC settings as a profile and share with others. ASRock Instant Flash ASRock Instant Flash is a BIOS flash utility embedded in a few seconds...
User Manual
Page 18
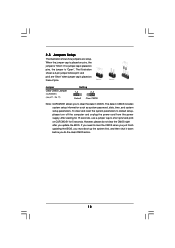
Jumper Clear CMOS Jumper (CLRCMOS1) (see p.11, No. 11) Setting 1_2 2_3 Default Clear CMOS Note: CLRCMOS1 allows you update the BIOS. However, please do the clear-CMOS action. 18 If no jumper cap is placed on pins, the jumper is "Short". To clear and reset the ... these 2 pins. The illustration shows a 3-pin jumper whose pin1 and pin2 are setup. If you need to clear the CMOS when you just finish updating the BIOS, you must boot up the system first, and then shut it down before you do not clear the CMOS right after you to clear the...
Jumper Clear CMOS Jumper (CLRCMOS1) (see p.11, No. 11) Setting 1_2 2_3 Default Clear CMOS Note: CLRCMOS1 allows you update the BIOS. However, please do the clear-CMOS action. 18 If no jumper cap is placed on pins, the jumper is "Short". To clear and reset the ... these 2 pins. The illustration shows a 3-pin jumper whose pin1 and pin2 are setup. If you need to clear the CMOS when you just finish updating the BIOS, you must boot up the system first, and then shut it down before you do not clear the CMOS right after you to clear the...
User Manual
Page 34
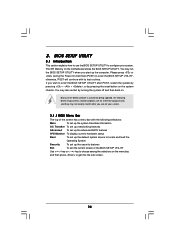
... the reset button on the motherboard stores the BIOS SETUP UTILITY. 3. BIOS SETUP UTILITY 3.1 Introduction This section explains how to use the BIOS SETUP UTILITY to get into the sub screen. 34 Because the BIOS software is constantly being updated, the following selections: Main To set up ...the system time/date information OC Tweaker To set up overclocking features Advanced To set up the advanced BIOS features H/W Monitor To display current hardware status...
... the reset button on the motherboard stores the BIOS SETUP UTILITY. 3. BIOS SETUP UTILITY 3.1 Introduction This section explains how to use the BIOS SETUP UTILITY to get into the sub screen. 34 Because the BIOS software is constantly being updated, the following selections: Main To set up ...the system time/date information OC Tweaker To set up overclocking features Advanced To set up the advanced BIOS features H/W Monitor To display current hardware status...
User Manual
Page 35
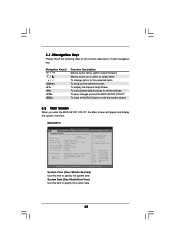
... UTILITY To jump to the Exit Screen or exit the current screen 3.2 Main Screen When you enter the BIOS SETUP UTILITY, the Main screen will appear and display the system overview. Use [+] or [-] to select a field. System Date [Day Month/Date/Year] Use ...H/W Monitor Boot Security Exit System Overview System Time System Date [17:00:09] [Tue 09/17/2013] BIOS Version : N68-GS4 FX P1.00 Processor Type : AMD Athlon (tm) II X3 440 Processor (64bit) Processor Speed : 3000MHz Microcode Update : 100F52/1000086 L1 Cache Size : 384KB L2 Cache Size : 1536KB Total Memory DDR3_A1 DDR3_B1 : 1024MB with...
... UTILITY To jump to the Exit Screen or exit the current screen 3.2 Main Screen When you enter the BIOS SETUP UTILITY, the Main screen will appear and display the system overview. Use [+] or [-] to select a field. System Date [Day Month/Date/Year] Use ...H/W Monitor Boot Security Exit System Overview System Time System Date [17:00:09] [Tue 09/17/2013] BIOS Version : N68-GS4 FX P1.00 Processor Type : AMD Athlon (tm) II X3 440 Processor (64bit) Processor Speed : 3000MHz Microcode Update : 100F52/1000086 L1 Cache Size : 384KB L2 Cache Size : 1536KB Total Memory DDR3_A1 DDR3_B1 : 1024MB with...

User Manual
Page 36
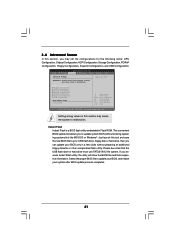
... Overclock Mode CPU Frequency (MHz) PCIE Frequency (MHz) Boot Failure Guard Boot Failure Guard Count CPU/LDT Spread Spectrum PCIE Spread Spectrum SATA Spread Spectrum ASRock UCC AMD Turbo Core Technology AMD IO C-State Support CPU Active Core Control [Auto] [200] [100] [Enabled] [3] [Enabled] [Enabled] [Enabled] [... System Overview System Time System Date [17:00:09] [Tue 09/17/2013] BIOS Version : N68-S4 FX P1.00 Processor Type : AMD Athlon (tm) II X3 440 Processor (64bit) Processor Speed : 3000MHz Microcode Update : 100F52/1000086 L1 Cache Size : 384KB L2 Cache Size : 1536KB Total Memory...
... Overclock Mode CPU Frequency (MHz) PCIE Frequency (MHz) Boot Failure Guard Boot Failure Guard Count CPU/LDT Spread Spectrum PCIE Spread Spectrum SATA Spread Spectrum ASRock UCC AMD Turbo Core Technology AMD IO C-State Support CPU Active Core Control [Auto] [200] [100] [Enabled] [3] [Enabled] [Enabled] [Enabled] [... System Overview System Time System Date [17:00:09] [Tue 09/17/2013] BIOS Version : N68-S4 FX P1.00 Processor Type : AMD Athlon (tm) II X3 440 Processor (64bit) Processor Speed : 3000MHz Microcode Update : 100F52/1000086 L1 Cache Size : 384KB L2 Cache Size : 1536KB Total Memory...
User Manual
Page 41
... and their respective information. CPU Configuration Chipset Configuration ACPI Configuration Storage Configuration PCIPnP Configuration Floppy Configuration SuperIO Configuration USB Configuration BIOS Update Utility Instant Flash Select Screen Select Item Enter Go to update system BIOS without preparing an additional floppy diskette or other complicated flash utility. Just launch this tool and save the new...
... and their respective information. CPU Configuration Chipset Configuration ACPI Configuration Storage Configuration PCIPnP Configuration Floppy Configuration SuperIO Configuration USB Configuration BIOS Update Utility Instant Flash Select Screen Select Item Enter Go to update system BIOS without preparing an additional floppy diskette or other complicated flash utility. Just launch this tool and save the new...
Quick Installation Guide
Page 5
... this motherboard, please visit our website for purchasing ASRock N68-GS4 FX / N68-S4 FX motherboard, a reliable motherboard produced under ASRock's consistently stringent quality control. ASRock website http://www.asrock.com If you are using. Because the motherboard specifications and the BIOS software might be updated, the content of this manual occur, the updated version will be subject to this manual will...
... this motherboard, please visit our website for purchasing ASRock N68-GS4 FX / N68-S4 FX motherboard, a reliable motherboard produced under ASRock's consistently stringent quality control. ASRock website http://www.asrock.com If you are using. Because the motherboard specifications and the BIOS software might be updated, the content of this manual occur, the updated version will be subject to this manual will...
Quick Installation Guide
Page 9
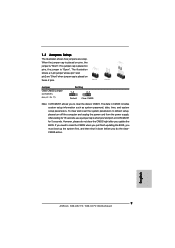
... seconds, use a jumper cap to clear the CMOS when you just finish updating the BIOS, you must boot up the system first, and then shut it down before you update the BIOS. The data in CMOS. After waiting for 5 seconds. English 9 ASRock N68-GS4 FX / N68-S4 FX Motherboard The illustration shows a 3-pin jumper whose pin1 and pin2 are setup...
... seconds, use a jumper cap to clear the CMOS when you just finish updating the BIOS, you must boot up the system first, and then shut it down before you update the BIOS. The data in CMOS. After waiting for 5 seconds. English 9 ASRock N68-GS4 FX / N68-S4 FX Motherboard The illustration shows a 3-pin jumper whose pin1 and pin2 are setup...


