
User Manual
Page 3
... 2.5 Dual Monitor and Surround Display Features 20 2.6 CrossFireXTM and 3-Way CrossFireXTM Operation Guide ........ 23 2.7 Hybrid CrossFireXTM Operation Guide 30 2.8 Jumpers Setup 32 2.9 Onboard Headers and Connectors 33 2.10 HDMI_SPDIF Header Connection Guide 39 2.11 SATAII Hard Disk Setup Guide 40 2.12 eSATAII Interface Introduction 41 2.13 Serial ATA (SATA) / Serial ATAII...
... 2.5 Dual Monitor and Surround Display Features 20 2.6 CrossFireXTM and 3-Way CrossFireXTM Operation Guide ........ 23 2.7 Hybrid CrossFireXTM Operation Guide 30 2.8 Jumpers Setup 32 2.9 Onboard Headers and Connectors 33 2.10 HDMI_SPDIF Header Connection Guide 39 2.11 SATAII Hard Disk Setup Guide 40 2.12 eSATAII Interface Introduction 41 2.13 Serial ATA (SATA) / Serial ATAII...

User Manual
Page 7
... RAID (RAID 0, RAID 1, RAID 5, RAID 10 and JBOD), NCQ, AHCI and "Hot Plug" functions (see CAUTION 9) - 1 x eSATAII 3.0Gb/s connector (shared with 1 SATAII connector) (see CAUTION 10) - 1 x ATA133 IDE connector (supports 2 x IDE devices) - 1 x Floppy connector - 1 x IR header - 1 x COM port header - 1 x IEEE 1394 header - 1 x HDMI_SPDIF header - Supports Full HD 1080p Blu-ray (BD) / HD-DVD playback...
... RAID (RAID 0, RAID 1, RAID 5, RAID 10 and JBOD), NCQ, AHCI and "Hot Plug" functions (see CAUTION 9) - 1 x eSATAII 3.0Gb/s connector (shared with 1 SATAII connector) (see CAUTION 10) - 1 x ATA133 IDE connector (supports 2 x IDE devices) - 1 x Floppy connector - 1 x IR header - 1 x COM port header - 1 x IEEE 1394 header - 1 x HDMI_SPDIF header - Supports Full HD 1080p Blu-ray (BD) / HD-DVD playback...

User Manual
Page 9
This motherboard supports Dual Channel Memory Technology. If you implement Dual Channel Memory Technology, make sure to SATAII connector, please read the installation guide of ASRock SLI/XFire Switch Card in advance. 6. Before installing SATAII hard disk to read the "SATAII Hard Disk Setup Guide"... procedures. 11. The maximum shared memory size is defined by hardware monitor function and overclock your SATAII hard disk drive to SATAII connector directly. 10. It is no such limitation. 5. The voltage regulator can also connect SATA hard disk to SATAII mode. Please ...
This motherboard supports Dual Channel Memory Technology. If you implement Dual Channel Memory Technology, make sure to SATAII connector, please read the installation guide of ASRock SLI/XFire Switch Card in advance. 6. Before installing SATAII hard disk to read the "SATAII Hard Disk Setup Guide"... procedures. 11. The maximum shared memory size is defined by hardware monitor function and overclock your SATAII hard disk drive to SATAII connector directly. 10. It is no such limitation. 5. The voltage regulator can also connect SATA hard disk to SATAII mode. Please ...

User Manual
Page 12
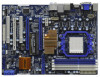
... Bottom: CTR BASS MIC IN AMD Top: LINE IN Center: Bottom: 790GX NB_FAN1 41 PWR_FAN1 Chipset PCIE1 LAN PHY 40 M3A790GXH/USB3 39 PCIE2 IDE1 CrossFireX Hybrid CrossFire 38 37 36 35 34 Super I/O AUDIO CODEC HDMI_SPDIF1 1 CD1 HD_AUDIO1 1 PCIE3 PCI1 PCI...(USB10_11, Blue) (Dual Channel A: DDR3_A1, DDR3_B1; White) (SPEAKER 1, White) 41 Power Fan Connector (PWR_FAN1) 22 Fifth SATAII Connector (SATAII_5, Blue) 42 eSATAII Connector (eSATAII_TOP) 12 Blue) 20 Third SATAII Connector (SATAII_3, Blue) 39 PCI Express 2.0 x16 Slot (PCIE2; Blue) 21 Chassis Speaker Header 40 PCI...
... Bottom: CTR BASS MIC IN AMD Top: LINE IN Center: Bottom: 790GX NB_FAN1 41 PWR_FAN1 Chipset PCIE1 LAN PHY 40 M3A790GXH/USB3 39 PCIE2 IDE1 CrossFireX Hybrid CrossFire 38 37 36 35 34 Super I/O AUDIO CODEC HDMI_SPDIF1 1 CD1 HD_AUDIO1 1 PCIE3 PCI1 PCI...(USB10_11, Blue) (Dual Channel A: DDR3_A1, DDR3_B1; White) (SPEAKER 1, White) 41 Power Fan Connector (PWR_FAN1) 22 Fifth SATAII Connector (SATAII_5, Blue) 42 eSATAII Connector (eSATAII_TOP) 12 Blue) 20 Third SATAII Connector (SATAII_3, Blue) 39 PCI Express 2.0 x16 Slot (PCIE2; Blue) 21 Chassis Speaker Header 40 PCI...

User Manual
Page 15
... and the heatsink. 15 The CPU fits only in place, press it is locked. Step 4. For proper installation, please kindly refer to the CPU FAN connector (CPU_FAN1, see Page 12, No. 3). When the CPU is necessary to install a larger heatsink and cooling fan to avoid bending of CPU Fan and Heatsink...
... and the heatsink. 15 The CPU fits only in place, press it is locked. Step 4. For proper installation, please kindly refer to the CPU FAN connector (CPU_FAN1, see Page 12, No. 3). When the CPU is necessary to install a larger heatsink and cooling fan to avoid bending of CPU Fan and Heatsink...

User Manual
Page 19
.... 19 Step 4. Step 6. Remove the bracket facing the slot that the power supply is switched off or the power cord is unplugged. Align the card connector with screws. Fasten the card to use . PCIE2 / PCIE3 / SLI/XFire Switch Card Retention Slot Configurations PCIE2 Slot PCIE3 Slot SLI/XFire Switch Card (Blue...
.... 19 Step 4. Step 6. Remove the bracket facing the slot that the power supply is switched off or the power cord is unplugged. Align the card connector with screws. Fasten the card to use . PCIE2 / PCIE3 / SLI/XFire Switch Card Retention Slot Configurations PCIE2 Slot PCIE3 Slot SLI/XFire Switch Card (Blue...

User Manual
Page 21
...OS: Right click the desktop, choose "Properties", and select the "Settings" tab so that the value you select is inserted to the corresponding connectors of surround display feature. Please make sure that you can adjust the parameters of "Share Memory", [Auto], will be designated as appropriate for ...Sub port on the I/O panel, and connect HDMI monitor cable to display a large number on PCI Express VGA card driver to enable the function of ASRock SLI/XFire Switch Card. 2. Enter "Share Memory" option to adjust the memory capability to [32MB], [64MB], [128MB] [256MB] or [512MB] ...
...OS: Right click the desktop, choose "Properties", and select the "Settings" tab so that the value you select is inserted to the corresponding connectors of surround display feature. Please make sure that you can adjust the parameters of "Share Memory", [Auto], will be designated as appropriate for ...Sub port on the I/O panel, and connect HDMI monitor cable to display a large number on PCI Express VGA card driver to enable the function of ASRock SLI/XFire Switch Card. 2. Enter "Share Memory" option to adjust the memory capability to [32MB], [64MB], [128MB] [256MB] or [512MB] ...

User Manual
Page 24
... pull open both the retention arms firmly hold the card in position. The card itself will spring away from touching the connectors (Golden Fingers). Also, keep away from touching the connectors (Golden Fingers). Insert the card into position. Step 4. Install one Radeon graphics card to have the "X8 / X8 MODE" wording side... direction of the base. Push the card down into the retention slot till both the retention arms that hold the card into the bottom of ASRock SLI/XFire Switch Card.
... pull open both the retention arms firmly hold the card in position. The card itself will spring away from touching the connectors (Golden Fingers). Also, keep away from touching the connectors (Golden Fingers). Insert the card into position. Step 4. Install one Radeon graphics card to have the "X8 / X8 MODE" wording side... direction of the base. Push the card down into the retention slot till both the retention arms that hold the card into the bottom of ASRock SLI/XFire Switch Card.

User Manual
Page 25
...to D-Sub adapter.) Step 9. Connect a 4-pin ATX power cable to section "Expansion Slots". For the proper installation procedures, please refer to SLI/XFIRE power connector. 25 Please refer to PCIE3 slot. If there are two gold fingers on each Radeon graphics card, please use the DVI to D-Sub adapter to... convert the DVI connector to D-Sub interface, and then connect the D-Sub monitor cable to the DVI to connect two Radeon graphics cards. (CrossFireTM Bridge is provided ...
...to D-Sub adapter.) Step 9. Connect a 4-pin ATX power cable to section "Expansion Slots". For the proper installation procedures, please refer to SLI/XFIRE power connector. 25 Please refer to PCIE3 slot. If there are two gold fingers on each Radeon graphics card, please use the DVI to D-Sub adapter to... convert the DVI connector to D-Sub interface, and then connect the D-Sub monitor cable to the DVI to connect two Radeon graphics cards. (CrossFireTM Bridge is provided ...

User Manual
Page 27
Connect the DVI monitor cable to the DVI connector on the Radeon graphics card on PCIE2 slot. (You may use the DVI to D-Sub adapter to convert the DVI connector to D-Sub interface, and then connect the D-Sub monitor cable to the DVI to SLI/XFIRE power connector. 27 CrossFireTM Bridge Step 6. Connect a 4-pin ATX power cable to D-Sub adapter.) Step 7.
Connect the DVI monitor cable to the DVI connector on the Radeon graphics card on PCIE2 slot. (You may use the DVI to D-Sub adapter to convert the DVI connector to D-Sub interface, and then connect the D-Sub monitor cable to the DVI to SLI/XFIRE power connector. 27 CrossFireTM Bridge Step 6. Connect a 4-pin ATX power cable to D-Sub adapter.) Step 7.

User Manual
Page 30
...further information. 2.7 Hybrid CrossFireXTM Operation Guide This motherboard supports ATITM Hybrid CrossFireXTM feature. Please refer to section "Expansion Slots". Keep ASRock SLI/XFire Switch Card at the default mode (x16). Step 3. For the proper installation procedures, please refer to below PCI Express.../ 7 OS, and is not available with Windows® XP OS. Install one compatible PCI Express graphics card to the correspondent connector on the PCI Express graphics card on your system for ATITM Hybrid CrossFireXTM. Enter "Advanced" screen, and enter "Chipset Settings". ...
...further information. 2.7 Hybrid CrossFireXTM Operation Guide This motherboard supports ATITM Hybrid CrossFireXTM feature. Please refer to section "Expansion Slots". Keep ASRock SLI/XFire Switch Card at the default mode (x16). Step 3. For the proper installation procedures, please refer to below PCI Express.../ 7 OS, and is not available with Windows® XP OS. Install one compatible PCI Express graphics card to the correspondent connector on the PCI Express graphics card on your system for ATITM Hybrid CrossFireXTM. Enter "Advanced" screen, and enter "Chipset Settings". ...

User Manual
Page 33
... SATAII or SATA hard disk for internal SATAII_1 SATAII_2 storage devices. The current eSATAII interface allows up to support eSATAII device. Serial ATAII Connectors (SATAII_1: see p.12, No. 17) (SATAII_2: see p.12, No. 18) (SATAII_3: see p.12, No. 20) (SATAII_4: see p.12, No. 19) (... FLOPPY1 the red-striped side to the instruction of your IDE device vendor for external SATAII function. 2.9 Onboard Headers and Connectors Onboard headers and connectors are NOT jumpers. Please read "eSATAII Interface Introduction" on page 43 for internal storage device or be used for details ...
... SATAII or SATA hard disk for internal SATAII_1 SATAII_2 storage devices. The current eSATAII interface allows up to support eSATAII device. Serial ATAII Connectors (SATAII_1: see p.12, No. 17) (SATAII_2: see p.12, No. 18) (SATAII_3: see p.12, No. 20) (SATAII_4: see p.12, No. 19) (... FLOPPY1 the red-striped side to the instruction of your IDE device vendor for external SATAII function. 2.9 Onboard Headers and Connectors Onboard headers and connectors are NOT jumpers. Please read "eSATAII Interface Introduction" on page 43 for internal storage device or be used for details ...

User Manual
Page 34
... three USB 2.0 headers on this motherboard. Serial ATA (SATA) Data Cable (Optional) Serial ATA (SATA) Power Cable (Optional) connect to the SATA HDD power connector connect to the power supply USB 2.0 Headers (9-pin USB10_11) (see p.12 No. 27) (9-pin USB8_9) (see p.12 No. 29) (9-pin USB6_7) (...GND P+8 P-8 USB_PWR USB_PWR P-7 P+7 GND DUMMY 1 GND P+6 P-6 USB_PWR Infrared Module Header (5-pin IR1) (see p.12 No. 24) IRTX +5V DUMMY 1 GND IRRX Internal Audio Connectors (4-pin CD1) (CD1: see p.12 No. 34) CD1 CD-L GND GND CD-R 34 Either end of the SATA data cable can be connected to the...
... three USB 2.0 headers on this motherboard. Serial ATA (SATA) Data Cable (Optional) Serial ATA (SATA) Power Cable (Optional) connect to the SATA HDD power connector connect to the power supply USB 2.0 Headers (9-pin USB10_11) (see p.12 No. 27) (9-pin USB8_9) (see p.12 No. 29) (9-pin USB6_7) (...GND P+8 P-8 USB_PWR USB_PWR P-7 P+7 GND DUMMY 1 GND P+6 P-6 USB_PWR Infrared Module Header (5-pin IR1) (see p.12 No. 24) IRTX +5V DUMMY 1 GND IRRX Internal Audio Connectors (4-pin CD1) (CD1: see p.12 No. 34) CD1 CD-L GND GND CD-R 34 Either end of the SATA data cable can be connected to the...

User Manual
Page 35
... front mic, please deselect "Mute" icon in our manual and chassis manual to [Enabled]. F. For Windows® XP / XP 64-bit OS: Click "Audio I/O", select "Connector Settings" , choose "Disable front panel jack detection", and save the change by clicking "OK".
... front mic, please deselect "Mute" icon in our manual and chassis manual to [Enabled]. F. For Windows® XP / XP 64-bit OS: Click "Audio I/O", select "Connector Settings" , choose "Disable front panel jack detection", and save the change by clicking "OK".

User Manual
Page 36
... the black wire to the ground pin. Chassis Speaker Header (4-pin SPEAKER 1) (see p.12 No. 21) 1 SPEAKER DUMMY DUMMY +5V Chassis, NB and Power Fan Connectors (3-pin CHA_FAN1) (see p.12 No. 30) GND +12V CHA_FAN_SPEED (3-pin NB_FAN1) (see p.12 No. 1) 20-Pin ATX Power Supply Installation 1 13 4 8 1... connect it can work if you adopt a traditional 20-pin ATX power supply. Though this motherboard provides 24-pin ATX power connector, 12 24 it to this connector. 1 13 Though this motherboard provides 4-Pin CPU fan (Quiet Fan) support, the 3-Pin CPU fan still can still work...
... the black wire to the ground pin. Chassis Speaker Header (4-pin SPEAKER 1) (see p.12 No. 21) 1 SPEAKER DUMMY DUMMY +5V Chassis, NB and Power Fan Connectors (3-pin CHA_FAN1) (see p.12 No. 30) GND +12V CHA_FAN_SPEED (3-pin NB_FAN1) (see p.12 No. 1) 20-Pin ATX Power Supply Installation 1 13 4 8 1... connect it can work if you adopt a traditional 20-pin ATX power supply. Though this motherboard provides 24-pin ATX power connector, 12 24 it to this connector. 1 13 Though this motherboard provides 4-Pin CPU fan (Quiet Fan) support, the 3-Pin CPU fan still can still work...

User Manual
Page 37
...VGA card, allows the system to this header. 37 Though this motherboard provides 8-pin ATX 12V power connector, it with Pin 1 and Pin 5. 4 8 4-Pin ATX 12V Power Supply Installation 1 5 SLI/XFIRE Power Connector (4-pin SLI/XFIRE_PWR1) (see p.12 No. 35) RXTPAM_0 GND RXTPBM_0 +12V GND 1 +12V ... graphics cards are plugged to this motherboard at the same time. This COM1 header supports a serial port module. Please connect the HDMI_SPDIF connector of HDMI VGA card to connect HDMI Digital TV/ projector/LCD devices. This IEEE 1394 header can still work if you adopt a traditional...
...VGA card, allows the system to this header. 37 Though this motherboard provides 8-pin ATX 12V power connector, it with Pin 1 and Pin 5. 4 8 4-Pin ATX 12V Power Supply Installation 1 5 SLI/XFIRE Power Connector (4-pin SLI/XFIRE_PWR1) (see p.12 No. 35) RXTPAM_0 GND RXTPBM_0 +12V GND 1 +12V ... graphics cards are plugged to this motherboard at the same time. This COM1 header supports a serial port module. Please connect the HDMI_SPDIF connector of HDMI VGA card to connect HDMI Digital TV/ projector/LCD devices. This IEEE 1394 header can still work if you adopt a traditional...

User Manual
Page 38
Then connect the white end (B or C) of HDMI_SPDIF cable to the HDMI_SPDIF connector of HDMI_SPDIF cable to the HDMI_SPDIF header on the motherboard. white end (3-pin) SPDIFOUT GND blue black 38 white end (2-pin) SPDIFOUT GND blue black C. A. black end +5V SPDIFOUT GND blue black B. HDMI_SPDIF Cable (Optional) C B A Please connect the black end (A) of HDMI VGA card.
Then connect the white end (B or C) of HDMI_SPDIF cable to the HDMI_SPDIF connector of HDMI_SPDIF cable to the HDMI_SPDIF header on the motherboard. white end (3-pin) SPDIFOUT GND blue black 38 white end (2-pin) SPDIFOUT GND blue black C. A. black end +5V SPDIFOUT GND blue black B. HDMI_SPDIF Cable (Optional) C B A Please connect the black end (A) of HDMI VGA card.

User Manual
Page 39
... HDMI Digital TV/projector/ LCD devices. To use HDMI function on page 18. For the proper installation of HDMI_SPDIF header and HDMI_SPDIF cable connectors, please refer to this motherboard, please carefully follow the below steps. •Step 1. For the pin definition of HDMI VGA card, ...Otherwise, the motherboard and the VGA card may cause permanent damage to page 37. Step 5. Install HDMI VGA card driver to the wrong connector of HDMI_SPDIF connectors on HDMI VGA card to HDMI device, such as a digital television (DTV). Connect the white end (B or C) of HDMI_SPDIF cable to...
... HDMI Digital TV/projector/ LCD devices. To use HDMI function on page 18. For the proper installation of HDMI_SPDIF header and HDMI_SPDIF cable connectors, please refer to this motherboard, please carefully follow the below steps. •Step 1. For the pin definition of HDMI VGA card, ...Otherwise, the motherboard and the VGA card may cause permanent damage to page 37. Step 5. Install HDMI VGA card driver to the wrong connector of HDMI_SPDIF connectors on HDMI VGA card to HDMI device, such as a digital television (DTV). Connect the white end (B or C) of HDMI_SPDIF cable to...

User Manual
Page 42
see p.12 No.23) and the eSATAII connector (eSATAII_TOP; Connect one end of the eSATAII device cable to eSATAII device Connect the other end of the eSATAII device cable to connect eSATAII device ... the eSATAII port of the I/O shield. SATAII_6 eSATAII_TOP 1. Use the eSATAII device cable to eSATAII port of the I /O shield 42 How to connect the SATAII connector (SATAII_6; In order to enable the eSATAII port of the I /O shield, you need to install eSATAII? Connect the SATA data Cable to the SATAII...
see p.12 No.23) and the eSATAII connector (eSATAII_TOP; Connect one end of the eSATAII device cable to eSATAII device Connect the other end of the eSATAII device cable to connect eSATAII device ... the eSATAII port of the I/O shield. SATAII_6 eSATAII_TOP 1. Use the eSATAII device cable to eSATAII port of the I /O shield 42 How to connect the SATAII connector (SATAII_6; In order to enable the eSATAII port of the I /O shield, you need to install eSATAII? Connect the SATA data Cable to the SATAII...

User Manual
Page 44
... as Hot Plug. If SATA / SATAII HDDs are NOT set for RAID configuration, it is called "Hot Swap" for the action to the motherboard's SATAII connector. 2 . 1 3 Serial ATA (SATA) / Serial ATAII (SATAII) Hard Disks Installation This motherboard adopts AMD SB750 south bridge chipset that it cannot perform Hot Plug if the...
... as Hot Plug. If SATA / SATAII HDDs are NOT set for RAID configuration, it is called "Hot Swap" for the action to the motherboard's SATAII connector. 2 . 1 3 Serial ATA (SATA) / Serial ATAII (SATAII) Hard Disks Installation This motherboard adopts AMD SB750 south bridge chipset that it cannot perform Hot Plug if the...
