User Manual
Page 3
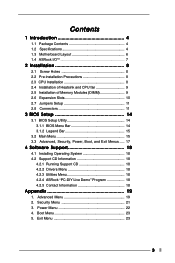
Contents 1 Introduction 4 1.1 Package Contents 4 1.2 Specifications 4 1.3 Motherboard Layout 6 1.4 ASRock I/O 7 TM ...2 Installation 8 2.1 Screw Holes 8 2.2 Pre-installation Precautions 8 2.3 CPU Installation 8 2.4 Installation of Heatsink and CPU fan 9 2.5 Installation of Memory Modules (DIMM 9 2.6 Expansion Slots 10 2.7 Jumpers Setup 11 2.8 Connectors 11 3 BIOS Setup 14 3.1 BIOS Setup Utility 14 3.1.1 BIOS Menu Bar 14 3.1.2 Legend Bar 15 3.2 Main Menu 15 3.3 Advanced, Security...
Contents 1 Introduction 4 1.1 Package Contents 4 1.2 Specifications 4 1.3 Motherboard Layout 6 1.4 ASRock I/O 7 TM ...2 Installation 8 2.1 Screw Holes 8 2.2 Pre-installation Precautions 8 2.3 CPU Installation 8 2.4 Installation of Heatsink and CPU fan 9 2.5 Installation of Memory Modules (DIMM 9 2.6 Expansion Slots 10 2.7 Jumpers Setup 11 2.8 Connectors 11 3 BIOS Setup 14 3.1 BIOS Setup Utility 14 3.1.1 BIOS Menu Bar 14 3.1.2 Legend Bar 15 3.2 Main Menu 15 3.3 Advanced, Security...
User Manual
Page 4
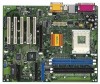
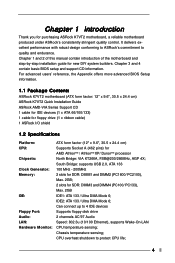
... advanced BIOS Setup information. 1.1 Package Contents ASRock K7VT2 motherboard (ATX form factor: 12" x 9.6", 30.5 x 24.4 cm) ASRock K7VT2 Quick Installation Guide ASRock AMD-VIA Series Support CD 1 cable for IDE devices (1 x ATA 66/100/133) 1 cable for floppy drive (1 x ribbon cable) 1 ASRock I/O ... of this manual contain introduction of the motherboard and step-by-step installation guide for purchasing ASRock K7VT2 motherboard, a reliable motherboard produced under ASRock's consistently stringent quality control. Chassis temperature sensing; CPU overheat shutdown to protect CPU life; ...
... advanced BIOS Setup information. 1.1 Package Contents ASRock K7VT2 motherboard (ATX form factor: 12" x 9.6", 30.5 x 24.4 cm) ASRock K7VT2 Quick Installation Guide ASRock AMD-VIA Series Support CD 1 cable for IDE devices (1 x ATA 66/100/133) 1 cable for floppy drive (1 x ribbon cable) 1 ASRock I/O ... of this manual contain introduction of the motherboard and step-by-step installation guide for purchasing ASRock K7VT2 motherboard, a reliable motherboard produced under ASRock's consistently stringent quality control. Chassis temperature sensing; CPU overheat shutdown to protect CPU life; ...
User Manual
Page 5
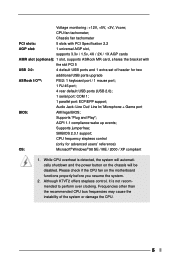
... 1. Supports "Plug and Play"; CPU fan tachometer; Audio Jack: Line Out/ Line In/ Microphone + Game port BIOS: AMI legal BIOS; Supports jumperfree; Although K7VT2 offers stepless control, it is detected, the system will automatically shutdown and the power button on the motherboard functions properly before...2.2 AGP slot: 1 universal AGP slot, supports 3.3v / 1.5v, 4X / 2X / 1X AGP cards AMR slot (optional): 1 slot, supports ASRock MR card, shares the bracket with the slot PCI 5 USB 2.0: 4 default USB ports and 1 extra set of the system or damage the CPU. ...
... 1. Supports "Plug and Play"; CPU fan tachometer; Audio Jack: Line Out/ Line In/ Microphone + Game port BIOS: AMI legal BIOS; Supports jumperfree; Although K7VT2 offers stepless control, it is detected, the system will automatically shutdown and the power button on the motherboard functions properly before...2.2 AGP slot: 1 universal AGP slot, supports 3.3v / 1.5v, 4X / 2X / 1X AGP cards AMR slot (optional): 1 slot, supports ASRock MR card, shares the bracket with the slot PCI 5 USB 2.0: 4 default USB ports and 1 extra set of the system or damage the CPU. ...
User Manual
Page 14
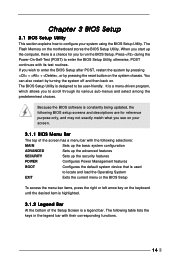
...otherwise, POST continues with their corresponding functions. 14 You can also restart by pressing the reset button on the system chassis. Chapter 3 BIOS Setup 3.1 BIOS Setup Utility This section explains how to be user-friendly. It is a menu-driven program, which allows you see on the keyboard until...up the basic system configuration ADVANCED Sets up the advanced features SECURITY Sets up the computer, there is designed to configure your screen. 3.1.1 BIOS Menu Bar The top of the Setup Screen is highlighted. 3.1.2 Legend Bar At the bottom of the screen has a menu bar with the...
...otherwise, POST continues with their corresponding functions. 14 You can also restart by pressing the reset button on the system chassis. Chapter 3 BIOS Setup 3.1 BIOS Setup Utility This section explains how to be user-friendly. It is a menu-driven program, which allows you see on the keyboard until...up the basic system configuration ADVANCED Sets up the advanced features SECURITY Sets up the computer, there is designed to configure your screen. 3.1.1 BIOS Menu Bar The top of the Setup Screen is highlighted. 3.1.2 Legend Bar At the bottom of the screen has a menu bar with the...
User Manual
Page 15
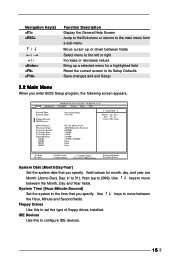
... returns to the main menu from a sub-menu Move cursor up to the time that you enter BIOS Setup program, the following screen appears. Main Advanced System Date System Time Floppy Drives IDE Devices BIOS Version Processor Type Processor Speed L1 Cache Size L2 Cache Size Total Memory DDR1 DDR2 SDR1 SDR2... Month: (Jan to Dec), Day: (1 to 31), Year: (up or down between the Month, Day and Year fields. Dec Day: 01 - 31 Year: 1980 - 2099 K7VT2 BIOS P1.00 AMD Duron(tm) Processor 800MHz 128 KB 64 KB 128 MB 128 MB / 266MHz None None None F1:Help Esc:Exit :Select Item...
... returns to the main menu from a sub-menu Move cursor up to the time that you enter BIOS Setup program, the following screen appears. Main Advanced System Date System Time Floppy Drives IDE Devices BIOS Version Processor Type Processor Speed L1 Cache Size L2 Cache Size Total Memory DDR1 DDR2 SDR1 SDR2... Month: (Jan to Dec), Day: (1 to 31), Year: (up or down between the Month, Day and Year fields. Dec Day: 01 - 31 Year: 1980 - 2099 K7VT2 BIOS P1.00 AMD Duron(tm) Processor 800MHz 128 KB 64 KB 128 MB 128 MB / 266MHz None None None F1:Help Esc:Exit :Select Item...

User Manual
Page 16
... you have the correct configuration information supplied by the drive manufacturer. After entering the hard disk information into BIOS, use a disk utility, such as MO. 16 This is successful, the BIOS Setup automatically fills in which the hard disk drive field will display the size for the hard disk drive...disk drive parameters. If the autodetection fails, it may detect incorrect parameters. If the hard disk was already formatted on an older system, the BIOS Setup may due to manually enter the number of the Primary IDE hard disk drives to active. [CD/DVD]: This is used for IDE CD...
... you have the correct configuration information supplied by the drive manufacturer. After entering the hard disk information into BIOS, use a disk utility, such as MO. 16 This is successful, the BIOS Setup automatically fills in which the hard disk drive field will display the size for the hard disk drive...disk drive parameters. If the autodetection fails, it may detect incorrect parameters. If the hard disk was already formatted on an older system, the BIOS Setup may due to manually enter the number of the Primary IDE hard disk drives to active. [CD/DVD]: This is used for IDE CD...
User Manual
Page 17
... the hard disk timing. 32 Bit Transfer Mode It allows user to enable 32-bit access to [On] will enhance hard disk performance by the BIOS based on the drive information you entered. Refer to the drive documentation to determine the correct values. Ultra DMA Mode Ultra DMA capability improves transfer...
... the hard disk timing. 32 Bit Transfer Mode It allows user to enable 32-bit access to [On] will enhance hard disk performance by the BIOS based on the drive information you entered. Refer to the drive documentation to determine the correct values. Ultra DMA Mode Ultra DMA capability improves transfer...
User Manual
Page 19
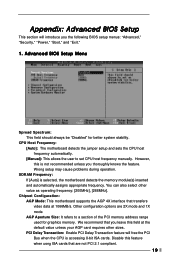
...AGP card requires other value as operating frequency: [200MHz], [266MHz]. PCI Delay Transaction: Enable PCI Delay Transaction feature will introduce you the following BIOS setup menus: "Advanced," "Security," "Power," "Boot," and "Exit." 1. Wrong setup may cause problems during operation. Other configuration options are ... However, this is not recommended unless you leave this feature when usng ISA cards that you thoroughly knows the feature. Advanced BIOS Setup Menu Spread Spectrum: This field should always be "Disabled" for graphics memory. AGP Aperture Size: It refers to set ...
...AGP card requires other value as operating frequency: [200MHz], [266MHz]. PCI Delay Transaction: Enable PCI Delay Transaction feature will introduce you the following BIOS setup menus: "Advanced," "Security," "Power," "Boot," and "Exit." 1. Wrong setup may cause problems during operation. Other configuration options are ... However, this is not recommended unless you leave this feature when usng ISA cards that you thoroughly knows the feature. Advanced BIOS Setup Menu Spread Spectrum: This field should always be "Disabled" for graphics memory. AGP Aperture Size: It refers to set ...
User Manual
Page 21
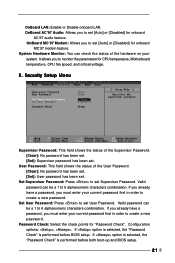
... can check the status of the hardware on your system. If option is selected, the "Password Check" is performed before both boot-up and BIOS setup. 21 OnBoard MC'97 Modem: Allows you to 6 alphanumeric characters combination. System Hardware Monitor: You can be a 1 to set [Auto...[Clear]: No password has been set. [Set]: Supervisor password has been set . If option is selected, the "Password Check" is performed before BIOS setup. Security Setup Menu Supervisor Password: This field shows the status of the User Password. [Clear]: No password has been set. [Set]: User...
... can check the status of the hardware on your system. If option is selected, the "Password Check" is performed before both boot-up and BIOS setup. 21 OnBoard MC'97 Modem: Allows you to 6 alphanumeric characters combination. System Hardware Monitor: You can be a 1 to set [Auto...[Clear]: No password has been set. [Set]: Supervisor password has been set . If option is selected, the "Password Check" is performed before BIOS setup. Security Setup Menu Supervisor Password: This field shows the status of the User Password. [Clear]: No password has been set. [Set]: User...

User Manual
Page 24
.... 24 Exit Saving Changes: After you press , it will save the current settings and exit the BIOS SETUP Utility. If you press , you enter the submenu, the message "Quit without saving changes" will exit the BIOS Setup Utility without making any changes to the settings. Exit Discarding Changes: After you will appear.
.... 24 Exit Saving Changes: After you press , it will save the current settings and exit the BIOS SETUP Utility. If you press , you enter the submenu, the message "Quit without saving changes" will exit the BIOS Setup Utility without making any changes to the settings. Exit Discarding Changes: After you will appear.


