
User Manual
Page 1
K7VM3 User Manual Version 1.0 Published April 2004 Copyright©2004 ASRock INC. All rights reserved. 1
K7VM3 User Manual Version 1.0 Published April 2004 Copyright©2004 ASRock INC. All rights reserved. 1
User Manual
Page 2
...not cause harmful interference, and (2) this device must accept any interference received, including interference that may appear in the manual or product. ASRock assumes no event shall ASRock, its directors, officers, employees, or agents be registered trademarks or copyrights of their respective companies, and are furnished ... loss of profits, loss of business, loss of data, interruption of business and the like), even if ASRock has been advised of the possibility of such damages arising from any defect or error in this manual, ASRock does not provide warranty of the FCC Rules.
...not cause harmful interference, and (2) this device must accept any interference received, including interference that may appear in the manual or product. ASRock assumes no event shall ASRock, its directors, officers, employees, or agents be registered trademarks or copyrights of their respective companies, and are furnished ... loss of profits, loss of business, loss of data, interruption of business and the like), even if ASRock has been advised of the possibility of such damages arising from any defect or error in this manual, ASRock does not provide warranty of the FCC Rules.
User Manual
Page 4
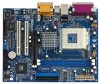
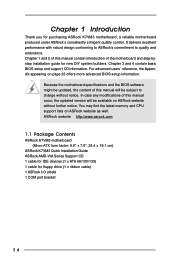
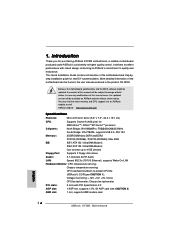
... devices (1 x ATA 66/100/133) 1 cable for purchasing ASRock K7VM3 motherboard, a reliable motherboard produced under ASRock's consistently stringent quality control. You may find the latest memory and CPU support lists on page 23 offers more advanced BIOS setup information. In case any modifications of this manual will be subject to quality and endurance. Chapter...
... devices (1 x ATA 66/100/133) 1 cable for purchasing ASRock K7VM3 motherboard, a reliable motherboard produced under ASRock's consistently stringent quality control. You may find the latest memory and CPU support lists on page 23 offers more advanced BIOS setup information. In case any modifications of this manual will be subject to quality and endurance. Chapter...

User Manual
Page 10
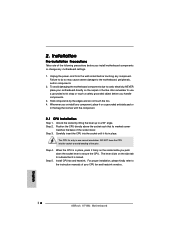
... heatsink to dissipate heat. Step 3. For proper installation, please kindly refer to a 90o angle. Unlock the socket by lifting the lever up to the instruction manuals of CPU Fan and Heatsink This motherboard adopts 462-pin CPU socket to the CPU_FAN connector (CPU_FAN1, see page 7, No. 3). 2.3 CPU Installation Step 1. Position the...
... heatsink to dissipate heat. Step 3. For proper installation, please kindly refer to a 90o angle. Unlock the socket by lifting the lever up to the instruction manuals of CPU Fan and Heatsink This motherboard adopts 462-pin CPU socket to the CPU_FAN connector (CPU_FAN1, see page 7, No. 3). 2.3 CPU Installation Step 1. Position the...
User Manual
Page 20
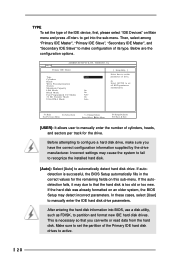
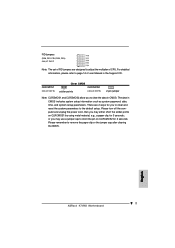
... "Primary IDE Master", "Primary IDE Slave", "Secondary IDE Master", and "Secondary IDE Slave" to get into BIOS, use a disk utility, such as FDISK, to manually enter the IDE hard disk drive parameters. F1:Help Esc:Previous Menu :Select Item +/-:Change Values Enter:Select Sub-Menu F9:Setup Defaults F10:Save... & Exit [USER]: It allows user to manually enter the number of the IDE device, first, please select "IDE Devices" on Main menu and press to make sure you can write or read...
... "Primary IDE Master", "Primary IDE Slave", "Secondary IDE Master", and "Secondary IDE Slave" to get into BIOS, use a disk utility, such as FDISK, to manually enter the IDE hard disk drive parameters. F1:Help Esc:Previous Menu :Select Item +/-:Change Values Enter:Select Sub-Menu F9:Setup Defaults F10:Save... & Exit [USER]: It allows user to manually enter the number of the IDE device, first, please select "IDE Devices" on Main menu and press to make sure you can write or read...
User Manual
Page 23
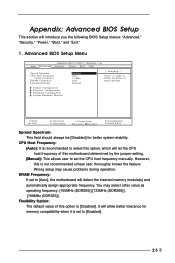
.... You may cause problems during operation. Flexibility Option: The default value of this motherboard determined by the jumper-setting. [Manual]: This allows user to set to [Enabled]. 23 Chipset Configuration Resource Configuration Peripheral Configuration System Hardware Monitor F1:Help Esc... should always be [Disabled] for memory compatibility when it is [Disabled]. DRAM Frequency: If set the CPU host frequency manually. Appendix: Advanced BIOS Setup This section will detect the inserted memory module(s) and automatically assign appropriate frequency. VERSION 3.31a Security...
.... You may cause problems during operation. Flexibility Option: The default value of this motherboard determined by the jumper-setting. [Manual]: This allows user to set to [Enabled]. 23 Chipset Configuration Resource Configuration Peripheral Configuration System Hardware Monitor F1:Help Esc... should always be [Disabled] for memory compatibility when it is [Disabled]. DRAM Frequency: If set the CPU host frequency manually. Appendix: Advanced BIOS Setup This section will detect the inserted memory module(s) and automatically assign appropriate frequency. VERSION 3.31a Security...
Quick Installation Guide
Page 4
... contains introduction of this manual occur, the updated version will be subject to quality and endurance. In case any modifications of the motherboard can be available on ASRock website as well. Can connect up to protect CPU life (ASRock U-COP)(see CAUTION 2) AMR slot: 1 slot, supports AMR modem card English 4 ASRock K7VM3 Motherboard Chassis fan...
... contains introduction of this manual occur, the updated version will be subject to quality and endurance. In case any modifications of the motherboard can be available on ASRock website as well. Can connect up to protect CPU life (ASRock U-COP)(see CAUTION 2) AMR slot: 1 slot, supports AMR modem card English 4 ASRock K7VM3 Motherboard Chassis fan...
Quick Installation Guide
Page 6
...touch a safety grounded object before touching any component, place it firmly on the carpet or the like. When the CPU is locked. English 6 ASRock K7VM3 Motherboard Failure to do not touch the ICs. 4. Step 3. DO NOT force the CPU into the socket until it is in one correct orientation...lever clicks on a grounded antistatic pad or in place. The CPU fits only in place, press it on the side tab to the instruction manuals of the socket lever. Unplug the power cord from the wall socket before you install motherboard components or change any motherboard settings. 1. Step 4. ...
...touch a safety grounded object before touching any component, place it firmly on the carpet or the like. When the CPU is locked. English 6 ASRock K7VM3 Motherboard Failure to do not touch the ICs. 4. Step 3. DO NOT force the CPU into the socket until it is in one correct orientation...lever clicks on a grounded antistatic pad or in place. The CPU fits only in place, press it on the side tab to the instruction manuals of the socket lever. Unplug the power cord from the wall socket before you install motherboard components or change any motherboard settings. 1. Step 4. ...
Quick Installation Guide
Page 9
..., e.g., a paper clip, for 3 seconds; There are designed to adjust the multiplier of CPU. English 9 ASRock K7VM3 Motherboard The data in CMOS. CLRCMOS1 (see p.2 item 13) Clear CMOS CLRCMOS2 solder points (see p.2 item 2) Note: The set of user Manual in the Support CD. or you may either short the solder points on CLRCMOS2 for...
..., e.g., a paper clip, for 3 seconds; There are designed to adjust the multiplier of CPU. English 9 ASRock K7VM3 Motherboard The data in CMOS. CLRCMOS1 (see p.2 item 13) Clear CMOS CLRCMOS2 solder points (see p.2 item 2) Note: The set of user Manual in the Support CD. or you may either short the solder points on CLRCMOS2 for...
Quick Installation Guide
Page 12
... in your CD-ROM drive. If you how to scroll through the following path: ..\ MPEGAV \ AVSEQ01.DAT 12 ASRock K7VM3 Motherboard English For the detailed information about BIOS Setup, please refer to the User Manual (PDF file) contained in the Support CD to enter BIOS Setup after POST, please restart the system by...
... in your CD-ROM drive. If you how to scroll through the following path: ..\ MPEGAV \ AVSEQ01.DAT 12 ASRock K7VM3 Motherboard English For the detailed information about BIOS Setup, please refer to the User Manual (PDF file) contained in the Support CD to enter BIOS Setup after POST, please restart the system by...
