
User Manual
Page 3
... 5. Contents 1 Introduction 4 1.1 Package Contents 4 1.2 Specifications 5 1.3 Motherboard Layout 7 1.4 ASRock I/OTM 8 2 Installation 9 2.1 Screw Holes 9 2.2 Pre-installation Precautions 9 2.3 CPU Installation 9 2.4 Installation of Heatsink and CPU fan 10 2.5 Installation of Memory Modules (DIMM 10 2.6 Expansion Slots 11 2.7 Jumpers Setup 11 2.8 Connectors 12 3 BIOS Setup 15 3.1 BIOS Setup Utility 15 3.1.1 BIOS Menu Bar 15 3.1.2 Legend Bar 15 3.2 Main Menu...
... 5. Contents 1 Introduction 4 1.1 Package Contents 4 1.2 Specifications 5 1.3 Motherboard Layout 7 1.4 ASRock I/OTM 8 2 Installation 9 2.1 Screw Holes 9 2.2 Pre-installation Precautions 9 2.3 CPU Installation 9 2.4 Installation of Heatsink and CPU fan 10 2.5 Installation of Memory Modules (DIMM 10 2.6 Expansion Slots 11 2.7 Jumpers Setup 11 2.8 Connectors 12 3 BIOS Setup 15 3.1 BIOS Setup Utility 15 3.1.1 BIOS Menu Bar 15 3.1.2 Legend Bar 15 3.2 Main Menu...
User Manual
Page 4
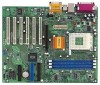
... step-by-step installation guide for new DIY system builders. Chapter 3 and 4 contain basic BIOS setup and support CD information. ASRock website http://www.asrock.com 1.1 Package Contents ASRock K7S8X motherboard (ATX form factor: 12" x 9.6", 30.5 x 24.4 cm) ASRock K7S8X Quick Installation Guide ASRock AMD-SiS Series Support CD 1 cable for IDE devices (1 x ATA 66/100/133) 1 cable...
... step-by-step installation guide for new DIY system builders. Chapter 3 and 4 contain basic BIOS setup and support CD information. ASRock website http://www.asrock.com 1.1 Package Contents ASRock K7S8X motherboard (ATX form factor: 12" x 9.6", 30.5 x 24.4 cm) ASRock K7S8X Quick Installation Guide ASRock AMD-SiS Series Support CD 1 cable for IDE devices (1 x ATA 66/100/133) 1 cable...

User Manual
Page 5
1.2 Specifications Platform: CPU: Chipsets: Clock Generator: Memory: IDE: Floppy Port: Audio: LAN: Hardware Monitor: PCI slots: AGP slot: USB 2.0: ASRock I/OTM: BIOS: OS: ATX form factor (12" x 9.6", 30.5 x 24.4 cm) Supports Socket A (462 pins) for 2 DDR DIMM slots, Max. 2GB; PC2700 for AMD AthlonTM / AthlonTM XP/ DuronTM ...
1.2 Specifications Platform: CPU: Chipsets: Clock Generator: Memory: IDE: Floppy Port: Audio: LAN: Hardware Monitor: PCI slots: AGP slot: USB 2.0: ASRock I/OTM: BIOS: OS: ATX form factor (12" x 9.6", 30.5 x 24.4 cm) Supports Socket A (462 pins) for 2 DDR DIMM slots, Max. 2GB; PC2700 for AMD AthlonTM / AthlonTM XP/ DuronTM ...
User Manual
Page 15
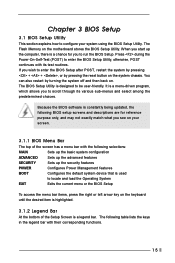
...for reference purpose only, and may not exactly match what you to locate and load the Operating System EXIT Exits the current menu or the BIOS Setup To access the menu bar items, press the right or left arrow key on the system chassis. You can also restart by pressing ... following table lists the keys in the legend bar with its various sub-menus and select among the predetermined choices. The BIOS Setup Utility is used to run the BIOS Setup. The following selections: MAIN Sets up the basic system configuration ADVANCED Sets up the advanced features SECURITY Sets up the...
...for reference purpose only, and may not exactly match what you to locate and load the Operating System EXIT Exits the current menu or the BIOS Setup To access the menu bar items, press the right or left arrow key on the system chassis. You can also restart by pressing ... following table lists the keys in the legend bar with its various sub-menus and select among the predetermined choices. The BIOS Setup Utility is used to run the BIOS Setup. The following selections: MAIN Sets up the basic system configuration ADVANCED Sets up the advanced features SECURITY Sets up the...
User Manual
Page 16
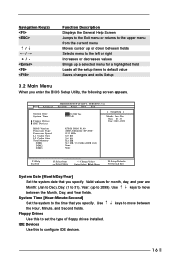
... time that you specify. IDE Devices Use this to move between the Month, Day, and Year fields. Dec Day: 01 - 31 Year: 1980 - 2099 K7S8X BIOS P1.00 AMD Athlon(tm) XP 2600+ 2133 MHz 128 KB 256 KB 512 MB 512 MB / 133 MHz (DDR 266) None None F1:Help.../Year] Set the system date that you specify. Use keys to configure IDE devices. 16 Main Advanced System Date System Time Floppy Drives IDE Devices BIOS Version Processor Type Processor Speed L1 Cache Size L2 Cache Size Total Memory DDR1 DDR2 DDR3 AMIBIOS SETUP UTILITY - Navigation Key(s) / / + / Function Description ...
... time that you specify. IDE Devices Use this to move between the Month, Day, and Year fields. Dec Day: 01 - 31 Year: 1980 - 2099 K7S8X BIOS P1.00 AMD Athlon(tm) XP 2600+ 2133 MHz 128 KB 256 KB 512 MB 512 MB / 133 MHz (DDR 266) None None F1:Help.../Year] Set the system date that you specify. Use keys to configure IDE devices. 16 Main Advanced System Date System Time Floppy Drives IDE Devices BIOS Version Processor Type Processor Speed L1 Cache Size L2 Cache Size Total Memory DDR1 DDR2 DDR3 AMIBIOS SETUP UTILITY - Navigation Key(s) / / + / Function Description ...
User Manual
Page 17
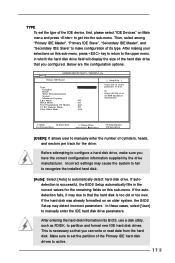
...disk drive that you can write or read data from the hard disk. After making your selections on Main menu and press to get into BIOS, use a disk utility, such as FDISK, to make sure you have the correct configuration information supplied by the drive manufacturer. Below are...drives to configure a hard disk drive, make configuration of cylinders, heads, and sectors per track for the remaining fields on an older system, the BIOS Setup may cause the system to fail to recognize the installed hard disk. [Auto]: Select [Auto] to that you configured. If the autodetection fails...
...disk drive that you can write or read data from the hard disk. After making your selections on Main menu and press to get into BIOS, use a disk utility, such as FDISK, to make sure you have the correct configuration information supplied by the drive manufacturer. Below are...drives to configure a hard disk drive, make configuration of cylinders, heads, and sectors per track for the remaining fields on an older system, the BIOS Setup may cause the system to fail to recognize the installed hard disk. [Auto]: Select [Auto] to that you configured. If the autodetection fails...
User Manual
Page 18
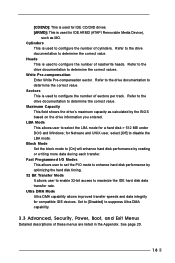
.../DVD]: This is used for IDE CD/DVD drives. [ARMD]: This is used for IDE ARMD (ATAPI Removable Media Device), such as calculated by the BIOS based on the drive information you entered. Write Pre-compensation Enter Write Pre-compensation sector. Block Mode Set the block mode to [On] will enhance...
.../DVD]: This is used for IDE CD/DVD drives. [ARMD]: This is used for IDE ARMD (ATAPI Removable Media Device), such as calculated by the BIOS based on the drive information you entered. Write Pre-compensation Enter Write Pre-compensation sector. Block Mode Set the block mode to [On] will enhance...
User Manual
Page 20
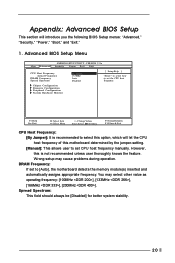
...It is not recommended unless user thoroughly knows the feature. DRAM Frequency: If set to set CPU host frequency manually. Appendix: Advanced BIOS Setup This section will let the CPU host frequency of this motherboard determined by the jumper-setting. [Manual]: This allows user to ... automatically assigns appropriate frequency. Wrong setup may select other value as operating frequency: [100MHz ], [133MHz ], [166MHz ], [200MHz ]. Advanced BIOS Setup Menu Main Advanced AMIBIOS SETUP UTILITY - However, this is recommended to select this option, which will introduce you the following...
...It is not recommended unless user thoroughly knows the feature. DRAM Frequency: If set to set CPU host frequency manually. Appendix: Advanced BIOS Setup This section will let the CPU host frequency of this motherboard determined by the jumper-setting. [Manual]: This allows user to ... automatically assigns appropriate frequency. Wrong setup may select other value as operating frequency: [100MHz ], [133MHz ], [166MHz ], [200MHz ]. Advanced BIOS Setup Menu Main Advanced AMIBIOS SETUP UTILITY - However, this is recommended to select this option, which will introduce you the following...
User Manual
Page 24
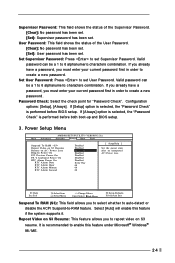
... . Set User Password: Press to create a new p assword. Password Check: Select the check point for "Password Check". It is performed before both boot-up and BIOS setup. 3. If you already have a password, you to select whether to auto-detect or disable the ACPI Suspend-to 6 alphanumeric characters combination. If [Always] option...
... . Set User Password: Press to create a new p assword. Password Check: Select the check point for "Password Check". It is performed before both boot-up and BIOS setup. 3. If you already have a password, you to select whether to auto-detect or disable the ACPI Suspend-to 6 alphanumeric characters combination. If [Always] option...
User Manual
Page 26
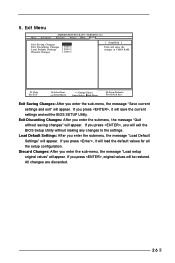
... and saves the changes in CMOS RAM. If you press , you enter the sub-menu, the message "Save current settings and exit" will exit the BIOS Setup Utility without saving changes" will be restored. Exit Menu Main Advanced AMIBIOS SETUP UTILITY - F1:Help Esc:Exit :Select Item :Select Menu +/-:Change Values... you enter the sub-menu, the message "Load setup original values" will appear. If you press , it will save the current settings and exit the BIOS SETUP Utility. If you press , it will load the default values for all the setup configuration. 5.
... and saves the changes in CMOS RAM. If you press , you enter the sub-menu, the message "Save current settings and exit" will exit the BIOS Setup Utility without saving changes" will be restored. Exit Menu Main Advanced AMIBIOS SETUP UTILITY - F1:Help Esc:Exit :Select Item :Select Menu +/-:Change Values... you enter the sub-menu, the message "Load setup original values" will appear. If you press , it will save the current settings and exit the BIOS SETUP Utility. If you press , it will load the default values for all the setup configuration. 5.


