RAID Installation Guide
Page 1
NVIDIA Windows RAID Installation Guide 11 2.1 NVIDIA Windows RAID Installation Guide for Windows XP / XP 64-bit Users 11 2.2 NVIDIA Windows RAID Installation Guide for Windows Vista / Vista 64-bit Users 21 1 NVIDIA RAID Installation Guide 1. NVIDIA BIOS RAID Installation Guide 2 1.1 Introduction to RAID 2 1.2 RAID Configurations Precautions 3 1.3 Installing Windows XP / XP 64-bit / Vista / Vista 64-bit With RAID Functions 5 1.3.1 Installing Windows XP / XP 64-bit With RAID Functions 5 1.3.2 Installing Windows Vista / Vista 64-bit With RAID Functions 7 1.4 Create Disk Array 8 2.
NVIDIA Windows RAID Installation Guide 11 2.1 NVIDIA Windows RAID Installation Guide for Windows XP / XP 64-bit Users 11 2.2 NVIDIA Windows RAID Installation Guide for Windows Vista / Vista 64-bit Users 21 1 NVIDIA RAID Installation Guide 1. NVIDIA BIOS RAID Installation Guide 2 1.1 Introduction to RAID 2 1.2 RAID Configurations Precautions 3 1.3 Installing Windows XP / XP 64-bit / Vista / Vista 64-bit With RAID Functions 5 1.3.1 Installing Windows XP / XP 64-bit With RAID Functions 5 1.3.2 Installing Windows Vista / Vista 64-bit With RAID Functions 7 1.4 Create Disk Array 8 2.
RAID Installation Guide
Page 2
... disk alone while the two hard disks perform the same work as it does not provide any HDDs of using NVIDIA RAID Utility under BIOS environment. It provides data protection and increases fault tolerance to configure RAID. Please refer to the RAID functions your motherboard according to the ... drive if one drive to read and write data in our support CD or "Quick Installation Guide", you install. NVIDIA BIOS RAID Installation Guide NVIDIA BIOS RAID Installation Guide is called data mirroring that copies and maintains an identical image of Independent Disks", which is called data ...
... disk alone while the two hard disks perform the same work as it does not provide any HDDs of using NVIDIA RAID Utility under BIOS environment. It provides data protection and increases fault tolerance to configure RAID. Please refer to the RAID functions your motherboard according to the ... drive if one drive to read and write data in our support CD or "Quick Installation Guide", you install. NVIDIA BIOS RAID Installation Guide NVIDIA BIOS RAID Installation Guide is called data mirroring that copies and maintains an identical image of Independent Disks", which is called data ...

RAID Installation Guide
Page 5
... Please insert a floppy diskette into your optical drive to boot your system. (There are two ASRock Support CD in the motherboard gift box pack, please choose the one for WindowsXP64 5. A. STEP 1: Set Up BIOS. Insert the ASRock Support CD into the floppy drive. Then you will start to format the floppy diskette and...
... Please insert a floppy diskette into your optical drive to boot your system. (There are two ASRock Support CD in the motherboard gift box pack, please choose the one for WindowsXP64 5. A. STEP 1: Set Up BIOS. Insert the ASRock Support CD into the floppy drive. Then you will start to format the floppy diskette and...
RAID Installation Guide
Page 6
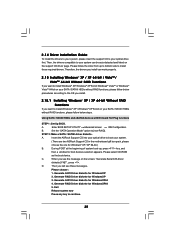
...first RAID driver and then specify again for Windows® XP / XP 64-bit in RAID mode. (There are as below: A. Please refer to the BIOS RAID installation guide in the following path in the Support CD: .. \ RAID Installation Guide 6 NVIDIA nForce Storage Controller (required) Please select A and B...(create, convert, delete, or rebuild) RAID functions on SATA / SATAII HDDs, you need to set up "SATA Operation Mode" to [RAID] in BIOS first. After reading the floppy disk, the drivers will be presented. STEP 4: Use "RAID Installation Guide" to set the RAID configuration by using the ...
...first RAID driver and then specify again for Windows® XP / XP 64-bit in RAID mode. (There are as below: A. Please refer to the BIOS RAID installation guide in the following path in the Support CD: .. \ RAID Installation Guide 6 NVIDIA nForce Storage Controller (required) Please select A and B...(create, convert, delete, or rebuild) RAID functions on SATA / SATAII HDDs, you need to set up "SATA Operation Mode" to [RAID] in BIOS first. After reading the floppy disk, the drivers will be presented. STEP 4: Use "RAID Installation Guide" to set the RAID configuration by using the ...
RAID Installation Guide
Page 7
... 64-bit With RAID Functions If you want to install Windows? Please refer to continue the installation. " page, please insert the ASRock Support CD into the optical drive again to the BIOS RAID installation guide part of the document in the following path in our Support CD: (There are two... ASRock Support CD in the Support CD: .. \ RAID Installation Guide STEP 3: Install Windows® VistaTM / Windows® VistaTM 64-bit OS ...
... 64-bit With RAID Functions If you want to install Windows? Please refer to continue the installation. " page, please insert the ASRock Support CD into the optical drive again to the BIOS RAID installation guide part of the document in the following path in our Support CD: (There are two... ASRock Support CD in the Support CD: .. \ RAID Installation Guide STEP 3: Install Windows® VistaTM / Windows® VistaTM 64-bit OS ...
RAID Installation Guide
Page 8
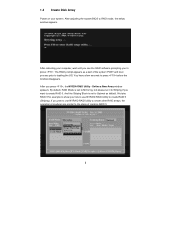
After adjusting the system BIOS to press before the window disappears. By default, RAID Mode is set it to Striping if you to press . After rebooting your system. Define a New ...
After adjusting the system BIOS to press before the window disappears. By default, RAID Mode is set it to Striping if you to press . After rebooting your system. Define a New ...
RAID Installation Guide
Page 9
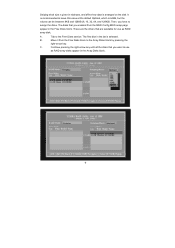
... disk, A. Striping block size is given in the list is selected. Then, you want to the Free Disks section. Move it from the RAID Config BIOS setup page appear in the Array Disks block. 9 C.
... disk, A. Striping block size is given in the list is selected. Then, you want to the Free Disks section. Move it from the RAID Config BIOS setup page appear in the Array Disks block. 9 C.
RAID Installation Guide
Page 12
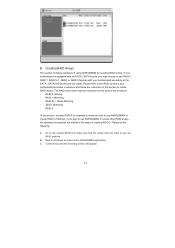
... are RAID enabled. The RAID items which may choose to use NVRAIDMAN to create other RAID arrays, the operation procedures are similar to the system BIOS and make sure that the drives that you install. Please do the following screen will appear. 12 Go to the steps of using NVRAIDMAN for...
... are RAID enabled. The RAID items which may choose to use NVRAIDMAN to create other RAID arrays, the operation procedures are similar to the system BIOS and make sure that the drives that you install. Please do the following screen will appear. 12 Go to the steps of using NVRAIDMAN for...

User Manual
Page 4
Software Support 60 4.1 Install Operating System 60 4.2 Support CD Information 60 4.2.1 Running Support CD 60 4.2.2 Drivers Menu 60 4.2.3 Utilities Menu 60 4.2.4 Contact Information 60 4 BIOS SETUP UTILITY 4 0 3.1 Introduction 40 3.1.1 BIOS Menu Bar 40 3.1.2 Navigation Keys 41 3.2 Main Screen 41 3.3 Advanced Screen 42 3.3.1 CPU Configuration 43 3.3.2 Chipset Configuration 47 3.3.3 ACPI Configuration 50 3.3.4 IDE Configuration...
Software Support 60 4.1 Install Operating System 60 4.2 Support CD Information 60 4.2.1 Running Support CD 60 4.2.2 Drivers Menu 60 4.2.3 Utilities Menu 60 4.2.4 Contact Information 60 4 BIOS SETUP UTILITY 4 0 3.1 Introduction 40 3.1.1 BIOS Menu Bar 40 3.1.2 Navigation Keys 41 3.2 Main Screen 41 3.3 Advanced Screen 42 3.3.1 CPU Configuration 43 3.3.2 Chipset Configuration 47 3.3.3 ACPI Configuration 50 3.3.4 IDE Configuration...
User Manual
Page 5
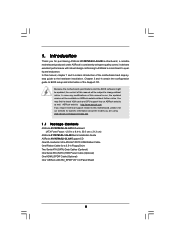
... for purchasing ASRock K10N78hSLI-GLAN motherboard, a reliable motherboard produced under ASRock's consistently stringent quality control. In this manual, chapter 1 and 2 contain introduction of the Support CD. 1. Introduction Thank you are using. Chapter 3 and 4 contain the configuration guide to quality and endurance. It delivers excellent performance with robust design conforming to ASRock's commitment to BIOS setup and...
... for purchasing ASRock K10N78hSLI-GLAN motherboard, a reliable motherboard produced under ASRock's consistently stringent quality control. In this manual, chapter 1 and 2 contain introduction of the Support CD. 1. Introduction Thank you are using. Chapter 3 and 4 contain the configuration guide to quality and endurance. It delivers excellent performance with robust design conforming to ASRock's commitment to BIOS setup and...
User Manual
Page 7
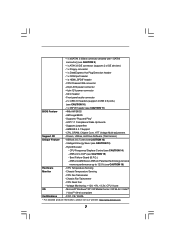
... Tuner (see CAUTION 16) Hardware - Boot Failure Guard (B.F.G.) - ASRock AM2 Boost: ASRock Patented Technology to boost memory performance up to 12.5% (see CAUTION 12) - Microsoft® Windows® XP / XP Media ... 7 CPU/Chassis FAN connector - 24 pin ATX power connector - 4 pin 12V power connector - AMI Legal BIOS - CD in header - Supports "Plug and Play" - AMBIOS 2.3.1 Support - ASRock U-COP (see CAUTION 9) - 1 x ATA133 IDE connector (supports 2 x IDE devices) - 1 x Floppy connector - 1 x DeskExpress Hot Plug Detection header - 1 x COM port header - 1 x...
... Tuner (see CAUTION 16) Hardware - Boot Failure Guard (B.F.G.) - ASRock AM2 Boost: ASRock Patented Technology to boost memory performance up to 12.5% (see CAUTION 12) - Microsoft® Windows® XP / XP Media ... 7 CPU/Chassis FAN connector - 24 pin ATX power connector - 4 pin 12V power connector - AMI Legal BIOS - CD in header - Supports "Plug and Play" - AMBIOS 2.3.1 Support - ASRock U-COP (see CAUTION 9) - 1 x ATA133 IDE connector (supports 2 x IDE devices) - 1 x Floppy connector - 1 x DeskExpress Hot Plug Detection header - 1 x COM port header - 1 x...
User Manual
Page 8
... to SATAII connector directly. 9. It should depend on our website for details about eSATAII and eSATAII installation procedures. 8 ASRock website http://www.asrock.com 2. This motherboard supports Untied Overclocking Technology. If you implement Dual Channel Memory Technology, make sure to 5200 MT/s),... adjusting the setting in the future. As long as we have the latest Hybrid SLITM driver, we will be updated in the BIOS, applying Untied Overclocking Technology, or using the thirdparty overclocking tools. For microphone input, this motherboard supports 2-channel, 4-channel and 6-...
... to SATAII connector directly. 9. It should depend on our website for details about eSATAII and eSATAII installation procedures. 8 ASRock website http://www.asrock.com 2. This motherboard supports Untied Overclocking Technology. If you implement Dual Channel Memory Technology, make sure to 5200 MT/s),... adjusting the setting in the future. As long as we have the latest Hybrid SLITM driver, we will be updated in the BIOS, applying Untied Overclocking Technology, or using the thirdparty overclocking tools. For microphone input, this motherboard supports 2-channel, 4-channel and 6-...
User Manual
Page 9
WiFi/E header supports WiFi+AP function with ASRock WiFi-802.11g or WiFi-802.11n module, an easy-to-use Intelligent Energy Saver function, please enable Cool 'n' Quiet option in the BIOS setup in the BIOS setup, the memory performance will improve up to 12.5%, but the effect still depends... on the motherboard functions properly and unplug the power cord, then plug it is a user-friendly ASRock overclocking tool which allows you to improve ...
WiFi/E header supports WiFi+AP function with ASRock WiFi-802.11g or WiFi-802.11n module, an easy-to-use Intelligent Energy Saver function, please enable Cool 'n' Quiet option in the BIOS setup in the BIOS setup, the memory performance will improve up to 12.5%, but the effect still depends... on the motherboard functions properly and unplug the power cord, then plug it is a user-friendly ASRock overclocking tool which allows you to improve ...
User Manual
Page 11
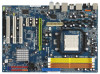
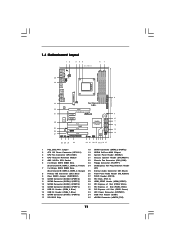
... LINE IN Center: FRONT Bottom: MIC IN 33 32 31 30 29 28 27 CPU_FAN1 Dual Channel AM2+ LAN PHY PCIE1 PCI Express 2.0 K10N78hSLI-GLAN PCIE2 CLRCMOS1 1 CMOS BATTERY Super I/O PCIE3 HDMI_SPDIF1 1 AUDIO CODEC 1 WIFI/E HD_AUDIO1 CD1 1 IR1 1 FLOPPY1 PCI1 RoHS PCI2 PCI3 NVIDIA ...GeForce 8200 Chipset CHA_FAN1 SPEAKER1 1 PANEL 1 PLED PWRBTN 1 HDLED RESET 4Mb BIOS USB8_9 1 1 USB6_7 SATAII_1 (PORT0) SATAII_3 (PORT2) SATAII_5 (PORT4) SATAII_2 (PORT1) SATAII_4 (PORT3) SATAII_6 (PORT5) 26 25 24 23 22 21 20...
... LINE IN Center: FRONT Bottom: MIC IN 33 32 31 30 29 28 27 CPU_FAN1 Dual Channel AM2+ LAN PHY PCIE1 PCI Express 2.0 K10N78hSLI-GLAN PCIE2 CLRCMOS1 1 CMOS BATTERY Super I/O PCIE3 HDMI_SPDIF1 1 AUDIO CODEC 1 WIFI/E HD_AUDIO1 CD1 1 IR1 1 FLOPPY1 PCI1 RoHS PCI2 PCI3 NVIDIA ...GeForce 8200 Chipset CHA_FAN1 SPEAKER1 1 PANEL 1 PLED PWRBTN 1 HDLED RESET 4Mb BIOS USB8_9 1 1 USB6_7 SATAII_1 (PORT0) SATAII_3 (PORT2) SATAII_5 (PORT4) SATAII_2 (PORT1) SATAII_4 (PORT3) SATAII_6 (PORT5) 26 25 24 23 22 21 20...
User Manual
Page 19
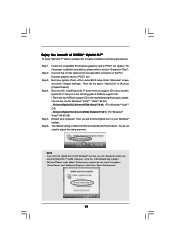
Step 1. Connect the monitor cable to enter BIOS setup. Boot your computer. Then you are two ASRock support CD in the motherboard gift box pack, please choose the one compatible PCI Express graphics card to PCIE1 slot (green). Step 5. Press to the ...; VistaTM 64-bit OS) Restart your system. Install Hybrid SLITM driver from our support CD to [Auto] or [Chipset Default]. Step 4. Enjoy the benefit of ASRock support CD: (There are allowed to section "Expansion Slots". Step 3. Step 2.
Step 1. Connect the monitor cable to enter BIOS setup. Boot your computer. Then you are two ASRock support CD in the motherboard gift box pack, please choose the one compatible PCI Express graphics card to PCIE1 slot (green). Step 5. Press to the ...; VistaTM 64-bit OS) Restart your system. Install Hybrid SLITM driver from our support CD to [Auto] or [Chipset Default]. Step 4. Enjoy the benefit of ASRock support CD: (There are allowed to section "Expansion Slots". Step 3. Step 2.
User Manual
Page 20
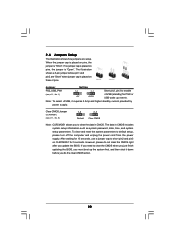
... select +5VSB, it down before you do not clear the CMOS right after you update the BIOS. To clear and reset the system parameters to clear the CMOS when you just finish updating the BIOS, you need to default setup, please turn off the computer and unplug the power cord from the...
... select +5VSB, it down before you do not clear the CMOS right after you update the BIOS. To clear and reset the system parameters to clear the CMOS when you just finish updating the BIOS, you need to default setup, please turn off the computer and unplug the power cord from the...

User Manual
Page 23
... Internal Audio Connectors (4-pin CD1) (CD1: see p.11, No. 26) GND PRESENCE# MIC_RET OUT_RET 1 OUT2_L J_SENSE OUT2_R MIC2_R MIC2_L This is an interface for ASRock DeskExpress. Enter BIOS Setup Utility. To connect the 4-Pin USB device cable to this header, please refer to this header can be used as below: A. B. If you...
... Internal Audio Connectors (4-pin CD1) (CD1: see p.11, No. 26) GND PRESENCE# MIC_RET OUT_RET 1 OUT2_L J_SENSE OUT2_R MIC2_R MIC2_L This is an interface for ASRock DeskExpress. Enter BIOS Setup Utility. To connect the 4-Pin USB device cable to this header, please refer to this header can be used as below: A. B. If you...
User Manual
Page 27
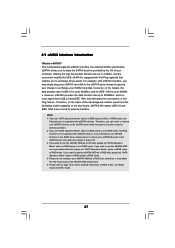
... Plug feature. Therefore, on the basis of opening your eSATAII HDD as a removable data disk, please set "SATA Operation Mode" option in BIOS setup to non-RAID mode. Please do not configure your chassis to 400Mb/ s. However, eSATAII provides the data transfer rate up to RAID ...remove your computer, offering the high speed data transfer rate up to exchange drives easily. Therefore, you set "SATA Operation Mode" option in BIOS setup to 3.0Gb/s, and the convenient mobility like USB. 2.9 eSATAII Interface Introduction What is power-on and in working condition. 2. This ...
... Plug feature. Therefore, on the basis of opening your eSATAII HDD as a removable data disk, please set "SATA Operation Mode" option in BIOS setup to non-RAID mode. Please do not configure your chassis to 400Mb/ s. However, eSATAII provides the data transfer rate up to RAID ...remove your computer, offering the high speed data transfer rate up to exchange drives easily. Therefore, you set "SATA Operation Mode" option in BIOS setup to 3.0Gb/s, and the convenient mobility like USB. 2.9 eSATAII Interface Introduction What is power-on and in working condition. 2. This ...
User Manual
Page 35
Enter BIOS SETUP UTILITY Advanced screen IDE Configuration. A. Insert the ASRock Support CD into your optical drive to boot your SATA / SATAII HDDs... want to install Windows® XP / Windows® XP 64-bit on your system. (There are two ASRock Support CD in the motherboard gift box pack, please choose the one for WindowsXP 2. Generate RAID Driver diskette for... page. Using SATA / SATAII HDDs and eSATAII devices with NCQ and Hot Plug functions STEP 1: Set Up BIOS. Set the "SATA Operation Mode" option to continue 35 D. Please follow below steps. A. During POST at...
Enter BIOS SETUP UTILITY Advanced screen IDE Configuration. A. Insert the ASRock Support CD into your optical drive to boot your SATA / SATAII HDDs... want to install Windows® XP / Windows® XP 64-bit on your system. (There are two ASRock Support CD in the motherboard gift box pack, please choose the one for WindowsXP 2. Generate RAID Driver diskette for... page. Using SATA / SATAII HDDs and eSATAII devices with NCQ and Hot Plug functions STEP 1: Set Up BIOS. Set the "SATA Operation Mode" option to continue 35 D. Please follow below steps. A. During POST at...

User Manual
Page 36
...RAID functions, please follow below : A. STEP 2: Install Windows® VistaTM / VistaTM 64-bit OS on your system. " page, please insert the ASRock Support CD into your optical drive, and click the "Load Driver" button on the left on the bottom to format the floppy diskette and copy...party AHCI driver. NVIDIA® AHCI drivers are as below steps. The drivers are in the following path in AHCI mode. STEP 3: Set Up BIOS. Set the "SATA Operation Mode" option to install Windows? Please insert a floppy diskette into the optical drive to boot your system, and follow step...
...RAID functions, please follow below : A. STEP 2: Install Windows® VistaTM / VistaTM 64-bit OS on your system. " page, please insert the ASRock Support CD into your optical drive, and click the "Load Driver" button on the left on the bottom to format the floppy diskette and copy...party AHCI driver. NVIDIA® AHCI drivers are as below steps. The drivers are in the following path in AHCI mode. STEP 3: Set Up BIOS. Set the "SATA Operation Mode" option to install Windows? Please insert a floppy diskette into the optical drive to boot your system, and follow step...


