User Manual
Page 2
... furnished for informational use only and subject to change without notice, and should not be constructed as a commitment by ASRock. ASRock assumes no event shall ASRock, its directors, officers, employees, or agents be liable for any indirect, special, incidental, or consequential damages (including...purchaser for backup purpose, without written consent of the FCC Rules. Products and corporate names appearing in this motherboard contains Perchlorate, a toxic substance controlled in advance. "Perchlorate Material-special handling may cause undesired operation. This device complies with ...
... furnished for informational use only and subject to change without notice, and should not be constructed as a commitment by ASRock. ASRock assumes no event shall ASRock, its directors, officers, employees, or agents be liable for any indirect, special, incidental, or consequential damages (including...purchaser for backup purpose, without written consent of the FCC Rules. Products and corporate names appearing in this motherboard contains Perchlorate, a toxic substance controlled in advance. "Perchlorate Material-special handling may cause undesired operation. This device complies with ...
User Manual
Page 3
... Swap Functions for 1080p Blu-ray (BD) / HD-DVD Playback Support 10 1.4 Passed 1080p Blu-ray (BD) / HD-DVD Films in Our Lab Test ..... 11 1.5 Motherboard Layout 12 1.6 I/O Panel 13 2 . Contents 1 . Introduction 5 1.1 Package Contents 5 1.2 Specifications 6 1.3 Minimum Hardware Requirement for SATA / SATAII HDDs Devices 32 2.13 SATA / SATAII HDD Hot Plug Feature...
... Swap Functions for 1080p Blu-ray (BD) / HD-DVD Playback Support 10 1.4 Passed 1080p Blu-ray (BD) / HD-DVD Films in Our Lab Test ..... 11 1.5 Motherboard Layout 12 1.6 I/O Panel 13 2 . Contents 1 . Introduction 5 1.1 Package Contents 5 1.2 Specifications 6 1.3 Minimum Hardware Requirement for SATA / SATAII HDDs Devices 32 2.13 SATA / SATAII HDD Hot Plug Feature...

User Manual
Page 5
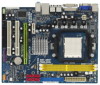
...-step guide to BIOS setup and information of this motherboard, please visit our website for purchasing ASRock K10N78M Pro motherboard, a reliable motherboard produced under ASRock's consistently stringent quality control. www.asrock.com/support/index.asp 1.1 Package Contents ASRock K10N78M Pro Motherboard (Micro ATX Form Factor: 9.6-in x 7.5-in, 24.4 cm x 19.1 cm) ASRock K10N78M Pro Quick Installation Guide ASRock K10N78M Pro Support CD One 80-conductor Ultra ATA 66...
...-step guide to BIOS setup and information of this motherboard, please visit our website for purchasing ASRock K10N78M Pro motherboard, a reliable motherboard produced under ASRock's consistently stringent quality control. www.asrock.com/support/index.asp 1.1 Package Contents ASRock K10N78M Pro Motherboard (Micro ATX Form Factor: 9.6-in x 7.5-in, 24.4 cm x 19.1 cm) ASRock K10N78M Pro Quick Installation Guide ASRock K10N78M Pro Support CD One 80-conductor Ultra ATA 66...

User Manual
Page 8
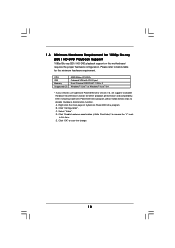
... on our website for proper installation. 3. FCC, CE, WHQL * For detailed product information, please visit our website: http://www.asrock.com WARNING Please realize that there is supported depends on page 16 for the compatible memory modules. Before installing SATAII hard disk to SATAII...1080p Blu-ray (BD) / HD-DVD films in the BIOS, applying Untied Overclocking Technology, or using the thirdparty overclocking tools. This motherboard supports Untied Overclocking Technology. Before you adopt. Due to the operating system limitation, the actual memory size may use the DVI to ...
... on our website for proper installation. 3. FCC, CE, WHQL * For detailed product information, please visit our website: http://www.asrock.com WARNING Please realize that there is supported depends on page 16 for the compatible memory modules. Before installing SATAII hard disk to SATAII...1080p Blu-ray (BD) / HD-DVD films in the BIOS, applying Untied Overclocking Technology, or using the thirdparty overclocking tools. This motherboard supports Untied Overclocking Technology. Before you adopt. Due to the operating system limitation, the actual memory size may use the DVI to ...

User Manual
Page 9
... 64-bit / VistaTM / XP 64-bit / XP SP1 or SP2. 10. 9. ASRock website: http://www.asrock.com 11. ASRock website: http://www.asrock.com 12. ASRock Instant Flash is able to perform over-clocking. Just launch this motherboard offers stepless control, it is a BIOS flash utility embedded in a few clicks without entering... the heatsink when you resume the system, please check if the CPU fan on the motherboard functions properly and unplug the power cord, then plug it may choose to access ASRock Instant Flash. Although this tool and save the new BIOS file to improve efficiency when ...
... 64-bit / VistaTM / XP 64-bit / XP SP1 or SP2. 10. 9. ASRock website: http://www.asrock.com 11. ASRock website: http://www.asrock.com 12. ASRock Instant Flash is able to perform over-clocking. Just launch this motherboard offers stepless control, it is a BIOS flash utility embedded in a few clicks without entering... the heatsink when you resume the system, please check if the CPU fan on the motherboard functions properly and unplug the power cord, then plug it may choose to access ASRock Instant Flash. Although this tool and save the new BIOS file to improve efficiency when ...
User Manual
Page 10
... (nVidia PureVideo)" to save the change. 10 Right-click the main page of CyberLink PowerDVD Ultra program. Click "OK" to remove the "V" mark in this motherboard requires the proper hardware configuration. CPU VGA Memory Suggested OS AMD Athlon X2 4000+ Onboard VGA with DVI-D port Dual Channel DDR2 667, 1GB x 2 Windows...
... (nVidia PureVideo)" to save the change. 10 Right-click the main page of CyberLink PowerDVD Ultra program. Click "OK" to remove the "V" mark in this motherboard requires the proper hardware configuration. CPU VGA Memory Suggested OS AMD Athlon X2 4000+ Onboard VGA with DVI-D port Dual Channel DDR2 667, 1GB x 2 Windows...

User Manual
Page 12
... CMOS Jumper (CLRCMOS1) 28 PCI Express x1 Slot (PCIE1, White) 15 Chassis Fan Connector (CHA_FAN1) 29 NVIDIA GeForce 8100 Chipset 12 1.5 Motherboard Layout 1 2 3 4 19.1cm (7.5-in) 56 PS2 Mouse PS2 Keyboard VGA1 1 PS2_USB_PW1 ATX12V1 CPU_FAN1 7 ATXPWR1 DDR2 1066 DDRII_1 (64 bit... (PORT 3) SATAII_1 (PORT 0) SATAII_2 (PORT 1) 28 27 26 PCIE1 Hybrid SLI Gigabit LAN Super I/O AUDIO CODEC HD_AUDIO1 1 CD1 COM1 1 FLOPPY1 K10N78M Pro PCIE2 PCI1 RAID PCI2 LPT1 1 CMOS BATTERY 1 CLRCMOS1 IR1 1 USB8_9 1 USB6_7 1 RoHS 8Mb BIOS CHA_FAN1 SPEAKER1 1 PLED PWRBTN PANEL 1 1 HDLED...
... CMOS Jumper (CLRCMOS1) 28 PCI Express x1 Slot (PCIE1, White) 15 Chassis Fan Connector (CHA_FAN1) 29 NVIDIA GeForce 8100 Chipset 12 1.5 Motherboard Layout 1 2 3 4 19.1cm (7.5-in) 56 PS2 Mouse PS2 Keyboard VGA1 1 PS2_USB_PW1 ATX12V1 CPU_FAN1 7 ATXPWR1 DDR2 1066 DDRII_1 (64 bit... (PORT 3) SATAII_1 (PORT 0) SATAII_2 (PORT 1) 28 27 26 PCIE1 Hybrid SLI Gigabit LAN Super I/O AUDIO CODEC HD_AUDIO1 1 CD1 COM1 1 FLOPPY1 K10N78M Pro PCIE2 PCI1 RAID PCI2 LPT1 1 CMOS BATTERY 1 CLRCMOS1 IR1 1 USB8_9 1 USB6_7 1 RoHS 8Mb BIOS CHA_FAN1 SPEAKER1 1 PLED PWRBTN PANEL 1 1 HDLED...

User Manual
Page 14
... is a Micro ATX form factor (9.6-in x 7.5-in the bag that the motherboard fits into the screw holes to secure the motherboard to the chassis, please do not over-tighten the screws! To avoid damaging the motherboard components due to do not touch the ICs. 4. 2. Pre-installation Precautions Take...that comes with the component. 5. Unplug the power cord from the power supply. Hold components by the edges and do so may damage the motherboard. 14 Doing so may cause severe damage to use a grounded wrist strap or touch a safety grounded object before you install or remove any ...
... is a Micro ATX form factor (9.6-in x 7.5-in the bag that the motherboard fits into the screw holes to secure the motherboard to the chassis, please do not over-tighten the screws! To avoid damaging the motherboard components due to do not touch the ICs. 4. 2. Pre-installation Precautions Take...that comes with the component. 5. Unplug the power cord from the power supply. Hold components by the edges and do so may damage the motherboard. 14 Doing so may cause severe damage to use a grounded wrist strap or touch a safety grounded object before you install or remove any ...
User Manual
Page 15
... the golden triangle matches the socket corner with each other. For proper installation, please kindly refer to a 90o angle. Carefully insert the CPU into this motherboard, it fits in one correct orientation. You also need to spray thermal grease between the CPU and the heatsink to the CPU FAN connector (CPU_FAN1...
... the golden triangle matches the socket corner with each other. For proper installation, please kindly refer to a 90o angle. Carefully insert the CPU into this motherboard, it fits in one correct orientation. You also need to spray thermal grease between the CPU and the heatsink to the CPU FAN connector (CPU_FAN1...

User Manual
Page 16
2.3 Installation of Memory Modules (DIMM) K10N78M Pro motherboard provides two 240-pin DDR2 (Double Data Rate 2) DIMM slots, and supports Dual Channel Memory Technology. Otherwise, it is unable to activate the Dual Channel ... the retaining clips at both ends fully snap back in place and the DIMM is not allowed to the motherboard and the DIMM if you force the DIMM into DDR2 slot; otherwise, this motherboard and DIMM may be damaged. 2. Step 1. Align a DIMM on the slot such that the notch on the DIMM...
2.3 Installation of Memory Modules (DIMM) K10N78M Pro motherboard provides two 240-pin DDR2 (Double Data Rate 2) DIMM slots, and supports Dual Channel Memory Technology. Otherwise, it is unable to activate the Dual Channel ... the retaining clips at both ends fully snap back in place and the DIMM is not allowed to the motherboard and the DIMM if you force the DIMM into DDR2 slot; otherwise, this motherboard and DIMM may be damaged. 2. Step 1. Align a DIMM on the slot such that the notch on the DIMM...
User Manual
Page 17
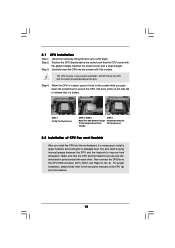
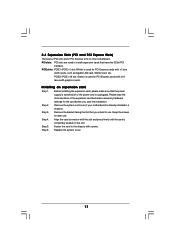
... intend to install expansion cards that you start the installation. PCIE slots: PCIE1 (PCIE x1 slot; White) is completely seated on this motherboard. Remove the system unit cover (if your motherboard is used to use . PCIE2 (PCIE x16 slot; Step 3. Step 4. 2.4 Expansion Slots (PCI and PCI Express Slots) There are used for...
... intend to install expansion cards that you start the installation. PCIE slots: PCIE1 (PCIE x1 slot; White) is completely seated on this motherboard. Remove the system unit cover (if your motherboard is used to use . PCIE2 (PCIE x16 slot; Step 3. Step 4. 2.4 Expansion Slots (PCI and PCI Express Slots) There are used for...
User Manual
Page 18
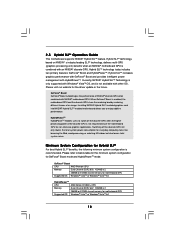
...NVIDIA® Hybrid SLITM Technology is only supported with Windows® VistaTM OS, and is combined with NVIDIA® motherboard GPU. HybridPowerTM HybridPowerTM enables users to enjoy additive performance. Hybrid SLITM increases graphics performance with GeForce® Boost and ...provides intelligent power management with other OS. 2.5 Hybrid SLITM Operation Guide This motherboard supports NVIDIA® Hybrid SLITM feature. Minimum System Configuration for non intensive graphics applications. Hybrid SLITM technology, based on ...
...NVIDIA® Hybrid SLITM Technology is only supported with Windows® VistaTM OS, and is combined with NVIDIA® motherboard GPU. HybridPowerTM HybridPowerTM enables users to enjoy additive performance. Hybrid SLITM increases graphics performance with GeForce® Boost and ...provides intelligent power management with other OS. 2.5 Hybrid SLITM Operation Guide This motherboard supports NVIDIA® Hybrid SLITM feature. Minimum System Configuration for non intensive graphics applications. Hybrid SLITM technology, based on ...
User Manual
Page 19
... the card GPU, you can switch between GeForce® Boost mode (Boost Performance) and HybridPowerTM mode (Save Power) according to your monitor cable to the motherboard GPU, you are supported only with certain set the option "Hybrid SLI" to section "Expansion Slots". Connect the monitor cable to [Onboard], and save your...
... the card GPU, you can switch between GeForce® Boost mode (Boost Performance) and HybridPowerTM mode (Save Power) according to your monitor cable to the motherboard GPU, you are supported only with certain set the option "Hybrid SLI" to section "Expansion Slots". Connect the monitor cable to [Onboard], and save your...

User Manual
Page 20
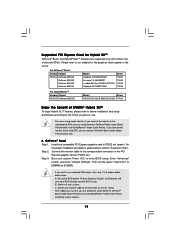
Boot into OS. Step 4. Step 5. Step 5. Hybrid SLITM driver is in the following path of ASRock support CD: (There are two ASRock support CD in the motherboard gift box pack, please choose the one for Windows® VistaTM / VistaTM 64-bit.) ..\Drivers\Hybrid SLI driver\Vista *... driver is GeForce® Boost mode (Boost Performance). Step 6. The default setting is in the following path of ASRock support CD: (There are two ASRock support CD in the motherboard gift box pack, please choose the one compatible PCI Express graphics card to [256MB] or [512MB]. Step 2....
Boot into OS. Step 4. Step 5. Step 5. Hybrid SLITM driver is in the following path of ASRock support CD: (There are two ASRock support CD in the motherboard gift box pack, please choose the one for Windows® VistaTM / VistaTM 64-bit.) ..\Drivers\Hybrid SLI driver\Vista *... driver is GeForce® Boost mode (Boost Performance). Step 6. The default setting is in the following path of ASRock support CD: (There are two ASRock support CD in the motherboard gift box pack, please choose the one compatible PCI Express graphics card to [256MB] or [512MB]. Step 2....

User Manual
Page 21
... website for future update. Install Hybrid SLITM driver from our support CD to your system is in the following path of ASRock support CD: (There are two ASRock support CD in the motherboard gift box pack, please choose the one monitor cable to HybridPowerTM mode (Save Power). Step 6. Install one compatible PCI Express...
... website for future update. Install Hybrid SLITM driver from our support CD to your system is in the following path of ASRock support CD: (There are two ASRock support CD in the motherboard gift box pack, please choose the one monitor cable to HybridPowerTM mode (Save Power). Step 6. Install one compatible PCI Express...

User Manual
Page 22
...of this situation, the VGA/DVI-D output is no such limitation under DOS because in one of the two monitors instead of this motherboard. 1. This motherboard also provides independent display controllers for DVI-D and D-Sub to your system already, you can freely enjoy the benefits of dual monitor function... If you playback HDCP-protected video from Blu-ray (BD) or HD-DVD disc, the content will be displayed only in this motherboard. This motherboard does not support dual monitor feature under Windows® OS. 22 Connect the DVI-D monitor cable to your system and restart your system...
...of this situation, the VGA/DVI-D output is no such limitation under DOS because in one of the two monitors instead of this motherboard. 1. This motherboard also provides independent display controllers for DVI-D and D-Sub to your system already, you can freely enjoy the benefits of dual monitor function... If you playback HDCP-protected video from Blu-ray (BD) or HD-DVD disc, the content will be displayed only in this motherboard. This motherboard does not support dual monitor feature under Windows® OS. 22 Connect the DVI-D monitor cable to your system and restart your system...
User Manual
Page 23
...Properties dialog that you wish to page 17 for proper expansion card installation procedures for the second monitor. Click "Extend my Windows desktop onto this motherboard. Click "Apply" or "OK" to PCI Express slot. For Windows® VistaTM / VistaTM 64-bit OS: Right click the desktop,... and the add-on the I /O panel of this monitor". If you can easily enjoy the benefits of VGA/D-sub. F. Surround Display Feature This motherboard supports surround display upgrade. Enter "Share Memory" option to adjust the memory capability to [32MB], [64MB], [128MB], [256MB] or [512MB] to...
...Properties dialog that you wish to page 17 for proper expansion card installation procedures for the second monitor. Click "Extend my Windows desktop onto this motherboard. Click "Apply" or "OK" to PCI Express slot. For Windows® VistaTM / VistaTM 64-bit OS: Right click the desktop,... and the add-on the I /O panel of this monitor". If you can easily enjoy the benefits of VGA/D-sub. F. Surround Display Feature This motherboard supports surround display upgrade. Enter "Share Memory" option to adjust the memory capability to [32MB], [64MB], [128MB], [256MB] or [512MB] to...

User Manual
Page 24
Click "OK" to use HDCP function with DVI-D port on this motherboard. HDCP Function with DVI-D Port HDCP function is a copy protection scheme to eliminate the possibility of your change. To use . B. Repeat steps A through C for protecting ... to the increase in manufacturers employing HDCP in their equipment, it is compatible. 24 What is my main monitor" and "Extend the desktop onto this motherboard, you can enjoy the superior display quality with the HDCP scheme such as DVD players, satellite and cable HDTV set-top-boxes, as well as...
Click "OK" to use HDCP function with DVI-D port on this motherboard. HDCP Function with DVI-D Port HDCP function is a copy protection scheme to eliminate the possibility of your change. To use . B. Repeat steps A through C for protecting ... to the increase in manufacturers employing HDCP in their equipment, it is compatible. 24 What is my main monitor" and "Extend the desktop onto this motherboard, you can enjoy the superior display quality with the HDCP scheme such as DVD players, satellite and cable HDTV set-top-boxes, as well as...

User Manual
Page 25
... Chipset Configuration. DVI to HDMI adapter is available. 25 If you install the DVI-D monitor instead of the HDMI monitor on this motherboard can support DVI/HDCP and HDMI format signal. Step 2: Enter Windows® to the adapter vendor for the chipset adopted on this... HDMI HD Audio" to "Digital Output Device (HDMI)". Change the default setting "Speaker" to [Auto]. Install "Onboard HDMI HD Audio Driver" from ASRock Support CD to the OS you reboot the system, the HDMI audio function is installed, the OS default will not function. A. For Windows® XP...
... Chipset Configuration. DVI to HDMI adapter is available. 25 If you install the DVI-D monitor instead of the HDMI monitor on this motherboard can support DVI/HDCP and HDMI format signal. Step 2: Enter Windows® to the adapter vendor for the chipset adopted on this... HDMI HD Audio" to "Digital Output Device (HDMI)". Change the default setting "Speaker" to [Auto]. Install "Onboard HDMI HD Audio Driver" from ASRock Support CD to the OS you reboot the system, the HDMI audio function is installed, the OS default will not function. A. For Windows® XP...

User Manual
Page 27
...data cables for the details. Please connect the black end of the SATA data cable can be connected to the power connector on this motherboard. Either end of SATA power cable to the SATA / SATAII hard disk or the SATAII connector on each drive. 2.9 Onboard Headers and... cable is plugged into Pin1 side of the connector. Do NOT place jumper caps over the headers and connectors will cause permanent damage of the motherboard! • Floppy Connector (33-pin FLOPPY1) (see p.12, No. 10) SATAII_3 (PORT 2) Serial ATA (SATA) Data Cable (Optional) Serial ATA (SATA) Power...
...data cables for the details. Please connect the black end of the SATA data cable can be connected to the power connector on this motherboard. Either end of SATA power cable to the SATA / SATAII hard disk or the SATAII connector on each drive. 2.9 Onboard Headers and... cable is plugged into Pin1 side of the connector. Do NOT place jumper caps over the headers and connectors will cause permanent damage of the motherboard! • Floppy Connector (33-pin FLOPPY1) (see p.12, No. 10) SATAII_3 (PORT 2) Serial ATA (SATA) Data Cable (Optional) Serial ATA (SATA) Power...

