
User Manual
Page 2
...Licensing LLC in Perchlorate Best Management Practices (BMP) regulations passed by ASRock. Operation is subject to the owners' beneit, without notice, and should not be registered trademarks or copyrights of this motherboard contains Perchlorate, a toxic substance controlled in the United States and...this device must accept any kind, either expressed or implied, including but not limited to the contents of this documentation, ASRock does not provide warranty of any interference received, including interference that may not cause harmful interference, and (2) this documentation may...
...Licensing LLC in Perchlorate Best Management Practices (BMP) regulations passed by ASRock. Operation is subject to the owners' beneit, without notice, and should not be registered trademarks or copyrights of this motherboard contains Perchlorate, a toxic substance controlled in the United States and...this device must accept any kind, either expressed or implied, including but not limited to the contents of this documentation, ASRock does not provide warranty of any interference received, including interference that may not cause harmful interference, and (2) this documentation may...
User Manual
Page 3
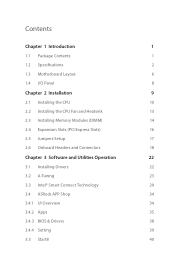
Contents Chapter 1 Introduction 1 1.1 Package Contents 1 1.2 Speciications 2 1.3 Motherboard Layout 6 1.4 I/O Panel 8 Chapter 2 Installation 9 2.1 Installing the CPU 10 2.2 Installing the CPU Fan and Heatsink 13 2.3 Installing Memory Modules (DIMM) 14 2.4 Expansion Slots (...17 2.6 Onboard Headers and Connectors 18 Chapter 3 Software and Utilities Operation 22 3.1 Installing Drivers 22 3.2 A-Tuning 23 3.3 Intel® Smart Connect Technology 29 3.4 ASRock APP Shop 34 3.4.1 UI Overview 34 3.4.2 Apps 35 3.4.3 BIOS & Drivers 38 3.4.4 Setting 39 3.5 Start8 40
Contents Chapter 1 Introduction 1 1.1 Package Contents 1 1.2 Speciications 2 1.3 Motherboard Layout 6 1.4 I/O Panel 8 Chapter 2 Installation 9 2.1 Installing the CPU 10 2.2 Installing the CPU Fan and Heatsink 13 2.3 Installing Memory Modules (DIMM) 14 2.4 Expansion Slots (...17 2.6 Onboard Headers and Connectors 18 Chapter 3 Software and Utilities Operation 22 3.1 Installing Drivers 22 3.2 A-Tuning 23 3.3 Intel® Smart Connect Technology 29 3.4 ASRock APP Shop 34 3.4.1 UI Overview 34 3.4.2 Apps 35 3.4.3 BIOS & Drivers 38 3.4.4 Setting 39 3.5 Start8 40
User Manual
Page 5
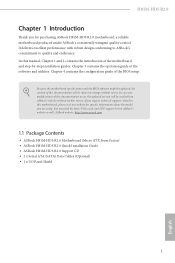
... be subject to change without further notice. If you require technical support related to quality and endurance. ASRock website http://www.asrock.com. 1.1 Package Contents • ASRock H81M-HDS R2.0 Motherboard (Micro ATX Form Factor) • ASRock H81M-HDS R2.0 Quick Installation Guide • ASRock H81M-HDS R2.0 Support CD • 2 x Serial ATA (SATA) Data Cables (Optional) • 1 x I/O Panel Shield 1 English Chapter 3 contains the operation...
... be subject to change without further notice. If you require technical support related to quality and endurance. ASRock website http://www.asrock.com. 1.1 Package Contents • ASRock H81M-HDS R2.0 Motherboard (Micro ATX Form Factor) • ASRock H81M-HDS R2.0 Quick Installation Guide • ASRock H81M-HDS R2.0 Support CD • 2 x Serial ATA (SATA) Data Cables (Optional) • 1 x I/O Panel Shield 1 English Chapter 3 contains the operation...
User Manual
Page 10
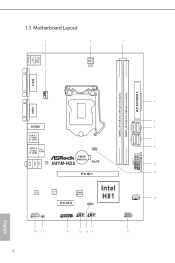
1.3 Motherboard Layout 1 2 3 USB 2.0 T: USB0 B: USB1 PS2 Keyboard/ Mouse ATX12V1 DVI1 AT X P W R 1 DDR3_B1 (64 bit, 240-pin module) DDR3_A1 (64 bit, 240-pin module) CPU_FAN1 4 VGA1 Top: LINE IN Center: FRONT Bottom: MIC IN 5 HDMI 6 SATA2_4 SATA2_5 SATA3_0 SATA3_1 USB 3.0 T: USB0 B: USB1 7 USB 2.0 T: USB2 Top: RJ-45 CLRCMOS1 1 8 B: USB3 CMOS Battery LAN H81M-HDS RoHS...
1.3 Motherboard Layout 1 2 3 USB 2.0 T: USB0 B: USB1 PS2 Keyboard/ Mouse ATX12V1 DVI1 AT X P W R 1 DDR3_B1 (64 bit, 240-pin module) DDR3_A1 (64 bit, 240-pin module) CPU_FAN1 4 VGA1 Top: LINE IN Center: FRONT Bottom: MIC IN 5 HDMI 6 SATA2_4 SATA2_5 SATA3_0 SATA3_1 USB 3.0 T: USB0 B: USB1 7 USB 2.0 T: USB2 Top: RJ-45 CLRCMOS1 1 8 B: USB3 CMOS Battery LAN H81M-HDS RoHS...
User Manual
Page 13
...not touch the ICs. • Whenever you uninstall any motherboard settings. • Make sure to ensure that comes with the components. • When placing screws to secure the motherboard to the motherboard's components, NEVER place your chassis to unplug the power ...to do so may damage the motherboard. 9 English Before you install motherboard components or change any components, place them on a carpet. H81M-HDS R2.0 Chapter 2 Installation his is a Micro ATX form factor motherboard. Pre-installation Precautions Take note of your motherboard directly on a grounded anti-static...
...not touch the ICs. • Whenever you uninstall any motherboard settings. • Make sure to ensure that comes with the components. • When placing screws to secure the motherboard to the motherboard's components, NEVER place your chassis to unplug the power ...to do so may damage the motherboard. 9 English Before you install motherboard components or change any components, place them on a carpet. H81M-HDS R2.0 Chapter 2 Installation his is a Micro ATX form factor motherboard. Pre-installation Precautions Take note of your motherboard directly on a grounded anti-static...
User Manual
Page 16
Please save and replace the cover if the processor is removed. he cover must be placed if you wish to return the motherboard for ater service. 12 English
Please save and replace the cover if the processor is removed. he cover must be placed if you wish to return the motherboard for ater service. 12 English
User Manual
Page 18
...is unable to install identical (the same brand, speed, size and chip-type) DDR3 DIMM pairs. 2. otherwise, this motherboard and DIMM may be damaged. 2.3 Installing Memory Modules (DIMM) his motherboard provides two 240-pin DDR3 (Double Data Rate 3) DIMM slots, and supports Dual Channel Memory Technology. 1. It is ...not allowed to the motherboard and the DIMM if you always need to activate Dual Channel Memory Technology with only one correct orientation. For dual channel coniguration, ...
...is unable to install identical (the same brand, speed, size and chip-type) DDR3 DIMM pairs. 2. otherwise, this motherboard and DIMM may be damaged. 2.3 Installing Memory Modules (DIMM) his motherboard provides two 240-pin DDR3 (Double Data Rate 3) DIMM slots, and supports Dual Channel Memory Technology. 1. It is ...not allowed to the motherboard and the DIMM if you always need to activate Dual Channel Memory Technology with only one correct orientation. For dual channel coniguration, ...
User Manual
Page 20
Please read the documentation of the expansion card and make sure that the power supply is switched of or the power cord is unplugged. PCIe slots: PCIE1 (PCIe 2.0 x16 slot) is used for the card before you start the installation. 2.4 Expansion Slots (PCI Express Slots) here are 2 PCI Express slots on the motherboard. PCIE2 (PCIe 2.0 x1 slot) is used for PCI Express x1 lane width cards. 16 English Before installing an expansion card, please make necessary hardware settings for PCI Express x16 lane width graphics cards.
Please read the documentation of the expansion card and make sure that the power supply is switched of or the power cord is unplugged. PCIe slots: PCIE1 (PCIe 2.0 x16 slot) is used for the card before you start the installation. 2.4 Expansion Slots (PCI Express Slots) here are 2 PCI Express slots on the motherboard. PCIE2 (PCIe 2.0 x1 slot) is used for PCI Express x1 lane width cards. 16 English Before installing an expansion card, please make necessary hardware settings for PCI Express x16 lane width graphics cards.

User Manual
Page 22
.../S3 sleep state. he LED is on the chassis front panel. Placing jumper caps over these headers and connectors. PWRBTN (Power Switch): Connect to the motherboard. RESET (Reset Switch): Connect to perform a normal restart. Press the reset switch to restart the computer if the computer freezes and fails to the reset...
.../S3 sleep state. he LED is on the chassis front panel. Placing jumper caps over these headers and connectors. PWRBTN (Power Switch): Connect to the motherboard. RESET (Reset Switch): Connect to perform a normal restart. Press the reset switch to restart the computer if the computer freezes and fails to the reset...
User Manual
Page 23
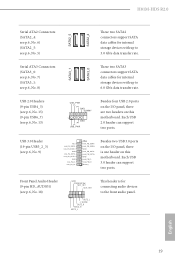
... GND IntA_PB_SSTXIntA_PB_SSTX+ GND IntA_PB_DIntA_PB_D+ Dummy 1 Besides two USB 3.0 ports on the I /O panel, there are two headers on this motherboard. English 19 Front Panel Audio Header (9-pin HD_AUDIO1) (see p.6, No. 18) GND PRESENCE# MIC_RET OUT_RET 1 OUT2_L J_SENSE OUT2_R MIC2_R... his header is one header on this motherboard. Serial ATA3 Connectors (SATA3_0: see p.6, No. 7) (SATA3_1: see p.6, No. 8) SATA3_1 SATA3_0 hese two SATA3 connectors support SATA data cables for connecting audio devices to the front audio panel. H81M-HDS R2.0 Serial ATA2 Connectors (SATA2_4: see p.6,...
... GND IntA_PB_SSTXIntA_PB_SSTX+ GND IntA_PB_DIntA_PB_D+ Dummy 1 Besides two USB 3.0 ports on the I /O panel, there are two headers on this motherboard. English 19 Front Panel Audio Header (9-pin HD_AUDIO1) (see p.6, No. 18) GND PRESENCE# MIC_RET OUT_RET 1 OUT2_L J_SENSE OUT2_R MIC2_R... his header is one header on this motherboard. Serial ATA3 Connectors (SATA3_0: see p.6, No. 7) (SATA3_1: see p.6, No. 8) SATA3_1 SATA3_0 hese two SATA3 connectors support SATA data cables for connecting audio devices to the front audio panel. H81M-HDS R2.0 Serial ATA2 Connectors (SATA2_4: see p.6,...
User Manual
Page 24
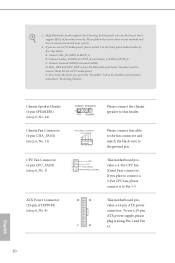
... (RIN) to OUT2_R and Audio_L (LIN) to install your system. 2. CPU Fan Connector (4-pin CPU_FAN1) (see p.6, No. 4) 12 24 1 13 his motherboard pro- 2 +12V 3 FAN_SPEED vides a 4-Pin CPU fan 4 FAN_SPEED_CONTROL (Quiet Fan) connector. ATX Power Connector (24-pin ATXPWR1) (see p.6, No. 1) 1 GND his.... 11) FAN_SPEED_CONTROL FAN_SPEED +12V GND 1 234 Please connect fan cable to the fan connector and match the black wire to connect them for the HD audio panel only. E. To activate the front mic, go to Pin 1-3. If you use a 20-pin ATX power supply, please plug it...
... (RIN) to OUT2_R and Audio_L (LIN) to install your system. 2. CPU Fan Connector (4-pin CPU_FAN1) (see p.6, No. 4) 12 24 1 13 his motherboard pro- 2 +12V 3 FAN_SPEED vides a 4-Pin CPU fan 4 FAN_SPEED_CONTROL (Quiet Fan) connector. ATX Power Connector (24-pin ATXPWR1) (see p.6, No. 1) 1 GND his.... 11) FAN_SPEED_CONTROL FAN_SPEED +12V GND 1 234 Please connect fan cable to the fan connector and match the black wire to connect them for the HD audio panel only. E. To activate the front mic, go to Pin 1-3. If you use a 20-pin ATX power supply, please plug it...

User Manual
Page 25
.... his motherboard supports CASE OPEN detection feature that detects if the chassis cove has been removed. A TPM system also helps enhance network security, protects digital identities, and ensures platform integrity. his connector supports Trusted Platform Module (TPM) system, which can securely store keys, digital certiicates, passwords, and data. English 21 H81M-HDS R2.0 ATX...
.... his motherboard supports CASE OPEN detection feature that detects if the chassis cove has been removed. A TPM system also helps enhance network security, protects digital identities, and ensures platform integrity. his connector supports Trusted Platform Module (TPM) system, which can securely store keys, digital certiicates, passwords, and data. English 21 H81M-HDS R2.0 ATX...
User Manual
Page 26
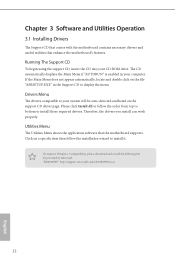
Drivers Menu he Support CD that comes with the motherboard contains necessary drivers and useful utilities that the motherboard supports. Chapter 3 Software and Utilities Operation 3.1 Installing Drivers he drivers compatible to your system will be auto-detected and listed on the... Support CD To begin using the support CD, insert the CD into your computer. he Utilities Menu shows the application sotware that enhance the motherboard's features. herefore, the drivers you install can work properly. Utilities Menu he CD automatically displays the Main Menu if "AUTORUN" is enabled ...
Drivers Menu he Support CD that comes with the motherboard contains necessary drivers and useful utilities that the motherboard supports. Chapter 3 Software and Utilities Operation 3.1 Installing Drivers he drivers compatible to your system will be auto-detected and listed on the... Support CD To begin using the support CD, insert the CD into your computer. he Utilities Menu shows the application sotware that enhance the motherboard's features. herefore, the drivers you install can work properly. Utilities Menu he CD automatically displays the Main Menu if "AUTORUN" is enabled ...
User Manual
Page 29
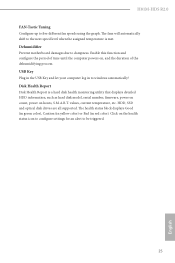
... this function and conigure the period of time until the computer powers on, and the duration of the dehumidifying process. H81M-HDS R2.0 FAN-Tastic Tuning Conigure up to windows automatically! Dehumidiier Prevent motherboard damages due to the next speed level when the assigned temperature is a hard disk health monitoring utility that displays detailed...
... this function and conigure the period of time until the computer powers on, and the duration of the dehumidifying process. H81M-HDS R2.0 FAN-Tastic Tuning Conigure up to windows automatically! Dehumidiier Prevent motherboard damages due to the next speed level when the assigned temperature is a hard disk health monitoring utility that displays detailed...
User Manual
Page 33
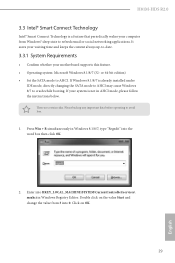
...Please backup any important data before operating to refresh email or social networking applications. Double click on OK. 29 English H81M-HDS R2.0 3.3 Intel® Smart Connect Technology Intel® Smart Connect Technology is a feature that periodically wakes your computer... Set the SATA mode to crash while booting. If Windows 8.1/8/7 is not in AHCI mode, please follow the instructions below. If your motherboard supports this feature. • Operating system: Microsot Windows 8.1/8/7 (32- Enter into HKEY_LOCAL_MACHINE\SYSTEM\CurrentControlSet\services\ msahci in Windows 8.1/8/7, type "...
...Please backup any important data before operating to refresh email or social networking applications. Double click on OK. 29 English H81M-HDS R2.0 3.3 Intel® Smart Connect Technology Intel® Smart Connect Technology is a feature that periodically wakes your computer... Set the SATA mode to crash while booting. If Windows 8.1/8/7 is not in AHCI mode, please follow the instructions below. If your motherboard supports this feature. • Operating system: Microsot Windows 8.1/8/7 (32- Enter into HKEY_LOCAL_MACHINE\SYSTEM\CurrentControlSet\services\ msahci in Windows 8.1/8/7, type "...

User Manual
Page 38
...buttons that when selected the information panel below displays the relative information. 3.4 ASRock APP Shop he ASRock APP Shop is an online store for purchasing and downloading sotware applications for your desktop to access ASRock APP Shop utility. *You need to be connected to the Internet to .... You can install various apps and support utilities quickly and easily, and optimize your system and keep your motherboard up to download apps from the ASRock APP Shop. 3.4.1 UI Overview Category Panel Hot News Information Panel Category Panel: he hot news section displays the various latest ...
...buttons that when selected the information panel below displays the relative information. 3.4 ASRock APP Shop he ASRock APP Shop is an online store for purchasing and downloading sotware applications for your desktop to access ASRock APP Shop utility. *You need to be connected to the Internet to .... You can install various apps and support utilities quickly and easily, and optimize your system and keep your motherboard up to download apps from the ASRock APP Shop. 3.4.1 UI Overview Category Panel Hot News Information Panel Category Panel: he hot news section displays the various latest ...
User Manual
Page 50
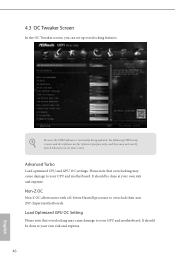
... not exactly match what you can set up overclocking features. Non-Z OC Non-Z OC allows users with a K-Series Haswell processor to your CPU and motherboard. It should be done at your own risk and expense. 46 English Advanced Turbo Load optimized CPU and GPU OC settings. 4.3 OC Tweaker Screen In... the OC Tweaker screen, you see on your GPU and motherboard. It should be done at your own risk and expense. Please note that overclocking may cause damage to overclock their non Z87 chipset...
... not exactly match what you can set up overclocking features. Non-Z OC Non-Z OC allows users with a K-Series Haswell processor to your CPU and motherboard. It should be done at your own risk and expense. 46 English Advanced Turbo Load optimized CPU and GPU OC settings. 4.3 OC Tweaker Screen In... the OC Tweaker screen, you see on your GPU and motherboard. It should be done at your own risk and expense. Please note that overclocking may cause damage to overclock their non Z87 chipset...
User Manual
Page 51
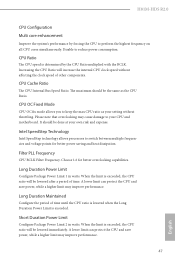
...the CPU Ratio will increase the internal CPU clock speed without throttling. Long Duration Power Limit Conigure Package Power Limit 1 in watts. H81M-HDS R2.0 CPU Coniguration Multi core enhancement Improve the system's performance by the CPU Ratio multiplied with the BCLK. CPU Ratio he CPU speed is... Filter Frequency. Choose 1.6 for better power saving and heat dissipation. When the limit is determined by forcing the CPU to your CPU and motherboard. A lower limit can protect the CPU and save power, while a higher limit may cause damage to perform the highest frequency on all ...
...the CPU Ratio will increase the internal CPU clock speed without throttling. Long Duration Power Limit Conigure Package Power Limit 1 in watts. H81M-HDS R2.0 CPU Coniguration Multi core enhancement Improve the system's performance by the CPU Ratio multiplied with the BCLK. CPU Ratio he CPU speed is... Filter Frequency. Choose 1.6 for better power saving and heat dissipation. When the limit is determined by forcing the CPU to your CPU and motherboard. A lower limit can protect the CPU and save power, while a higher limit may cause damage to perform the highest frequency on all ...
User Manual
Page 52
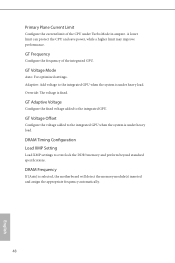
... the DDR3 memory and perform beyond standard speciications. GT Voltage Ofset Conigure the voltage added to the integrated GPU when the system is selected, the motherboard will detect the memory module(s) inserted and assign the appropriate frequency automatically. 48 English A lower limit can protect the CPU and save power, while a higher...
... the DDR3 memory and perform beyond standard speciications. GT Voltage Ofset Conigure the voltage added to the integrated GPU when the system is selected, the motherboard will detect the memory module(s) inserted and assign the appropriate frequency automatically. 48 English A lower limit can protect the CPU and save power, while a higher...
User Manual
Page 74
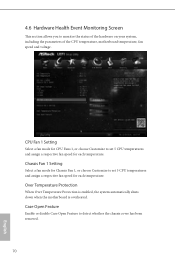
...respective fan speed for each temperature. Over Temperature Protection When Over Temperature Protection is enabled, the system automatically shuts down when the motherboard is overheated. Case Open Feature Enable or disable Case Open Feature to monitor the status of the hardware on your system, including... the parameters of the CPU temperature, motherboard temperature, fan speed and voltage. 4.6 Hardware Health Event Monitoring Screen his section allows you to detect whether the chassis cover has...
...respective fan speed for each temperature. Over Temperature Protection When Over Temperature Protection is enabled, the system automatically shuts down when the motherboard is overheated. Case Open Feature Enable or disable Case Open Feature to monitor the status of the hardware on your system, including... the parameters of the CPU temperature, motherboard temperature, fan speed and voltage. 4.6 Hardware Health Event Monitoring Screen his section allows you to detect whether the chassis cover has...

