
Intel Rapid Storage Guide
Page 12
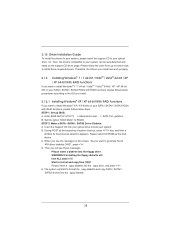
... order to install an operating system onto a RAID volume, the RAID option must be used to load the Intel® Rapid Storage Technology driver during POST, press Ctrl and i at the same time to enter the option ROM user interface. 2. Select the appropriate number of hard drives and press Space... to select the drive. Use the up or down arrow keys to enter the BIOS Setup program after the Power-On-Self-Test (POST) memory test begins. 2. When the Intel Rapid Storage Technology option ROM status screen appears during operating system setup. Click F2 or Delete to select...
... order to install an operating system onto a RAID volume, the RAID option must be used to load the Intel® Rapid Storage Technology driver during POST, press Ctrl and i at the same time to enter the option ROM user interface. 2. Select the appropriate number of hard drives and press Space... to select the drive. Use the up or down arrow keys to enter the BIOS Setup program after the Power-On-Self-Test (POST) memory test begins. 2. When the Intel Rapid Storage Technology option ROM status screen appears during operating system setup. Click F2 or Delete to select...
User Manual
Page 9
...stereo and mono modes. In Fan Control, it shows the major readings of output phases to change. Just launch this utility, you to access ASRock Instant Flash. This motherboard supports Dual Channel Memory Technology. D-Sub, DVI-D andHDMI monitors cannot be less than 4GB for the reservation for optimal ... can load the OC pro le to their own system to your OC settings as HDMIport. 6. Your friends then can press key during the POST or press key to BIOS setup menu to adjust. In IES (Intelligent Energy Saver), the voltage regulator can support the same features as a...
...stereo and mono modes. In Fan Control, it shows the major readings of output phases to change. Just launch this utility, you to access ASRock Instant Flash. This motherboard supports Dual Channel Memory Technology. D-Sub, DVI-D andHDMI monitors cannot be less than 4GB for the reservation for optimal ... can load the OC pro le to their own system to your OC settings as HDMIport. 6. Your friends then can press key during the POST or press key to BIOS setup menu to adjust. In IES (Intelligent Energy Saver), the voltage regulator can support the same features as a...
User Manual
Page 35
... into your system. The system will start to generate Serial ATA driver diskette [YN]?", press . Enter BIOS SETUP UTILITY Advanced screen SATA Con guration. During POST at the beginning of system boot-up BIOS.
... into your system. The system will start to generate Serial ATA driver diskette [YN]?", press . Enter BIOS SETUP UTILITY Advanced screen SATA Con guration. During POST at the beginning of system boot-up BIOS.

User Manual
Page 41
.... If you wish to con gure your required item. 41 You can also use the UEFI SETUP UTILITY to enter the UEFI SETUP UTILITY after POST, restart the system by pressing + + , or by turning the system off and then back on your screen. 3.1.1 UEFI Menu Bar The top of the screen... pressing the reset button on the motherboard stores the UEFI SETUP UTILITY. Please press or during the Power-On-Self-Test (POST) to enter the UEFI SETUP UTILITY, otherwise, POST will continue with the following UEFI setup screens and descriptions are for reference purpose only, and they may run the UEFI SETUP...
.... If you wish to con gure your required item. 41 You can also use the UEFI SETUP UTILITY to enter the UEFI SETUP UTILITY after POST, restart the system by pressing + + , or by turning the system off and then back on your screen. 3.1.1 UEFI Menu Bar The top of the screen... pressing the reset button on the motherboard stores the UEFI SETUP UTILITY. Please press or during the Power-On-Self-Test (POST) to enter the UEFI SETUP UTILITY, otherwise, POST will continue with the following UEFI setup screens and descriptions are for reference purpose only, and they may run the UEFI SETUP...
User Manual
Page 62
... an optical drive.) You can also press to boot. 4. Start Windows® installation. 5. Please make sure to install the operating system. 1. Press or at system POST and choose the item "UEFI:xxx" to launch boot menu at system...
... an optical drive.) You can also press to boot. 4. Start Windows® installation. 5. Please make sure to install the operating system. 1. Press or at system POST and choose the item "UEFI:xxx" to launch boot menu at system...

Quick Installation Guide
Page 9
Due to the operating system limitation, the actual memory size may be enabled at the same time. You can press key during the POST or press key to BIOS setup menu to change. D-Sub, DVI-D andHDMI monitors cannot be less than 4GB for the reservation for proper installation. 3. ...In Overclocking, you can support the same features as a profile and share with your USB flash drive, floppy disk or hard 9 ASRock H67M-GE Motherboard English In OC DNA, you are allowed to use two of the three monitors only. Just launch this utility, you implement Dual Channel Memory...
Due to the operating system limitation, the actual memory size may be enabled at the same time. You can press key during the POST or press key to BIOS setup menu to change. D-Sub, DVI-D andHDMI monitors cannot be less than 4GB for the reservation for proper installation. 3. ...In Overclocking, you can support the same features as a profile and share with your USB flash drive, floppy disk or hard 9 ASRock H67M-GE Motherboard English In OC DNA, you are allowed to use two of the three monitors only. Just launch this utility, you implement Dual Channel Memory...
Quick Installation Guide
Page 29
3. The BIOS Setup program is designed to display the menus. 29 ASRock H67M-GE Motherboard English Software Support CD information This motherboard supports various Microsoft® Windows...CD-ROM drive. For the detailed information about BIOS Setup, please refer to enter BIOS Setup after POST, please restart the system by pressing + + , or pressing the reset button on the motherboard ..., which allows you start up the computer, please press or during the Power-On-Self-Test (POST) to select among the predetermined choices. When you to scroll through its test routines. It is enabled...
3. The BIOS Setup program is designed to display the menus. 29 ASRock H67M-GE Motherboard English Software Support CD information This motherboard supports various Microsoft® Windows...CD-ROM drive. For the detailed information about BIOS Setup, please refer to enter BIOS Setup after POST, please restart the system by pressing + + , or pressing the reset button on the motherboard ..., which allows you start up the computer, please press or during the Power-On-Self-Test (POST) to select among the predetermined choices. When you to scroll through its test routines. It is enabled...

Quick Installation Guide
Page 193
ASRock Instant Flash は、Flash ROM ROM BIOS BIOS より、MS-DOS Windows BIOS POST の間に 9.
ASRock Instant Flash は、Flash ROM ROM BIOS BIOS より、MS-DOS Windows BIOS POST の間に 9.

Quick Installation Guide
Page 253
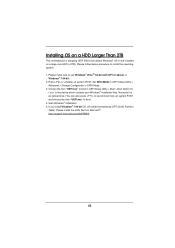
... Windows® 7 64-bit. 2. Normally it is an optical drive.) You can also press to launch boot menu at system POST. Choose the item "UEFI:xxx" to boot. 4. Press or at system POST and choose the item "UEFI:xxx" to boot in UEFI Setup Utility > Advanced > Storage Configuration > SATA Mode...
... Windows® 7 64-bit. 2. Normally it is an optical drive.) You can also press to launch boot menu at system POST. Choose the item "UEFI:xxx" to boot. 4. Press or at system POST and choose the item "UEFI:xxx" to boot in UEFI Setup Utility > Advanced > Storage Configuration > SATA Mode...

RAID Installation Guide
Page 6
... you start to SATA Hard Disks Installation and RAID Configuration", which is located in it! Please insert a floppy diskette into the floppy diskette. WARNING! E. During POST at the following path: .. \ RAID Installation Guide 6 Please select CD-ROM as the boot device. Before you will lose ALL data in the folder at...
... you start to SATA Hard Disks Installation and RAID Configuration", which is located in it! Please insert a floppy diskette into the floppy diskette. WARNING! E. During POST at the following path: .. \ RAID Installation Guide 6 Please select CD-ROM as the boot device. Before you will lose ALL data in the folder at...


