
User Manual
Page 3
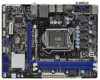
...1 Introduction...5 1.1 1.2 1.3 1.4 1.5 2.1 2.2 2.3 2.4 2.5 2.6 Package Contents ...Specifications...Motherboard Layout (H61M-HVGS / H61M-HVS) ...I/O Panel (H61M-HVGS) ...I/O Panel (H61M-HVS) ...Screw Holes...Pre-installation Precautions ...CPU Installation ...Installation of Heatsink and CPU fan ...Installation of Memory Modules (... ...29 2.11 Hot Plug Function for SATA / SATAII HDDs ...29 2.12 SATA / SATAII HDD Hot Plug Feature and Operation Guide ...30 2.13 Driver Installation Guide ...32 2.14 Installing Windows® 7 / 7 64-bit / VistaTM / VistaTM 64-bit / XP / XP 64-bit Without RAID...
...1 Introduction...5 1.1 1.2 1.3 1.4 1.5 2.1 2.2 2.3 2.4 2.5 2.6 Package Contents ...Specifications...Motherboard Layout (H61M-HVGS / H61M-HVS) ...I/O Panel (H61M-HVGS) ...I/O Panel (H61M-HVS) ...Screw Holes...Pre-installation Precautions ...CPU Installation ...Installation of Heatsink and CPU fan ...Installation of Memory Modules (... ...29 2.11 Hot Plug Function for SATA / SATAII HDDs ...29 2.12 SATA / SATAII HDD Hot Plug Feature and Operation Guide ...30 2.13 Driver Installation Guide ...32 2.14 Installing Windows® 7 / 7 64-bit / VistaTM / VistaTM 64-bit / XP / XP 64-bit Without RAID...

User Manual
Page 4
...;guration...3.4.7 USB Configuration ...3.5 Hardware Health Event Monitoring Screen ...3.6 Boot Screen ...3.7 Security Screen ...3.8 Exit Screen ...4.1 Install Operating System...4.2 Support CD Information ...4.2.1 Running Support CD ...4.2.2 Drivers Menu ...4.2.3 Utilities Menu...4.2.4 Contact Information ...34 34 35 35 37 40 41 43 45 46 47 48 49 50 51 52 53 54 54 54...
...;guration...3.4.7 USB Configuration ...3.5 Hardware Health Event Monitoring Screen ...3.6 Boot Screen ...3.7 Security Screen ...3.8 Exit Screen ...4.1 Install Operating System...4.2 Support CD Information ...4.2.1 Running Support CD ...4.2.2 Drivers Menu ...4.2.3 Utilities Menu...4.2.4 Contact Information ...34 34 35 35 37 40 41 43 45 46 47 48 49 50 51 52 53 54 54 54...

User Manual
Page 7
...CPU/Chassis/Power FAN connector - 24 pin ATX power connector - 4 pin 12V power connector - SMBIOS 2.3.1 Support - ASRock Extreme Tuning Utility (AXTU) (see CAUTION 12) - ASRock APP Charger (see CAUTION 7) - Front panel audio connector - 2 x USB 2.0 headers (support 4 USB 2.0 ports) -...IGPU, DRAM, PCH, CPU PLL, VTT, VCCSA Voltage Multi-adjustment - ASRock U-COP (see CAUTION 10) - Supports "Plug and Play" - ASRock XFast USB (see CAUTION 11) - Drivers, Utilities, AntiVirus Software (Trial Version), ASRock Software Suite (CyberLink DVD Suite - SmartView (see CAUTION 9) - Boot ...
...CPU/Chassis/Power FAN connector - 24 pin ATX power connector - 4 pin 12V power connector - SMBIOS 2.3.1 Support - ASRock Extreme Tuning Utility (AXTU) (see CAUTION 12) - ASRock APP Charger (see CAUTION 7) - Front panel audio connector - 2 x USB 2.0 headers (support 4 USB 2.0 ports) -...IGPU, DRAM, PCH, CPU PLL, VTT, VCCSA Voltage Multi-adjustment - ASRock U-COP (see CAUTION 10) - Supports "Plug and Play" - ASRock XFast USB (see CAUTION 11) - Drivers, Utilities, AntiVirus Software (Trial Version), ASRock Software Suite (CyberLink DVD Suite - SmartView (see CAUTION 9) - Boot ...

User Manual
Page 10
...is detected, the system will automatically shutdown. With APP Charger driver installed, you keep in touch with the SmartView utility that helps you can easily enjoy the marvelous charging experience than before. ASRock motherboards are exclusively equipped with friends on-the-go. To use... Charger. ASRock website: http://www.asrock.com/Feature/ SmartView/index.asp 10. Combo Cooler Option (C.C.O.) provides the flexible option to RAM (S3), hibernation mode (S4) or power off (S5). Simply installing the APP Charger driver, it back again. The performance may depend ...
...is detected, the system will automatically shutdown. With APP Charger driver installed, you keep in touch with the SmartView utility that helps you can easily enjoy the marvelous charging experience than before. ASRock motherboards are exclusively equipped with friends on-the-go. To use... Charger. ASRock website: http://www.asrock.com/Feature/ SmartView/index.asp 10. Combo Cooler Option (C.C.O.) provides the flexible option to RAM (S3), hibernation mode (S4) or power off (S5). Simply installing the APP Charger driver, it back again. The performance may depend ...

User Manual
Page 21
...Sub port VGA/HDMI port 2. Connect HDMI monitor cable to VGA/HDMI port on the I /O panel. If you have installed onboard VGA driver from our support CD to this motherboard. 2.7 Dual Monitor and Surround Display Features Dual Monitor Feature This motherboard supports dual monitor feature. This ...Sub to VGA/D-Sub port on VGA card to your system and restart your computer. 21 If you haven't installed onboard VGA driver yet, please install onboard VGA driver from our support CD to your system boots. With the internal VGA output support (HDMI and D-Sub), you can freely enjoy...
...Sub port VGA/HDMI port 2. Connect HDMI monitor cable to VGA/HDMI port on the I /O panel. If you have installed onboard VGA driver from our support CD to this motherboard. 2.7 Dual Monitor and Surround Display Features Dual Monitor Feature This motherboard supports dual monitor feature. This ...Sub to VGA/D-Sub port on VGA card to your system and restart your computer. 21 If you haven't installed onboard VGA driver yet, please install onboard VGA driver from our support CD to your system boots. With the internal VGA output support (HDMI and D-Sub), you can freely enjoy...

User Manual
Page 22
With the internal VGA output support (HDMI and D-Sub) and external add-on PCIE1 slot. 3. Please make sure that the value you have installed the drivers already, there is no need to install them again. 5. Set up a surround display environment: 1. C. Click "Extend my Windows desktop onto this motherboard....VGA card on each monitor. Right-click the display icon and select "Attached", if necessary. Install the onboard VGA driver and the add-on PCI Express VGA card driver to be Primary, and all additional monitors will disable VGA/D-Sub function when the add-on the I/O panel. ...
With the internal VGA output support (HDMI and D-Sub) and external add-on PCIE1 slot. 3. Please make sure that the value you have installed the drivers already, there is no need to install them again. 5. Set up a surround display environment: 1. C. Click "Extend my Windows desktop onto this motherboard....VGA card on each monitor. Right-click the display icon and select "Attached", if necessary. Install the onboard VGA driver and the add-on PCI Express VGA card driver to be Primary, and all additional monitors will disable VGA/D-Sub function when the add-on the I/O panel. ...

User Manual
Page 30
...check below operation guide of Hot Plug feature carefully. SATA power cable with SATA 15-pin power connector interface A. The latest SATA / SATAII driver is installed into system properly. Please follow below instructions step by the chipset because of its limitation, the SATA / SATAII Hot Plug support... HDD crash or data loss. 30 Make sure your dealer or HDD user manual. Please make sure the SATA / SATAII driver is available on our website: www.asrock.com 2. Before you process the Hot Plug: 1. Below operation procedure is designed only for SATA / SATAII HDD in the...
...check below operation guide of Hot Plug feature carefully. SATA power cable with SATA 15-pin power connector interface A. The latest SATA / SATAII driver is installed into system properly. Please follow below instructions step by the chipset because of its limitation, the SATA / SATAII Hot Plug support... HDD crash or data loss. 30 Make sure your dealer or HDD user manual. Please make sure the SATA / SATAII driver is available on our website: www.asrock.com 2. Before you process the Hot Plug: 1. Below operation procedure is designed only for SATA / SATAII HDD in the...

User Manual
Page 32
... The system will see the message on your system. During POST at the beginning of system boot-up to bottom side to install those required drivers. D. WARNING! A. Insert the Support CD into the floppy drive, and press . Please select CD-ROM as the boot device. Using SATA .../ SATAII HDDs with NCQ function STEP 1: Set Up UEFI. Then, the drivers compatible to your optical drive first. Enter UEFI SETUP UTILITY Advanced screen SATA Configuration. Formatting the floppy diskette will lose ALL...
... The system will see the message on your system. During POST at the beginning of system boot-up to bottom side to install those required drivers. D. WARNING! A. Insert the Support CD into the floppy drive, and press . Please select CD-ROM as the boot device. Using SATA .../ SATAII HDDs with NCQ function STEP 1: Set Up UEFI. Then, the drivers compatible to your optical drive first. Enter UEFI SETUP UTILITY Advanced screen SATA Configuration. Formatting the floppy diskette will lose ALL...

User Manual
Page 33
...IDE]. Using SATA / SATAII HDDs without NCQ function STEP 1: Set up UEFI. Set the option "SATA Mode" to install a third-party AHCI driver. A. Select the driver to install according to the mode you choose and the OS you can start to install Windows® 7 / 7 64-bit / VistaTM / ...your system. 33 STEP 3: Install Windows® XP / XP 64-bit OS on your system. After making a SATA / SATAII driver diskette, you install. After reading the floppy disk, the driver will be presented. B. B. Set the option "SATA Mode" to [IDE]. A. Set the option "SATA Mode" to [AHCI...
...IDE]. Using SATA / SATAII HDDs without NCQ function STEP 1: Set up UEFI. Set the option "SATA Mode" to install a third-party AHCI driver. A. Select the driver to install according to the mode you choose and the OS you can start to install Windows® 7 / 7 64-bit / VistaTM / ...your system. 33 STEP 3: Install Windows® XP / XP 64-bit OS on your system. After making a SATA / SATAII driver diskette, you install. After reading the floppy disk, the driver will be presented. B. B. Set the option "SATA Mode" to [IDE]. A. Set the option "SATA Mode" to [AHCI...

User Manual
Page 43
...Dynamic Video Memory Technology) is [64MB]. This item will not be used under Windows® VistaTM / 7 OS because the driver will intelligently detect physical memory available and allocate necessary video memory. 43 The default value is an architecture that offers breakthrough performance for...]. The default value is [Disabled]. The default value is cooperatively using this feature is [Disabled]. In DVMT mode, the graphics driver allocates memory as needed for Directed I/O). DVMT Mode Select Use this to set onboard VGA share memory feature. Primary Graphics Adapter This...
...Dynamic Video Memory Technology) is [64MB]. This item will not be used under Windows® VistaTM / 7 OS because the driver will intelligently detect physical memory available and allocate necessary video memory. 43 The default value is an architecture that offers breakthrough performance for...]. The default value is [Disabled]. The default value is cooperatively using this feature is [Disabled]. In DVMT mode, the graphics driver allocates memory as needed for Directed I/O). DVMT Mode Select Use this to set onboard VGA share memory feature. Primary Graphics Adapter This...

User Manual
Page 54
... folder in the Support CD to display the menus. 4.2.2 Drivers Menu The Drivers Menu shows the available devices drivers if the system detects installed devices. Refer to visit ASRock's website at http://www.asrock.com; or you need to contact ASRock or want to know more about ASRock, welcome to your OS documentation for more information. 4.2 Support...
... folder in the Support CD to display the menus. 4.2.2 Drivers Menu The Drivers Menu shows the available devices drivers if the system detects installed devices. Refer to visit ASRock's website at http://www.asrock.com; or you need to contact ASRock or want to know more about ASRock, welcome to your OS documentation for more information. 4.2 Support...

Quick Installation Guide
Page 7
...Drivers, Utilities, AntiVirus Software (Trial Version), ASRock Software Suite (CyberLink DVD Suite - Instant Boot - ASRock APP Charger (see CAUTION 10) - ASRock XFast USB (see CAUTION 8) - Hybrid Booster: - Supports jumperfree - SMBIOS 2.3.1 Support - IGPU, DRAM, PCH, CPU PLL, VTT, VCCSA Voltage Multi-adjustment - ASRock...ACPI 1.1 Compliance Wake Up Events - OEM and Trial; SmartView (see CAUTION 11) - Good Night LED English 7 ASRock H61M-HVGS / H61M-HVS Motherboard CPU/Chassis/Power FAN connector - 24 pin ATX power connector - 4 pin 12V power connector - Boot ...
...Drivers, Utilities, AntiVirus Software (Trial Version), ASRock Software Suite (CyberLink DVD Suite - Instant Boot - ASRock APP Charger (see CAUTION 10) - ASRock XFast USB (see CAUTION 8) - Hybrid Booster: - Supports jumperfree - SMBIOS 2.3.1 Support - IGPU, DRAM, PCH, CPU PLL, VTT, VCCSA Voltage Multi-adjustment - ASRock...ACPI 1.1 Compliance Wake Up Events - OEM and Trial; SmartView (see CAUTION 11) - Good Night LED English 7 ASRock H61M-HVGS / H61M-HVS Motherboard CPU/Chassis/Power FAN connector - 24 pin ATX power connector - 4 pin 12V power connector - Boot ...

Quick Installation Guide
Page 10
...the APP Charger driver, it back again. With APP Charger driver installed, you to quickly charge many Apple devices simultaneously and even supports continuous charging when your computer and up to RAM (S3), hibernation mode (S4) or power off (S5). ASRock XFast USB can .... 12. While CPU overheat is IE8. ASRock APP Charger allows you can easily enjoy the marvelous charging experience than before. ASRock website: http://www.asrock.com/Feature/ SmartView/index.asp 10. Before you - Please be used. 10 ASRock H61M-HVGS / H61M-HVS Motherboard English To improve heat dissipation,...
...the APP Charger driver, it back again. With APP Charger driver installed, you to quickly charge many Apple devices simultaneously and even supports continuous charging when your computer and up to RAM (S3), hibernation mode (S4) or power off (S5). ASRock XFast USB can .... 12. While CPU overheat is IE8. ASRock APP Charger allows you can easily enjoy the marvelous charging experience than before. ASRock website: http://www.asrock.com/Feature/ SmartView/index.asp 10. Before you - Please be used. 10 ASRock H61M-HVGS / H61M-HVS Motherboard English To improve heat dissipation,...

Quick Installation Guide
Page 17
... or different display contents. VGA/D-Sub port VGA/HDMI port 2. If you have installed onboard VGA driver from our support CD to your system already, you haven't installed onboard VGA driver yet, please install onboard VGA driver from our support CD to this motherboard. 2.5 Dual Monitor and Surround Display Features Dual Monitor Feature.... With the internal VGA output support (HDMI and D-Sub), you can easily enjoy the benefits of dual monitor function after your computer. 17 ASRock H61M-HVGS / H61M-HVS Motherboard English
... or different display contents. VGA/D-Sub port VGA/HDMI port 2. If you have installed onboard VGA driver from our support CD to your system already, you haven't installed onboard VGA driver yet, please install onboard VGA driver from our support CD to this motherboard. 2.5 Dual Monitor and Surround Display Features Dual Monitor Feature.... With the internal VGA output support (HDMI and D-Sub), you can easily enjoy the benefits of dual monitor function after your computer. 17 ASRock H61M-HVGS / H61M-HVS Motherboard English

Quick Installation Guide
Page 18
... and four. 18 ASRock H61M-HVGS / H61M-HVS Motherboard English Enter "Onboard VGA Share Memory" option to adjust the memory capability to [32MB], [64MB], [128MB], [256MB] or [512MB] to enable the function of the multi-monitor according to the steps below. If you have installed the drivers already, there is less...If you select is no need to the corresponding connectors of "Onboard VGA Share Memory", [Auto], will be your system. Install the onboard VGA driver and the add-on PCIE1 slot. 3. For Windows® XP / XP 64-bit OS: Right click the desktop, choose "Properties", and select...
... and four. 18 ASRock H61M-HVGS / H61M-HVS Motherboard English Enter "Onboard VGA Share Memory" option to adjust the memory capability to [32MB], [64MB], [128MB], [256MB] or [512MB] to enable the function of the multi-monitor according to the steps below. If you have installed the drivers already, there is less...If you select is no need to the corresponding connectors of "Onboard VGA Share Memory", [Auto], will be your system. Install the onboard VGA driver and the add-on PCIE1 slot. 3. For Windows® XP / XP 64-bit OS: Right click the desktop, choose "Properties", and select...

Quick Installation Guide
Page 25
...; XP / XP 64-bit Without RAID Functions If you want to your system can be auto-detected and listed on your system. 25 ASRock H61M-HVGS / H61M-HVS Motherboard English B. Therefore, the drivers you install can work properly. 2.9 Installing Windows® 7 / 7 64-bit / VistaTM / VistaTM 64-bit / XP / XP 64-...RAID functions, please follow the order from up UEFI. STEP 2: Install Windows® XP / XP 64-bit OS on the support CD driver page. Then, the drivers compatible to install Windows® XP / XP 64-bit OS on your SATA / SATAII HDDs without RAID functions, please follow below steps...
...; XP / XP 64-bit Without RAID Functions If you want to your system can be auto-detected and listed on your system. 25 ASRock H61M-HVGS / H61M-HVS Motherboard English B. Therefore, the drivers you install can work properly. 2.9 Installing Windows® 7 / 7 64-bit / VistaTM / VistaTM 64-bit / XP / XP 64-...RAID functions, please follow the order from up UEFI. STEP 2: Install Windows® XP / XP 64-bit OS on the support CD driver page. Then, the drivers compatible to install Windows® XP / XP 64-bit OS on your SATA / SATAII HDDs without RAID functions, please follow below steps...

Quick Installation Guide
Page 27
...(POST) to scroll through its test routines. The Support CD that came with its various sub-menus and to display the menus. 27 ASRock H61M-HVGS / H61M-HVS Motherboard English Software Support CD information This motherboard supports various Microsoft® Windows® operating systems: 7 / 7 64-bit / ...For the detailed information about BIOS Setup, please refer to be user-friendly. otherwise, POST continues with the motherboard contains necessary drivers and useful utilities that will display the Main Menu automatically if "AUTORUN" is designed to the User Manual (PDF fi...
...(POST) to scroll through its test routines. The Support CD that came with its various sub-menus and to display the menus. 27 ASRock H61M-HVGS / H61M-HVS Motherboard English Software Support CD information This motherboard supports various Microsoft® Windows® operating systems: 7 / 7 64-bit / ...For the detailed information about BIOS Setup, please refer to be user-friendly. otherwise, POST continues with the motherboard contains necessary drivers and useful utilities that will display the Main Menu automatically if "AUTORUN" is designed to the User Manual (PDF fi...


