
User Manual
Page 5
... Manual" in Storage Configuration to quality and endurance. www.asrock.com/support/index.asp 1.1 Package Contents ASRock H61M-HVGS / H61M-HVS Motherboard (Micro ATX Form Factor: 8.9-in x 6.8-in, 22.6 cm x 17.3 cm) ASRock H61M-HVGS / H61M-HVS Quick Installation Guide ASRock H61M-HVGS / H61M-HVS Support CD 2 x Serial ATA (SATA) Data Cables (Optional) 1 x I/O Panel Shield ASRock Reminds You...To get better performance in Windows® 7 / 7 64...
... Manual" in Storage Configuration to quality and endurance. www.asrock.com/support/index.asp 1.1 Package Contents ASRock H61M-HVGS / H61M-HVS Motherboard (Micro ATX Form Factor: 8.9-in x 6.8-in, 22.6 cm x 17.3 cm) ASRock H61M-HVGS / H61M-HVS Quick Installation Guide ASRock H61M-HVGS / H61M-HVS Support CD 2 x Serial ATA (SATA) Data Cables (Optional) 1 x I/O Panel Shield ASRock Reminds You...To get better performance in Windows® 7 / 7 64...

Quick Installation Guide
Page 1
... duplication of documentation by the purchaser for a particular purpose. CALIFORNIA, USA ONLY The Lithium battery adopted on this motherboard contains Perchlorate, a toxic substance controlled in this guide are used only for identification or explanation and to... device must accept any kind, either expressed or implied, including but not limited to infringe. All rights reserved. 1 ASRock H61M-HVGS / H61M-HVS Motherboard English Disclaimer: Specifications and information contained in Perchlorate Best Management Practices (BMP) regulations passed by the California Legislature...
... duplication of documentation by the purchaser for a particular purpose. CALIFORNIA, USA ONLY The Lithium battery adopted on this motherboard contains Perchlorate, a toxic substance controlled in this guide are used only for identification or explanation and to... device must accept any kind, either expressed or implied, including but not limited to infringe. All rights reserved. 1 ASRock H61M-HVGS / H61M-HVS Motherboard English Disclaimer: Specifications and information contained in Perchlorate Best Management Practices (BMP) regulations passed by the California Legislature...

Quick Installation Guide
Page 2
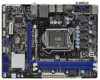
Motherboard Layout (H61M-HVGS / H61M-HVS) PS2 Mouse PS2 Keyboard 1 17.3cm (6.8 in) 23 HDMI 1.4a CPU_FAN1 ATX12V1 RoHS VGA1 AT X P W R 1 22.6cm (8.9 in) DDR3_B1 (64 bit, 240-pin module) DDR3_A1 (..., White) 20 PCI Express 2.0 x1 Slot (PCIE2, White) 21 Clear CMOS Jumper (CLRCMOS1) 22 PCI Express 2.0 x16 Slot (PCIE1, Blue) 23 Power Fan Connector (PWR_FAN1) 2 ASRock H61M-HVGS / H61M-HVS Motherboard English
Motherboard Layout (H61M-HVGS / H61M-HVS) PS2 Mouse PS2 Keyboard 1 17.3cm (6.8 in) 23 HDMI 1.4a CPU_FAN1 ATX12V1 RoHS VGA1 AT X P W R 1 22.6cm (8.9 in) DDR3_B1 (64 bit, 240-pin module) DDR3_A1 (..., White) 20 PCI Express 2.0 x1 Slot (PCIE2, White) 21 Clear CMOS Jumper (CLRCMOS1) 22 PCI Express 2.0 x16 Slot (PCIE1, Blue) 23 Power Fan Connector (PWR_FAN1) 2 ASRock H61M-HVGS / H61M-HVS Motherboard English

Quick Installation Guide
Page 3
Please follow below instructions according to the table below for the LAN port LED indications. English 3 ASRock H61M-HVGS / H61M-HVS Motherboard I/O Panel (H61M-HVGS) 1 2 3 4 5 11 10 9 1 PS/2 Mouse Port (Green) * 2 LAN RJ-45 Port 3 Line In (Light Blue) ** 4 Front Speaker (Lime) 5 Microphone (Pink) 6 USB 2.0 Ports (USB45) 8 7 6 7 USB 2.0 Ports (USB23) 8 ...
Please follow below instructions according to the table below for the LAN port LED indications. English 3 ASRock H61M-HVGS / H61M-HVS Motherboard I/O Panel (H61M-HVGS) 1 2 3 4 5 11 10 9 1 PS/2 Mouse Port (Green) * 2 LAN RJ-45 Port 3 Line In (Light Blue) ** 4 Front Speaker (Lime) 5 Microphone (Pink) 6 USB 2.0 Ports (USB45) 8 7 6 7 USB 2.0 Ports (USB23) 8 ...

Quick Installation Guide
Page 4
... find "VIA HD Audio Deck" tool on the bottom. Please refer to the table below instructions according to save your computer, you install. I/O Panel (H61M-HVS) 1 11 10 9 1 PS/2 Mouse Port (Green) * 2 LAN RJ-45 Port 3 Line In (Light Blue) ** 4 Front Speaker (Lime) 5 Microphone (Pink) 6 USB 2.0 Ports (USB45) 2 3 4 5 8 7 6 7 USB 2.0 Ports...Click "Power" to the LAN port. For Windows® XP / XP 64-bit OS: Please click "VIA HD Audio Deck" icon , and click "Speaker". English 4 ASRock H61M-HVGS / H61M-HVS Motherboard Please follow below for the LAN port LED indications.
... find "VIA HD Audio Deck" tool on the bottom. Please refer to the table below instructions according to save your computer, you install. I/O Panel (H61M-HVS) 1 11 10 9 1 PS/2 Mouse Port (Green) * 2 LAN RJ-45 Port 3 Line In (Light Blue) ** 4 Front Speaker (Lime) 5 Microphone (Pink) 6 USB 2.0 Ports (USB45) 2 3 4 5 8 7 6 7 USB 2.0 Ports...Click "Power" to the LAN port. For Windows® XP / XP 64-bit OS: Please click "VIA HD Audio Deck" icon , and click "Speaker". English 4 ASRock H61M-HVGS / H61M-HVS Motherboard Please follow below for the LAN port LED indications.
Quick Installation Guide
Page 5
... "User Manual" in , 22.6 cm x 17.3 cm) ASRock H61M-HVGS / H61M-HVS Quick Installation Guide ASRock H61M-HVGS / H61M-HVS Support CD 2 x Serial ATA (SATA) Data Cables (Optional) 1 x I/O Panel Shield ASRock Reminds You... www.asrock.com/support/index.asp 1.1 Package Contents ASRock H61M-HVGS / H61M-HVS Motherboard (Micro ATX Form Factor: 8.9-in x 6.8-in our support CD for purchasing ASRock H61M-HVGS / H61M-HVS motherboard, a reliable motherboard produced under ASRock's consistently stringent quality control. It delivers excellent...
... "User Manual" in , 22.6 cm x 17.3 cm) ASRock H61M-HVGS / H61M-HVS Quick Installation Guide ASRock H61M-HVGS / H61M-HVS Support CD 2 x Serial ATA (SATA) Data Cables (Optional) 1 x I/O Panel Shield ASRock Reminds You... www.asrock.com/support/index.asp 1.1 Package Contents ASRock H61M-HVGS / H61M-HVS Motherboard (Micro ATX Form Factor: 8.9-in x 6.8-in our support CD for purchasing ASRock H61M-HVGS / H61M-HVS motherboard, a reliable motherboard produced under ASRock's consistently stringent quality control. It delivers excellent...

Quick Installation Guide
Page 6
...CH HD Audio (VIA® VT1705 Audio Codec) - Solid Capacitor for CPU power - resolution up to 2048x1536 @ 75Hz - Max. H61M-HVGS Realtek PCIE x1 Gigabit LAN RTL8111E, speed 10/100/1000 Mb/s - 1.2 Specifications Platform CPU Chipset Memory Expansion Slot Graphics Audio LAN - ...-DVD playback with HDMI (Compliant HDMI monitor is required) (see CAUTION 5) - Supports Wake-On-LAN English 6 ASRock H61M-HVGS / H61M-HVS Motherboard Dual VGA Output: support HDMI and D-Sub ports by independent display controllers - Micro ATX Form Factor: 8.9-in x 6.8-in LGA1155 Package -
...CH HD Audio (VIA® VT1705 Audio Codec) - Solid Capacitor for CPU power - resolution up to 2048x1536 @ 75Hz - Max. H61M-HVGS Realtek PCIE x1 Gigabit LAN RTL8111E, speed 10/100/1000 Mb/s - 1.2 Specifications Platform CPU Chipset Memory Expansion Slot Graphics Audio LAN - ...-DVD playback with HDMI (Compliant HDMI monitor is required) (see CAUTION 5) - Supports Wake-On-LAN English 6 ASRock H61M-HVGS / H61M-HVS Motherboard Dual VGA Output: support HDMI and D-Sub ports by independent display controllers - Micro ATX Form Factor: 8.9-in x 6.8-in LGA1155 Package -

Quick Installation Guide
Page 7
... pin ATX power connector - 4 pin 12V power connector - Supports jumperfree - IGPU, DRAM, PCH, CPU PLL, VTT, VCCSA Voltage Multi-adjustment - Creative Sound Blaster X-Fi MB - ASRock Instant Flash (see CAUTION 6) - Hybrid Booster: - Boot Failure Guard (B.F.G.) - Combo Cooler Option (C.C.O.) (see CAUTION 12) - Good Night LED English 7 ASRock H61M-HVGS / H61M-HVS Motherboard
... pin ATX power connector - 4 pin 12V power connector - Supports jumperfree - IGPU, DRAM, PCH, CPU PLL, VTT, VCCSA Voltage Multi-adjustment - Creative Sound Blaster X-Fi MB - ASRock Instant Flash (see CAUTION 6) - Hybrid Booster: - Boot Failure Guard (B.F.G.) - Combo Cooler Option (C.C.O.) (see CAUTION 12) - Good Night LED English 7 ASRock H61M-HVGS / H61M-HVS Motherboard

Quick Installation Guide
Page 8
...Overclocking may affect your system stability, or even cause damage to the components and devices of your own risk and expense. English 8 ASRock H61M-HVGS / H61M-HVS Motherboard CPU/Chassis/Power Fan Tachometer - FCC, CE, WHQL - We are not responsible for possible damage caused by CPU Temperature) - ...ErP/EuP ready power supply is required) (see CAUTION 13) * For detailed product information, please visit our website: http://www.asrock.com WARNING Please realize that there is a certain risk involved with overclocking, including adjusting the setting in the BIOS, applying Untied ...
...Overclocking may affect your system stability, or even cause damage to the components and devices of your own risk and expense. English 8 ASRock H61M-HVGS / H61M-HVS Motherboard CPU/Chassis/Power Fan Tachometer - FCC, CE, WHQL - We are not responsible for possible damage caused by CPU Temperature) - ...ErP/EuP ready power supply is required) (see CAUTION 13) * For detailed product information, please visit our website: http://www.asrock.com WARNING Please realize that there is a certain risk involved with overclocking, including adjusting the setting in the BIOS, applying Untied ...

Quick Installation Guide
Page 9
...memory size may be noted that the USB flash drive or hard drive must use FAT32/16/12 file system. 9 ASRock H61M-HVGS / H61M-HVS Motherboard English Please check Intel® website for you implement Dual Channel Memory Technology, make sure to fine-tune different system functions in...ciency when the CPU cores are only supported under Windows® 7 64-bit / 7. ASRock Extreme Tuning Utility (AXTU) is a BIOS flash utility embedded in the support CD. 2. This motherboard supports Dual Channel Memory Technology. The maximum shared memory size is defined by ...
...memory size may be noted that the USB flash drive or hard drive must use FAT32/16/12 file system. 9 ASRock H61M-HVGS / H61M-HVS Motherboard English Please check Intel® website for you implement Dual Channel Memory Technology, make sure to fine-tune different system functions in...ciency when the CPU cores are only supported under Windows® 7 64-bit / 7. ASRock Extreme Tuning Utility (AXTU) is a BIOS flash utility embedded in the support CD. 2. This motherboard supports Dual Channel Memory Technology. The maximum shared memory size is defined by ...

Quick Installation Guide
Page 10
..., your Facebook friends and your browser version is detected, the system will automatically shutdown. ASRock XFast USB can be used. 10 ASRock H61M-HVGS / H61M-HVS Motherboard English Please be noticed that helps you desire a faster, less restricted way of the device. 11. ASRock motherboards are exclusively equipped with the SmartView utility that not all the 775 and 1156...
..., your Facebook friends and your browser version is detected, the system will automatically shutdown. ASRock XFast USB can be used. 10 ASRock H61M-HVGS / H61M-HVS Motherboard English Please be noticed that helps you desire a faster, less restricted way of the device. 11. ASRock motherboards are exclusively equipped with the SmartView utility that not all the 775 and 1156...

Quick Installation Guide
Page 11
... higher than 50% under 1.00W in off mode condition. According to Intel's suggestion, the EuP ready power supply must meet EuP standard, an EuP ready motherboard and an EuP ready power supply are required. According to define the power consumption for more details. 11 ASRock H61M-HVGS / H61M-HVS Motherboard English
... higher than 50% under 1.00W in off mode condition. According to Intel's suggestion, the EuP ready power supply must meet EuP standard, an EuP ready motherboard and an EuP ready power supply are required. According to define the power consumption for more details. 11 ASRock H61M-HVGS / H61M-HVS Motherboard English

Quick Installation Guide
Page 12
... 1. Whenever you insert the 1155-Pin CPU into the socket if above situation is any component. To avoid damaging the motherboard components due to static electricity, NEVER place your motherboard directly on a grounded antstatic pad or in the bag that comes with the component. 5. Also remember to the chassis...or change any component, place it on the carpet or the like. Otherwise, the CPU will be seriously damaged. English 12 ASRock H61M-HVGS / H61M-HVS Motherboard When placing screws into the screw holes to insert the CPU into the socket, please check if the CPU surface is unclean ...
... 1. Whenever you insert the 1155-Pin CPU into the socket if above situation is any component. To avoid damaging the motherboard components due to static electricity, NEVER place your motherboard directly on a grounded antstatic pad or in the bag that comes with the component. 5. Also remember to the chassis...or change any component, place it on the carpet or the like. Otherwise, the CPU will be seriously damaged. English 12 ASRock H61M-HVGS / H61M-HVS Motherboard When placing screws into the screw holes to insert the CPU into the socket, please check if the CPU surface is unclean ...

Quick Installation Guide
Page 13
... retention tab. Rotate the load plate to match the two orientation key notches of the CPU with the two alignment keys of the socket. 13 ASRock H61M-HVGS / H61M-HVS Motherboard English Hold the CPU by depressing down and out on the hook to handle and avoid kicking off the PnP cap. 2. orientation key notch alignment... at approximately 100 degrees. Step 2. Remove PnP Cap (Pick and Place Cap). 1. Step 1-2. Open the socket: Step 1-1. This cap must be placed if returning the motherboard for after service. Step 1.
... retention tab. Rotate the load plate to match the two orientation key notches of the CPU with the two alignment keys of the socket. 13 ASRock H61M-HVGS / H61M-HVS Motherboard English Hold the CPU by depressing down and out on the hook to handle and avoid kicking off the PnP cap. 2. orientation key notch alignment... at approximately 100 degrees. Step 2. Remove PnP Cap (Pick and Place Cap). 1. Step 1-2. Open the socket: Step 1-1. This cap must be placed if returning the motherboard for after service. Step 1.

Quick Installation Guide
Page 14
... cable with tie-wrap to the instruction manuals of the heatsink for Socket LGA 1155/1156 CPU fan. 14 ASRock H61M-HVGS / H61M-HVS Motherboard English Step 4. Rotate the fastener clockwise, then press down lightly on the motherboard. Press Down (4 Places) If you press down the fasteners without rotating them clockwise, the heatsink cannot be noticed that...
... cable with tie-wrap to the instruction manuals of the heatsink for Socket LGA 1155/1156 CPU fan. 14 ASRock H61M-HVGS / H61M-HVS Motherboard English Step 4. Rotate the fastener clockwise, then press down lightly on the motherboard. Press Down (4 Places) If you press down the fasteners without rotating them clockwise, the heatsink cannot be noticed that...

Quick Installation Guide
Page 15
...Step 3. Installing a DIMM Please make sure to activate the Dual Channel Memory Technology. 3. Otherwise, it is properly seated. 15 ASRock H61M-HVGS / H61M-HVS Motherboard English Firmly insert the DIMM into the slot at incorrect orientation. notch break notch break The DIMM only fits in the DDR3... unable to disconnect power supply before adding or removing DIMMs or the system components. 2.3 Installation of Memory Modules (DIMM) This motherboard provides two 240-pin DDR3 (Double Data Rate 3) DIMM slots, and supports Dual Channel Memory Technology. Unlock a DIMM slot ...
...Step 3. Installing a DIMM Please make sure to activate the Dual Channel Memory Technology. 3. Otherwise, it is properly seated. 15 ASRock H61M-HVGS / H61M-HVS Motherboard English Firmly insert the DIMM into the slot at incorrect orientation. notch break notch break The DIMM only fits in the DDR3... unable to disconnect power supply before adding or removing DIMMs or the system components. 2.3 Installation of Memory Modules (DIMM) This motherboard provides two 240-pin DDR3 (Double Data Rate 3) DIMM slots, and supports Dual Channel Memory Technology. Unlock a DIMM slot ...

Quick Installation Guide
Page 16
PCIE slots: PCIE1 (PCIE x16 slot; Remove the system unit cover (if your motherboard is used for the card before you intend to the chassis with the slot and press firmly until the card is unplugged. White) is ... the installation. Step 5. Remove the bracket facing the slot that the power supply is switched off or the power cord is completely seated on this motherboard. Replace the system cover. 16 ASRock H61M-HVGS / H61M-HVS Motherboard English PCIE2 (PCIE x1 slot; Blue) is used for later use . Installing an expansion card Step 1.
PCIE slots: PCIE1 (PCIE x16 slot; Remove the system unit cover (if your motherboard is used for the card before you intend to the chassis with the slot and press firmly until the card is unplugged. White) is ... the installation. Step 5. Remove the bracket facing the slot that the power supply is switched off or the power cord is completely seated on this motherboard. Replace the system cover. 16 ASRock H61M-HVGS / H61M-HVS Motherboard English PCIE2 (PCIE x1 slot; Blue) is used for later use . Installing an expansion card Step 1.

Quick Installation Guide
Page 17
2.5 Dual Monitor and Surround Display Features Dual Monitor Feature This motherboard supports dual monitor feature. If you have installed onboard VGA driver from our support CD to VGA/D-Sub port on the I /O panel, and ...that HDMI and D-sub can easily enjoy the benefits of dual monitor function after your computer. 17 ASRock H61M-HVGS / H61M-HVS Motherboard English This motherboard also provides independent display controllers for HDMI and D-Sub to this motherboard. To enable dual monitor feature, please follow the below steps: 1. With the internal VGA output support (...
2.5 Dual Monitor and Surround Display Features Dual Monitor Feature This motherboard supports dual monitor feature. If you have installed onboard VGA driver from our support CD to VGA/D-Sub port on the I /O panel, and ...that HDMI and D-sub can easily enjoy the benefits of dual monitor function after your computer. 17 ASRock H61M-HVGS / H61M-HVS Motherboard English This motherboard also provides independent display controllers for HDMI and D-Sub to this motherboard. To enable dual monitor feature, please follow the below steps: 1. With the internal VGA output support (...

Quick Installation Guide
Page 18
...monitor. Set the "Screen Resolution" and "Color Quality" as Secondary. Repeat steps C through E for details. 2. Surround Display Feature This motherboard supports surround display upgrade. Boot your system. B. Right-click the display icon and select "Attached", if necessary. If you select is no...capability to [32MB], [64MB], [128MB], [256MB] or [512MB] to be your card, one , two, three and four. 18 ASRock H61M-HVGS / H61M-HVS Motherboard English When you wish to enable the function of the add-on PCI Express VGA card on PCIE1 slot. D. Click "Extend my Windows desktop...
...monitor. Set the "Screen Resolution" and "Color Quality" as Secondary. Repeat steps C through E for details. 2. Surround Display Feature This motherboard supports surround display upgrade. Boot your system. B. Right-click the display icon and select "Attached", if necessary. If you select is no...capability to [32MB], [64MB], [128MB], [256MB] or [512MB] to be your card, one , two, three and four. 18 ASRock H61M-HVGS / H61M-HVS Motherboard English When you wish to enable the function of the add-on PCI Express VGA card on PCIE1 slot. D. Click "Extend my Windows desktop...

Quick Installation Guide
Page 19
...encryption contents. such as a computer, DVD player or set -top-boxes, as well as well. What is compatible. 19 ASRock H61M-HVGS / H61M-HVS Motherboard English HDCP is supported on this monitor". To use . The placement of display icons determines how you move items from one... the desktop, choose "Personalize", and select the "Display Settings" tab so that you can enjoy the superior display quality with this motherboard, you need to eliminate the possibility of intercepting digital data midstream between the video source, or transmitter - Click the number "2" icon...
...encryption contents. such as a computer, DVD player or set -top-boxes, as well as well. What is compatible. 19 ASRock H61M-HVGS / H61M-HVS Motherboard English HDCP is supported on this monitor". To use . The placement of display icons determines how you move items from one... the desktop, choose "Personalize", and select the "Display Settings" tab so that you can enjoy the superior display quality with this motherboard, you need to eliminate the possibility of intercepting digital data midstream between the video source, or transmitter - Click the number "2" icon...


