Intel Rapid Storage Guide
Page 12
... method) In order to install an operating system onto a RAID volume, the RAID option must be used to load the Intel® Rapid Storage Technology driver during POST, press Ctrl and i at the same time to enter the option ROM user interface. 2.
... method) In order to install an operating system onto a RAID volume, the RAID option must be used to load the Intel® Rapid Storage Technology driver during POST, press Ctrl and i at the same time to enter the option ROM user interface. 2.
Intel Rapid Storage Guide
Page 13
... F6. Use the Floppy Configuration Utility to create a floppy disk with a screen asking you need to install the Intel Rapid Storage Technology driver during text-mode phase). At this point, you see a prompt that says, Press F6 if you to load support for mass storage device... Manufacturer-supplied hardware support disk into Drive A:, insert ;a floppy disk containing the following steps to install a third party SCSI or RAID driver. This message appears at the beginning of available SCSI adapters. Press S to confirm your controller and continue. Select the volume size and...
... F6. Use the Floppy Configuration Utility to create a floppy disk with a screen asking you need to install the Intel Rapid Storage Technology driver during text-mode phase). At this point, you see a prompt that says, Press F6 if you to load support for mass storage device... Manufacturer-supplied hardware support disk into Drive A:, insert ;a floppy disk containing the following steps to install a third party SCSI or RAID driver. This message appears at the beginning of available SCSI adapters. Press S to confirm your controller and continue. Select the volume size and...
Intel Rapid Storage Guide
Page 16
...-supplied hardware support disk into Drive A:, insert a floppy disk containing the following steps to install the Intel® Rapid Storage Technology driver using F6 when in RAID mode or AHCI mode, the F6 installation method must be prompted with the necessary files. Setup will happen..., IASTOR.SYS, and TXTSETUP.OEM. You do not have a floppy drive on Microsoft Windows 7 and Microsoft Windows 8 because Intel provided a RAID driver as part of the operating system. 16 You can use the Floppy Configuration Utility to create a floppy disk with a screen asking you do not...
...-supplied hardware support disk into Drive A:, insert a floppy disk containing the following steps to install the Intel® Rapid Storage Technology driver using F6 when in RAID mode or AHCI mode, the F6 installation method must be prompted with the necessary files. Setup will happen..., IASTOR.SYS, and TXTSETUP.OEM. You do not have a floppy drive on Microsoft Windows 7 and Microsoft Windows 8 because Intel provided a RAID driver as part of the operating system. 16 You can use the Floppy Configuration Utility to create a floppy disk with a screen asking you do not...
Intel Rapid Storage Guide
Page 17
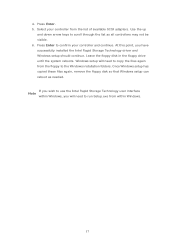
... floppy disk so that Windows setup can reboot as all controllers may not be visible. 6. If you have successfully installed the Intel Rapid Storage Technology driver and Windows setup should continue. 4.
... floppy disk so that Windows setup can reboot as all controllers may not be visible. 6. If you have successfully installed the Intel Rapid Storage Technology driver and Windows setup should continue. 4.
RAID Installation Guide
Page 7
... BIOS RAID Items After installing the hard disk drives, please set SATA Mode Selection to complete the process. STEP 2: Use ASRock Easy RAID Installer Easy RAID Installer can copy the RAID driver from a support CD to p.8 -17 of this feature is not available for instructions on your system, and press key to...
... BIOS RAID Items After installing the hard disk drives, please set SATA Mode Selection to complete the process. STEP 2: Use ASRock Easy RAID Installer Easy RAID Installer can copy the RAID driver from a support CD to p.8 -17 of this feature is not available for instructions on your system, and press key to...
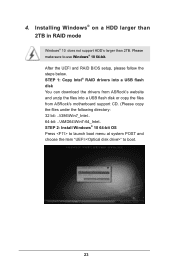
RAID Installation Guide
Page 23
... than 2TB. Please make sure to boot. 23 STEP 1: Copy Intel® RAID drivers into a USB flash disk You can download the drivers from ASRock's website and unzip the files into a USB flash disk or copy the files from ASRock's motherboard support CD. (Please copy the files under the following directory: 32 bit: ..\i386...
... than 2TB. Please make sure to boot. 23 STEP 1: Copy Intel® RAID drivers into a USB flash disk You can download the drivers from ASRock's website and unzip the files into a USB flash disk or copy the files from ASRock's motherboard support CD. (Please copy the files under the following directory: 32 bit: ..\i386...
RAID Installation Guide
Page 24
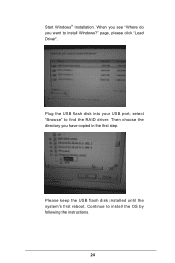
Start Windows® Installation. select "Browse" to install Windows?" Then choose the directory you want to find the RAID driver. Plug the USB flash disk into your USB port; When you see "Where do you have copied in the first step. page, please click "Load Driver". Please keep the USB flash disk installed until the system's first reboot. Continue to install the OS by following the instructions. 24
Start Windows® Installation. select "Browse" to install Windows?" Then choose the directory you want to find the RAID driver. Plug the USB flash disk into your USB port; When you see "Where do you have copied in the first step. page, please click "Load Driver". Please keep the USB flash disk installed until the system's first reboot. Continue to install the OS by following the instructions. 24
RAID Installation Guide
Page 25
... >30 mins.) C. Windows® 10 64-bit: A. Windows® will need to follow the instructions below to boot into Windows® or install driver/utilities. E. After installing Windows® 10 64-bit, install the hotfix kb2505454. (This may take more time to fix this problem. Please start to ...reboot.) D. Disk volume > 2TB), it may take about 5 minutes to install motherboard drivers and utilities. 25 If you encounter this problem, you install Windows® 10 64-bit on a large hard disk (ex. If you will install...
... >30 mins.) C. Windows® 10 64-bit: A. Windows® will need to follow the instructions below to boot into Windows® or install driver/utilities. E. After installing Windows® 10 64-bit, install the hotfix kb2505454. (This may take more time to fix this problem. Please start to ...reboot.) D. Disk volume > 2TB), it may take about 5 minutes to install motherboard drivers and utilities. 25 If you encounter this problem, you install Windows® 10 64-bit on a large hard disk (ex. If you will install...
User Manual
Page 5
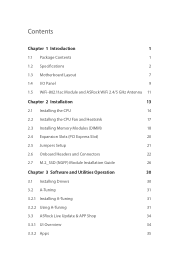
...1 Introduction 1 1.1 Package Contents 1 1.2 Specifications 2 1.3 Motherboard Layout 7 1.4 I/O Panel 9 1.5 WiFi-802.11ac Module and ASRock WiFi 2.4/5 GHz Antenna 11 Chapter 2 Installation 13 2.1 Installing the CPU 14 2.2 Installing the CPU Fan and Heatsink 17 2.3 Installing... Headers and Connectors 22 2.7 M.2_SSD (NGFF) Module Installation Guide 26 Chapter 3 Software and Utilities Operation 30 3.1 Installing Drivers 30 3.2 A-Tuning 31 3.2.1 Installing A-Tuning 31 3.2.2 Using A-Tuning 31 3.3 ASRock Live Update & APP Shop 34 3.3.1 UI Overview 34 3.3.2 Apps 35
...1 Introduction 1 1.1 Package Contents 1 1.2 Specifications 2 1.3 Motherboard Layout 7 1.4 I/O Panel 9 1.5 WiFi-802.11ac Module and ASRock WiFi 2.4/5 GHz Antenna 11 Chapter 2 Installation 13 2.1 Installing the CPU 14 2.2 Installing the CPU Fan and Heatsink 17 2.3 Installing... Headers and Connectors 22 2.7 M.2_SSD (NGFF) Module Installation Guide 26 Chapter 3 Software and Utilities Operation 30 3.1 Installing Drivers 30 3.2 A-Tuning 31 3.2.1 Installing A-Tuning 31 3.2.2 Using A-Tuning 31 3.3 ASRock Live Update & APP Shop 34 3.3.1 UI Overview 34 3.3.2 Apps 35
User Manual
Page 6
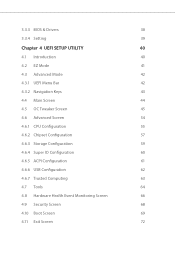
3.3.3 BIOS & Drivers 38 3.3.4 Setting 39 Chapter 4 UEFI SETUP UTILITY 40 4.1 Introduction 40 4.2 EZ Mode 41 4.3 Advanced Mode 42 4.3.1 UEFI Menu Bar 42 4.3.2 Navigation Keys 43 4.4 Main Screen ...
3.3.3 BIOS & Drivers 38 3.3.4 Setting 39 Chapter 4 UEFI SETUP UTILITY 40 4.1 Introduction 40 4.2 EZ Mode 41 4.3 Advanced Mode 42 4.3.1 UEFI Menu Bar 42 4.3.2 Navigation Keys 43 4.4 Main Screen ...

User Manual
Page 9
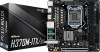
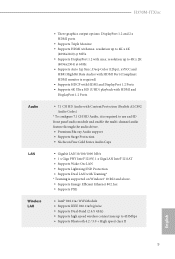
H370M-ITX/ac Audio LAN Wireless LAN • Three graphics output options: DisplayPort 1.2 and 2 x...Energy Efficient Ethernet 802.3az • Supports PXE • Intel® 802.11ac WiFi Module • Supports IEEE 802.11a/b/g/n/ac • Supports Dual-Band (2.4/5 GHz) • Supports high speed wireless connections up to 433Mbps • Supports Bluetooth 4.2 ...is required to use an HD front panel audio module and enable the multi-channel audio feature through the audio driver. • Premium Blu-ray Audio support • Supports Surge Protection • Nichicon Fine Gold Series Audio...
H370M-ITX/ac Audio LAN Wireless LAN • Three graphics output options: DisplayPort 1.2 and 2 x...Energy Efficient Ethernet 802.3az • Supports PXE • Intel® 802.11ac WiFi Module • Supports IEEE 802.11a/b/g/n/ac • Supports Dual-Band (2.4/5 GHz) • Supports high speed wireless connections up to 433Mbps • Supports Bluetooth 4.2 ...is required to use an HD front panel audio module and enable the multi-channel audio feature through the audio driver. • Premium Blu-ray Audio support • Supports Surge Protection • Nichicon Fine Gold Series Audio...

User Manual
Page 16
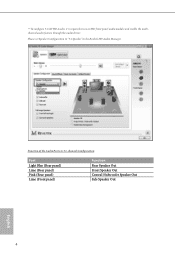
** To configure 7.1 CH HD Audio, it is required to "7.1 Speaker"in 7.1-channel Configuration: Port Light Blue (Rear panel) Lime (Rear panel) Pink (Rear panel) Lime (Front panel) Function Rear Speaker Out Front Speaker Out Central /Subwoofer Speaker Out Side Speaker Out 10 English Please set Speaker Configuration to use an HD front panel audio module and enable the multichannel audio feature through the audio driver. Function of the Audio Ports in the Realtek HD Audio Manager.
** To configure 7.1 CH HD Audio, it is required to "7.1 Speaker"in 7.1-channel Configuration: Port Light Blue (Rear panel) Lime (Rear panel) Pink (Rear panel) Lime (Front panel) Function Rear Speaker Out Front Speaker Out Central /Subwoofer Speaker Out Side Speaker Out 10 English Please set Speaker Configuration to use an HD front panel audio module and enable the multichannel audio feature through the audio driver. Function of the Audio Ports in the Realtek HD Audio Manager.
User Manual
Page 36
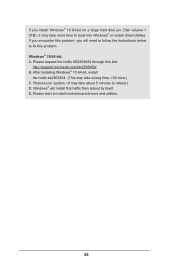
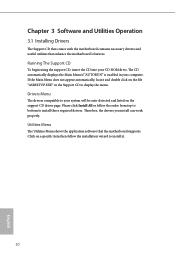
...the menu. The CD automatically displays the Main Menu if "AUTORUN" is enabled in the Support CD to install those required drivers. Utilities Menu The Utilities Menu shows the application software that enhance the motherboard's features. If the Main Menu does not appear ... wizard to your CD-ROM drive. Chapter 3 Software and Utilities Operation 3.1 Installing Drivers The Support CD that comes with the motherboard contains necessary drivers and useful utilities that the motherboard supports. Drivers Menu The drivers compatible to install it. 30 English Click on the support CD...
...the menu. The CD automatically displays the Main Menu if "AUTORUN" is enabled in the Support CD to install those required drivers. Utilities Menu The Utilities Menu shows the application software that enhance the motherboard's features. If the Main Menu does not appear ... wizard to your CD-ROM drive. Chapter 3 Software and Utilities Operation 3.1 Installing Drivers The Support CD that comes with the motherboard contains necessary drivers and useful utilities that the motherboard supports. Drivers Menu The drivers compatible to install it. 30 English Click on the support CD...
User Manual
Page 44
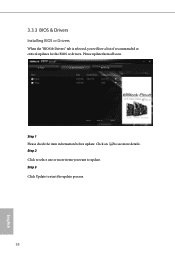
Step 1 Please check the item information before update. Click on Step 2 to see a list of recommended or critical updates for the BIOS or drivers. Click to select one or more details. Step 3 Click Update to start the update process. 38 English 3.3.3 BIOS & Drivers Installing BIOS or Drivers When the "BIOS & Drivers" tab is selected, you will see more items you want to update. Please update them all soon.
Step 1 Please check the item information before update. Click on Step 2 to see a list of recommended or critical updates for the BIOS or drivers. Click to select one or more details. Step 3 Click Update to start the update process. 38 English 3.3.3 BIOS & Drivers Installing BIOS or Drivers When the "BIOS & Drivers" tab is selected, you will see more items you want to update. Please update them all soon.
User Manual
Page 68
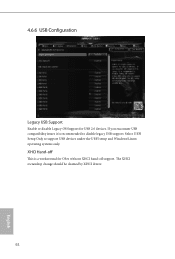
If you encounter USB compatibility issues it is a workaround for USB 2.0 devices. Select UEFI Setup Only to disable legacy USB support. XHCI Hand-off support. 4.6.6 USB Configuration Legacy USB Support Enable or disable Legacy OS Support for OSes without XHCI hand-off This is recommended to support USB devices under the UEFI setup and Windows/Linux operating systems only. The XHCI ownership change should be claimed by XHCI driver. 62 English
If you encounter USB compatibility issues it is a workaround for USB 2.0 devices. Select UEFI Setup Only to disable legacy USB support. XHCI Hand-off support. 4.6.6 USB Configuration Legacy USB Support Enable or disable Legacy OS Support for OSes without XHCI hand-off This is recommended to support USB devices under the UEFI setup and Windows/Linux operating systems only. The XHCI ownership change should be claimed by XHCI driver. 62 English
User Manual
Page 70
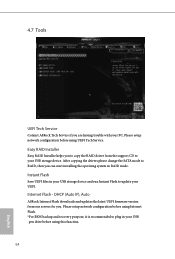
Instant Flash Save UEFI files in RAID mode. DHCP (Auto IP), Auto ASRock Internet Flash downloads and updates the latest UEFI firmware version from the support CD to copy the RAID driver from our servers for you. Easy RAID Installer Easy RAID Installer helps you to your UEFI. Internet ...recommended to update your USB storage device. 4.7 Tools UEFI Tech Service Contact ASRock Tech Service if you are having trouble with your USB pen drive before using this function. 64 English After copying the drivers please change the SATA mode to RAID, then you can start installing the ...
Instant Flash Save UEFI files in RAID mode. DHCP (Auto IP), Auto ASRock Internet Flash downloads and updates the latest UEFI firmware version from the support CD to copy the RAID driver from our servers for you. Easy RAID Installer Easy RAID Installer helps you to your UEFI. Internet ...recommended to update your USB storage device. 4.7 Tools UEFI Tech Service Contact ASRock Tech Service if you are having trouble with your USB pen drive before using this function. 64 English After copying the drivers please change the SATA mode to RAID, then you can start installing the ...
Quick Installation Guide
Page 8
** To configure 7.1 CH HD Audio, it is required to "7.1 Speaker"in 7.1-channel Configuration: Port Light Blue (Rear panel) Lime (Rear panel) Pink (Rear panel) Lime (Front panel) Function Rear Speaker Out Front Speaker Out Central /Subwoofer Speaker Out Side Speaker Out 4 English Please set Speaker Configuration to use an HD front panel audio module and enable the multichannel audio feature through the audio driver. Function of the Audio Ports in the Realtek HD Audio Manager.
** To configure 7.1 CH HD Audio, it is required to "7.1 Speaker"in 7.1-channel Configuration: Port Light Blue (Rear panel) Lime (Rear panel) Pink (Rear panel) Lime (Front panel) Function Rear Speaker Out Front Speaker Out Central /Subwoofer Speaker Out Side Speaker Out 4 English Please set Speaker Configuration to use an HD front panel audio module and enable the multichannel audio feature through the audio driver. Function of the Audio Ports in the Realtek HD Audio Manager.
Quick Installation Guide
Page 13
... Audio, it is required to use an HD front panel audio module and enable the multi-channel audio feature through the audio driver. • Premium Blu-ray Audio support • Supports Surge Protection • Nichicon Fine Gold Series Audio Caps • ... Intel® 802.11ac WiFi Module • Supports IEEE 802.11a/b/g/n/ac • Supports Dual-Band (2.4/5 GHz) • Supports high speed wireless connections up to 433Mbps • Supports Bluetooth 4.2 / 3.0 + High speed class II English 9 H370M-ITX/ac Audio LAN Wireless LAN • Three graphics output options: DisplayPort 1.2...
... Audio, it is required to use an HD front panel audio module and enable the multi-channel audio feature through the audio driver. • Premium Blu-ray Audio support • Supports Surge Protection • Nichicon Fine Gold Series Audio Caps • ... Intel® 802.11ac WiFi Module • Supports IEEE 802.11a/b/g/n/ac • Supports Dual-Band (2.4/5 GHz) • Supports high speed wireless connections up to 433Mbps • Supports Bluetooth 4.2 / 3.0 + High speed class II English 9 H370M-ITX/ac Audio LAN Wireless LAN • Three graphics output options: DisplayPort 1.2...


