
User Manual
Page 4
... (PCI Express Slots) 21 2.5 Onboard Headers and Connectors 22 Chapter 3 Software and Utilities Operation 26 3.1 Installing Drivers 26 3.2 ASRock Live Update & APP Shop 27 3.2.1 UI Overview 27 3.2.2 Apps 28 3.2.3 BIOS & Drivers 31 3.2.4 Setting 32 3.3 Enabling USB Ports for Windows® 7 Installation 33 Chapter 4 UEFI SETUP UTILITY 36 4.1 Introduction 36 4.2 EZ Mode 37
... (PCI Express Slots) 21 2.5 Onboard Headers and Connectors 22 Chapter 3 Software and Utilities Operation 26 3.1 Installing Drivers 26 3.2 ASRock Live Update & APP Shop 27 3.2.1 UI Overview 27 3.2.2 Apps 28 3.2.3 BIOS & Drivers 31 3.2.4 Setting 32 3.3 Enabling USB Ports for Windows® 7 Installation 33 Chapter 4 UEFI SETUP UTILITY 36 4.1 Introduction 36 4.2 EZ Mode 37

User Manual
Page 10
... • Voltage monitoring: +12V, +5V, +3.3V, CPU Vcore OS • Microsoft® Windows® 10 64-bit / 8.1 64-bit / 7 32-bit / 7 64- It should be done at your system. H110M-HDS R3.0 / H110M-DVS R3.0 / H110M-DGS R3.0 • 1 x USB 2.0 Header (Supports 2 USB 2.0 ports) (Supports ESD Protection (ASRock Full Spike Protection)) • 1 x USB 3.0 Header (Supports 2 USB 3.0 ports) (Supports ESD...
... • Voltage monitoring: +12V, +5V, +3.3V, CPU Vcore OS • Microsoft® Windows® 10 64-bit / 8.1 64-bit / 7 32-bit / 7 64- It should be done at your system. H110M-HDS R3.0 / H110M-DVS R3.0 / H110M-DGS R3.0 • 1 x USB 2.0 Header (Supports 2 USB 2.0 ports) (Supports ESD Protection (ASRock Full Spike Protection)) • 1 x USB 3.0 Header (Supports 2 USB 3.0 ports) (Supports ESD...

User Manual
Page 31
...://support.microsoft.com/kb/2720599/en-us 26 English Utilities Menu The Utilities Menu shows the application software that enhance the motherboard's features. To improve Windows 7 compatibility, please download and install the following hot fix provided by Microsoft. Drivers Menu The drivers compatible to your system will be auto-detected and...
...://support.microsoft.com/kb/2720599/en-us 26 English Utilities Menu The Utilities Menu shows the application software that enhance the motherboard's features. To improve Windows 7 compatibility, please download and install the following hot fix provided by Microsoft. Drivers Menu The drivers compatible to your system will be auto-detected and...

User Manual
Page 37
3.2.4 Setting In the "Setting" page, you can change the language, select the server location, and determine if you want to automatically run the ASRock Live Update & APP Shop on Windows startup. 32 English
3.2.4 Setting In the "Setting" page, you can change the language, select the server location, and determine if you want to automatically run the ASRock Live Update & APP Shop on Windows startup. 32 English
User Manual
Page 38
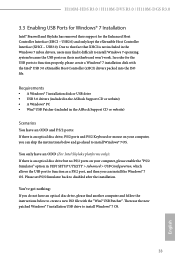
... USB ports to install Windows® 7 OS. Requirements • A Windows® 7 installation disk or USB drive • USB 3.0 drivers (included in the ASRock Support CD or website) • A Windows® PC • Win7 USB Patcher (included in the ASRock Support CD or website)...> USB Configuration, which allows the USB port to install Windows 7 operating system because the USB ports on your computer, you can install the Windows® 7 OS. H110M-HDS R3.0 / H110M-DVS R3.0 / H110M-DGS R3.0 3.3 Enabling USB Ports for Windows® 7 Installation Intel® Braswell and Skylake has removed...
... USB ports to install Windows® 7 OS. Requirements • A Windows® 7 installation disk or USB drive • USB 3.0 drivers (included in the ASRock Support CD or website) • A Windows® PC • Win7 USB Patcher (included in the ASRock Support CD or website)...> USB Configuration, which allows the USB port to install Windows 7 operating system because the USB ports on your computer, you can install the Windows® 7 OS. H110M-HDS R3.0 / H110M-DVS R3.0 / H110M-DGS R3.0 3.3 Enabling USB Ports for Windows® 7 Installation Intel® Braswell and Skylake has removed...

User Manual
Page 39
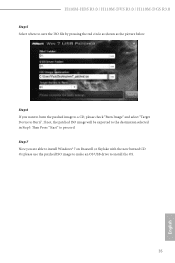
Step 3 Select the "Win7 Folder" from Step1 by clicking the red circle as shown as the picture below . Step 4 Select the "USB Driver Folder" by clicking the red circle as shown as the picture below . Step 2 Extract the tool (Win7 USB Patcher) and launch it. If you are using ASRock's Support CD for the USB 3.0 driver, please select your system. Instructions Step 1 Insert the Windows® 7 installation disk or USB drive to your CD-ROM. 34 English
Step 3 Select the "Win7 Folder" from Step1 by clicking the red circle as shown as the picture below . Step 4 Select the "USB Driver Folder" by clicking the red circle as shown as the picture below . Step 2 Extract the tool (Win7 USB Patcher) and launch it. If you are using ASRock's Support CD for the USB 3.0 driver, please select your system. Instructions Step 1 Insert the Windows® 7 installation disk or USB drive to your CD-ROM. 34 English
User Manual
Page 40
If not, the patched ISO image will be exported to save the ISO file by pressing the red circle as shown as the picture below. H110M-HDS R3.0 / H110M-DVS R3.0 / H110M-DGS R3.0 Step 5 Select where to the destination selected in Step5. Then Press "Start" to install the OS. 35 English Step 7 Now you want to burn the patched image to a CD, please check "Burn Image" and select "Target Device to install Windows® 7 on Braswell or Skylake with the new burned CD. Or please use the patched ISO image to make an OS USB drive to proceed. Step 6 If you are able to Burn".
If not, the patched ISO image will be exported to save the ISO file by pressing the red circle as shown as the picture below. H110M-HDS R3.0 / H110M-DVS R3.0 / H110M-DGS R3.0 Step 5 Select where to the destination selected in Step5. Then Press "Start" to install the OS. 35 English Step 7 Now you want to burn the patched image to a CD, please check "Burn Image" and select "Target Device to install Windows® 7 on Braswell or Skylake with the new burned CD. Or please use the patched ISO image to make an OS USB drive to proceed. Step 6 If you are able to Burn".

User Manual
Page 48
... same rank. CAS Write Latency (tCWL) Configure CAS Write Latency. Write to Read Delay (tWTR_L) The number of the same rank. H110M-HDS R3.0 / H110M-DVS R3.0 / H110M-DGS R3.0 Command Rate (CR) The delay between when a memory chip is selected and when the first active command can be issued. Write to...command to RAS Delay (tRRD_L) The number of a valid write operation, before an active bank can be precharged. Four Activate Window (tFAW) The time window in different banks of clocks between the last valid write operation and the next read command to the same internal bank. RAS ...
... same rank. CAS Write Latency (tCWL) Configure CAS Write Latency. Write to Read Delay (tWTR_L) The number of the same rank. H110M-HDS R3.0 / H110M-DVS R3.0 / H110M-DGS R3.0 Command Rate (CR) The delay between when a memory chip is selected and when the first active command can be issued. Write to...command to RAS Delay (tRRD_L) The number of a valid write operation, before an active bank can be precharged. Four Activate Window (tFAW) The time window in different banks of clocks between the last valid write operation and the next read command to the same internal bank. RAS ...

User Manual
Page 61
... OS Support for OSes without XHCI hand-off This is recommended to support USB devices under the UEFI setup and Windows/Linux operating systems only. XHCI Hand-off support. If you install Windows 7. PS/2 Simulator Enable PS/2 Simulator. The XHCI ownership change should be claimed by XHCI driver. 56 English Select UEFI...
... OS Support for OSes without XHCI hand-off This is recommended to support USB devices under the UEFI setup and Windows/Linux operating systems only. XHCI Hand-off support. If you install Windows 7. PS/2 Simulator Enable PS/2 Simulator. The XHCI ownership change should be claimed by XHCI driver. 56 English Select UEFI...

User Manual
Page 68
Only the administrator has authority to change the settings in the UEFI Setup Utility. User Password Set or change the password for Windows 8.1 Secure Boot. Users are unable to change the settings in ME. You may set or change the supervisor/user password for the administrator ... enter to enable or disable support for the user account. Leave it blank and press enter to use discrete TPM Module. 63 English H110M-HDS R3.0 / H110M-DVS R3.0 / H110M-DGS R3.0 4.9 Security Screen In this section you may also clear the user password. Disable this option to remove the password.
Only the administrator has authority to change the settings in the UEFI Setup Utility. User Password Set or change the password for Windows 8.1 Secure Boot. Users are unable to change the settings in ME. You may set or change the supervisor/user password for the administrator ... enter to enable or disable support for the user account. Leave it blank and press enter to use discrete TPM Module. 63 English H110M-HDS R3.0 / H110M-DVS R3.0 / H110M-DGS R3.0 4.9 Security Screen In this section you may also clear the user password. Disable this option to remove the password.

User Manual
Page 69
... seconds to wait for you may not boot from an USB storage device. Bootup Num-Lock Select whether Num Lock should be waked up by Windows 8.1 and the VBIOS must support UEFI GOP if you are using an external graphics card. In fast mode you to be turned on or off... on your computer's boot time. Ultra Fast mode is only supported by the onboard LAN. Please note that the only way to UEFI utility in Windows.
... seconds to wait for you may not boot from an USB storage device. Bootup Num-Lock Select whether Num Lock should be waked up by Windows 8.1 and the VBIOS must support UEFI GOP if you are using an external graphics card. In fast mode you to be turned on or off... on your computer's boot time. Ultra Fast mode is only supported by the onboard LAN. Please note that the only way to UEFI utility in Windows.

User Manual
Page 71
... option ROM only. Launch Video OpROM Policy Select UEFI only to not execute both legacy and UEFI option ROM. 66 English If you are using Windows 8.1 64-bit and all of your devices support UEFI, you 're running a WHCK test. Select Do not launch to run those that support UEFI option...
... option ROM only. Launch Video OpROM Policy Select UEFI only to not execute both legacy and UEFI option ROM. 66 English If you are using Windows 8.1 64-bit and all of your devices support UEFI, you 're running a WHCK test. Select Do not launch to run those that support UEFI option...


