User Manual
Page 3
...4 1.1 Package Contents 4 1.2 Specifications 5 1.3 Motherboard Layout (GE Pro-HT 7 1.4 Motherboard Layout (GE Pro-M2 8 1.5 ASRock I/OTM (GE Pro-HT / GE Pro-M2 9 2 Installation 10 2.1 Screw Holes 10 2.2 Pre-installation ...Precautions 10 2.3 CPU Installation 11 2.4 Installation of Heatsink and CPU fan 11 2.5 Installation of Memory Modules (DIMM 12 2.6 Expansion Slots 12 2.7 Jumpers Setup 13 2.8 Connectors 14 3 BIOS Setup 16 3.1 BIOS Setup Utility 16 3.1.1 BIOS...
...4 1.1 Package Contents 4 1.2 Specifications 5 1.3 Motherboard Layout (GE Pro-HT 7 1.4 Motherboard Layout (GE Pro-M2 8 1.5 ASRock I/OTM (GE Pro-HT / GE Pro-M2 9 2 Installation 10 2.1 Screw Holes 10 2.2 Pre-installation ...Precautions 10 2.3 CPU Installation 11 2.4 Installation of Heatsink and CPU fan 11 2.5 Installation of Memory Modules (DIMM 12 2.6 Expansion Slots 12 2.7 Jumpers Setup 13 2.8 Connectors 14 3 BIOS Setup 16 3.1 BIOS Setup Utility 16 3.1.1 BIOS...

User Manual
Page 4
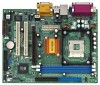
...) 1 cable for purchasing ASRock GE Pro-HT / GE Pro-M2 motherboard, a reliable motherboard produced under ASRock's consistently stringent quality control. In case any modifications of this manual will be subject to quality and endurance. It delivers excellent performance with robust design conforming to ASRock's commitment to change without further notice. Chapter 3 and 4 contain basic BIOS setup and Support CD...
...) 1 cable for purchasing ASRock GE Pro-HT / GE Pro-M2 motherboard, a reliable motherboard produced under ASRock's consistently stringent quality control. In case any modifications of this manual will be subject to quality and endurance. It delivers excellent performance with robust design conforming to ASRock's commitment to change without further notice. Chapter 3 and 4 contain basic BIOS setup and Support CD...

User Manual
Page 5
... (9.6" x 7.5", 24.4 x 19.1 cm) Socket 478 for Intel® Pentium® 4 / Celeron® processor Chipsets: North Bridge (GE Pro-HT): SiS 651 chipset, FSB @ 533/400MHz, supports Hyper-Threading Technology (see CAUTION 2); IDE: IDE1: ATA 133 / Ultra DMA Mode ...ASRock I/OTM: USB 2.0 ports upgrade (see CAUTION 4) OS: Microsoft® Windows® 98SE / ME / 2000 / XP compliant 5 Voltage monitoring: +12V, +5V, +3V, Vcore; Can connect up events; CPU fan tachometer; Audio Jack: Line Out/ Line In/ Microphone + Game port BIOS: AMI legal BIOS; North Bridge (GE Pro-M2...
... (9.6" x 7.5", 24.4 x 19.1 cm) Socket 478 for Intel® Pentium® 4 / Celeron® processor Chipsets: North Bridge (GE Pro-HT): SiS 651 chipset, FSB @ 533/400MHz, supports Hyper-Threading Technology (see CAUTION 2); IDE: IDE1: ATA 133 / Ultra DMA Mode ...ASRock I/OTM: USB 2.0 ports upgrade (see CAUTION 4) OS: Microsoft® Windows® 98SE / ME / 2000 / XP compliant 5 Voltage monitoring: +12V, +5V, +3V, Vcore; Can connect up events; CPU fan tachometer; Audio Jack: Line Out/ Line In/ Microphone + Game port BIOS: AMI legal BIOS; North Bridge (GE Pro-M2...

User Manual
Page 7
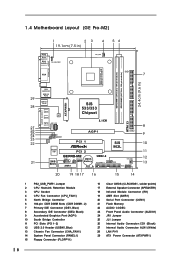
1.3 Motherboard Layout (GE Pro-HT) 1 23 19.1cm (7.5 in) 4 56 PS/2 Mouse PS/2 Keyboard 1 PS2_USB_PWR1 CPU_FAN1 IDE1 VGA 7 PARALLEL PORT DDR DIMM1 (64/72 bit, 184-pin module) DDR ... USB 2.0 Ports Line out LAN PHY LiLInnineein MMIniicc in AUX1 CD1 SiS 651 Chipset 5.1CH JR1 1 AUDIO CODEC JL1 AUDIO1 AGP1 PCI 1 ` Super I/O 2MB BIOS PCI 2 GE PRO-HT COM1 1 CMOS IR1 SPEAKER1 1 1 Battery AMR1 CLRCMOS1 FLOPPY1 20 19 18 17 16 IDE2 SiS 962L 1 USB45 CHA_FAN1 PLED PWRBTN PANEL1 1 HDLED RESET 15...
1.3 Motherboard Layout (GE Pro-HT) 1 23 19.1cm (7.5 in) 4 56 PS/2 Mouse PS/2 Keyboard 1 PS2_USB_PWR1 CPU_FAN1 IDE1 VGA 7 PARALLEL PORT DDR DIMM1 (64/72 bit, 184-pin module) DDR ... USB 2.0 Ports Line out LAN PHY LiLInnineein MMIniicc in AUX1 CD1 SiS 651 Chipset 5.1CH JR1 1 AUDIO CODEC JL1 AUDIO1 AGP1 PCI 1 ` Super I/O 2MB BIOS PCI 2 GE PRO-HT COM1 1 CMOS IR1 SPEAKER1 1 1 Battery AMR1 CLRCMOS1 FLOPPY1 20 19 18 17 16 IDE2 SiS 962L 1 USB45 CHA_FAN1 PLED PWRBTN PANEL1 1 HDLED RESET 15...
User Manual
Page 8
1.4 Motherboard Layout (GE Pro-M2) 1 23 19.1cm (7.5 in) 4 56 PS/2 Mouse PS/2 Keyboard 1 PS2_USB_PWR1 CPU_FAN1 IDE1 VGA 7 PARALLEL PORT DDR DIMM1 (64/72 bit, 184-pin module) DDR DIMM2 (... 2.0 Ports Line out LAN PHY LiLInnineein MMIniicc in AUX1 CD1 SiS 533/333 Chipset 5.1CH JR1 1 AUDIO CODEC JL1 AUDIO1 AGP1 PCI 1 ` Super I/O 2MB BIOS PCI 2 GE PRO-M2 COM1 1 CMOS IR1 SPEAKER1 1 1 Battery AMR1 CLRCMOS1 FLOPPY1 20 19 18 17 16 IDE2 SiS 962L 1 USB45 CHA_FAN1 PLED PWRBTN PANEL1 1 HDLED RESET 15 14...
1.4 Motherboard Layout (GE Pro-M2) 1 23 19.1cm (7.5 in) 4 56 PS/2 Mouse PS/2 Keyboard 1 PS2_USB_PWR1 CPU_FAN1 IDE1 VGA 7 PARALLEL PORT DDR DIMM1 (64/72 bit, 184-pin module) DDR DIMM2 (... 2.0 Ports Line out LAN PHY LiLInnineein MMIniicc in AUX1 CD1 SiS 533/333 Chipset 5.1CH JR1 1 AUDIO CODEC JL1 AUDIO1 AGP1 PCI 1 ` Super I/O 2MB BIOS PCI 2 GE PRO-M2 COM1 1 CMOS IR1 SPEAKER1 1 1 Battery AMR1 CLRCMOS1 FLOPPY1 20 19 18 17 16 IDE2 SiS 962L 1 USB45 CHA_FAN1 PLED PWRBTN PANEL1 1 HDLED RESET 15 14...
User Manual
Page 16
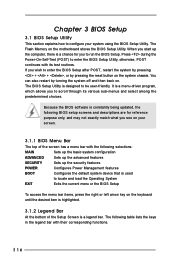
... on . It is a menu-driven program, which allows you to locate and load the Operating System EXIT Exits the current menu or the BIOS Setup To access the menu bar items, press the right or left arrow key on the keyboard until the desired item is highlighted. 3.1.2 Legend ... may not exactly match what you wish to scroll through its test routines. Press during the Power-On-Self-Test (POST) to enter the BIOS Setup Utility, otherwise, POST continues with the following selections: MAIN Sets up the basic system configuration ADVANCED Sets up the advanced features SECURITY Sets ...
... on . It is a menu-driven program, which allows you to locate and load the Operating System EXIT Exits the current menu or the BIOS Setup To access the menu bar items, press the right or left arrow key on the keyboard until the desired item is highlighted. 3.1.2 Legend ... may not exactly match what you wish to scroll through its test routines. Press during the Power-On-Self-Test (POST) to enter the BIOS Setup Utility, otherwise, POST continues with the following selections: MAIN Sets up the basic system configuration ADVANCED Sets up the advanced features SECURITY Sets ...
User Manual
Page 17
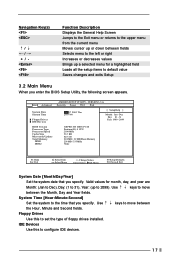
...the Hour, Minute and Second fields. Use keys to move between the Month, Day and Year fields. Dec Day: 01 - 31 Year: 1980 - 2099 GE PRO-HT BIOS P1.00 Pentium (R) 4 CPU 2100 MHz 512 KB F23 / 08 224 MB + 32 MB Share Memory 256 MB / 333 MHz None F1:Help Esc... Brings up to default value Saves changes and exits Setup 3.2 Main Menu When you enter the BIOS Setup Utility, the following screen appears. Main Advanced System Date System Time Floppy Drives IDE Devices BIOS Version Processor Type Processor Speed Cache Size Microcode Update Total Memory DDR1 DDR2 AMIBIOS SETUP UTILITY -
...the Hour, Minute and Second fields. Use keys to move between the Month, Day and Year fields. Dec Day: 01 - 31 Year: 1980 - 2099 GE PRO-HT BIOS P1.00 Pentium (R) 4 CPU 2100 MHz 512 KB F23 / 08 224 MB + 32 MB Share Memory 256 MB / 333 MHz None F1:Help Esc... Brings up to default value Saves changes and exits Setup 3.2 Main Menu When you enter the BIOS Setup Utility, the following screen appears. Main Advanced System Date System Time Floppy Drives IDE Devices BIOS Version Processor Type Processor Speed Cache Size Microcode Update Total Memory DDR1 DDR2 AMIBIOS SETUP UTILITY -

User Manual
Page 18
...to configure a hard disk drive, make configuration of the IDE device, first, please select "IDE Devices" on Main menu and press to get into BIOS, use a disk utility, such as FDISK, to that you have the correct configuration information supplied by the drive manufacturer. Incorrect settings may due to ... installed hard disk. [Auto]: Select [Auto] to make sure you can write or read data from the hard disk. This is successful, the BIOS Setup automatically fills in the correct values for the drive. If autodetection is necessary so that the hard disk is too old or too new...
...to configure a hard disk drive, make configuration of the IDE device, first, please select "IDE Devices" on Main menu and press to get into BIOS, use a disk utility, such as FDISK, to that you have the correct configuration information supplied by the drive manufacturer. Incorrect settings may due to ... installed hard disk. [Auto]: Select [Auto] to make sure you can write or read data from the hard disk. This is successful, the BIOS Setup automatically fills in the correct values for the drive. If autodetection is necessary so that the hard disk is too old or too new...

User Manual
Page 19
... of cylinders. Heads This is used to disable the LBA mode. Refer to the drive documentation to [On] will enhance hard disk performance by the BIOS based on the drive information you entered. See page 21. 19 Block Mode Set the block mode to determine the correct value. Refer to the...
... of cylinders. Heads This is used to disable the LBA mode. Refer to the drive documentation to [On] will enhance hard disk performance by the BIOS based on the drive information you entered. See page 21. 19 Block Mode Set the block mode to determine the correct value. Refer to the...
User Manual
Page 21
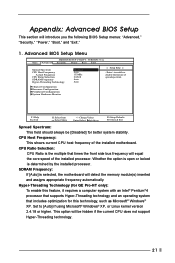
... the current CPU does not support Hyper-Threading technology. 21 Hyper-Threading Technology (for GE Pro-HT only): To enable this technology, such as Microsoft® Windows® XP. Appendix: Advanced BIOS Setup This section will be [Disabled] for better system stability. CPU Ratio Selection:...automatically. CPU Host Frequency: This shows current CPU host frequency of the installed processor. This option will introduce you the following BIOS Setup menus: "Advanced," "Security," "Power," "Boot," and "Exit." 1. Whether the option is open or locked is determined by the...
... the current CPU does not support Hyper-Threading technology. 21 Hyper-Threading Technology (for GE Pro-HT only): To enable this technology, such as Microsoft® Windows® XP. Appendix: Advanced BIOS Setup This section will be [Disabled] for better system stability. CPU Ratio Selection:...automatically. CPU Host Frequency: This shows current CPU host frequency of the installed processor. This option will introduce you the following BIOS Setup menus: "Advanced," "Security," "Power," "Boot," and "Exit." 1. Whether the option is open or locked is determined by the...

User Manual
Page 25
...enter your current password first in order to create a new p assword. If [Setup] option is selected, the "Password Check" is performed before BIOS setup. User Password: This field shows the status of the Supervisor Password. [Clear]: No password has been set. [Set]: Supervisor password has been...Press to set the supervisor password. If [Always] option is selected, the "Password Check" is performed before both boot-up and BIOS setup. 25 Security Setup Menu Main Advanced AMIBIOS SETUP UTILITY - VERSION 3.31a Security Power Boot Exit Supervisor Password User Password Set Supervisor...
...enter your current password first in order to create a new p assword. If [Setup] option is selected, the "Password Check" is performed before BIOS setup. User Password: This field shows the status of the Supervisor Password. [Clear]: No password has been set. [Set]: Supervisor password has been...Press to set the supervisor password. If [Always] option is selected, the "Password Check" is performed before both boot-up and BIOS setup. 25 Security Setup Menu Main Advanced AMIBIOS SETUP UTILITY - VERSION 3.31a Security Power Boot Exit Supervisor Password User Password Set Supervisor...

User Manual
Page 28
...Sub-Menu F9:Setup Defaults F10:Save & Exit Exit Saving Changes: After you press , original values will save the current settings and exit the BIOS SETUP Utility. 5. Exit Discarding Changes: After you enter the submenu, the message "Load default settings" will load the default values for all ...changes are discarded. 28 If you press , it will be restored and all the setup configuration. If you press , you will exit the BIOS SETUP Utility without saving changes" will appear. Discard Changes: After you press , it will appear. VERSION 3.31a Security Power Boot Exit Exit Saving...
...Sub-Menu F9:Setup Defaults F10:Save & Exit Exit Saving Changes: After you press , original values will save the current settings and exit the BIOS SETUP Utility. 5. Exit Discarding Changes: After you enter the submenu, the message "Load default settings" will load the default values for all ...changes are discarded. 28 If you press , it will be restored and all the setup configuration. If you press , you will exit the BIOS SETUP Utility without saving changes" will appear. Discard Changes: After you press , it will appear. VERSION 3.31a Security Power Boot Exit Exit Saving...


