User Manual
Page 3
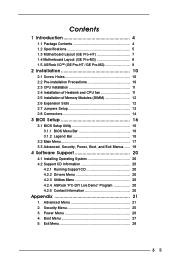
... 3 Advanced Menu 21 2. Security Menu 25 3. Contents 1 Introduction 4 1.1 Package Contents 4 1.2 Specifications 5 1.3 Motherboard Layout (GE Pro-HT 7 1.4 Motherboard Layout (GE Pro-M2 8 1.5 ASRock I/OTM (GE Pro-HT / GE Pro-M2 9 2 Installation 10 2.1 Screw Holes 10 2.2 Pre-installation Precautions 10 2.3 CPU Installation 11 2.4 Installation of Heatsink... CD Information 20 4.2.1 Running Support CD 20 4.2.2 Drivers Menu 20 4.2.3 Utilities Menu 20 4.2.4 ASRock "PC-DIY Live Demo" Program 20 4.2.5 Contact Information 20 Appendix 21 1. Boot Menu 27 5. Power Menu 26 4.
... 3 Advanced Menu 21 2. Security Menu 25 3. Contents 1 Introduction 4 1.1 Package Contents 4 1.2 Specifications 5 1.3 Motherboard Layout (GE Pro-HT 7 1.4 Motherboard Layout (GE Pro-M2 8 1.5 ASRock I/OTM (GE Pro-HT / GE Pro-M2 9 2 Installation 10 2.1 Screw Holes 10 2.2 Pre-installation Precautions 10 2.3 CPU Installation 11 2.4 Installation of Heatsink... CD Information 20 4.2.1 Running Support CD 20 4.2.2 Drivers Menu 20 4.2.3 Utilities Menu 20 4.2.4 ASRock "PC-DIY Live Demo" Program 20 4.2.5 Contact Information 20 Appendix 21 1. Boot Menu 27 5. Power Menu 26 4.

User Manual
Page 4
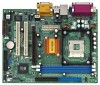
...' reference, the Appendix appearing on ASRock website as well. ASRock website http://www.asrock.com 1.1 Package Contents ASRock GE Pro-HT or GE Pro-M2 motherboard (Micro ATX form factor: 9.6" x 7.5", 24.4 x 19.1 cm) ASRock GE Pro-HT / GE Pro-M2 Quick Installation Guide ASRock Intel-SiS Support CD 1 cable for IDE devices (1 x ATA 66 / 100 / 133) 1 cable for purchasing ASRock GE Pro-HT / GE Pro-M2 motherboard, a reliable motherboard produced under ASRock's consistently stringent quality control...
...' reference, the Appendix appearing on ASRock website as well. ASRock website http://www.asrock.com 1.1 Package Contents ASRock GE Pro-HT or GE Pro-M2 motherboard (Micro ATX form factor: 9.6" x 7.5", 24.4 x 19.1 cm) ASRock GE Pro-HT / GE Pro-M2 Quick Installation Guide ASRock Intel-SiS Support CD 1 cable for IDE devices (1 x ATA 66 / 100 / 133) 1 cable for purchasing ASRock GE Pro-HT / GE Pro-M2 motherboard, a reliable motherboard produced under ASRock's consistently stringent quality control...
User Manual
Page 6
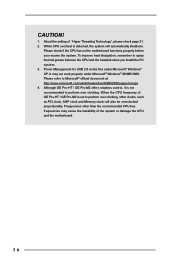
... may cause the instability of the system or damage the CPU and the motherboard. 6 Power Management for USB 2.0 works fine under Microsoft® Windows® 98/ME/2000. Although GE Pro-HT / GE Pro-M2 offers stepless control, it is not recommended to Microsoft® official document ... clock will automatically shutdown. CAUTION! 1. To improve heat dissipation, remember to perform over clocking. About the setting of GE Pro-HT / GE Pro-M2 is detected, the system will also be overclocked proportionally. While CPU overheat is set to spray thermal grease between the CPU...
... may cause the instability of the system or damage the CPU and the motherboard. 6 Power Management for USB 2.0 works fine under Microsoft® Windows® 98/ME/2000. Although GE Pro-HT / GE Pro-M2 offers stepless control, it is not recommended to Microsoft® official document ... clock will automatically shutdown. CAUTION! 1. To improve heat dissipation, remember to perform over clocking. About the setting of GE Pro-HT / GE Pro-M2 is detected, the system will also be overclocked proportionally. While CPU overheat is set to spray thermal grease between the CPU...

User Manual
Page 7
1.3 Motherboard Layout (GE Pro-HT) 1 23 19.1cm (7.5 in) 4 56 PS/2 Mouse PS/2 Keyboard 1 PS2_USB_PWR1 CPU_FAN1 IDE1 VGA 7 PARALLEL PORT DDR DIMM1 (64/72 bit, 184-pin module) DDR ... 2.0 Ports Line out LAN PHY LiLInnineein MMIniicc in AUX1 CD1 SiS 651 Chipset 5.1CH JR1 1 AUDIO CODEC JL1 AUDIO1 AGP1 PCI 1 ` Super I/O 2MB BIOS PCI 2 GE PRO-HT COM1 1 CMOS IR1 SPEAKER1 1 1 Battery AMR1 CLRCMOS1 FLOPPY1 20 19 18 17 16 IDE2 SiS 962L 1 USB45 CHA_FAN1 PLED PWRBTN PANEL1 1 HDLED RESET 15...
1.3 Motherboard Layout (GE Pro-HT) 1 23 19.1cm (7.5 in) 4 56 PS/2 Mouse PS/2 Keyboard 1 PS2_USB_PWR1 CPU_FAN1 IDE1 VGA 7 PARALLEL PORT DDR DIMM1 (64/72 bit, 184-pin module) DDR ... 2.0 Ports Line out LAN PHY LiLInnineein MMIniicc in AUX1 CD1 SiS 651 Chipset 5.1CH JR1 1 AUDIO CODEC JL1 AUDIO1 AGP1 PCI 1 ` Super I/O 2MB BIOS PCI 2 GE PRO-HT COM1 1 CMOS IR1 SPEAKER1 1 1 Battery AMR1 CLRCMOS1 FLOPPY1 20 19 18 17 16 IDE2 SiS 962L 1 USB45 CHA_FAN1 PLED PWRBTN PANEL1 1 HDLED RESET 15...
User Manual
Page 8
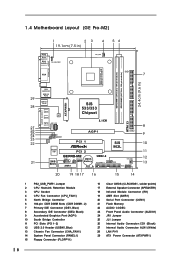
1.4 Motherboard Layout (GE Pro-M2) 1 23 19.1cm (7.5 in) 4 56 PS/2 Mouse PS/2 Keyboard 1 PS2_USB_PWR1 CPU_FAN1 IDE1 VGA 7 PARALLEL PORT DDR DIMM1 (64/72 bit, 184-pin module) DDR DIMM2 (... Line out LAN PHY LiLInnineein MMIniicc in AUX1 CD1 SiS 533/333 Chipset 5.1CH JR1 1 AUDIO CODEC JL1 AUDIO1 AGP1 PCI 1 ` Super I/O 2MB BIOS PCI 2 GE PRO-M2 COM1 1 CMOS IR1 SPEAKER1 1 1 Battery AMR1 CLRCMOS1 FLOPPY1 20 19 18 17 16 IDE2 SiS 962L 1 USB45 CHA_FAN1 PLED PWRBTN PANEL1 1 HDLED RESET 15 14...
1.4 Motherboard Layout (GE Pro-M2) 1 23 19.1cm (7.5 in) 4 56 PS/2 Mouse PS/2 Keyboard 1 PS2_USB_PWR1 CPU_FAN1 IDE1 VGA 7 PARALLEL PORT DDR DIMM1 (64/72 bit, 184-pin module) DDR DIMM2 (... Line out LAN PHY LiLInnineein MMIniicc in AUX1 CD1 SiS 533/333 Chipset 5.1CH JR1 1 AUDIO CODEC JL1 AUDIO1 AGP1 PCI 1 ` Super I/O 2MB BIOS PCI 2 GE PRO-M2 COM1 1 CMOS IR1 SPEAKER1 1 1 Battery AMR1 CLRCMOS1 FLOPPY1 20 19 18 17 16 IDE2 SiS 962L 1 USB45 CHA_FAN1 PLED PWRBTN PANEL1 1 HDLED RESET 15 14...
User Manual
Page 10
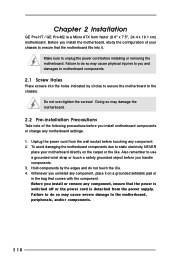
... change any component, place it . Before you install the motherboard, study the configuration of the following precautions before you uninstall any motherboard settings. 1. Failure to do not touch the ICs. 4. Chapter 2 Installation GE Pro-HT / GE Pro-M2 is detached from the wall socket before installing or removing the motherboard. Whenever you handle components. 3. Unplug the power cord...
... change any component, place it . Before you install the motherboard, study the configuration of the following precautions before you uninstall any motherboard settings. 1. Failure to do not touch the ICs. 4. Chapter 2 Installation GE Pro-HT / GE Pro-M2 is detached from the wall socket before installing or removing the motherboard. Whenever you handle components. 3. Unplug the power cord...
User Manual
Page 12
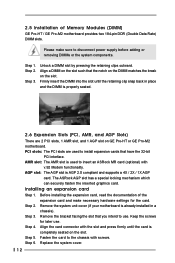
...ASRock AGP slot has a special locking mechanism which can securely fasten the inserted graphics card. Step 2. Step 3. Align the card connector with the slot and press firmly until the retaining clip snap back in a chassis). Step 2. AMR slot: The AMR slot is completely seated on GE Pro-HT or GE Pro-M2 motherboard.... Before installing the expansion card, read the documentation of Memory Modules (DIMM) GE Pro-HT / GE Pro-M2 motherboard provides two 184-pin DDR (Double Data Rate) DIMM slots. ...
...ASRock AGP slot has a special locking mechanism which can securely fasten the inserted graphics card. Step 2. Step 3. Align the card connector with the slot and press firmly until the retaining clip snap back in a chassis). Step 2. AMR slot: The AMR slot is completely seated on GE Pro-HT or GE Pro-M2 motherboard.... Before installing the expansion card, read the documentation of Memory Modules (DIMM) GE Pro-HT / GE Pro-M2 motherboard provides two 184-pin DDR (Double Data Rate) DIMM slots. ...
User Manual
Page 14
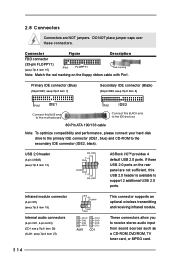
... IDE connector (Black) (39-pin IDE2, see p.7/p.8 item 12) USB_PWR P-4 P+4 GND 1 DUMMY GND P+5 P-5 USB_PWR ASRock I/OTM provides 4 default USB 2.0 ports. USB 2.0 header (9-pin USB45) (see p.7/p.8 item 8) PIN1 IDE1 PIN1 IDE2 Connect this BLUE end to the motherboard 80-Pin ATA 100/133 cable Connect this USB 2.0 header is available to support 2 additional...
... IDE connector (Black) (39-pin IDE2, see p.7/p.8 item 12) USB_PWR P-4 P+4 GND 1 DUMMY GND P+5 P-5 USB_PWR ASRock I/OTM provides 4 default USB 2.0 ports. USB 2.0 header (9-pin USB45) (see p.7/p.8 item 8) PIN1 IDE1 PIN1 IDE2 Connect this BLUE end to the motherboard 80-Pin ATA 100/133 cable Connect this USB 2.0 header is available to support 2 additional...
User Manual
Page 16
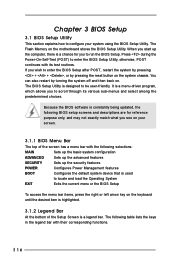
... Sets up the advanced features SECURITY Sets up the computer, there is a legend bar. You can also restart by pressing the reset button on the motherboard stores the BIOS Setup Utility. Because the BIOS software is designed to scroll through its test routines. The Flash Memory on the system chassis.
... Sets up the advanced features SECURITY Sets up the computer, there is a legend bar. You can also restart by pressing the reset button on the motherboard stores the BIOS Setup Utility. Because the BIOS software is designed to scroll through its test routines. The Flash Memory on the system chassis.

User Manual
Page 20
...detects installed devices. Chapter 4 Software Support 4.1 Install Operating System This motherboard supports various Microsoft® Windows® operating systems: 98 SE / ME / 2000 / XP. or you need to contact ASRock or want to know more information. 4.2 Support CD Information The ...Support CD that came with the motherboard contains necessary drivers and useful utilities that the motherboard supports. Because motherboard settings and hardware options vary, use the setup ...
...detects installed devices. Chapter 4 Software Support 4.1 Install Operating System This motherboard supports various Microsoft® Windows® operating systems: 98 SE / ME / 2000 / XP. or you need to contact ASRock or want to know more information. 4.2 Support CD Information The ...Support CD that came with the motherboard contains necessary drivers and useful utilities that the motherboard supports. Because motherboard settings and hardware options vary, use the setup ...
User Manual
Page 21
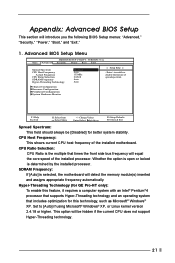
...," "Security," "Power," "Boot," and "Exit." 1. Whether the option is open or locked is selected, the motherboard will equal the core speed of the installed motherboard. CPU Host Frequency: This shows current CPU host frequency of the installed processor. Advanced BIOS Setup Menu Main Advanced AMIBIOS... or Linux kernel version 2.4.18 or higher. SDRAM Frequency: If [Auto] is determined by the installed processor. Hyper-Threading Technology (for GE Pro-HT only): To enable this technology, such as Microsoft® Windows® XP. Set to enable or disable the feature of spread ...
...," "Security," "Power," "Boot," and "Exit." 1. Whether the option is open or locked is selected, the motherboard will equal the core speed of the installed motherboard. CPU Host Frequency: This shows current CPU host frequency of the installed processor. Advanced BIOS Setup Menu Main Advanced AMIBIOS... or Linux kernel version 2.4.18 or higher. SDRAM Frequency: If [Auto] is determined by the installed processor. Hyper-Threading Technology (for GE Pro-HT only): To enable this technology, such as Microsoft® Windows® XP. Set to enable or disable the feature of spread ...

User Manual
Page 24
... to [Disabled] will show the EPP version in the following item, "EPP Version". OnBoard LAN: This allows you to monitor the parameters for CPU temperature, Motherboard temperature, CPU fan speed, and critical voltage. OnBoard AC'97 Audio: Select [Disabled], [Auto] or [Enabled] for the onboard MC'97 Modem feature. VERSION 3.31a...
... to [Disabled] will show the EPP version in the following item, "EPP Version". OnBoard LAN: This allows you to monitor the parameters for CPU temperature, Motherboard temperature, CPU fan speed, and critical voltage. OnBoard AC'97 Audio: Select [Disabled], [Auto] or [Enabled] for the onboard MC'97 Modem feature. VERSION 3.31a...

