
User Manual
Page 1
GE Pro-M / GE Pro-HT User Manual Version 1.0 Published December 2002 Copyright©2002 ASRock INC. All rights reserved. 1
GE Pro-M / GE Pro-HT User Manual Version 1.0 Published December 2002 Copyright©2002 ASRock INC. All rights reserved. 1

User Manual
Page 3
Contents 1 Introduction 4 1.1 Package Contents 4 1.2 Specifications 4 1.3 Motherboard Layout (GE Pro-M 6 1.4 Motherboard Layout (GE Pro-HT 7 1.5 ASRock I/OTM (GE Pro-M / GE Pro-HT 8 2 Installation 9 2.1 Screw Holes 9 2.2 Pre-installation Precautions 9 2.3 CPU Installation 9 2.4 Installation of ... Installing Operating System 19 4.2 Support CD Information 19 4.2.1 Running Support CD 19 4.2.2 Drivers Menu 19 4.2.3 Utilities Menu 19 4.2.4 ASRock PC-DIY Live Demo Program 19 4.2.5 Contact Information 19 Appendix: Advanced BIOS Setup 20 1. Advanced Menu 20 2. Exit Menu 25...
Contents 1 Introduction 4 1.1 Package Contents 4 1.2 Specifications 4 1.3 Motherboard Layout (GE Pro-M 6 1.4 Motherboard Layout (GE Pro-HT 7 1.5 ASRock I/OTM (GE Pro-M / GE Pro-HT 8 2 Installation 9 2.1 Screw Holes 9 2.2 Pre-installation Precautions 9 2.3 CPU Installation 9 2.4 Installation of ... Installing Operating System 19 4.2 Support CD Information 19 4.2.1 Running Support CD 19 4.2.2 Drivers Menu 19 4.2.3 Utilities Menu 19 4.2.4 ASRock PC-DIY Live Demo Program 19 4.2.5 Contact Information 19 Appendix: Advanced BIOS Setup 20 1. Advanced Menu 20 2. Exit Menu 25...

User Manual
Page 4
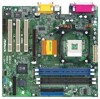
... 20 offers more advanced BIOS setup information. 1.1 Package Contents ASRock GE Pro-M or GE Pro-HT motherboard (Micro ATX form factor: 9.6" x 9.6", 24.4 x 24.4 cm) ASRock GE Pro-M / GE Pro-HT Quick Installation Guide ASRock Intel-SiS Support CD 1 cable for IDE devices (1 x ATA 66/100/133) 1 cable for floppy drive (1 x ribbon cable) 1 ASRock I/O shield 1 COM port bracket 1.2 Specifications Platform: Micro ATX form...
... 20 offers more advanced BIOS setup information. 1.1 Package Contents ASRock GE Pro-M or GE Pro-HT motherboard (Micro ATX form factor: 9.6" x 9.6", 24.4 x 24.4 cm) ASRock GE Pro-M / GE Pro-HT Quick Installation Guide ASRock Intel-SiS Support CD 1 cable for IDE devices (1 x ATA 66/100/133) 1 cable for floppy drive (1 x ribbon cable) 1 ASRock I/O shield 1 COM port bracket 1.2 Specifications Platform: Micro ATX form...

User Manual
Page 5
...see CAUTION 4) OS: Microsoft® Windows® 98 SE / ME / 2000 / XP compliant CAUTION! 1. Please refer to protect CPU life (ASRock U-COP) (see CAUTION 3) ASRock I/OTM: PS/2: 1 keyboard port / 1 mouse port; 1 RJ 45 port; 4 rear default USB 2.0 ports; 1 VGA port; 1 ...2.0 ports upgrade (see CAUTION 2);Chassis temperature sensing; It may cause the instability of the system or damage the CPU. 5 Although GE Pro-M/GE Pro-HT offers stepless control, it is detected, the system will automatically shutdown. Chassis fan tachometer PCI slots: 3 slots with PCI Specification...
...see CAUTION 4) OS: Microsoft® Windows® 98 SE / ME / 2000 / XP compliant CAUTION! 1. Please refer to protect CPU life (ASRock U-COP) (see CAUTION 3) ASRock I/OTM: PS/2: 1 keyboard port / 1 mouse port; 1 RJ 45 port; 4 rear default USB 2.0 ports; 1 VGA port; 1 ...2.0 ports upgrade (see CAUTION 2);Chassis temperature sensing; It may cause the instability of the system or damage the CPU. 5 Although GE Pro-M/GE Pro-HT offers stepless control, it is detected, the system will automatically shutdown. Chassis fan tachometer PCI slots: 3 slots with PCI Specification...

User Manual
Page 11
...graphics card. Remove the bracket facing the slot that you intend to use . AMR slot: AMR slot is completely seated on the slot. The ASRock AGP slot has a special locking mechanism which can securely fasten the graphics card inserted. Remove the system unit cover (if your motherboard is already ... 1. Step 2. Keep the screw for the card. Fasten the card to install expansion cards that the notch on the DIMM matches the break on both GE Pro-M and GE Pro-HT motherboards. PCI slots: PCI slots are 3 PCI slots, 1 AMR slot, and 1 AGP slot on the slot. Step 3. Step 5. Step 6. Unlock a ...
...graphics card. Remove the bracket facing the slot that you intend to use . AMR slot: AMR slot is completely seated on the slot. The ASRock AGP slot has a special locking mechanism which can securely fasten the graphics card inserted. Remove the system unit cover (if your motherboard is already ... 1. Step 2. Keep the screw for the card. Fasten the card to install expansion cards that the notch on the DIMM matches the break on both GE Pro-M and GE Pro-HT motherboards. PCI slots: PCI slots are 3 PCI slots, 1 AMR slot, and 1 AGP slot on the slot. Step 3. Step 5. Step 6. Unlock a ...


