User Manual
Page 5
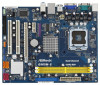
... website for specific information about the model you for purchasing ASRock G965M-S motherboard, a reliable motherboard produced under ASRock's consistently stringent quality control. www.asrock.com/support/index.asp 1.1 Package Contents ASRock G965M-S Motherboard (Micro ATX Form Factor: 9.6-in x 7.7-in, 24.4 cm x 19.6 cm) ASRock G965M-S Quick Installation Guide ASRock G965M-S Support CD One 80-conductor Ultra ATA 66/100/133...
... website for specific information about the model you for purchasing ASRock G965M-S motherboard, a reliable motherboard produced under ASRock's consistently stringent quality control. www.asrock.com/support/index.asp 1.1 Package Contents ASRock G965M-S Motherboard (Micro ATX Form Factor: 9.6-in x 7.7-in, 24.4 cm x 19.6 cm) ASRock G965M-S Quick Installation Guide ASRock G965M-S Support CD One 80-conductor Ultra ATA 66/100/133...
Quick Installation Guide
Page 1
... warranties or conditions of merchantability or fitness for a particular purpose. All rights reserved. 1 ASRock G965M-S Motherboard English With respect to the contents of this guide, ASRock does not provide warranty of any kind, either expressed or implied, including but not limited ..."Perchlorate Material-special handling may apply, see www.dtsc.ca.gov/hazardouswaste/perchlorate" ASRock Website: http://www.asrock.com Published February 2009 Copyright©2009 ASRock INC. ASRock assumes no event shall ASRock, its directors, officers, employees, or agents be liable for any indirect, special...
... warranties or conditions of merchantability or fitness for a particular purpose. All rights reserved. 1 ASRock G965M-S Motherboard English With respect to the contents of this guide, ASRock does not provide warranty of any kind, either expressed or implied, including but not limited ..."Perchlorate Material-special handling may apply, see www.dtsc.ca.gov/hazardouswaste/perchlorate" ASRock Website: http://www.asrock.com Published February 2009 Copyright©2009 ASRock INC. ASRock assumes no event shall ASRock, its directors, officers, employees, or agents be liable for any indirect, special...
Quick Installation Guide
Page 2
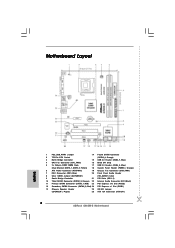
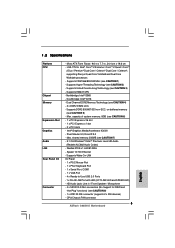
... Channel: DDRII_1, DDRII_2; Red) 24 PCI Express x1 Slot (PCIE1) 13 Chassis Speaker Header 25 OC 800 Jumper (SPEAKER 1, Purple) 26 ATX 12V Connector (ATX12V1) 2 ASRock G965M-S Motherboard Motherboard Layout English 1 PS2_USB_PWR1 Jumper 14 Fourth SATAII Connector 2 775-Pin CPU Socket (SATAII_4;
... Channel: DDRII_1, DDRII_2; Red) 24 PCI Express x1 Slot (PCIE1) 13 Chassis Speaker Header 25 OC 800 Jumper (SPEAKER 1, Purple) 26 ATX 12V Connector (ATX12V1) 2 ASRock G965M-S Motherboard Motherboard Layout English 1 PS2_USB_PWR1 Jumper 14 Fourth SATAII Connector 2 775-Pin CPU Socket (SATAII_4;

Quick Installation Guide
Page 3
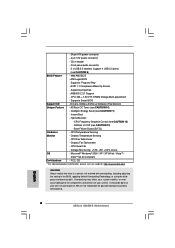
... header. For Windows® XP: After restarting your system. Please select "Mixer ToolBox" , click "Enable playback multi-streaming", and click "ok". Then reboot your system. 3 ASRock G965M-S Motherboard English I/O Panel 1 PS/2 Mouse Port (Green) 2 RJ-45 Port 3 Line In (Light Blue) 4 Front Speaker (Lime) * 5 Microphone (Pink) 6 USB 2.0 Ports (USB01) 7 USB 2.0 Ports (USB23...
... header. For Windows® XP: After restarting your system. Please select "Mixer ToolBox" , click "Enable playback multi-streaming", and click "ok". Then reboot your system. 3 ASRock G965M-S Motherboard English I/O Panel 1 PS/2 Mouse Port (Green) 2 RJ-45 Port 3 Line In (Light Blue) 4 Front Speaker (Lime) * 5 Microphone (Pink) 6 USB 2.0 Ports (USB01) 7 USB 2.0 Ports (USB23...
Quick Installation Guide
Page 4
... this manual occur, the updated version will be found in the user manual presented in , 24.4 cm x 19.6 cm) ASRock G965M-S Quick Installation Guide ASRock G965M-S Support CD One 80-conductor Ultra ATA 66/100/133 IDE Ribbon Cable (Optional) One Serial ATA (SATA) Data Cable (... Introduction Thank you are using. In case any modifications of the motherboard can be subject to quality and endurance. www.asrock.com/support/index.asp 1.1 Package Contents ASRock G965M-S Motherboard (Micro ATX Form Factor: 9.6-in x 7.7-in the Support CD. Because the motherboard specifications and the BIOS ...
... this manual occur, the updated version will be found in the user manual presented in , 24.4 cm x 19.6 cm) ASRock G965M-S Quick Installation Guide ASRock G965M-S Support CD One 80-conductor Ultra ATA 66/100/133 IDE Ribbon Cable (Optional) One Serial ATA (SATA) Data Cable (... Introduction Thank you are using. In case any modifications of the motherboard can be subject to quality and endurance. www.asrock.com/support/index.asp 1.1 Package Contents ASRock G965M-S Motherboard (Micro ATX Form Factor: 9.6-in x 7.7-in the Support CD. Because the motherboard specifications and the BIOS ...
Quick Installation Guide
Page 5
....6 cm - Supports Hyper-Threading Technology (see CAUTION 6) - 1 x PCI Express x16 slot - 1 x PCI Express x1 slot - 2 x PCI slots - Speed: 10/100 Ethernet - CPU/Chassis FAN connector 5 ASRock G965M-S Motherboard English Micro ATX Form Factor: 9.6-in x 7.7-in / Front Speaker / Microphone - 4 x SATAII 3.0 Gb/s connectors (No Support for Intel® CoreTM 2 Extreme / CoreTM 2 Quad / CoreTM 2 Duo...
....6 cm - Supports Hyper-Threading Technology (see CAUTION 6) - 1 x PCI Express x16 slot - 1 x PCI Express x1 slot - 2 x PCI slots - Speed: 10/100 Ethernet - CPU/Chassis FAN connector 5 ASRock G965M-S Motherboard English Micro ATX Form Factor: 9.6-in x 7.7-in / Front Speaker / Microphone - 4 x SATAII 3.0 Gb/s connectors (No Support for Intel® CoreTM 2 Extreme / CoreTM 2 Quad / CoreTM 2 Duo...
Quick Installation Guide
Page 6
- 24 pin ATX power connector - 4 pin 12V power connector - ACPI 1.1 Compliance Wake Up Events - ASRock OC Tuner (see CAUTION 13) - ASRock U-COP (see CAUTION 10) - Microsoft® Windows® 2000 / XP / XP 64-bit / VistaTM / VistaTM 64-bit ...5V,VTT, DRAM Voltage Multi-adjustment - CPU Temperature Sensing Monitor - CPU Quiet Fan - English 6 ASRock G965M-S Motherboard FCC, CE * For detailed product information, please visit our website: http://www.asrock.com WARNING Please realize that there is a certain risk involved with overclocking, including adjusting the setting in...
- 24 pin ATX power connector - 4 pin 12V power connector - ACPI 1.1 Compliance Wake Up Events - ASRock OC Tuner (see CAUTION 13) - ASRock U-COP (see CAUTION 10) - Microsoft® Windows® 2000 / XP / XP 64-bit / VistaTM / VistaTM 64-bit ...5V,VTT, DRAM Voltage Multi-adjustment - CPU Temperature Sensing Monitor - CPU Quiet Fan - English 6 ASRock G965M-S Motherboard FCC, CE * For detailed product information, please visit our website: http://www.asrock.com WARNING Please realize that there is a certain risk involved with overclocking, including adjusting the setting in...
Quick Installation Guide
Page 7
...tool which allows you to surveil your SATAII hard disk drive to read the installation guide of Intelligent Energy Saver. English 7 ASRock G965M-S Motherboard Please visit our website for the latest information. 8. If you want to overclock the CPU you adopt from FSB800 ...to FSB1066, you implement Dual Channel Memory Technology, make sure to SATAII mode. This motherboard supports Dual Channel Memory Technology. ASRock website: http://www.asrock.com 11. Before installing SATAII hard disk to page 14 for USB 2.0 works fine under Windows® XP, Win- Please...
...tool which allows you to surveil your SATAII hard disk drive to read the installation guide of Intelligent Energy Saver. English 7 ASRock G965M-S Motherboard Please visit our website for the latest information. 8. If you want to overclock the CPU you adopt from FSB800 ...to FSB1066, you implement Dual Channel Memory Technology, make sure to SATAII mode. This motherboard supports Dual Channel Memory Technology. ASRock website: http://www.asrock.com 11. Before installing SATAII hard disk to page 14 for USB 2.0 works fine under Windows® XP, Win- Please...
Quick Installation Guide
Page 8
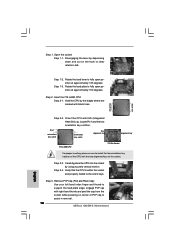
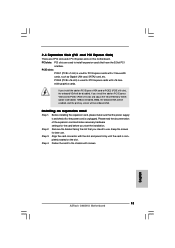
To improve heat dissipation, remember to spray thermal grease between the CPU and the heatsink when you resume the system, please check if the CPU fan on the motherboard functions properly and unplug the power cord, then plug it back again. Before you install the PC system. 8 ASRock G965M-S Motherboard English While CPU overheat is detected, the system will automatically shutdown. 13.
To improve heat dissipation, remember to spray thermal grease between the CPU and the heatsink when you resume the system, please check if the CPU fan on the motherboard functions properly and unplug the power cord, then plug it back again. Before you install the PC system. 8 ASRock G965M-S Motherboard English While CPU overheat is detected, the system will automatically shutdown. 13.

Quick Installation Guide
Page 9
... your motherboard directly on the socket. When placing screws into the socket if above situation is any component. Otherwise, the CPU will be seriously damaged. 9 ASRock G965M-S Motherboard English 2. Whenever you install motherboard components or change any component, place it on a grounded antstatic pad or in the bag that comes with the...
... your motherboard directly on the socket. When placing screws into the socket if above situation is any component. Otherwise, the CPU will be seriously damaged. 9 ASRock G965M-S Motherboard English 2. Whenever you install motherboard components or change any component, place it on a grounded antstatic pad or in the bag that comes with the...
Quick Installation Guide
Page 10
... 2-1. Locate Pin1 and the two orientation key notches. Step 2-3. Verify that the CPU is within the socket and properly mated to assist in removal. 10 ASRock G965M-S Motherboard Disengaging the lever by the edges where are marked with right hand thumb and peel the cap from the socket while pressing on the...
... 2-1. Locate Pin1 and the two orientation key notches. Step 2-3. Verify that the CPU is within the socket and properly mated to assist in removal. 10 ASRock G965M-S Motherboard Disengaging the lever by the edges where are marked with right hand thumb and peel the cap from the socket while pressing on the...
Quick Installation Guide
Page 11
... fastener clockwise, then press down on the motherboard. Step 3. This cap must be secured on fastener caps with fan operation or contact other components. 11 ASRock G965M-S Motherboard English
... fastener clockwise, then press down on the motherboard. Step 3. This cap must be secured on fastener caps with fan operation or contact other components. 11 ASRock G965M-S Motherboard English
Quick Installation Guide
Page 12
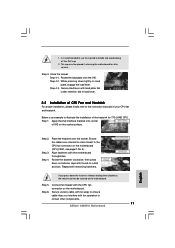
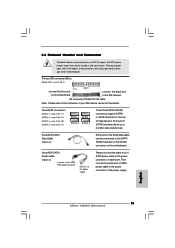
... unable to install two identical (the same brand, speed, size and chip-type) memory modules in place and the DIMM is properly seated. 12 ASRock G965M-S Motherboard English Installing a DIMM Please make sure to activate Dual Channel Memory Technology. Firmly insert the DIMM into the slot at incorrect orientation. For... damage to the motherboard and the DIMM if you always need to activate the Dual Channel Memory Technology. 2.3 Installation of Memory Modules (DIMM) G965M-S motherboard provides two 240-pin DDR2 (Double Data Rate 2) DIMM slots, and supports Dual Channel Memory Technology.
... unable to install two identical (the same brand, speed, size and chip-type) memory modules in place and the DIMM is properly seated. 12 ASRock G965M-S Motherboard English Installing a DIMM Please make sure to activate Dual Channel Memory Technology. Firmly insert the DIMM into the slot at incorrect orientation. For... damage to the motherboard and the DIMM if you always need to activate the Dual Channel Memory Technology. 2.3 Installation of Memory Modules (DIMM) G965M-S motherboard provides two 240-pin DDR2 (Double Data Rate 2) DIMM slots, and supports Dual Channel Memory Technology.
Quick Installation Guide
Page 13
... be enabled, and the primary screen will be onboard VGA. PCIE slots: PCIE1 (PCIE x1 slot) is used for PCI Express cards with screws. 13 ASRock G965M-S Motherboard English Step 3.
... be enabled, and the primary screen will be onboard VGA. PCIE slots: PCIE1 (PCIE x1 slot) is used for PCI Express cards with screws. 13 ASRock G965M-S Motherboard English Step 3.
Quick Installation Guide
Page 14
... p.2 No. 25) Default Note: If you to adjust the jumpers. Cel400, E1000, E2000, E4000, E5000, E6000 series CPU) to overclock the FSB800-CPU (e.g. English 14 ASRock G965M-S Motherboard
... p.2 No. 25) Default Note: If you to adjust the jumpers. Cel400, E1000, E2000, E4000, E5000, E6000 series CPU) to overclock the FSB800-CPU (e.g. English 14 ASRock G965M-S Motherboard
Quick Installation Guide
Page 15
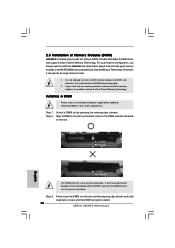
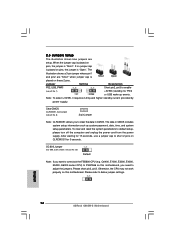
... power connector connect to the power supply Please connect the black end of SATA power cable to the power connector on the motherboard. English 15 ASRock G965M-S Motherboard Serial ATAII Connectors (SATAII_1: see p.2, No. 11) (SATAII_2: see p.2, No. 12) (SATAII_3: see p.2, No. 10) (SATAII_4: see p.2 No. 7) connect the blue end to the...
... power connector connect to the power supply Please connect the black end of SATA power cable to the power connector on the motherboard. English 15 ASRock G965M-S Motherboard Serial ATAII Connectors (SATAII_1: see p.2, No. 11) (SATAII_2: see p.2, No. 12) (SATAII_3: see p.2, No. 10) (SATAII_4: see p.2 No. 7) connect the blue end to the...
Quick Installation Guide
Page 16
.... 17) Besides four default USB 2.0 ports on the I /O", select "Connector Settings" , choose "Disable front panel jack detection", and save the change by clicking "OK". 16 ASRock G965M-S Motherboard English You don't need to [Enabled].
.... 17) Besides four default USB 2.0 ports on the I /O", select "Connector Settings" , choose "Disable front panel jack detection", and save the change by clicking "OK". 16 ASRock G965M-S Motherboard English You don't need to [Enabled].

Quick Installation Guide
Page 17
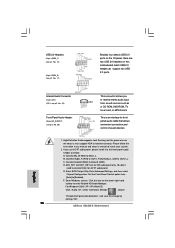
... the right-top "Folder" icon , choose "Disable front panel jack detection", and save the change by clicking "OK". Pin 1-3 Connected 3-Pin Fan Installation English 17 ASRock G965M-S Motherboard System Panel Header (9-pin PANEL1) (see p.2 No. 4) 4 3 2 1 Please connect the chassis speaker to this connector and match the black wire to the "Front Mic...
... the right-top "Folder" icon , choose "Disable front panel jack detection", and save the change by clicking "OK". Pin 1-3 Connected 3-Pin Fan Installation English 17 ASRock G965M-S Motherboard System Panel Header (9-pin PANEL1) (see p.2 No. 4) 4 3 2 1 Please connect the chassis speaker to this connector and match the black wire to the "Front Mic...

Quick Installation Guide
Page 18
... this motherboard provides 24-pin ATX power connector, 12 24 it can still work if you adopt a traditional 20-pin ATX power supply. English 18 ASRock G965M-S Motherboard Failing to do so will cause the failure to power up. ATX Power Connector (24-pin ATXPWR1) (see p.2 No. 26) Please note that it...
... this motherboard provides 24-pin ATX power connector, 12 24 it can still work if you adopt a traditional 20-pin ATX power supply. English 18 ASRock G965M-S Motherboard Failing to do so will cause the failure to power up. ATX Power Connector (24-pin ATXPWR1) (see p.2 No. 26) Please note that it...
Quick Installation Guide
Page 19
... Overclocking Technology. Therefore, CPU FSB is untied during overclocking, FSB enjoys better margin due to the warning on the support CD driver page. English 19 ASRock G965M-S Motherboard This section will guide you enable Untied Overclocking function, please enter "Overclock Mode" option of your optical drive first. STEP 2: Connect the SATA power...
... Overclocking Technology. Therefore, CPU FSB is untied during overclocking, FSB enjoys better margin due to the warning on the support CD driver page. English 19 ASRock G965M-S Motherboard This section will guide you enable Untied Overclocking function, please enter "Overclock Mode" option of your optical drive first. STEP 2: Connect the SATA power...


