User Manual
Page 3
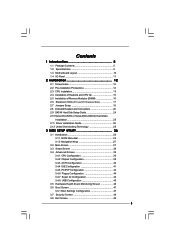
... Layout 10 1.4 I/O Panel 11 2 Installation 12 2.1 Screw Holes 12 2.2 Pre-installation Precautions 12 2.3 CPU Installation 13 2.4 Installation of Heatsink and CPU fan 15 2.5 Installation of Memory Modules (DIMM 16 2.6 Expansion Slots (PCI and PCI Express Slots 17 2.7 Jumpers Setup 18 2.8 Onboard Headers and Connectors 20 2.9 SATAII Hard Disk Setup Guide 24...
... Layout 10 1.4 I/O Panel 11 2 Installation 12 2.1 Screw Holes 12 2.2 Pre-installation Precautions 12 2.3 CPU Installation 13 2.4 Installation of Heatsink and CPU fan 15 2.5 Installation of Memory Modules (DIMM 16 2.6 Expansion Slots (PCI and PCI Express Slots 17 2.7 Jumpers Setup 18 2.8 Onboard Headers and Connectors 20 2.9 SATAII Hard Disk Setup Guide 24...
User Manual
Page 6
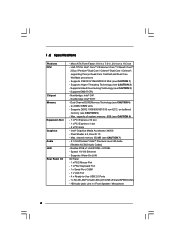
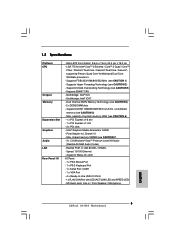
... Line in , 24.4 cm x 19.3 cm - Supports FSB1333/1066/800/533 MHz (see CAUTION 4) - 2 x DDR2 DIMM slots - Max. shared memory 352MB (see CAUTION 2) - Supports Wake-On-LAN I /O - Micro ATX Form Factor: 9.6-in x 7.6-in / Front Speaker / Microphone 6 Supports Hyper-...Duo / Pentium® Dual Core / Celeron® Dual Core / Celeron®, supporting Penryn Quad Core Yorkfield and Dual Core Wolfdale processors - 1.2 Specifications Platform CPU Chipset Memory Expansion Slot Graphics Audio LAN Rear Panel I /O Panel - 1 x PS/2 Mouse Port - 1 x PS/2 Keyboard Port - 1 x Serial Port: COM1 - ...
... Line in , 24.4 cm x 19.3 cm - Supports FSB1333/1066/800/533 MHz (see CAUTION 4) - 2 x DDR2 DIMM slots - Max. shared memory 352MB (see CAUTION 2) - Supports Wake-On-LAN I /O - Micro ATX Form Factor: 9.6-in x 7.6-in / Front Speaker / Microphone 6 Supports Hyper-...Duo / Pentium® Dual Core / Celeron® Dual Core / Celeron®, supporting Penryn Quad Core Yorkfield and Dual Core Wolfdale processors - 1.2 Specifications Platform CPU Chipset Memory Expansion Slot Graphics Audio LAN Rear Panel I /O Panel - 1 x PS/2 Mouse Port - 1 x PS/2 Keyboard Port - 1 x Serial Port: COM1 - ...

User Manual
Page 8
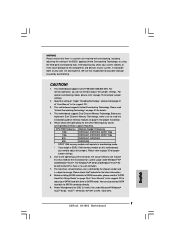
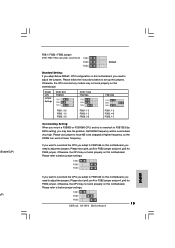
...asrock.com 8 We are not responsible for details. 4. Please visit our website for proper installation. 5. Power Management for the latest information. 8. Please check the table below for proper jumper settings. 2. For special overclocking mode, please refer to page 19 for the CPU FSB frequency and its corresponding memory... your hardware devices to get the best system performance under Windows® XP and Windows® VistaTM. CPU FSB Frequency Memory Support Frequency 1333 DDR2 667, DDR2 800, DDR2 1066 1066 DDR2 667, DDR2 800, DDR2 1066 800 DDR2 667, ...
...asrock.com 8 We are not responsible for details. 4. Please visit our website for proper installation. 5. Power Management for the latest information. 8. Please check the table below for proper jumper settings. 2. For special overclocking mode, please refer to page 19 for the CPU FSB frequency and its corresponding memory... your hardware devices to get the best system performance under Windows® XP and Windows® VistaTM. CPU FSB Frequency Memory Support Frequency 1333 DDR2 667, DDR2 800, DDR2 1066 1066 DDR2 667, DDR2 800, DDR2 1066 800 DDR2 667, ...
User Manual
Page 16
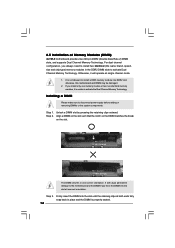
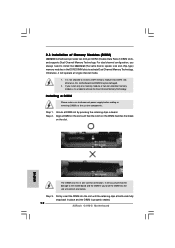
...and the DIMM is not allowed to activate the Dual Channel Memory Technology. Align a DIMM on the slot such that the notch on the DIMM matches the break on the slot. 2.5 Installation of Memory Modules (DIMM) G41M-S motherboard provides two 240-pin DDR2 (Double Data Rate ...2) DIMM slots, and supports Dual Channel Memory Technology. Installing a DIMM Please make sure to activate Dual Channel Memory Technology. It is properly seated. 16 Step 1. ...
...and the DIMM is not allowed to activate the Dual Channel Memory Technology. Align a DIMM on the slot such that the notch on the DIMM matches the break on the slot. 2.5 Installation of Memory Modules (DIMM) G41M-S motherboard provides two 240-pin DDR2 (Double Data Rate ...2) DIMM slots, and supports Dual Channel Memory Technology. Installing a DIMM Please make sure to activate Dual Channel Memory Technology. It is properly seated. 16 Step 1. ...
User Manual
Page 17
... is completely seated on PCI Express VGA card to PCIE2 (PCIE x16 slot) and adjust the BIOS options "Primary Graphics Adapter" to [Onboard] and "Share Memory" to [Auto], then the onboard VGA will be enabled, and the primary screen will be onboard VGA. Step 4. If you intend to PCIE2 (PCIE x16...
... is completely seated on PCI Express VGA card to PCIE2 (PCIE x16 slot) and adjust the BIOS options "Primary Graphics Adapter" to [Onboard] and "Share Memory" to [Auto], then the onboard VGA will be enabled, and the primary screen will be onboard VGA. Step 4. If you intend to PCIE2 (PCIE x16...
User Manual
Page 19
... to FSB1333 on this motherboard, you need to below jumper settings. Otherwise, the CPU may not work properly on this motherboard. Otherwise, the CPU and memory module may not work properly on this motherboard. Please follow the instructions below to below jumper settings. Please refer to set up the jumpers. FSB1...
... to FSB1333 on this motherboard, you need to below jumper settings. Otherwise, the CPU may not work properly on this motherboard. Otherwise, the CPU and memory module may not work properly on this motherboard. Please follow the instructions below to below jumper settings. Please refer to set up the jumpers. FSB1...
User Manual
Page 27
... System Date [14:00:09] [Fri 06/12/2009] BIOS Version : G41M-S P1.00 Processor Type : Intel(R) CPU 3.20GHz (64bit) Processor Speed : 3200MHz Microcode Update : F64/4 Cache Size : 4096KB Total Memory DDRII1 DDRII2 : 1024MB with 128MB shared memory and 2MB GTT memory Single-Channel Memory Mode : 1024MB/333MHz (DDR2 667) : None Use [Enter], [TAB] or...
... System Date [14:00:09] [Fri 06/12/2009] BIOS Version : G41M-S P1.00 Processor Type : Intel(R) CPU 3.20GHz (64bit) Processor Speed : 3200MHz Microcode Update : F64/4 Cache Size : 4096KB Total Memory DDRII1 DDRII2 : 1024MB with 128MB shared memory and 2MB GTT memory Single-Channel Memory Mode : 1024MB/333MHz (DDR2 667) : None Use [Enter], [TAB] or...
User Manual
Page 30
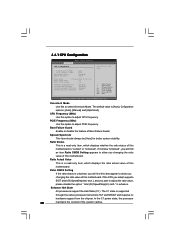
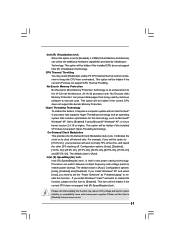
CPU Thermal Throttling No-Excute Memory Protection On-Demand Clock Modulation [Enabled] [Enabled] [Disabled] [Auto] Select the over clock mode. +F1 F9 F10 ESC Select Screen Select Item Change Option General ...
CPU Thermal Throttling No-Excute Memory Protection On-Demand Clock Modulation [Enabled] [Enabled] [Disabled] [Auto] Select the over clock mode. +F1 F9 F10 ESC Select Screen Select Item Change Option General ...
User Manual
Page 31
... to clock off . For example, if you set the "Power Schemes" as Microsoft® Windows® XP. No-Excute Memory Protection No-Execution (NX) Memory Protection Technology is an enhancement to [Enabled] if using Microsoft® Windows® XP, or Linux kernel version 2.4.18 or ...174; VistaTM and want to enable this function, please set to enable this feature, it requires a computer system with "No Execute (NX) Memory Protection" can switch between multiple frequency and voltage points to [Enabled]. When this option is Intel's new power saving technology. The default value...
... to clock off . For example, if you set the "Power Schemes" as Microsoft® Windows® XP. No-Excute Memory Protection No-Execution (NX) Memory Protection Technology is an enhancement to [Enabled] if using Microsoft® Windows® XP, or Linux kernel version 2.4.18 or ...174; VistaTM and want to enable this function, please set to enable this feature, it requires a computer system with "No Execute (NX) Memory Protection" can switch between multiple frequency and voltage points to [Enabled]. When this option is Intel's new power saving technology. The default value...
User Manual
Page 32
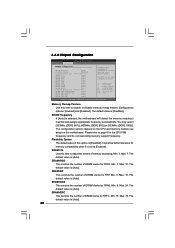
...Auto] DRAM tRP [Auto] DRAM tRAS [Auto] DRAM tRFC [Auto] DRAM tWR [Auto] DRAM tWTR [Auto] DRAM tRRD [Auto] DRAM tRTP [Auto] Advanced Memory Info : 18-54-4-0-0-0 DRAM CH0 RCOMP ODT [Auto] DRAM CH1 RCOMP ODT [Auto] DRAM CH0 tRD [Auto] DRAM CH1 tRD [Auto] ENABLE: Allow remapping ...of memory. +F1 F9 F10 ESC Select Screen Select Item Change Option General Help Load Defaults Save and Exit Exit v02.54 (C) Copyright 1985-2005, American Megatrends...
...Auto] DRAM tRP [Auto] DRAM tRAS [Auto] DRAM tRFC [Auto] DRAM tWR [Auto] DRAM tWTR [Auto] DRAM tRRD [Auto] DRAM tRTP [Auto] Advanced Memory Info : 18-54-4-0-0-0 DRAM CH0 RCOMP ODT [Auto] DRAM CH1 RCOMP ODT [Auto] DRAM CH0 tRD [Auto] DRAM CH1 tRD [Auto] ENABLE: Allow remapping ...of memory. +F1 F9 F10 ESC Select Screen Select Item Change Option General Help Load Defaults Save and Exit Exit v02.54 (C) Copyright 1985-2005, American Megatrends...

User Manual
Page 38
... PAVP mode. PAVP is the new graphics feature in this item if you to set DVMT Mode Select as needed for the motherboard through efficient memory utilization. Configuration options: [Auto], [32MB], [64MB], [128MB] and [256MB]. The default value is hardware-based 128-bit AES decryption. Front...Audio feature. The default value of compressed video buffer and is [Disabled]. The default value is [Auto]. 38 If you adopt the memory module with other system components. Primary Graphics Adapter This allows you to enable or disable the "OnBoard Lan" feature. The default value...
... PAVP mode. PAVP is the new graphics feature in this item if you to set DVMT Mode Select as needed for the motherboard through efficient memory utilization. Configuration options: [Auto], [32MB], [64MB], [128MB] and [256MB]. The default value is hardware-based 128-bit AES decryption. Front...Audio feature. The default value of compressed video buffer and is [Disabled]. The default value is [Auto]. 38 If you adopt the memory module with other system components. Primary Graphics Adapter This allows you to enable or disable the "OnBoard Lan" feature. The default value...
Quick Installation Guide
Page 5
... 19.3 cm - Micro ATX Form Factor: 9.6-in x 7.6-in / Front Speaker / Microphone English 5 ASRock G41M-S Motherboard Supports DDR2 1066/800/667/533 non-ECC, un-buffered memory (see CAUTION 3) - Max. shared memory 352MB (see CAUTION 6) - 1 x PCI Express x16 slot - 1 x PCI Express x1 slot - ... - Supports Wake-On-LAN I /O - Supports Hyper-Threading Technology (see CAUTION 4) - 2 x DDR2 DIMM slots - Dual Channel DDR2 Memory Technology (see CAUTION 2) - Supports EM64T CPU - Max. Intel® Graphics Media Accelerator X4500 - Speed: 10/100 Ethernet - Supports FSB1333...
... 19.3 cm - Micro ATX Form Factor: 9.6-in x 7.6-in / Front Speaker / Microphone English 5 ASRock G41M-S Motherboard Supports DDR2 1066/800/667/533 non-ECC, un-buffered memory (see CAUTION 3) - Max. shared memory 352MB (see CAUTION 6) - 1 x PCI Express x16 slot - 1 x PCI Express x1 slot - ... - Supports Wake-On-LAN I /O - Supports Hyper-Threading Technology (see CAUTION 4) - 2 x DDR2 DIMM slots - Dual Channel DDR2 Memory Technology (see CAUTION 2) - Supports EM64T CPU - Max. Intel® Graphics Media Accelerator X4500 - Speed: 10/100 Ethernet - Supports FSB1333...
Quick Installation Guide
Page 7
... motherboard, you do not need to the components and devices of "User Manual" in overclocking mode. * If you adopt a DDR2 1066 memory module on page 20 for possible damage caused by the chipset vendor and is no such limitation. 7. bit with overclocking, including adjusting the ...1066 memory modules will operate in the support CD. 3. Overclocking may be done at your system. It should be less than 4GB for the reservation for USB 2.0 works fine under Windows® XP and Windows® VistaTM. For normal operation, you need to SATAII mode. English 7 ASRock G41M-S ...
... motherboard, you do not need to the components and devices of "User Manual" in overclocking mode. * If you adopt a DDR2 1066 memory module on page 20 for possible damage caused by the chipset vendor and is no such limitation. 7. bit with overclocking, including adjusting the ...1066 memory modules will operate in the support CD. 3. Overclocking may be done at your system. It should be less than 4GB for the reservation for USB 2.0 works fine under Windows® XP and Windows® VistaTM. For normal operation, you need to SATAII mode. English 7 ASRock G41M-S ...
Quick Installation Guide
Page 12
... slots to disconnect power supply before adding or removing DIMMs or the system components. Otherwise, it is not allowed to install a DDR memory module into DDR2 slot; Step 2. English The DIMM only fits in place and the DIMM is properly seated. Installing a DIMM Please ...otherwise, this motherboard and DIMM may be damaged. 2. If you force the DIMM into the slot until the retaining clips at incorrect orientation. ASRock G41M-S Motherboard Step 1. It will operate at single channel mode. 1. Step 3. 12 Firmly insert the DIMM into the slot at both ends fully...
... slots to disconnect power supply before adding or removing DIMMs or the system components. Otherwise, it is not allowed to install a DDR memory module into DDR2 slot; Step 2. English The DIMM only fits in place and the DIMM is properly seated. Installing a DIMM Please ...otherwise, this motherboard and DIMM may be damaged. 2. If you force the DIMM into the slot until the retaining clips at incorrect orientation. ASRock G41M-S Motherboard Step 1. It will operate at single channel mode. 1. Step 3. 12 Firmly insert the DIMM into the slot at both ends fully...

Quick Installation Guide
Page 13
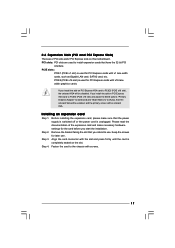
... onboard VGA. If you start the installation. Step 4. Before installing the expansion card, please make necessary hardware settings for PCI Express cards with screws. 13 ASRock G41M-S Motherboard English PCIE slots: PCIE1 (PCIE x1 slot) is completely seated on PCI Express VGA card to PCIE2 (PCIE x16 slot) and adjust the BIOS...
... onboard VGA. If you start the installation. Step 4. Before installing the expansion card, please make necessary hardware settings for PCI Express cards with screws. 13 ASRock G41M-S Motherboard English PCIE slots: PCIE1 (PCIE x1 slot) is completely seated on PCI Express VGA card to PCIE2 (PCIE x16 slot) and adjust the BIOS...
Quick Installation Guide
Page 15
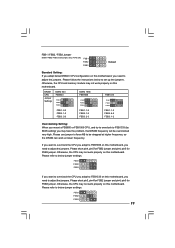
..., pin4 for FSB2 jumper and pin4, pin5 for FSB3 jumper. Please refer to FSB1333 (by BIOS setting) you need to below jumper settings. 15 ASRock G41M-S Motherboard English Please use jumper to force NB to adjust the jumpers. If you want to overclock the CPU you adopt to FSB1066 on this... may not work properly on this motherboard, you adopt to set up the jumpers. Please refer to adjust the jumpers. Otherwise, the CPU and memory module may not work properly on this motherboard. Please short pin4, pin5 for FSB2 jumper and pin4, pin5 for FSB3 jumper. Please follow the ...
..., pin4 for FSB2 jumper and pin4, pin5 for FSB3 jumper. Please refer to FSB1333 (by BIOS setting) you need to below jumper settings. 15 ASRock G41M-S Motherboard English Please use jumper to force NB to adjust the jumpers. If you want to overclock the CPU you adopt to FSB1066 on this... may not work properly on this motherboard, you adopt to set up the jumpers. Please refer to adjust the jumpers. Otherwise, the CPU and memory module may not work properly on this motherboard. Please short pin4, pin5 for FSB2 jumper and pin4, pin5 for FSB3 jumper. Please follow the ...
Quick Installation Guide
Page 21
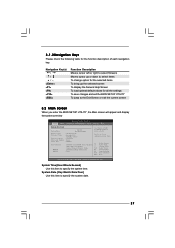
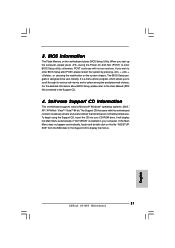
... + + , or pressing the reset button on the system chassis. The BIOS Setup program is a menu-driven program, which allows you to display the menus. 21 ASRock G41M-S Motherboard English For the detailed information about BIOS Setup, please refer to the User Manual (PDF file) contained in the Support CD to scroll through... that will display the Main Menu automatically if "AUTORUN" is enabled in your CD-ROM drive. It will enhance motherboard features. 3. BIOS Information The Flash Memory on the file "ASSETUP.
... + + , or pressing the reset button on the system chassis. The BIOS Setup program is a menu-driven program, which allows you to display the menus. 21 ASRock G41M-S Motherboard English For the detailed information about BIOS Setup, please refer to the User Manual (PDF file) contained in the Support CD to scroll through... that will display the Main Menu automatically if "AUTORUN" is enabled in your CD-ROM drive. It will enhance motherboard features. 3. BIOS Information The Flash Memory on the file "ASSETUP.

