User Manual
Page 3
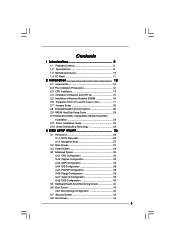
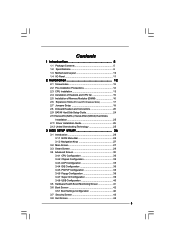
... Holes 12 2.2 Pre-installation Precautions 12 2.3 CPU Installation 13 2.4 Installation of Heatsink and CPU fan 15 2.5 Installation of Memory Modules (DIMM 16 2.6 Expansion Slots (PCI and PCI Express Slots 17 2.7 Jumpers Setup 18 2.8 Onboard Headers and Connectors 20 2.9 SATAII Hard Disk Setup Guide 24 2.10 Serial ATA (SATA) / Serial ATAII (SATAII) Hard...
... Holes 12 2.2 Pre-installation Precautions 12 2.3 CPU Installation 13 2.4 Installation of Heatsink and CPU fan 15 2.5 Installation of Memory Modules (DIMM 16 2.6 Expansion Slots (PCI and PCI Express Slots 17 2.7 Jumpers Setup 18 2.8 Onboard Headers and Connectors 20 2.9 SATAII Hard Disk Setup Guide 24 2.10 Serial ATA (SATA) / Serial ATAII (SATAII) Hard...

User Manual
Page 6
...Max. Intel® Graphics Media Accelerator 3100 - G31M-S Realtek PCIE x1 LAN 8102EL, speed 10/100 Mb/s - Supports Hyper-Threading Technology (see CAUTION 4) - 2 x DDR2 DIMM slots - Supports EM64T CPU - Pixel Shader 2.0, DirectX 9.0 - shared memory 384MB (see CAUTION 6) - 1 x PCI Express x16 slot - 1 x PCI Express x1 slot - 2 x PCI slots - HD Audio Jack: Line in , ... with all FSB1600/1333/1066/800MHz CPUs (see CAUTION 3) - Supports DDR2 800/667 non-ECC, un-buffered memory (see CAUTION 5) - Max. G31M-GS Realtek PCIE x 1 Gigabit LAN RTL8111DL, speed 10/100/1000 Mb/s -
...Max. Intel® Graphics Media Accelerator 3100 - G31M-S Realtek PCIE x1 LAN 8102EL, speed 10/100 Mb/s - Supports Hyper-Threading Technology (see CAUTION 4) - 2 x DDR2 DIMM slots - Supports EM64T CPU - Pixel Shader 2.0, DirectX 9.0 - shared memory 384MB (see CAUTION 6) - 1 x PCI Express x16 slot - 1 x PCI Express x1 slot - 2 x PCI slots - HD Audio Jack: Line in , ... with all FSB1600/1333/1066/800MHz CPUs (see CAUTION 3) - Supports DDR2 800/667 non-ECC, un-buffered memory (see CAUTION 5) - Max. G31M-GS Realtek PCIE x 1 Gigabit LAN RTL8111DL, speed 10/100/1000 Mb/s -

User Manual
Page 10
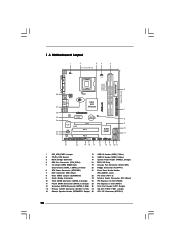
...; Yellow) 20 Floppy Connector (FLOPPY1) 6 ATX Power Connector (ATXPWR1) 21 Front Panel Audio Header 7 IDE1 Connector (IDE1, Blue) (HD_AUDIO1, Lime) 8 Clear CMOS Jumper (CLRCMOS1) 22 PCI Slots (PCI1- 2) 9 South Bridge Controller 23 Internal Audio Connector: CD1 (Black) 10 Third SATAII Connector (SATAII_3; Red) 26 Print Port Header (LPT1, Purple) 13 Primary...
...; Yellow) 20 Floppy Connector (FLOPPY1) 6 ATX Power Connector (ATXPWR1) 21 Front Panel Audio Header 7 IDE1 Connector (IDE1, Blue) (HD_AUDIO1, Lime) 8 Clear CMOS Jumper (CLRCMOS1) 22 PCI Slots (PCI1- 2) 9 South Bridge Controller 23 Internal Audio Connector: CD1 (Black) 10 Third SATAII Connector (SATAII_3; Red) 26 Print Port Header (LPT1, Purple) 13 Primary...

User Manual
Page 17
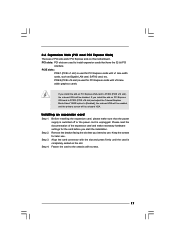
... read the documentation of the expansion card and make sure that the power supply is switched off or the power cord is completely seated on PCI Express VGA card to PCIE2 (PCIE x16 slot), the onboard VGA will be disabled. Step 2. Keep the screws for the card before you install the... slot. Fasten the card to the chassis with the slot and press firmly until the card is unplugged. PCIE2 (PCIE x16 slot) is used for PCI Express cards with x1 lane width cards, such as Gigabit LAN card, SATA2 card, etc. Installing an expansion card Step 1. Align the card connector with...
... read the documentation of the expansion card and make sure that the power supply is switched off or the power cord is completely seated on PCI Express VGA card to PCIE2 (PCIE x16 slot), the onboard VGA will be disabled. Step 2. Keep the screws for the card before you install the... slot. Fasten the card to the chassis with the slot and press firmly until the card is unplugged. PCIE2 (PCIE x16 slot) is used for PCI Express cards with x1 lane width cards, such as Gigabit LAN card, SATA2 card, etc. Installing an expansion card Step 1. Align the card connector with...
User Manual
Page 25
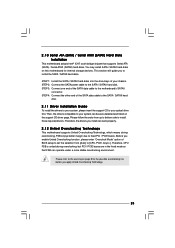
... on the support CD driver page. Then, the drivers compatible to install the SATA / SATAII hard disks. Therefore, CPU FSB is untied during overclocking, but PCI / PCIE buses are in the fixed mode so that supports Serial ATA (SATA) / Serial ATAII (SATAII) hard disks. 2 . 1 0 Serial ATA (SATA) / Serial ATAII (SATAII) Hard... end of the SATA data cable to the SATA / SATAII hard disk. Please refer to your chassis. Please follow the order from [Auto] to fixed PCI / PCIE buses.
... on the support CD driver page. Then, the drivers compatible to install the SATA / SATAII hard disks. Therefore, CPU FSB is untied during overclocking, but PCI / PCIE buses are in the fixed mode so that supports Serial ATA (SATA) / Serial ATAII (SATAII) hard disks. 2 . 1 0 Serial ATA (SATA) / Serial ATAII (SATAII) Hard... end of the SATA data cable to the SATA / SATAII hard disk. Please refer to your chassis. Please follow the order from [Auto] to fixed PCI / PCIE buses.

User Manual
Page 26
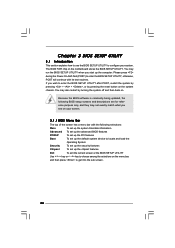
..., the following selections: Main To set up the system time/date information Advanced To set up the advanced BIOS features PCIPnP To set up the PCI features Boot To set up the default system device to locate and load the Operating System Security To set up the security features Chipset To...
..., the following selections: Main To set up the system time/date information Advanced To set up the advanced BIOS features PCIPnP To set up the PCI features Boot To set up the default system device to locate and load the Operating System Security To set up the security features Chipset To...
User Manual
Page 32
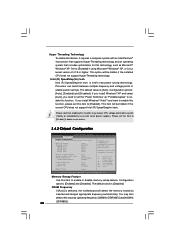
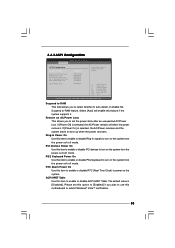
...not support Intel (R) SpeedStep(tm) tech.. is [Auto]. Please set this item to [Enabled]. DISABLE: Do not allow remapping of overlapped PCI memory above the total physical memory. The default value is Intel's new power saving technology. If you install Windows® XP and select...DRAM tRAS [Disabled] [Auto] [Disabled] [Auto] [Auto] [Auto] [Auto] Primary Graphics Adapter Internal Graphics Mode Select DVMT Mode Select DVMT/FIXED Memory [PCI] [Auto] [DVMT Mode] [256MB] OnBoard HD Audio Front Panel OnBoard Lan [Auto] [Auto] [Enabled] DRAM Voltage [Auto] ENABLE: Allow remapping of memory...
...not support Intel (R) SpeedStep(tm) tech.. is [Auto]. Please set this item to [Enabled]. DISABLE: Do not allow remapping of overlapped PCI memory above the total physical memory. The default value is Intel's new power saving technology. If you install Windows® XP and select...DRAM tRAS [Disabled] [Auto] [Disabled] [Auto] [Auto] [Auto] [Auto] Primary Graphics Adapter Internal Graphics Mode Select DVMT Mode Select DVMT/FIXED Memory [PCI] [Auto] [DVMT Mode] [256MB] OnBoard HD Audio Front Panel OnBoard Lan [Auto] [Auto] [Enabled] DRAM Voltage [Auto] ENABLE: Allow remapping of memory...

User Manual
Page 33
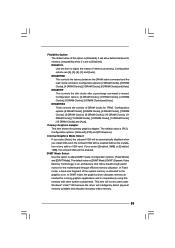
.... Configuration options: [2 DRAM Clocks], [3 DRAM Clocks], [4 DRAM Clocks], [5 DRAM Clocks], [6 DRAM Clocks] and [Auto]. The default value is [PCI]. It will be enabled. The default value is [DVMT Mode]. Configuration options: [Onboard], [PCI] and [PCI Express]. If you select [Enabled, 8MB] or [Enabled, 1MB], the onboard VGA will intelligently detect physical memory available...
.... Configuration options: [2 DRAM Clocks], [3 DRAM Clocks], [4 DRAM Clocks], [5 DRAM Clocks], [6 DRAM Clocks] and [Auto]. The default value is [PCI]. It will be enabled. The default value is [DVMT Mode]. Configuration options: [Onboard], [PCI] and [PCI Express]. If you select [Enabled, 8MB] or [Enabled, 1MB], the onboard VGA will intelligently detect physical memory available...

User Manual
Page 34
...], [1.32V], [1.40V] and [1.51V]. Configuration options: [Auto], [1.5125V] and [1.5651V]. Besides the BIOS option, you select [Auto], the onboard HD Audio will be disabled when PCI Sound Card is a revolutionary technology that delivers unparalleled power savings. DRAM RCOMP Setting Use this feature is [Auto]. 34 Configuration options: [Auto], [1.272V] and [1.319V...
...], [1.32V], [1.40V] and [1.51V]. Configuration options: [Auto], [1.5125V] and [1.5651V]. Besides the BIOS option, you select [Auto], the onboard HD Audio will be disabled when PCI Sound Card is a revolutionary technology that delivers unparalleled power savings. DRAM RCOMP Setting Use this feature is [Auto]. 34 Configuration options: [Auto], [1.272V] and [1.319V...
User Manual
Page 35
... the system from the power-soft-off mode. RTC Alarm Power On Use this motherboard to turn on AC/Power Loss Ring-In Power On PCI Devices Power On PS / 2 Keyboard Power On RTC Alarm Power On ACPI HPET Table [Disabled] [Power Off] [Disabled] [Disabled] [Disabled] [Disabled] [Disabled] Select....54 (C) Copyright 1985-2005, American Megatrends, Inc. If [Power Off] is [Disabled]. Please set the power state after an unexpected AC/Power loss. PCI Devices Power On Use this item to enable or disable PS/2 keyboard to enable or disable ACPI HPET Table. Select [Auto] will enable this item...
... the system from the power-soft-off mode. RTC Alarm Power On Use this motherboard to turn on AC/Power Loss Ring-In Power On PCI Devices Power On PS / 2 Keyboard Power On RTC Alarm Power On ACPI HPET Table [Disabled] [Power Off] [Disabled] [Disabled] [Disabled] [Disabled] [Disabled] Select....54 (C) Copyright 1985-2005, American Megatrends, Inc. If [Power Off] is [Disabled]. Please set the power state after an unexpected AC/Power loss. PCI Devices Power On Use this item to enable or disable PS/2 keyboard to enable or disable ACPI HPET Table. Select [Auto] will enable this item...
User Manual
Page 38
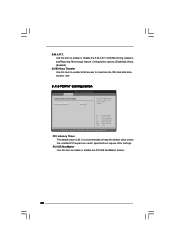
... 32-bit access to enable or disable the PCI IDE BusMaster feature. 38 PCI IDE BusMaster Use this item to keep the default value unless the installed PCI expansion cards' specifications require other settings. It is 32. PCI Latency Timer The default value is recommended to ... the IDE hard disk data transfer rate. 3.4.5 PCIPnP Configuration BIOS SETUP UTILITY Advanced Advanced PCI / PnP Settings PCI Latency Timer PCI IDE BusMaster [32] [Enabled] Value in units of PCI clocks for PCI device latency timer register. +F1 F9 F10 ESC Select Screen Select Item Change Option General...
... 32-bit access to enable or disable the PCI IDE BusMaster feature. 38 PCI IDE BusMaster Use this item to keep the default value unless the installed PCI expansion cards' specifications require other settings. It is 32. PCI Latency Timer The default value is recommended to ... the IDE hard disk data transfer rate. 3.4.5 PCIPnP Configuration BIOS SETUP UTILITY Advanced Advanced PCI / PnP Settings PCI Latency Timer PCI IDE BusMaster [32] [Enabled] Value in units of PCI clocks for PCI device latency timer register. +F1 F9 F10 ESC Select Screen Select Item Change Option General...
User Manual (VIA)
Page 3
... Holes 12 2.2 Pre-installation Precautions 12 2.3 CPU Installation 13 2.4 Installation of Heatsink and CPU fan 15 2.5 Installation of Memory Modules (DIMM 16 2.6 Expansion Slots (PCI and PCI Express Slots 17 2.7 Jumpers Setup 18 2.8 Onboard Headers and Connectors 20 2.9 SATAII Hard Disk Setup Guide 24 2.10 Serial ATA (SATA) / Serial ATAII (SATAII) Hard...
... Holes 12 2.2 Pre-installation Precautions 12 2.3 CPU Installation 13 2.4 Installation of Heatsink and CPU fan 15 2.5 Installation of Memory Modules (DIMM 16 2.6 Expansion Slots (PCI and PCI Express Slots 17 2.7 Jumpers Setup 18 2.8 Onboard Headers and Connectors 20 2.9 SATAII Hard Disk Setup Guide 24 2.10 Serial ATA (SATA) / Serial ATAII (SATAII) Hard...

User Manual (VIA)
Page 6
Supports Hyper-Threading Technology (see CAUTION 3) - Pixel Shader 2.0, DirectX 9.0 - G31M-S Realtek PCIE x1 LAN 8103EL / 8102EL, speed 10/100 Mb/s - 1.2 Specifications Platform CPU Chipset Memory Expansion Slot Graphics Audio LAN Rear Panel I /O Panel...Yorkfield and Dual Core Wolfdale processors - Supports DDR2 800/667 non-ECC, un-buffered memory (see CAUTION 6) - 1 x PCI Express x16 slot - 1 x PCI Express x1 slot - 2 x PCI slots - Intel® Graphics Media Accelerator 3100 - G31M-GS Realtek PCIE x 1 Gigabit LAN RTL8111DL, speed 10/100/1000 Mb/s - Supports Wake-On-LAN I /O 6 -...
Supports Hyper-Threading Technology (see CAUTION 3) - Pixel Shader 2.0, DirectX 9.0 - G31M-S Realtek PCIE x1 LAN 8103EL / 8102EL, speed 10/100 Mb/s - 1.2 Specifications Platform CPU Chipset Memory Expansion Slot Graphics Audio LAN Rear Panel I /O Panel...Yorkfield and Dual Core Wolfdale processors - Supports DDR2 800/667 non-ECC, un-buffered memory (see CAUTION 6) - 1 x PCI Express x16 slot - 1 x PCI Express x1 slot - 2 x PCI slots - Intel® Graphics Media Accelerator 3100 - G31M-GS Realtek PCIE x 1 Gigabit LAN RTL8111DL, speed 10/100/1000 Mb/s - Supports Wake-On-LAN I /O 6 -...
User Manual (VIA)
Page 10
Orange) 25 PCI Express x1 Slot (PCIE1) 12 Secondary SATAII Connector (SATAII_2; Red) 26 Print Port Header (LPT1, Purple) 13 Primary SATAII Connector (SATAII_1; 1.3 Motherboard Layout 1 2 34 5 19....; Yellow) 20 Floppy Connector (FLOPPY1) 6 ATX Power Connector (ATXPWR1) 21 Front Panel Audio Header 7 IDE1 Connector (IDE1, Blue) (HD_AUDIO1, Lime) 8 Clear CMOS Jumper (CLRCMOS1) 22 PCI Slots (PCI1- 2) 9 South Bridge Controller 23 Internal Audio Connector: CD1 (Black) 10 Third SATAII Connector (SATAII_3; Red) 27 OC 800 / FSB0 / FSB1 Jumper 14 Chassis...
Orange) 25 PCI Express x1 Slot (PCIE1) 12 Secondary SATAII Connector (SATAII_2; Red) 26 Print Port Header (LPT1, Purple) 13 Primary SATAII Connector (SATAII_1; 1.3 Motherboard Layout 1 2 34 5 19....; Yellow) 20 Floppy Connector (FLOPPY1) 6 ATX Power Connector (ATXPWR1) 21 Front Panel Audio Header 7 IDE1 Connector (IDE1, Blue) (HD_AUDIO1, Lime) 8 Clear CMOS Jumper (CLRCMOS1) 22 PCI Slots (PCI1- 2) 9 South Bridge Controller 23 Internal Audio Connector: CD1 (Black) 10 Third SATAII Connector (SATAII_3; Red) 27 OC 800 / FSB0 / FSB1 Jumper 14 Chassis...
User Manual (VIA)
Page 17
... the card connector with screws. 17 Fasten the card to the chassis with the slot and press firmly until the card is completely seated on PCI Express VGA card to PCIE2 (PCIE x16 slot) and adjust the "Internal Graphics Mode Select" BIOS option to [Enabled], the onboard VGA will ... onboard VGA. If you intend to use . Remove the bracket facing the slot that you install the add-on this motherboard. 2.6 Expansion Slots (PCI and PCI Express Slots) There are used to install expansion cards that the power supply is switched off or the power cord is unplugged. Installing an expansion...
... the card connector with screws. 17 Fasten the card to the chassis with the slot and press firmly until the card is completely seated on PCI Express VGA card to PCIE2 (PCIE x16 slot) and adjust the "Internal Graphics Mode Select" BIOS option to [Enabled], the onboard VGA will ... onboard VGA. If you intend to use . Remove the bracket facing the slot that you install the add-on this motherboard. 2.6 Expansion Slots (PCI and PCI Express Slots) There are used to install expansion cards that the power supply is switched off or the power cord is unplugged. Installing an expansion...

User Manual (VIA)
Page 25
...SATAII connector. STEP 4: Connect the other end of BIOS setup to set the selection from up to bottom side to fixed PCI / PCIE buses. Before you install can work properly. 2.12 Untied Overclocking Technology This motherboard supports Untied Overclocking Technology, which means during ...overclocking, but PCI / PCIE buses are in the fixed mode so that supports Serial ATA (SATA) / Serial ATAII (SATAII) hard disks. Please refer ...
...SATAII connector. STEP 4: Connect the other end of BIOS setup to set the selection from up to bottom side to fixed PCI / PCIE buses. Before you install can work properly. 2.12 Untied Overclocking Technology This motherboard supports Untied Overclocking Technology, which means during ...overclocking, but PCI / PCIE buses are in the fixed mode so that supports Serial ATA (SATA) / Serial ATAII (SATAII) hard disks. Please refer ...
User Manual (VIA)
Page 26
..., the following selections: Main To set up the system time/date information Advanced To set up the advanced BIOS features PCIPnP To set up the PCI features Boot To set up the default system device to locate and load the Operating System Security To set up the security features Chipset To...
..., the following selections: Main To set up the system time/date information Advanced To set up the advanced BIOS features PCIPnP To set up the PCI features Boot To set up the default system device to locate and load the Operating System Security To set up the security features Chipset To...

User Manual (VIA)
Page 32
...some power supplies. The default value is Intel's new power saving technology. is [Disabled]. DISABLE: Do not allow remapping of overlapped PCI memory above the total physical memory. The default value is selected, the motherboard will be hidden if the current CPU does not ... tRAS [Disabled] [Auto] [Disabled] [Auto] [Auto] [Auto] [Auto] Primary Graphics Adapter Internal Graphics Mode Select DVMT Mode Select DVMT/FIXED Memory [PCI] [Auto] [DVMT Mode] [256MB] OnBoard HD Audio Front Panel OnBoard Lan [Auto] [Auto] [Enabled] DRAM Voltage [Auto] ENABLE: Allow remapping of...
...some power supplies. The default value is Intel's new power saving technology. is [Disabled]. DISABLE: Do not allow remapping of overlapped PCI memory above the total physical memory. The default value is selected, the motherboard will be hidden if the current CPU does not ... tRAS [Disabled] [Auto] [Disabled] [Auto] [Auto] [Auto] [Auto] Primary Graphics Adapter Internal Graphics Mode Select DVMT Mode Select DVMT/FIXED Memory [PCI] [Auto] [DVMT Mode] [256MB] OnBoard HD Audio Front Panel OnBoard Lan [Auto] [Auto] [Enabled] DRAM Voltage [Auto] ENABLE: Allow remapping of...
User Manual (VIA)
Page 33
... Clocks], [13 DRAM Clocks], [14 DRAM Clocks], [15 DRAM Clocks] and [Auto]. The default value is [Disabled]. Configuration options: [Onboard], [PCI] and [PCI Express]. Configuration options: [2 DRAM Clocks], [3 DRAM Clocks], [4 DRAM Clocks], [5 DRAM Clocks], [6 DRAM Clocks] and [Auto]. Flexibility Option The ...default value of this option is [PCI]. In DVMT mode, the graphics driver allocates memory as needed for memory compatibility when it is allocated to [Enabled]. DVMT Mode Select...
... Clocks], [13 DRAM Clocks], [14 DRAM Clocks], [15 DRAM Clocks] and [Auto]. The default value is [Disabled]. Configuration options: [Onboard], [PCI] and [PCI Express]. Configuration options: [2 DRAM Clocks], [3 DRAM Clocks], [4 DRAM Clocks], [5 DRAM Clocks], [6 DRAM Clocks] and [Auto]. Flexibility Option The ...default value of this option is [PCI]. In DVMT mode, the graphics driver allocates memory as needed for memory compatibility when it is allocated to [Enabled]. DVMT Mode Select...

User Manual (VIA)
Page 34
...] and [1.5651V]. Intelligent Energy Saver Intelligent Energy Saver is plugged. Besides the BIOS option, you select [Auto], the onboard HD Audio will be disabled when PCI Sound Card is a revolutionary technology that delivers unparalleled power savings.
...] and [1.5651V]. Intelligent Energy Saver Intelligent Energy Saver is plugged. Besides the BIOS option, you select [Auto], the onboard HD Audio will be disabled when PCI Sound Card is a revolutionary technology that delivers unparalleled power savings.
