
User Manual
Page 14
.... Step 2. Orient the CPU with black lines. Locate Pin1 and the two orientation key notches. Open the socket: CPU Marked Corner Step 1-1. DLifitsLeevnergUapgtoin9g0° the lever by the edges where are marked with IHS (Integrated Heat Sink) up. Rotate the load lever to fully open position at approximately 100 degrees. Step 1. Step...
.... Step 2. Orient the CPU with black lines. Locate Pin1 and the two orientation key notches. Open the socket: CPU Marked Corner Step 1-1. DLifitsLeevnergUapgtoin9g0° the lever by the edges where are marked with IHS (Integrated Heat Sink) up. Rotate the load lever to fully open position at approximately 100 degrees. Step 1. Step...
Quick Installation Guide
Page 11
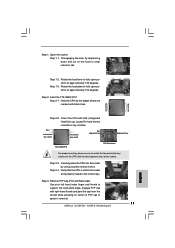
... of the CPU with right hand thumb and peel the cap from the socket while pressing on the hook to assist in removal. 11 ASRock G31M-GS / G31M-S Motherboard English Remove PnP Cap (Pick and Place Cap): Use your left hand index finger and thumb to support the load plate edge,... with the two alignment keys of PnP cap to clear retention tab. Step 1-3. Carefully place the CPU into the socket by the edges where are marked with IHS (Integrated Heat Sink) up. Step 1. Open the socket: Step 1-1. Locate Pin1 and the two orientation key notches. Pin1 orientation key ...
... of the CPU with right hand thumb and peel the cap from the socket while pressing on the hook to assist in removal. 11 ASRock G31M-GS / G31M-S Motherboard English Remove PnP Cap (Pick and Place Cap): Use your left hand index finger and thumb to support the load plate edge,... with the two alignment keys of PnP cap to clear retention tab. Step 1-3. Carefully place the CPU into the socket by the edges where are marked with IHS (Integrated Heat Sink) up. Step 1. Open the socket: Step 1-1. Locate Pin1 and the two orientation key notches. Pin1 orientation key ...