

User Manual
Page 10
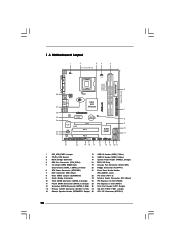
... PCIE1 CMOS Battery CLRCMOS1 IDE1 Super IO CD1 RoHS AUDIO CODEC HD_AUDIO1 FLOPPY1 1 21 20 PCIE2 SATAII_3 PCI1 Intel ICH7 PCI2 CHA_FAN1 4Mb BIOS PANEL 1 PLED PWRBTN 1 HDLED RESET USB4_5 1 USB6_7 1 SPEAKER1 1 SATAII_1 19 18 17 16 15 14 13 12 SATAII_2 SATAII_4 6 7 8 9 10 11 1 PS2_USB_PWR1 Jumper 15 USB 2.0 Header (USB6_7, Blue...
... PCIE1 CMOS Battery CLRCMOS1 IDE1 Super IO CD1 RoHS AUDIO CODEC HD_AUDIO1 FLOPPY1 1 21 20 PCIE2 SATAII_3 PCI1 Intel ICH7 PCI2 CHA_FAN1 4Mb BIOS PANEL 1 PLED PWRBTN 1 HDLED RESET USB4_5 1 USB6_7 1 SPEAKER1 1 SATAII_1 19 18 17 16 15 14 13 12 SATAII_2 SATAII_4 6 7 8 9 10 11 1 PS2_USB_PWR1 Jumper 15 USB 2.0 Header (USB6_7, Blue...
User Manual
Page 22
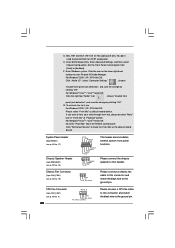
... "Front Mic" as the default record device. Click "Set Default Device" to the ground pin. MIC_RET and OUT_RET are for AC'97 audio panel. Enter BIOS Setup Utility. Set the Front Panel Control option from [Auto] to enter Realtek HD Audio Manager. CPU Fan Connector (4-pin CPU_FAN1) (see p.10 No. 19...
... "Front Mic" as the default record device. Click "Set Default Device" to the ground pin. MIC_RET and OUT_RET are for AC'97 audio panel. Enter BIOS Setup Utility. Set the Front Panel Control option from [Auto] to enter Realtek HD Audio Manager. CPU Fan Connector (4-pin CPU_FAN1) (see p.10 No. 19...

User Manual
Page 26
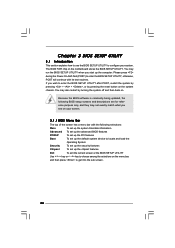
...BIOS SETUP UTILITY 3.1 Introduction This section explains how to use the BIOS SETUP UTILITY to configure your screen. 3.1.1 BIOS Menu Bar The top of the screen has a menu bar with its test routines. Because the BIOS... software is constantly being updated, the following selections: Main To set up the system time/date information Advanced To set up the advanced BIOS... features PCIPnP To set up the PCI features Boot To set up the computer. You may run the BIOS...the BIOS SETUP... or the BIOS SETUP UTILITY ...BIOS SETUP UTILITY, otherwise, POST will continue with the following BIOS...
...BIOS SETUP UTILITY 3.1 Introduction This section explains how to use the BIOS SETUP UTILITY to configure your screen. 3.1.1 BIOS Menu Bar The top of the screen has a menu bar with its test routines. Because the BIOS... software is constantly being updated, the following selections: Main To set up the system time/date information Advanced To set up the advanced BIOS... features PCIPnP To set up the PCI features Boot To set up the computer. You may run the BIOS...the BIOS SETUP... or the BIOS SETUP UTILITY ...BIOS SETUP UTILITY, otherwise, POST will continue with the following BIOS...
User Manual (VIA)
Page 10
... PCIE1 CMOS Battery CLRCMOS1 IDE1 Super IO CD1 RoHS AUDIO CODEC HD_AUDIO1 FLOPPY1 1 21 20 PCIE2 SATAII_3 PCI1 Intel ICH7 PCI2 CHA_FAN1 4Mb BIOS PANEL 1 PLED PWRBTN 1 HDLED RESET USB4_5 1 USB6_7 1 SPEAKER1 1 SATAII_1 19 18 17 16 15 14 13 12 SATAII_2 SATAII_4 6 7 8 9 10 11 1 PS2_USB_PWR1 Jumper 15 USB 2.0 Header (USB6_7, Blue...
... PCIE1 CMOS Battery CLRCMOS1 IDE1 Super IO CD1 RoHS AUDIO CODEC HD_AUDIO1 FLOPPY1 1 21 20 PCIE2 SATAII_3 PCI1 Intel ICH7 PCI2 CHA_FAN1 4Mb BIOS PANEL 1 PLED PWRBTN 1 HDLED RESET USB4_5 1 USB6_7 1 SPEAKER1 1 SATAII_1 19 18 17 16 15 14 13 12 SATAII_2 SATAII_4 6 7 8 9 10 11 1 PS2_USB_PWR1 Jumper 15 USB 2.0 Header (USB6_7, Blue...
User Manual (VIA)
Page 22
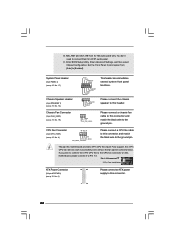
... 3-Pin Fan Installation ATX Power Connector (24-pin ATXPWR1) (see p.10 No. 19) PLED+ PLEDPWRBTN# GND 1 DUMMY RESET# GND HDLEDHDLED+ 1 SPEAKER DUMMY DUMMY +5V This header accommodates several system front panel functions. E. Enter BIOS Setup Utility. Please connect the chassis speaker to this header. MIC_RET and OUT_RET are for AC'97 audio...
... 3-Pin Fan Installation ATX Power Connector (24-pin ATXPWR1) (see p.10 No. 19) PLED+ PLEDPWRBTN# GND 1 DUMMY RESET# GND HDLEDHDLED+ 1 SPEAKER DUMMY DUMMY +5V This header accommodates several system front panel functions. E. Enter BIOS Setup Utility. Please connect the chassis speaker to this header. MIC_RET and OUT_RET are for AC'97 audio...
User Manual (VIA)
Page 26
... selections: Main To set up the system time/date information Advanced To set up the advanced BIOS features PCIPnP To set up the PCI features Boot To set up the default system device to...computer. Please press during the Power-On-Self-Test (POST) to enter the BIOS SETUP UTILITY, otherwise, POST will continue with the following BIOS setup screens and descriptions are for reference purpose only, and they may not exactly... the sub screen. 26 You may also restart by pressing the reset button on the motherboard stores the BIOS SETUP UTILITY. The BIOS FWH chip on the system chassis.
... selections: Main To set up the system time/date information Advanced To set up the advanced BIOS features PCIPnP To set up the PCI features Boot To set up the default system device to...computer. Please press during the Power-On-Self-Test (POST) to enter the BIOS SETUP UTILITY, otherwise, POST will continue with the following BIOS setup screens and descriptions are for reference purpose only, and they may not exactly... the sub screen. 26 You may also restart by pressing the reset button on the motherboard stores the BIOS SETUP UTILITY. The BIOS FWH chip on the system chassis.
Quick Installation Guide
Page 21
... and useful utilities that came with its various sub-menus and to select among the predetermined choices. The BIOS Setup program is designed to display the menus. 21 ASRock G31M-GS / G31M-S Motherboard English To begin using the Support CD, insert the CD into your computer. If the Main...Power-On-Self-Test (POST) to enter BIOS Setup after POST, please restart the system by pressing + + , or pressing the reset button on the file "ASSETUP. It will enhance motherboard features. BIOS Information The Flash Memory on the motherboard stores BIOS Setup Utility. It is enabled in your ...
... and useful utilities that came with its various sub-menus and to select among the predetermined choices. The BIOS Setup program is designed to display the menus. 21 ASRock G31M-GS / G31M-S Motherboard English To begin using the Support CD, insert the CD into your computer. If the Main...Power-On-Self-Test (POST) to enter BIOS Setup after POST, please restart the system by pressing + + , or pressing the reset button on the file "ASSETUP. It will enhance motherboard features. BIOS Information The Flash Memory on the motherboard stores BIOS Setup Utility. It is enabled in your ...


