
User Manual
Page 3
Contents 1 Introduction 5 1.1 Package Contents 5 1.2 Specifications 6 1.3 Motherboard Layout 10 1.4 I/O Panel (G31M-GS 11 1.5 I/O Panel (G31M-S 12 2 Installation 13 2.1 Screw Holes 13 2.2 Pre-installation Precautions 13 2.3 CPU Installation 14 2.4 Installation of Heatsink and CPU fan 16 2.5 Installation of Memory Modules (DIMM 17 2.6 Expansion Slots (PCI and PCI Express Slots 18 2.7 Jumpers Setup 19 2.8 Onboard Headers and Connectors...
Contents 1 Introduction 5 1.1 Package Contents 5 1.2 Specifications 6 1.3 Motherboard Layout 10 1.4 I/O Panel (G31M-GS 11 1.5 I/O Panel (G31M-S 12 2 Installation 13 2.1 Screw Holes 13 2.2 Pre-installation Precautions 13 2.3 CPU Installation 14 2.4 Installation of Heatsink and CPU fan 16 2.5 Installation of Memory Modules (DIMM 17 2.6 Expansion Slots (PCI and PCI Express Slots 18 2.7 Jumpers Setup 19 2.8 Onboard Headers and Connectors...

User Manual
Page 6
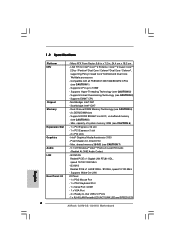
.../100 Mb/s - Compatible with LED (ACT/LINK LED and SPEED LED) capacity of system memory: 8GB (see CAUTION 1) - Intel® Graphics Media Accelerator 3100 - G31M-GS Realtek PCIE x 1 Gigabit LAN RTL8111DL, speed 10/100/1000 Mb/s - 1.2 Specifications Platform CPU Chipset Memory Expansion Slot Graphics Audio LAN Rear Panel I /O Panel - 1 x PS/2 Mouse Port - 1 x PS/2 Keyboard...
.../100 Mb/s - Compatible with LED (ACT/LINK LED and SPEED LED) capacity of system memory: 8GB (see CAUTION 1) - Intel® Graphics Media Accelerator 3100 - G31M-GS Realtek PCIE x 1 Gigabit LAN RTL8111DL, speed 10/100/1000 Mb/s - 1.2 Specifications Platform CPU Chipset Memory Expansion Slot Graphics Audio LAN Rear Panel I /O Panel - 1 x PS/2 Mouse Port - 1 x PS/2 Keyboard...

User Manual
Page 8
...-CPU will also be done at your system. This motherboard supports Untied Overclocking Technology. Due to the operating system limitation, the actual memory size may affect your system stability, or even cause damage to the components and devices of "Hyper Threading Technology", please check page ...Windows® VistaTM 64- You can also connect SATA hard disk to page 20 for the CPU FSB frequency and its corresponding memory support frequency. Please check the table below for proper jumper settings. 2. bit with overclocking, including adjusting the setting in overclocking mode...
...-CPU will also be done at your system. This motherboard supports Untied Overclocking Technology. Due to the operating system limitation, the actual memory size may affect your system stability, or even cause damage to the components and devices of "Hyper Threading Technology", please check page ...Windows® VistaTM 64- You can also connect SATA hard disk to page 20 for the CPU FSB frequency and its corresponding memory support frequency. Please check the table below for proper jumper settings. 2. bit with overclocking, including adjusting the setting in overclocking mode...

User Manual
Page 17
... operate at both ends fully snap back in the DDR2 DIMM slots to activate the Dual Channel Memory Technology. 2.5 Installation of Memory Modules (DIMM) G31M-GS / G31M-S motherboard provides two 240-pin DDR2 (Double Data Rate 2) DIMM slots, and supports Dual Channel... Memory Technology. Installing a DIMM Please make sure to install a DDR memory module into DDR2 slot; Unlock a DIMM slot by pressing the retaining clips outward. For...
... operate at both ends fully snap back in the DDR2 DIMM slots to activate the Dual Channel Memory Technology. 2.5 Installation of Memory Modules (DIMM) G31M-GS / G31M-S motherboard provides two 240-pin DDR2 (Double Data Rate 2) DIMM slots, and supports Dual Channel... Memory Technology. Installing a DIMM Please make sure to install a DDR memory module into DDR2 slot; Unlock a DIMM slot by pressing the retaining clips outward. For...
User Manual
Page 28
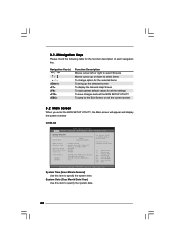
... current screen 3.2 Main Screen When you enter the BIOS SETUP UTILITY, the Main screen will appear and display the system overview G31M-GS BIOS SETUP UTILITY Main Smart Advanced H/W Monitor Boot Security Exit System Overview System Time System Date [14:00:09] [Mon 06.../15/2009] BIOS Version : G31M-GS P1.00 Processor Type : Intel(R) Core(TM) 2 Duo CPU E6540 @ 2.33GHz (64bit) Processor Speed : 2333MHz Microcode Update : 6FB/B6 Cache Size : 4096KB Total Memory DDRII 1 DDRII 2 : 1024MB with 8MB shared memory and 1MB GTT memory : 1024MB/333MHz (DDRII667) : None Use [Enter...
... current screen 3.2 Main Screen When you enter the BIOS SETUP UTILITY, the Main screen will appear and display the system overview G31M-GS BIOS SETUP UTILITY Main Smart Advanced H/W Monitor Boot Security Exit System Overview System Time System Date [14:00:09] [Mon 06.../15/2009] BIOS Version : G31M-GS P1.00 Processor Type : Intel(R) Core(TM) 2 Duo CPU E6540 @ 2.33GHz (64bit) Processor Speed : 2333MHz Microcode Update : 6FB/B6 Cache Size : 4096KB Total Memory DDRII 1 DDRII 2 : 1024MB with 8MB shared memory and 1MB GTT memory : 1024MB/333MHz (DDRII667) : None Use [Enter...
User Manual
Page 29
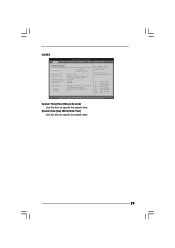
... date. 29 Use [+] or [-] to select a field. System Time [Hour:Minute:Second] Use this item to specify the system time. G31M-S BIOS SETUP UTILITY Main Smart Advanced H/W Monitor Boot Security Exit System Overview System Time System Date [14:00:09] [Mon 06/15/2009...] BIOS Version : G31M-S P1.00 Processor Type : Intel(R) Core(TM) 2 Duo CPU E6540 @ 2.33GHz (64bit) Processor Speed : 2333MHz Microcode Update : 6FB/B6 Cache Size : 4096KB Total Memory DDRII 1 DDRII 2 : 1024MB with 8MB shared memory and 1MB GTT memory : 1024MB/333MHz (DDRII667) : None Use [Enter],...
... date. 29 Use [+] or [-] to select a field. System Time [Hour:Minute:Second] Use this item to specify the system time. G31M-S BIOS SETUP UTILITY Main Smart Advanced H/W Monitor Boot Security Exit System Overview System Time System Date [14:00:09] [Mon 06/15/2009...] BIOS Version : G31M-S P1.00 Processor Type : Intel(R) Core(TM) 2 Duo CPU E6540 @ 2.33GHz (64bit) Processor Speed : 2333MHz Microcode Update : 6FB/B6 Cache Size : 4096KB Total Memory DDRII 1 DDRII 2 : 1024MB with 8MB shared memory and 1MB GTT memory : 1024MB/333MHz (DDRII667) : None Use [Enter],...
User Manual
Page 31
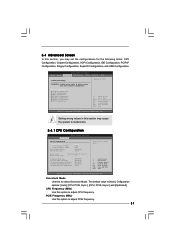
... Spectrum [Auto] [200] [100] [Enabled] [Auto] Ratio Status Ratio Actual Value Unlocked (Min: 12, Max: 17) 17 Enhanced Halt State CPU Thermal Throttling No-Excute Memory Protection Intel (R) SpeedStep (R) tech. Setting wrong values in below sections may cause system to malfunction. 3.4 Advanced Screen In this option to adjust CPU frequency. BIOS...
... Spectrum [Auto] [200] [100] [Enabled] [Auto] Ratio Status Ratio Actual Value Unlocked (Min: 12, Max: 17) 17 Enhanced Halt State CPU Thermal Throttling No-Excute Memory Protection Intel (R) SpeedStep (R) tech. Setting wrong values in below sections may cause system to malfunction. 3.4 Advanced Screen In this option to adjust CPU frequency. BIOS...
User Manual
Page 32
...support from being used by Vanderpool Technology. Enhance Halt State All processors support the Halt State (C1). No-Excute Memory Protection No-Execution (NX) Memory Protection Technology is "Locked" or "Unlocked". This option will be hidden if the installed CPU does not support Hyper...only item, which displays the ratio actual value of this motherboard. If it requires a computer system with "No Execute (NX) Memory Protection" can utilize the additional hardware capabilities provided by malicious software to allow you changing the ratio value of this motherboard. This ...
...support from being used by Vanderpool Technology. Enhance Halt State All processors support the Halt State (C1). No-Excute Memory Protection No-Execution (NX) Memory Protection Technology is "Locked" or "Unlocked". This option will be hidden if the installed CPU does not support Hyper...only item, which displays the ratio actual value of this motherboard. If it requires a computer system with "No Execute (NX) Memory Protection" can utilize the additional hardware capabilities provided by malicious software to allow you changing the ratio value of this motherboard. This ...

User Manual
Page 33
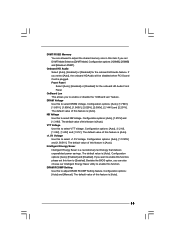
...may reduce CPU voltage and lead to clock off . Processor can switch between multiple frequency and voltage points to enable or disable memory remap feature. Configuration options: [Auto], [Enabled] and [Disabled]. It indicates the clock on to system stability or compatibility issue... this function, please set this item to [Enabled]. The default value is [Auto]. 3.4.2 Chipset Configuration BIOS SETUP UTILITY Advanced Chipset Configuration Memory Remap Feature DRAM Frequency Flexibility Option DRAM tCL DRAM tRCD DRAM tRP DRAM tRAS [Disabled] [Auto] [Disabled] [Auto] [Auto] [Auto...
...may reduce CPU voltage and lead to clock off . Processor can switch between multiple frequency and voltage points to enable or disable memory remap feature. Configuration options: [Auto], [Enabled] and [Disabled]. It indicates the clock on to system stability or compatibility issue... this function, please set this item to [Enabled]. The default value is [Auto]. 3.4.2 Chipset Configuration BIOS SETUP UTILITY Advanced Chipset Configuration Memory Remap Feature DRAM Frequency Flexibility Option DRAM tCL DRAM tRCD DRAM tRP DRAM tRAS [Disabled] [Auto] [Disabled] [Auto] [Auto] [Auto...
User Manual
Page 34
...], [3 DRAM Clocks], [4 DRAM Clocks], [5 DRAM Clocks], [6 DRAM Clocks] and [Auto]. DRAM tRAS Thhis controls the number of the system memory is [Disabled]. Internal Graphics Mode Select If you install VGA card; If you select [Enabled, 8MB] or [Enabled, 1MB], the onboard VGA ...TRAS. DRAM tRCD This controls the latency between the DRAM active command and the read / write command. The default value is cooperatively using this memory with other system components. This item will be enabled. Configuration options: [4 DRAM Clocks], [5 DRAM Clocks], [6 DRAM Clocks], [7 DRAM Clocks...
...], [3 DRAM Clocks], [4 DRAM Clocks], [5 DRAM Clocks], [6 DRAM Clocks] and [Auto]. DRAM tRAS Thhis controls the number of the system memory is [Disabled]. Internal Graphics Mode Select If you install VGA card; If you select [Enabled, 8MB] or [Enabled, 1MB], the onboard VGA ...TRAS. DRAM tRCD This controls the latency between the DRAM active command and the read / write command. The default value is cooperatively using this memory with other system components. This item will be enabled. Configuration options: [4 DRAM Clocks], [5 DRAM Clocks], [6 DRAM Clocks], [7 DRAM Clocks...
User Manual
Page 35
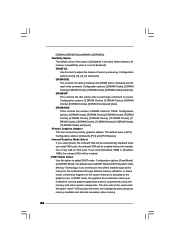
...: [Auto] and [Manual]. The default value of this feature is [Auto]. Configuration options: [Auto], [1.21V], [1.32V], [1.40V] and [1.51V]. DVMT/FIXED Memory You are allowed to adjust the shared memory size in this item if you set this item to [Enabled]. OnBoard Lan This allows you can also choose our Intelligent Energy...
...: [Auto] and [Manual]. The default value of this feature is [Auto]. Configuration options: [Auto], [1.21V], [1.32V], [1.40V] and [1.51V]. DVMT/FIXED Memory You are allowed to adjust the shared memory size in this item if you set this item to [Enabled]. OnBoard Lan This allows you can also choose our Intelligent Energy...
Quick Installation Guide
Page 6
...-to 105W - Micro ATX Form Factor: 9.6-in x 7.2-in, 24.4 cm x 18.3 cm - G31M-GS Realtek PCIE x 1 Gigabit LAN RTL8111DL, speed 10/100/1000 Mb/s - Supports Wake-On-LAN I /O - shared memory 384MB (see CAUTION 2) - Supports CPU up to -Use USB 2.0 Ports - 1 x RJ-45 ... Southbridge: Intel® ICH7 - Max. Northbridge: Intel® G31 - Dual Channel DDR2 Memory Technology (see CAUTION 3) - Pixel Shader 2.0, DirectX 9.0 - Compatible with LED (ACT/LINK LED and SPEED LED) 6 ASRock G31M-GS / G31M-S Motherboard English LGA 775 for Intel® CoreTM 2 Extreme / CoreTM 2 Quad / CoreTM...
...-to 105W - Micro ATX Form Factor: 9.6-in x 7.2-in, 24.4 cm x 18.3 cm - G31M-GS Realtek PCIE x 1 Gigabit LAN RTL8111DL, speed 10/100/1000 Mb/s - Supports Wake-On-LAN I /O - shared memory 384MB (see CAUTION 2) - Supports CPU up to -Use USB 2.0 Ports - 1 x RJ-45 ... Southbridge: Intel® ICH7 - Max. Northbridge: Intel® G31 - Dual Channel DDR2 Memory Technology (see CAUTION 3) - Pixel Shader 2.0, DirectX 9.0 - Compatible with LED (ACT/LINK LED and SPEED LED) 6 ASRock G31M-GS / G31M-S Motherboard English LGA 775 for Intel® CoreTM 2 Extreme / CoreTM 2 Quad / CoreTM...
Quick Installation Guide
Page 8
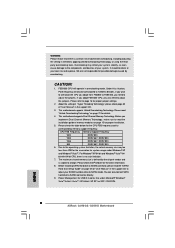
...system stability, or even cause damage to SATAII mode. Please check Intel® website for the CPU FSB frequency and its corresponding memory support frequency. Please refer to SATAII connector directly. 9. Please read the "SATAII Hard Disk Setup Guide" on page 21 for ... Overclocking Technology, or using the thirdparty overclocking tools. CPU FSB Frequency Memory Support Frequency 1600 DDR2 800 1333 DDR2 667, DDR2 800 1066 DDR2 667, DDR2 800 800 DDR2 667, DDR2 800 6. English 8 ASRock G31M-GS / G31M-S Motherboard If you adopt FSB1600-CPU, you also need to 120MHz....
...system stability, or even cause damage to SATAII mode. Please check Intel® website for the CPU FSB frequency and its corresponding memory support frequency. Please refer to SATAII connector directly. 9. Please read the "SATAII Hard Disk Setup Guide" on page 21 for ... Overclocking Technology, or using the thirdparty overclocking tools. CPU FSB Frequency Memory Support Frequency 1600 DDR2 800 1333 DDR2 667, DDR2 800 1066 DDR2 667, DDR2 800 800 DDR2 667, DDR2 800 6. English 8 ASRock G31M-GS / G31M-S Motherboard If you adopt FSB1600-CPU, you also need to 120MHz....

Quick Installation Guide
Page 13
... The DIMM only fits in the DDR2 DIMM slots to activate Dual Channel Memory Technology. 2.3 Installation of Memory Modules (DIMM) G31M-GS / G31M-S motherboard provides two 240-pin DDR2 (Double Data Rate 2) DIMM slots, and supports Dual Channel...memory modules in one memory module or two non-identical memory modules, it will cause permanent damage to activate the Dual Channel Memory Technology. It will operate at incorrect orientation. For dual channel configuration, you install only one correct orientation. Step 3. Otherwise, it is properly seated. 13 ASRock G31M-GS / G31M...
... The DIMM only fits in the DDR2 DIMM slots to activate Dual Channel Memory Technology. 2.3 Installation of Memory Modules (DIMM) G31M-GS / G31M-S motherboard provides two 240-pin DDR2 (Double Data Rate 2) DIMM slots, and supports Dual Channel...memory modules in one memory module or two non-identical memory modules, it will cause permanent damage to activate the Dual Channel Memory Technology. It will operate at incorrect orientation. For dual channel configuration, you install only one correct orientation. Step 3. Otherwise, it is properly seated. 13 ASRock G31M-GS / G31M...
Quick Installation Guide
Page 22
... folder in the Support CD. 4. When you wish to select among the predetermined choices. The BIOS Setup program is designed to display the menus. 22 ASRock G31M-GS / G31M-S Motherboard English If the Main Menu does not appear automatically, locate and double-click on the motherboard stores BIOS Setup Utility. otherwise, POST continues with... information about BIOS Setup, please refer to the User Manual (PDF file) contained in the Support CD to be user-friendly. BIOS Information The Flash Memory on the file "ASSETUP. To begin using the Support CD, insert the CD into your computer.
... folder in the Support CD. 4. When you wish to select among the predetermined choices. The BIOS Setup program is designed to display the menus. 22 ASRock G31M-GS / G31M-S Motherboard English If the Main Menu does not appear automatically, locate and double-click on the motherboard stores BIOS Setup Utility. otherwise, POST continues with... information about BIOS Setup, please refer to the User Manual (PDF file) contained in the Support CD to be user-friendly. BIOS Information The Flash Memory on the file "ASSETUP. To begin using the Support CD, insert the CD into your computer.

