
User Manual
Page 6
... 2.8 Dr. Debug 27 2.9 SLITM , 3-Way SLITMand Quad SLITM Operation Guide 29 2.9.1 Installing Two SLITM-Ready Graphics Cards 29 2.9.2 Installing Three SLITM-Ready Graphics Cards 31 2.9.3 Driver Installation and Setup 33 2.10 CrossFireXTM, 3-Way CrossFireXTM and Quad CrossFireXTM Operation Guide 34 2.10.1 Installing Two CrossFireXTM-Ready Graphics Cards 34 2.10.2 Installing Three...
... 2.8 Dr. Debug 27 2.9 SLITM , 3-Way SLITMand Quad SLITM Operation Guide 29 2.9.1 Installing Two SLITM-Ready Graphics Cards 29 2.9.2 Installing Three SLITM-Ready Graphics Cards 31 2.9.3 Driver Installation and Setup 33 2.10 CrossFireXTM, 3-Way CrossFireXTM and Quad CrossFireXTM Operation Guide 34 2.10.1 Installing Two CrossFireXTM-Ready Graphics Cards 34 2.10.2 Installing Three...

User Manual
Page 7
... Guide 41 Chapter 3 Software and Utilities Operation 42 3.1 Installing Drivers 42 3.2 F-Stream 43 3.3 Killer Network Manager 49 3.3.1 Installing Killer Network Manager 49 3.3.2 Using Killer Network Manager 49 3.4 ASRock Cloud (on Qualcomm® Atheros® KillerTM E2200 Series) 52 3.5 ASRock APP Shop 62 3.5.1 UI Overview 62 3.5.2 Apps 63 3.5.3 BIOS & Drivers 66 3.5.4 Setting 67 3.6 Start8 68 3.7 XSplit Broadcaster 71...
... Guide 41 Chapter 3 Software and Utilities Operation 42 3.1 Installing Drivers 42 3.2 F-Stream 43 3.3 Killer Network Manager 49 3.3.1 Installing Killer Network Manager 49 3.3.2 Using Killer Network Manager 49 3.4 ASRock Cloud (on Qualcomm® Atheros® KillerTM E2200 Series) 52 3.5 ASRock APP Shop 62 3.5.1 UI Overview 62 3.5.2 Apps 63 3.5.3 BIOS & Drivers 66 3.5.4 Setting 67 3.6 Start8 68 3.7 XSplit Broadcaster 71...

User Manual
Page 37
Make sure that your system requires. Download the drivers from the NVIDIA® website: www.nvidia.com 3. It is not supported. Make sure that the cards are NVIDIA® certified. 2. Step 2 If required, connect ..., NVIDIA® SLITM and Quad SLITM technology supports Windows® 7 / 7 64-bit / 8 / 8 64-bit / 8.1 / 8.1 64-bit OS. * If you to install up to PCIE3 slot. Fatal1ty X99X Killer Series 2.9 SLITM , 3-Way SLITMand Quad SLITM Operation Guide This motherboard supports NVIDIA® SLITM , 3-Way SLITM and Quad SLITM (Scalable Link Interface) technology that allows...
Make sure that your system requires. Download the drivers from the NVIDIA® website: www.nvidia.com 3. It is not supported. Make sure that the cards are NVIDIA® certified. 2. Step 2 If required, connect ..., NVIDIA® SLITM and Quad SLITM technology supports Windows® 7 / 7 64-bit / 8 / 8 64-bit / 8.1 / 8.1 64-bit OS. * If you to install up to PCIE3 slot. Fatal1ty X99X Killer Series 2.9 SLITM , 3-Way SLITMand Quad SLITM Operation Guide This motherboard supports NVIDIA® SLITM , 3-Way SLITM and Quad SLITM (Scalable Link Interface) technology that allows...

User Manual
Page 41
Step 3 Reboot your system. Step 2 In the left pane, click Set SLI and PhysX configuration. Step 1 Double-click the NVIDIA Control Panel icon in the NVIDIA® nView system tray utility. Then select Maximize 3D performance and click Apply. Fatal1ty X99X Killer Series 2.9.3 Driver Installation and Setup Install the graphics card drivers to enable the multi-GPU. After that, you can enable the Multi-Graphics Processing Unit (GPU) in the Windows® system tray. Please follow the below procedures to your system. 33 English
Step 3 Reboot your system. Step 2 In the left pane, click Set SLI and PhysX configuration. Step 1 Double-click the NVIDIA Control Panel icon in the NVIDIA® nView system tray utility. Then select Maximize 3D performance and click Apply. Fatal1ty X99X Killer Series 2.9.3 Driver Installation and Setup Install the graphics card drivers to enable the multi-GPU. After that, you can enable the Multi-Graphics Processing Unit (GPU) in the Windows® system tray. Please follow the below procedures to your system. 33 English

User Manual
Page 42
...details. 4. Please refer to three identical PCI Express x16 graphics cards. If you to install up to your graphics card driver supports AMD CrossFireXTM technology. Currently CrossFireXTM, 3-way CrossFireXTM and Quad CrossFireXTM are properly seated on the top of the graphics ...cards. (The CrossFire Bridge is recommended to enable CrossFireXTM. Download the drivers from the AMD's website: www.amd.com 3. 2.10 CrossFireXTM, 3-Way CrossFireXTM and Quad CrossFireXTM Operation Guide This motherboard supports ...
...details. 4. Please refer to three identical PCI Express x16 graphics cards. If you to install up to your graphics card driver supports AMD CrossFireXTM technology. Currently CrossFireXTM, 3-way CrossFireXTM and Quad CrossFireXTM are properly seated on the top of the graphics ...cards. (The CrossFire Bridge is recommended to enable CrossFireXTM. Download the drivers from the AMD's website: www.amd.com 3. 2.10 CrossFireXTM, 3-Way CrossFireXTM and Quad CrossFireXTM Operation Guide This motherboard supports ...

User Manual
Page 45
... in your computer. Then select Enable AMD CrossFireX and click Apply. We recommend using this utility to uninstall any VGA drivers installed in the Windows® system tray. Please check AMD's website for details. Step 3 Install the required... 37 Step 2 Remove the AMD drivers if you have any previously installed Catalyst drivers prior to your computer and boot into OS. Select the GPU number according to installation. Step 5 In the left pane, click Performance and then AMD CrossFireXTM. Fatal1ty X99X Killer Series 2.10.3 Driver Installation and Setup Step 1 Power on...
... in your computer. Then select Enable AMD CrossFireX and click Apply. We recommend using this utility to uninstall any VGA drivers installed in the Windows® system tray. Please check AMD's website for details. Step 3 Install the required... 37 Step 2 Remove the AMD drivers if you have any previously installed Catalyst drivers prior to your computer and boot into OS. Select the GPU number according to installation. Step 5 In the left pane, click Performance and then AMD CrossFireXTM. Fatal1ty X99X Killer Series 2.10.3 Driver Installation and Setup Step 1 Power on...
User Manual
Page 50
.... Running The Support CD To begin using the support CD, insert the CD into your computer. Drivers Menu The drivers compatible to install those required drivers. Click on a specific item then follow the order from top to bottom to your system will be auto-...kb/2720599/en-us 42 English Chapter 3 Software and Utilities Operation 3.1 Installing Drivers The Support CD that comes with the motherboard contains necessary drivers and useful utilities that the motherboard supports. Therefore, the drivers you install can work properly. To improve Windows 7 compatibility, please download and...
.... Running The Support CD To begin using the support CD, insert the CD into your computer. Drivers Menu The drivers compatible to install those required drivers. Click on a specific item then follow the order from top to bottom to your system will be auto-...kb/2720599/en-us 42 English Chapter 3 Software and Utilities Operation 3.1 Installing Drivers The Support CD that comes with the motherboard contains necessary drivers and useful utilities that the motherboard supports. Therefore, the drivers you install can work properly. To improve Windows 7 compatibility, please download and...
User Manual
Page 51
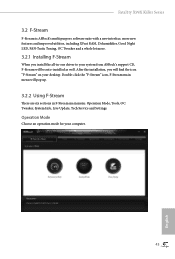
...Fatal1ty X99X Killer Series 3.2 F-Stream F-Stream is ASRock's multi purpose software suite with a new interface, more new features and improved utilities, including XFast RAM, Dehumidifier, Good Night LED, FAN-Tastic Tuning, OC Tweaker and a whole lot more. 3.2.1 Installing F-Stream When you will pop up. 3.2.2 Using F-Stream There are six sections in -one driver... to your computer. 43 English Operation Mode Choose an operation mode for your system from ASRock's support CD, F-Stream will be auto-installed as well.
...Fatal1ty X99X Killer Series 3.2 F-Stream F-Stream is ASRock's multi purpose software suite with a new interface, more new features and improved utilities, including XFast RAM, Dehumidifier, Good Night LED, FAN-Tastic Tuning, OC Tweaker and a whole lot more. 3.2.1 Installing F-Stream When you will pop up. 3.2.2 Using F-Stream There are six sections in -one driver... to your computer. 43 English Operation Mode Choose an operation mode for your system from ASRock's support CD, F-Stream will be auto-installed as well.

User Manual
Page 55
Fatal1ty X99X Killer Series Tech Service Contact Tech Service if you have problems with your contact information along with details of BIOS or drivers. Please leave your computer. Live Update Check for newer versions of the problem. 47 English
Fatal1ty X99X Killer Series Tech Service Contact Tech Service if you have problems with your contact information along with details of BIOS or drivers. Please leave your computer. Live Update Check for newer versions of the problem. 47 English
User Manual
Page 57
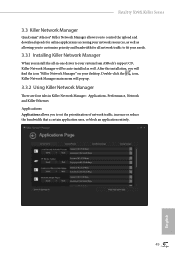
... the bandwidth that a certain application uses, or block an application entirely. 49 English Fatal1ty X99X Killer Series 3.3 Killer Network Manager Qualcomm® Atheros® Killer Network Manager allows you to control the upload and download speeds for online applications accessing ...Killer Ethernet. Double-click the icon, Killer Network Manager main menu will pop up. 3.3.2 Using Killer Network Manager There are four tabs in -one driver to your system from ASRock's support CD, Killer Network Manager will find the icon "Killer Network Manager" on your needs. 3.3.1 Installing Killer...
... the bandwidth that a certain application uses, or block an application entirely. 49 English Fatal1ty X99X Killer Series 3.3 Killer Network Manager Qualcomm® Atheros® Killer Network Manager allows you to control the upload and download speeds for online applications accessing ...Killer Ethernet. Double-click the icon, Killer Network Manager main menu will pop up. 3.3.2 Using Killer Network Manager There are four tabs in -one driver to your system from ASRock's support CD, Killer Network Manager will find the icon "Killer Network Manager" on your needs. 3.3.1 Installing Killer...

User Manual
Page 61
Before configuring this feature, verify the followings on your home computer from sleep or shutdown state. Fatal1ty X99X Killer Series 3.4.1 Qualcomm® Atheros® Security Wake On Internet Technology Qualcomm® Atheros® Security Wake On Internet Technology allows you to...up and remote control your host computer: • Make sure that the "Shutdown Wake Up" and "SWOI" are enabled in Device Manager > Network Adapters > Killer e2200 Gigabit Ethernet Controller (NDIS 6.30) Properties > Advanced. *"SWOI" may differ by model. • Make sure that the "PCI Devices Power On" is...
Before configuring this feature, verify the followings on your home computer from sleep or shutdown state. Fatal1ty X99X Killer Series 3.4.1 Qualcomm® Atheros® Security Wake On Internet Technology Qualcomm® Atheros® Security Wake On Internet Technology allows you to...up and remote control your host computer: • Make sure that the "Shutdown Wake Up" and "SWOI" are enabled in Device Manager > Network Adapters > Killer e2200 Gigabit Ethernet Controller (NDIS 6.30) Properties > Advanced. *"SWOI" may differ by model. • Make sure that the "PCI Devices Power On" is...

User Manual
Page 74
Click on Step 2 to see more items you will see a list of recommended or critical updates for the BIOS or drivers. Please update them all soon. Step 1 Please check the item information before update. Step 3 Click Update to select one or more details. 3.5.3 BIOS & Drivers Installing BIOS or Drivers When the "BIOS & Drivers" tab is selected, you want to update. Click to start the update process. 66 English
Click on Step 2 to see more items you will see a list of recommended or critical updates for the BIOS or drivers. Please update them all soon. Step 1 Please check the item information before update. Step 3 Click Update to select one or more details. 3.5.3 BIOS & Drivers Installing BIOS or Drivers When the "BIOS & Drivers" tab is selected, you want to update. Click to start the update process. 66 English

User Manual
Page 102
... 3.0 devices. Select UEFI Setup Only to support USB devices under Windows® 7). Set [Smart Auto] to keep the USB 3.0 driver enabled (Must install driver to disable the USB 3.0 ports. Set [Disabled] to use USB devices under the UEFI setup and Windows/Linux operating systems only. ...If you encounter USB compatibility issues it is enabled in BIOS). Set [Enabled] to keep the USB 3.0 driver enabled after entering the OS (USB 3.0 is recommended to disable legacy USB support. Intel USB 3.0 Mode Select Intel® USB 3.0 controller mode...
... 3.0 devices. Select UEFI Setup Only to support USB devices under Windows® 7). Set [Smart Auto] to keep the USB 3.0 driver enabled (Must install driver to disable the USB 3.0 ports. Set [Disabled] to use USB devices under the UEFI setup and Windows/Linux operating systems only. ...If you encounter USB compatibility issues it is enabled in BIOS). Set [Enabled] to keep the USB 3.0 driver enabled after entering the OS (USB 3.0 is recommended to disable legacy USB support. Intel USB 3.0 Mode Select Intel® USB 3.0 controller mode...

User Manual
Page 106
...ROM images are having trouble with your OS. Internet Flash - DHCP (Auto IP), Auto ASRock Internet Flash downloads and updates the latest UEFI firmware version from our support CD, Easy Driver Installer is recommended to update your USB pen drive before using Internet Flash. *For BIOS ... for you can also proceed the re-detection via an USB storage device, then downloads and installs the other required drivers automatically. After copying the drivers please change the SATA mode to the secondary flash ROM. 98 English Please setup network configuration before using UEFI Tech ...
...ROM images are having trouble with your OS. Internet Flash - DHCP (Auto IP), Auto ASRock Internet Flash downloads and updates the latest UEFI firmware version from our support CD, Easy Driver Installer is recommended to update your USB pen drive before using Internet Flash. *For BIOS ... for you can also proceed the re-detection via an USB storage device, then downloads and installs the other required drivers automatically. After copying the drivers please change the SATA mode to the secondary flash ROM. 98 English Please setup network configuration before using UEFI Tech ...

RAID Installation Guide
Page 7
.... Boot your USB lash drive into a USB port. Enter UEFI SETUP UTILITY Tool and highlight "Easy RAID Installer". B. STEP 2: Use ASRock Easy RAID Installer Easy RAID Installer can copy the RAID driver from a support CD to enter BIOS setup utility. STEP 1: Setting the BIOS RAID Items After installing the hard disk drives...
.... Boot your USB lash drive into a USB port. Enter UEFI SETUP UTILITY Tool and highlight "Easy RAID Installer". B. STEP 2: Use ASRock Easy RAID Installer Easy RAID Installer can copy the RAID driver from a support CD to enter BIOS setup utility. STEP 1: Setting the BIOS RAID Items After installing the hard disk drives...
RAID Installation Guide
Page 18
Please make sure to boot. 18 STEP 1: Copy Intel® RAID drivers into a USB lash disk You can download the drivers from ASRock's website and unzip the iles into a USB lash disk or copy the iles from ASRock's motherboard support CD. (Please copy the iles under the following directory: 32 bit: ..\i386\Win7_Intel.. 64-bit...
Please make sure to boot. 18 STEP 1: Copy Intel® RAID drivers into a USB lash disk You can download the drivers from ASRock's website and unzip the iles into a USB lash disk or copy the iles from ASRock's motherboard support CD. (Please copy the iles under the following directory: 32 bit: ..\i386\Win7_Intel.. 64-bit...
RAID Installation Guide
Page 19
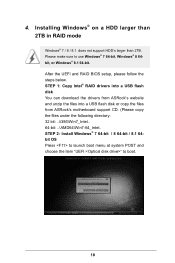
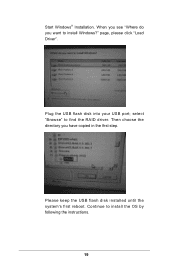
select "Browse" to install the OS by following the instructions. 19 Then choose the directory you want to install Windows?" Continue to find the RAID driver. Plug the USB flash disk into your USB port; Please keep the USB flash disk installed until the system's first reboot. When you see "Where do you have copied in the irst step. page, please click "Load Driver". Start Windows® Installation.
select "Browse" to install the OS by following the instructions. 19 Then choose the directory you want to install Windows?" Continue to find the RAID driver. Plug the USB flash disk into your USB port; Please keep the USB flash disk installed until the system's first reboot. When you see "Where do you have copied in the irst step. page, please click "Load Driver". Start Windows® Installation.

RAID Installation Guide
Page 20
... install this hotix then reboot by itself. Windows® will need to follow the instructions below to boot into Windows® or install driver/utilities. Disk volume > 2TB), it may take about 5 minutes to install motherboard drivers and utilities. 20 Please request the hotix KB2505454 through this problem. Please start to reboot.) D.
... install this hotix then reboot by itself. Windows® will need to follow the instructions below to boot into Windows® or install driver/utilities. Disk volume > 2TB), it may take about 5 minutes to install motherboard drivers and utilities. 20 Please request the hotix KB2505454 through this problem. Please start to reboot.) D.
Intel Rapid Storage Guide
Page 12
... allat ion m et hod is not required for Microsoft Windows 7 or Note Microsoft Windows 8. Self- On- When t he I nt el® Rapid St orage Technology driver during POST, press Ct r l and i at t he sam e t im e t o ent er t he I nt el Rapid St orage Technology opt ion ROM st at us screen...
... allat ion m et hod is not required for Microsoft Windows 7 or Note Microsoft Windows 8. Self- On- When t he I nt el® Rapid St orage Technology driver during POST, press Ct r l and i at t he sam e t im e t o ent er t he I nt el Rapid St orage Technology opt ion ROM st at us screen...
Intel Rapid Storage Guide
Page 13
... scroll through the list as all t he following files: I AAHCI .I NF, I AAHCI .CAT, I ASTOR.I NF, I ASTOR.CAT, I nt el Rapid St orage Technology driver during text- Press F6 when you to load support for m ass storage device( s). 2. You will t hen be v isib le. 6. I nstall the RAI...Use t he disk labeled Manufact urer- At t his point , you have successfully inst alled t he volum e size and press Ent er. 8. Select t he driver and Windows set up and down arrow keys to confirm volum e creat ion. 10. Select your cont roller and cont inue. 7. Press Y t o confirm your exit...
... scroll through the list as all t he following files: I AAHCI .I NF, I AAHCI .CAT, I ASTOR.I NF, I ASTOR.CAT, I nt el Rapid St orage Technology driver during text- Press F6 when you to load support for m ass storage device( s). 2. You will t hen be v isib le. 6. I nstall the RAI...Use t he disk labeled Manufact urer- At t his point , you have successfully inst alled t he volum e size and press Ent er. 8. Select t he driver and Windows set up and down arrow keys to confirm volum e creat ion. 10. Select your cont roller and cont inue. 7. Press Y t o confirm your exit...


