
User Manual
Page 9
... notice. If you require technical support related to this manual will be subject to quality and endurance. Fatal1ty 970 Performance Series Chapter 1 Introduction hank you are using. In this manual occur, the updated version will be available on ASRock's website as well. In case any modiications of this manual, Chapter 1 and 2 contains the introduction of this motherboard...
... notice. If you require technical support related to this manual will be subject to quality and endurance. Fatal1ty 970 Performance Series Chapter 1 Introduction hank you are using. In this manual occur, the updated version will be available on ASRock's website as well. In case any modiications of this manual, Chapter 1 and 2 contains the introduction of this motherboard...

User Manual
Page 21
You also need to spray thermal grease between the CPU and the heatsink to the instruction manuals of the CPU fan and the heatsink. 13 English For proper installation, please kindly refer to improve heat dissipation. Make sure that the CPU and the heatsink are securely fastened and in good contact with each other. Fatal1ty 970 Performance Series 2.2 Installing the CPU Fan and Heatsink Ater you install the CPU into this motherboard, it is necessary to install a larger heatsink and cooling fan to the CPU FAN connector. hen connect the CPU fan to dissipate heat.
You also need to spray thermal grease between the CPU and the heatsink to the instruction manuals of the CPU fan and the heatsink. 13 English For proper installation, please kindly refer to improve heat dissipation. Make sure that the CPU and the heatsink are securely fastened and in good contact with each other. Fatal1ty 970 Performance Series 2.2 Installing the CPU Fan and Heatsink Ater you install the CPU into this motherboard, it is necessary to install a larger heatsink and cooling fan to the CPU FAN connector. hen connect the CPU fan to dissipate heat.

User Manual
Page 28
... panel audio header by the steps below: A. You don't need to OUT2_L. To activate the front mic, go to the "FrontMic" Tab in our manual and chassis manual to this header. C. D. Please follow the instructions in the Realtek Control panel and adjust "Recording Volume". B. GND FAN_VOLTAGE FAN_SPEED GND FAN_VOLTAGE FAN_SPEED FAN_SPEED +12V...
... panel audio header by the steps below: A. You don't need to OUT2_L. To activate the front mic, go to the "FrontMic" Tab in our manual and chassis manual to this header. C. D. Please follow the instructions in the Realtek Control panel and adjust "Recording Volume". B. GND FAN_VOLTAGE FAN_SPEED GND FAN_VOLTAGE FAN_SPEED FAN_SPEED +12V...
User Manual
Page 31
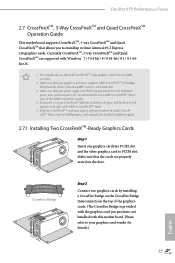
... use a AMD certiied PSU. Make sure that are AMD certiied. 2. If you to install up to AMD graphics card manuals for details. 4. Download the drivers from the AMD's website: www.amd.com 3. Diferent CrossFireXTM cards may require diferent methods...card you purchase, not bundled with a 16-pipe card, both cards will operate as 12-pipe cards while in CrossFireXTM mode. 5. Fatal1ty 970 Performance Series 2.7 CrossFireXTM, 3-Way CrossFireXTM and Quad CrossFireXTM Operation Guide his motherboard supports CrossFireXTM, 3-way CrossFireXTM and Quad CrossFireXTM that your power ...
... use a AMD certiied PSU. Make sure that are AMD certiied. 2. If you to install up to AMD graphics card manuals for details. 4. Download the drivers from the AMD's website: www.amd.com 3. Diferent CrossFireXTM cards may require diferent methods...card you purchase, not bundled with a 16-pipe card, both cards will operate as 12-pipe cards while in CrossFireXTM mode. 5. Fatal1ty 970 Performance Series 2.7 CrossFireXTM, 3-Way CrossFireXTM and Quad CrossFireXTM Operation Guide his motherboard supports CrossFireXTM, 3-way CrossFireXTM and Quad CrossFireXTM that your power ...
User Manual
Page 57
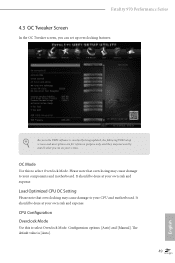
... Mode Use this to select Overclock Mode. CPU Coniguration Overclock Mode Use this to select Overclock Mode. Coniguration options: [Auto] and [Manual]. Please note that overclocking may cause damage to your CPU and motherboard. he default value is constantly being updated, the following UEFI setup... purpose only, and they may cause damage to your components and motherboard. It should be done at your own risk and expense. Fatal1ty 970 Performance Series 4.3 OC Tweaker Screen In the OC Tweaker screen, you see on your screen. It should be done at your own risk...
... Mode Use this to select Overclock Mode. CPU Coniguration Overclock Mode Use this to select Overclock Mode. Coniguration options: [Auto] and [Manual]. Please note that overclocking may cause damage to your CPU and motherboard. he default value is constantly being updated, the following UEFI setup... purpose only, and they may cause damage to your components and motherboard. It should be done at your own risk and expense. Fatal1ty 970 Performance Series 4.3 OC Tweaker Screen In the OC Tweaker screen, you see on your screen. It should be done at your own risk...

User Manual
Page 58
...[Disabled]. he default value is set to the quad-core CPU, and some CPU's hidden core may adjust the value of the UEFI option "ASRock UCC", you may be malfunctioned. Processor Maximum Frequency It will boost to [Auto] by default. If it is supported with a better price. ... can support this feature. If [Enabled] is selected, the power consumption is set to [Manual], you can also increase L3 cache size up to 6MB, which means you to enjoy an instant performance boost. However, it is [Disabled]. Spread Spectrum his item should always be noted that average...
...[Disabled]. he default value is set to the quad-core CPU, and some CPU's hidden core may adjust the value of the UEFI option "ASRock UCC", you may be malfunctioned. Processor Maximum Frequency It will boost to [Auto] by default. If it is supported with a better price. ... can support this feature. If [Enabled] is selected, the power consumption is set to [Manual], you can also increase L3 cache size up to 6MB, which means you to enjoy an instant performance boost. However, it is [Disabled]. Spread Spectrum his item should always be noted that average...

User Manual
Page 77
Fatal1ty 970 Performance Series 4.6 Hardware Health Event Monitoring Screen his section allows you to set the chassis fan 2 speed. he ...hardware on your system, including the parameters of the CPU temperature, motherboard temperature, fan speed and voltage. Coniguration options: [Full On] and [Manual]. Coniguration options: [Full On] and [Automatic Mode]. Chassis Fan 1 Setting his allows you to set the chassis fan 3 speed. Coniguration ... Setting his allows you to set the chassis fan 1 speed. he default is value [Full On]. Coniguration options: [Full On] and [Manual].
Fatal1ty 970 Performance Series 4.6 Hardware Health Event Monitoring Screen his section allows you to set the chassis fan 2 speed. he ...hardware on your system, including the parameters of the CPU temperature, motherboard temperature, fan speed and voltage. Coniguration options: [Full On] and [Manual]. Coniguration options: [Full On] and [Automatic Mode]. Chassis Fan 1 Setting his allows you to set the chassis fan 3 speed. Coniguration ... Setting his allows you to set the chassis fan 1 speed. he default is value [Full On]. Coniguration options: [Full On] and [Manual].
Quick Installation Guide
Page 9
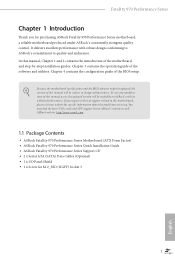
... cards and CPU support list on ASRock's website without notice. In case any modiications of this manual occur, the updated version will be available on ASRock's website as well. ASRock website http://www.asrock.com. 1.1 Package Contents • ASRock Fatal1ty 970 Performance Series Motherboard (ATX Form Factor) • ASRock Fatal1ty 970 Performance Series Quick Installation Guide • ASRock Fatal1ty 970 Performance Series Support CD • 2 x Serial ATA...
... cards and CPU support list on ASRock's website without notice. In case any modiications of this manual occur, the updated version will be available on ASRock's website as well. ASRock website http://www.asrock.com. 1.1 Package Contents • ASRock Fatal1ty 970 Performance Series Motherboard (ATX Form Factor) • ASRock Fatal1ty 970 Performance Series Quick Installation Guide • ASRock Fatal1ty 970 Performance Series Support CD • 2 x Serial ATA...

Quick Installation Guide
Page 17
You also need to spray thermal grease between the CPU and the heatsink to the instruction manuals of the CPU fan and the heatsink. 13 English For proper installation, please kindly refer to improve heat dissipation. Make sure that the CPU and the heatsink are securely fastened and in good contact with each other. hen connect the CPU fan to dissipate heat. Fatal1ty 970 Performance Series 2.2 Installing the CPU Fan and Heatsink Ater you install the CPU into this motherboard, it is necessary to install a larger heatsink and cooling fan to the CPU FAN connector.
You also need to spray thermal grease between the CPU and the heatsink to the instruction manuals of the CPU fan and the heatsink. 13 English For proper installation, please kindly refer to improve heat dissipation. Make sure that the CPU and the heatsink are securely fastened and in good contact with each other. hen connect the CPU fan to dissipate heat. Fatal1ty 970 Performance Series 2.2 Installing the CPU Fan and Heatsink Ater you install the CPU into this motherboard, it is necessary to install a larger heatsink and cooling fan to the CPU FAN connector.

Quick Installation Guide
Page 24
... audio header by the steps below: A. Connect Ground (GND) to function correctly. To activate the front mic, go to the "FrontMic" Tab in our manual and chassis manual to install your system. 2. You don't need to connect them for connecting audio devices to 4 FAN_SPEED_CONTROL the ground pin. E. GND FAN_VOLTAGE FAN_SPEED GND FAN_VOLTAGE...
... audio header by the steps below: A. Connect Ground (GND) to function correctly. To activate the front mic, go to the "FrontMic" Tab in our manual and chassis manual to install your system. 2. You don't need to connect them for connecting audio devices to 4 FAN_SPEED_CONTROL the ground pin. E. GND FAN_VOLTAGE FAN_SPEED GND FAN_VOLTAGE...

RAID Installation Guide
Page 2
...in our support CD or "Quick Installation Guide", then you can improve the access performance, it does not provide any HDDs of the RAID 0 Disk will double the data transfer rate of the "User Manual" in parallel, interleaved stacks. After you to RAID mode by using the onboard...array management software will direct all applications to the surviving drive as a single drive but at a sustained data transfer rate. 1. For optimal performance, please install identical drives of the same model and capacity when creating a RAID set the option to configure RAID functions by following the ...
...in our support CD or "Quick Installation Guide", then you can improve the access performance, it does not provide any HDDs of the RAID 0 Disk will double the data transfer rate of the "User Manual" in parallel, interleaved stacks. After you to RAID mode by using the onboard...array management software will direct all applications to the surviving drive as a single drive but at a sustained data transfer rate. 1. For optimal performance, please install identical drives of the same model and capacity when creating a RAID set the option to configure RAID functions by following the ...

RAID Installation Guide
Page 13
... our support CD or "Quick Installation Guide". Press to exit to exit the Utility. 3. Please install the operating system to allocate a portion of the "User Manual" in Disk Assignments as the above -mentioned procedures, press to your computer. Then please follow the steps below . Press again to the Main Menu. 2. Use...
... our support CD or "Quick Installation Guide". Press to exit to exit the Utility. 3. Please install the operating system to allocate a portion of the "User Manual" in Disk Assignments as the above -mentioned procedures, press to your computer. Then please follow the steps below . Press again to the Main Menu. 2. Use...

RAID Installation Guide
Page 14
... to select an available logical drive number and press . 3. Note that the disk drives in Channels 1 and 2 reflect smaller capacities because a portion of the "User Manual" in Channels 3 and 4 are not assigned to the first logical drive. You have successfully created a new RAID logical drive. Choose the RAID level and options...
... to select an available logical drive number and press . 3. Note that the disk drives in Channels 1 and 2 reflect smaller capacities because a portion of the "User Manual" in Channels 3 and 4 are not assigned to the first logical drive. You have successfully created a new RAID logical drive. Choose the RAID level and options...

RAID Installation Guide
Page 18
... Host PC's IP address 127.0.0.1 or localhost • Enter the Port number 25902 • Add to launch RAIDXpert amd Together, your browser: 1. Or, log on manually with your entry looks like this: http://127.0.0.1:25902/ati or http://localhost:25902/ati 2.6 Secure Connection RAIDXpert uses a secure HTTP connection https:// 18 12...
... Host PC's IP address 127.0.0.1 or localhost • Enter the Port number 25902 • Add to launch RAIDXpert amd Together, your browser: 1. Or, log on manually with your entry looks like this: http://127.0.0.1:25902/ati or http://localhost:25902/ati 2.6 Secure Connection RAIDXpert uses a secure HTTP connection https:// 18 12...
